
Popular categories
Looking for a yarn?


Comments / Questions (30)
![]() Anne wrote:
Anne wrote:
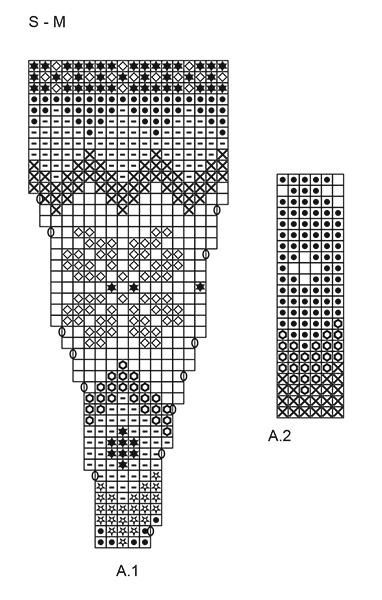
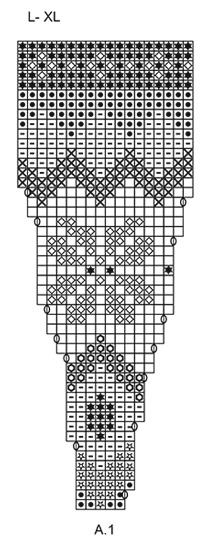
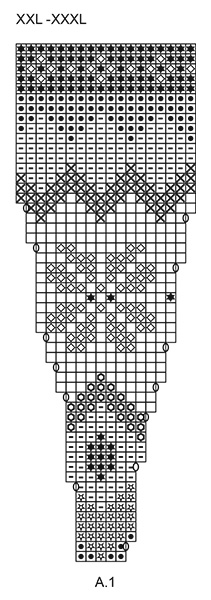
Bonjour, je tricote en taille M. Il est écrit qu'il faut ajuster de 270 à 274 mailles au dernier rang de A1. J'ai compris qu'il fallait augmenter de 4 mailles que j'ai réparties sur le rang. Était ce bien cela ? Si oui, je ne comprends pas comment faire A2 car cela ne donne pas un nombre juste de motifs... cela va tout décaler ! Que faire de ces 4 mailles ??? Merci pour votre réponse
27.10.2019 - 09:11DROPS Design answered:
Bonjour Anne, au dernier rang de A.1, on augmente 4 mailles et, au tour suivant = 1er rang de A.2, on va diviser l'ouvrage pour les manches, on tricote toutes les mailles en mauve violet; à la fin de ce tour, vous avez 174 m, soit suffisamment de mailles pour tricoter 29 fois les 6 mailles de A.2. Bon tricot!
04.11.2019 - 12:24
![]() Helen wrote:
Helen wrote:
I love this pattern. In the diagram A.1 when it asks to increase do I just increase the one time at the marker (to end up with 76sts) or do I increase between every 5th and 6th stitch (to end up with 90 stitches on the 3rd row)? I'm not sure if I have explained this properly. Thank you
13.10.2019 - 01:33DROPS Design answered:
Dear Helen, you will increase in each A.1 as shown in diagram, ie on 2nd row, start every A.1 with a yarn over, then work the next 5 sts in A.1 as shown in diagram = you will increase 1 stitch 15 times (in size M) = there are 90 sts at the end of 2nd row in A.1. When working row 7, increase now 1 stitch at the end of each A.1 = you increase 1 stitch 15 times = 105 sts. When all increased are done in A.1, there are 18 sts in each A.1 x 15 = 270 sts on needle. Happy knitting!
14.10.2019 - 10:11
![]() Gee Horton wrote:
Gee Horton wrote:
Can you recommend a non wool substitute yarn for this pattern at all please? I am fine with alpaca but allergic to wool/lanolin
07.10.2019 - 12:53DROPS Design answered:
Dear Mrs Horton, you can try our yarn converter to find the matching alternatives with our Alpaca yarns - your DROPS store will also help you to find the best matching alternatives, even per telephone or per Email. Happy knitting!
07.10.2019 - 13:25
![]() Judith wrote:
Judith wrote:
Lovely pattern but why not all instructions together followed byhelpful advice/diagrams
04.10.2019 - 21:54
![]() Lorraine wrote:
Lorraine wrote:
I’m knitting top don in round sweater many colours how do I know which color to increase in and how do I increase
01.10.2019 - 15:41DROPS Design answered:
Dear Lorraine, the increases for the round yoke are included in the diagram A.1 - make a yarn over, see last symbol diagram key. Make this yarn over with the colour of the background ot make it less visible, work it with the colour shown on next round as in diagram. Happy knitting!
01.10.2019 - 17:21
![]() Susanne wrote:
Susanne wrote:
Kann ich dieses Modell auch in Drops Lima arbeiten? Wie rechne ich das um?
18.08.2019 - 11:23DROPS Design answered:
Liebe Susanne, dieses Modell wird mit Nepal (= Garngruppe C) gestrickt, aber Lima gehört der Garngruppe B. Die Garnalternativen finden Sie durch unseren Garnumrechner finden; oder hier finden Sie alle Modellen, die mit Lima gestrickt werden können. Viel Spaß beim stricken!
19.08.2019 - 10:23
![]() Katharina Amport wrote:
Katharina Amport wrote:
Meeresblau sind in L 50g, orange 100g angegeben, aber: Meeresblau sind die Sterne in Kombination mit natur über 10 Reihen und als Punkte im königsblau. Orange ist nur die Zackenreihe nahe am Halsausschnitt. Das scheint mir unlogisch.
01.08.2019 - 15:44DROPS Design answered:
Orange hat noch eine weitere Zackenreihe, auf Brusthöhe in etwa. Dargestellt in Diagramm A.2. Sie werden in Größe L für Orange auch nicht die ganzen 100 g brauchen, aber eben mehr als nur 50 g, daher sind dann 100 g angegeben.
02.08.2019 - 09:18
![]() Katharina Amport wrote:
Katharina Amport wrote:
Wie schaut es mit den Materialmengen aus? Sollten nicht auch die noch geändert werden: Mehr Meeresblau und weniger Orange?
01.08.2019 - 08:14DROPS Design answered:
Die Materialmengen stimmt. Es wurden lediglich die Symbole für Meeresblau und Violett im Diagramm vertauscht, Orange war ja von vornherein richtig. Schauen Sie genau hin, die Symbole für Orange und Meeresblau sind sich ähnlich... Orange hat einen etwas dickeren Kreis, Meeresblau eine dünnere Raute.
01.08.2019 - 08:44
![]() Katharina Amport wrote:
Katharina Amport wrote:
Die Sterne sind sollten doch in Meeresblau sein, sie sind aber mit dem Zeichen von Violett eingetragen
31.07.2019 - 08:25DROPS Design answered:
Ja, da haben Sie Recht, violett und meeresblau sind tatsächlich vertauscht. Das wird in Kürze korrigiert.
31.07.2019 - 09:17
![]() Amport wrote:
Amport wrote:
Kann es sein, dass Sie in der Farbenlegende die Zeichen für Orange und Meeresblau verwechselt haben?
30.07.2019 - 10:22DROPS Design answered:
Sie müssen das Diagramm auf den Kopf stellen, damit Sie die farbliche Reihenfolge richtig sehen. Der Pullover wird von oben nach unten gestrickt, das Diagramm aber von unten nach oben gelesen. Die Farben passen wie im Diagramm dargestellt. Viel Spaß beim Stricken! :-)
30.07.2019 - 10:48
|
||||||||||||||||||||||||||||
Winter Escape#winterescapesweater |
||||||||||||||||||||||||||||
 |
 |
|||||||||||||||||||||||||||
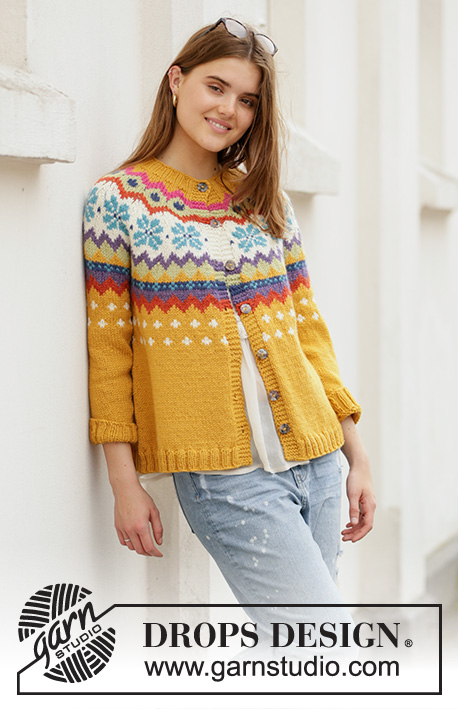
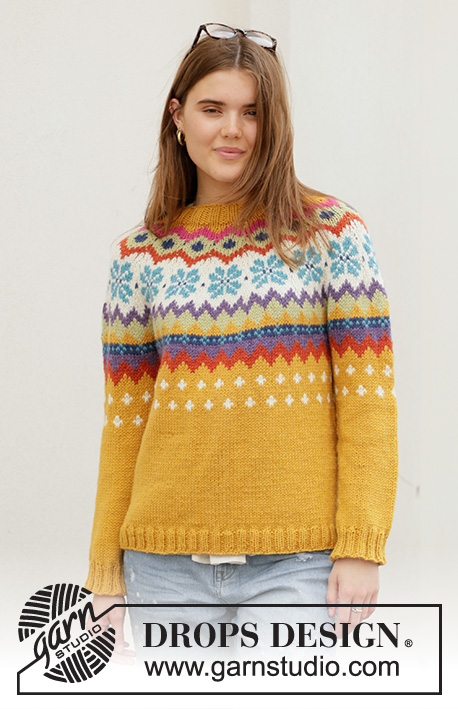
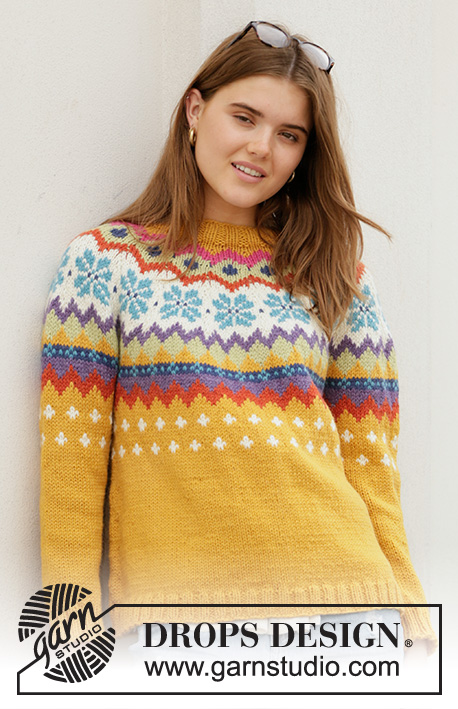
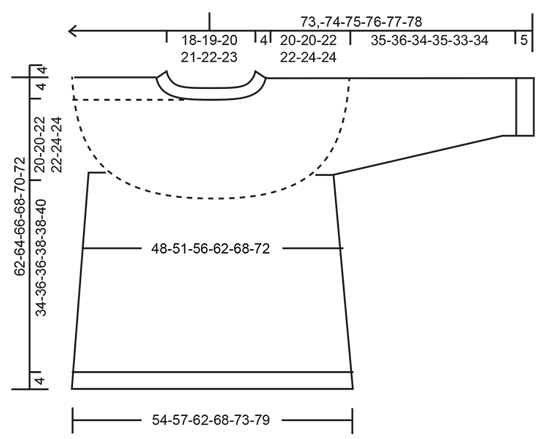
Knitted jumper with round yoke in DROPS Nepal. The piece is worked top down with Nordic pattern. Sizes S - XXXL.
DROPS 205-4 |
||||||||||||||||||||||||||||
|
------------------------------------------------------- EXPLANATIONS FOR THE PATTERN: ------------------------------------------------------ PATTERN: See diagrams A.1 and A.2. Choose diagram for your size in A.1. The diagrams show all the rows in the pattern seen from the right side. The whole pattern is worked in stocking stitch. KNITTING TIP: To avoid the knitting tension becoming tighter when working pattern it is important that the strands at the back are not tight. Use a size larger needle when working pattern if this is a problem. Make sure the knitting tension is correct in height as well, if this is too tight the yoke will be too short and the armholes too small! INCREASE TIP-1 (evenly spaced): To work out how to increase evenly, count the total number of stitches on the needle (e.g. 82 stitches) and divide by the number of increases to be made (e.g. 4) = 20.5. In this example, increase by making 1 yarn over after alternately each 20th and 21st stitch. On the next round knit the yarn overs twisted to avoid holes. INCREASE TIP-2 (for sides of body): Work until there are 2 stitches left before the marker thread, make 1 yarn over, knit 4 (marker thread sits between these 4 stitches) make 1 yarn over (= 2 stitches increased at each marker thread; 4 stitches increased on round). On the next round knit the yarn overs twisted to avoid holes. Then work the new stitches in stocking stitch. DECREASE TIP (for sleeves): Decrease 1 stitch on each side of the marker thread as follows: Work until there are 3 stitches left before the marker thread, knit 2 together, knit 2 (marker thread sits between these 2 stitches), slip 1 stitch as if to knit, knit 1 and pass the slipped stitch over the knitted stitch. ------------------------------------------------------- START THE PIECE HERE: ------------------------------------------------------- JUMPER: The piece is worked in the round with circular needle from mid back, top down. You can work an elevation in the back of the neck for a better fit. This elevation can be left out; the neck will then be the same front and back – see description further down the text. After the yoke the body is continued in the round. The sleeves are worked in the round with short circular needle/double pointed needles, top down. ------------------------------------------------------ NECK: Cast on 68-72-84-88-92-100 stitches with circular needle size 4 mm and goldenrod. Knit 1 round then work rib in the round, knit 2, purl 2, for 4 cm. Knit 1 round where you increase 2-3-1-2-3-0 stitches evenly spaced – read INCREASE TIP-1 = 70-75-85-90-95-100 stitches. Change to circular needle size 5 mm and knit 1 round. Now you can work an elevation in the back of the neck or go straight to yoke if you do not want an elevation. ELEVATION (back of neck): So the jumper is slightly higher at the back of the neck when working a round yoke, you can work an elevation as described here. Skip this section if you do not want an elevation. Start from the right side, mid back, using goldenrod: Knit 11-11-12-13-13-14 stitches, turn, tighten the strand and purl 22-22-24-26-26-28 stitches. Turn, tighten the strand and knit 33-33-36-39-39-42 stitches, turn, tighten the strand and purl 44-44-48-52-52-56 stitches. Turn, tighten the strand and knit 55-55-60-65-65-70 stitches, turn, tighten the strand and purl 66-66-72-78-78-84 stitches, turn, tighten strand and knit to mid back. Continue with YOKE as explained below. YOKE: Read KNITTING TIP! Work A.1 over all stitches (= 14-15-17-18-19-20 repeats of 5 stitches). Continue this pattern until there is 1 round left in A.1. There are 252-270-306-324-342-360 stitches on the needle. Work the last round in A.1, AT THE SAME TIME adjust the number of stitches to 246-274-304-322-344-362 stitches. REMEMBER THE KNITTING TENSION! Then work the next round as follows working A.2 over A.1: Work 38-41-45-49-53-56 stitches as shown on the first row in A.2 (= half back piece), place the next 48-56-62-64-66-68 stitches on 1 thread for sleeve, cast on 6-6-6-8-8-10 new stitches on the needle (= in side under sleeve), work 74-80-90-96-106-114 stitches as shown on the first row in A.2 (= front piece), place the next 48-56-62-64-66-68 stitches on 1 thread for sleeve, cast on 6-6-6-8-8-10 new stitches on the needle (= in side under sleeve) and work 38-41-45-49-53-56 stitches as shown on the first row in A.2 (= half back piece). Body and sleeves are finished separately. THE PIECE IS NOW MEASURED FROM HERE! BODY: = 162-174-192-210-228-246 stitches. Insert 1 marker thread in each side, in the middle of the 6-6-6-8-8-10 new stitches. Continue with A.2 over all stitches. When A.2 has been worked 1 time in height continue with stocking stitch and goldenrod. When the piece measures 15 cm, increase 1 stitch on each side of both marker threads. Increase every 4-4-4-5-5-5 cm a total of 5 times = 182-194-212-230-248-266 stitches – read INCREASE TIP-2. When the piece measures 34-36-36-38-38-40 cm from the division, work 1 round where you increase 38-42-44-50-52-58 stitches evenly spaced – read INCREASE TIP-1 = 220-236-256-280-300-324 stitches. Change to circular needle size 4 mm and work rib (knit 2, purl 2) for 4 cm. Cast off with knit over knit and purl over purl. The jumper measures approx. 62-64-66-68-70-72 cm from the shoulder. SLEEVE: Place the 48-56-62-64-66-68 stitches from the thread on the one side of the piece on short circular needle/double pointed needles size 5 mm and knit up 1 stitch in each of the 6-6-6-8-8-10 stitches cast on under the sleeve = 54-62-68-72-74-78 stitches. Insert 1 marker thread in the middle of the 6-6-6-8-8-10 stitches under the sleeve. Work A.2 over all stitches, AT THE SAME TIME on the first round adjust the number of stitches to 54-60-66-72-78-78 stitches. When the piece measures 4 cm, decrease 1 stitch on each side of the marker thread under the sleeve; decrease every 5-3-2½-2-2-2 cm a total of 7-10-12-14-15-15 times = 40-40-42-44-48-48 stitches – read DECREASE TIP. When the sleeve measures 35-36-34-35-33-34 cm from the division (shorter measurements in larger sizes due to longer yoke), knit 1 round with goldenrod where you increase 8-8-6-8-8-8 stitches evenly spaced = 48-48-48-52-56-56 stitches. Change to double pointed needles size 4 mm and work rib (= knit 2, purl 2) for 5 cm. Cast off with knit over knit and purl over purl; make sure the cast-off edge is not tight. Work the other sleeve in the same way. |
||||||||||||||||||||||||||||
Diagram explanations |
||||||||||||||||||||||||||||
|
||||||||||||||||||||||||||||
 |
||||||||||||||||||||||||||||
 |
||||||||||||||||||||||||||||
 |
||||||||||||||||||||||||||||
 |
||||||||||||||||||||||||||||
Have you finished this pattern?Tag your pictures with #dropspattern #winterescapesweater or submit them to the #dropsfan gallery. Do you need help with this pattern?You'll find 27 tutorial videos, a Comments/Questions area and more by visiting the pattern on garnstudio.com. © 1982-2026 DROPS Design A/S. We reserve all rights. This document, including all its sub-sections, has copyrights. Read more about what you can do with our patterns at the bottom of each pattern on our site. |
||||||||||||||||||||||||||||


With over 40 years in knitting and crochet design, DROPS Design offers one of the most extensive collections of free patterns on the internet - translated to 17 languages. As of today we count 324 catalogues and 12290 patterns translated into English (UK/cm).
We work hard to bring you the best knitting and crochet have to offer, inspiration and advice as well as great quality yarns at incredible prices! Would you like to use our patterns for other than personal use? You can read what you are allowed to do in the Copyright text at the bottom of all our patterns. Happy crafting!
Post a comment to pattern DROPS 205-4
We would love to hear what you have to say about this pattern!
If you want to leave a question, please make sure you select the correct category in the form below, to speed up the answering process. Required fields are marked *.