Clicking the ORDER button will redirect you to Wool Warehouse Direct Ltd website
The yarn cost is calculated from the pattern’s smallest size and the yarn’s cheapest product type. Looking for an even better price? You might find it on the DROPS Deals!
-------------------------------------------------------
Alternative Yarn – See how to change yarns here
Yarn Groups A to F – Use the same pattern and change the yarn here
Yarn usage using an alternative yarn – Use our yarn converter here
-------------------------------------------------------
Clicking the ORDER button will redirect you to Wool Warehouse Direct Ltd website
The yarn cost is calculated from the pattern’s smallest size and the yarn’s cheapest product type. Looking for an even better price? You might find it on the DROPS Deals!
= goldenrod | |
= cerise | |
= pistachio | |
= royal blue | |
= orange | |
= off white | |
= sea blue | |
= purple | |
= between 2 stitches make 1 yarn over |
Each of our patterns has specific tutorial videos to help you.
These step-by-step tutorials might also help you:
Why is the knitting/crochet tension so important?
Knitting tension is what determines the final measurements of your work, and is usually measured per 10 x 10 cm. It is provided like so: number of stitches in width x number of rows in height - eg: 19 stitches x 26 rows = 10 x 10 cm.
The knitting tension is very individual; some people knit/crochet loosely while others work tightly. You adjust the knitting tension with the needle size, which is why the suggested needle size is only meant as a guide! You need to adjust this (up or down) to ensure that YOUR knitting tension matches the knitting tension provided in the pattern. If you work with a different knitting tension than provided you will have a different yarn consumption, and your work will have different measurements than what the pattern suggests.
The knitting tension also determines which yarns can replace each other. As long as you achieve the same knitting tension you can replace one yarn with another.
See DROPS lesson: How to measure your tension/gauge
See DROPS video: How to make a gauge tension swatch
How do I know how many balls of yarn I need?
The required amount of yarn is provided in grams, eg: 450 g. To calculate how many balls you’ll need you first need to know how many grams are in 1 ball (25g, 50g or 100g). This information is available if you click on the individual yarn quality on our pages. Divide the amount required with the amount of each ball. For example, if each ball is 50g (the most common amount), the calculation will be as follows: 450 / 50 = 9 balls.
Can I use a different yarn than what the pattern suggests?
The important thing when changing from one yarn to another is that the knitting/crochet tension remains the same. This is so that the measurements of the finished piece will be the same as on the sketch provided. It is easier to achieve the same knitting tension using yarns from the same yarn group. It is also possible to work with multiple strands of a thinner yarn to achieve the knitting tension of a thicker one. Please try our yarn converter. We recommend you to always work a test swatch.
Please NOTE: when changing yarn the garment might have a different look and feel to the garment in the photo, due to individual properties and qualities of each yarn.
See DROPS lesson: Can I use a different yarn than the one mentioned in the pattern?
What are the yarn groups?
All our yarns are categorised into yarn groups (from A to F) according to thickness and knitting tension – group A contains the thinnest yarns and group F the thickest. This makes it easier for you to find alternative yarns to our patterns, should you wish to switch yarn. All yarns within the same group have a similar knitting tension and can easily replace each other. However, different yarn qualities have different structures and properties which will give the finished work a unique look and feel.
How do I use the yarn calculator?
At the top of all our patterns you’ll find a link to our yarn calculator, which is a helpful tool should you wish to use a different yarn than suggested. By filling in the yarn quality you wish to replace, the amount (in your size) and number of strands, the calculator will present good alternative yarns with the same knitting tension. Additionally it will tell you how much you’ll require in the new qualities and whether you’ll need to work with multiple strands. Most skeins are 50g (some are 25g or 100g).
If the pattern is worked with multiple colours, every colour will have to be calculated separately. Similarly, if the pattern is worked with several strands of different yarns (for example 1 strand Alpaca and 1 strand Kid-Silk) you will have to find alternatives for each, individually.
Why do you show discontinued yarns in the patterns?
Since different yarns have different qualities and textures we have chosen to keep the original yarn in our patterns. However, you can easily find options among our available qualities by using our yarn calculator, or simply pick a yarn from the same yarn group.
It is possible that some retailers still have discontinued yarns in stock, or that someone has a few skeins at home that they would like to find patterns for.
The yarn calculator will provide both alternative yarn as well as required amount in the new quality.
What size should I knit?
If you think it's hard to decide what size to make, it can be a good idea to measure a garment you own already and like the size of. Then you can pick the size by comparing those measures with the ones available in the pattern's size chart.
You'll find the size chart at the bottom of the pattern.
See DROPS lesson: How to read size chart
Why do I get the wrong knitting tension with the suggested needle size?
The needle size provided in the pattern serves only as a guide, the important thing is to follow the knitting tension. And since knitting tension is very individual, you will have to adjust the needle size to ensure that YOUR tension is the same as in the pattern – maybe you’ll have to adjust 1, or even 2 needle sizes, up or down to achieve the correct tension. For this, we recommend that you work test swatches.
Should you work with a different knitting tension than the one provided, the measurements of the finished garment might deviate from the measurement sketch.
See DROPS lesson: How to measure your tension/gauge
See DROPS video: How to make a tension/gauge swatch
Why is the pattern worked top-down?
Working a garment top-down provides more flexibility and room for personal adjustment. For example it is easier to try the garment on while working, as well as making adjustments to length of yoke and shoulder caps.
The instructions are carefully explaining every step, in the correct order. Diagrams are adjusted to the knitting direction and are worked as usual.
How do I work according to a knitting diagram?
The diagram depicts all rows/rounds, and every stitch seen from the right side. It is read from bottom to top, from right to left. 1 square = 1 stitch.
When working back and forth, every other row is worked from the right side and every other row is worked from the wrong side. When working from the wrong side, the diagram will have to be worked reversed: from left to right, knit stitches are purled, purl stitches are knit etc.
When working in the round every round is worked from the right side and the diagram are worked from right to left on all rounds.
See DROPS lesson: How to read knitting diagrams
How do I work according to a crochet diagram?
The diagram depicts all rows/rounds, and every stitch seen from the right side. It is worked from bottom to top, from right to left.
When working back and forth every other row is worked from the right side: from right to left and every other row is worked from the wrong side: from left to right.
When working in the round, every row in the diagram are worked from the right side, from right to left.
When working a circular diagram you start in the middle and work your way outwards, counter clockwise, row by row.
The rows usually start with a given number of chain stitches (equivalent to the height of the following stitch), this will either be depicted in the diagram or explained in the pattern.
See DROPS lesson: How to read crochet diagrams
How do I work several diagrams simultaneously on the same row/round?
Instructions for working several diagrams after each other on the same row/round, will often be written like so: “work A.1, A.2, A.3 a total of 0-0-2-3-4 times". This means you work A.1 once, then A.2 is worked once, and A.3 is repeated (in width) the number of times provided for your size – in this case like so: S = 0 times, M = 0 times, L=2 times, XL= 3 times and XXL = 4 times.
The diagrams are worked as usual: begin with the first row in A.1, then work the first row in A.2 etc.
See DROPS lesson: How to read knitting diagrams
See DROPS lesson: How to read crochet diagrams
Why are the sleeves shorter in larger sizes?
The total width of the garment (from wrist-to-wrist) will be larger in the larger sizes, despite the actual sleeves being shorter. The larger sizes have longer sleeve caps and wider shoulders, so there will be a good fit in all sizes.
Where on the garment is the length measured?
The measurement sketch/schematic drawing provides information regarding the full length of the garment. If it’s a jumper or a jacket the length is measured from the highest point on the shoulder closest to the neckline, and straight down to the bottom of the garment. It is NOT measured from the tip of shoulder. Similarly, the length of yoke is measured from the highest point on the shoulder and down to where yoke is split into body and sleeves.
On a jacket measures are never taken along bands, unless specifically stated. Always measure inside band stitches when measuring the length.
See DROPS lesson: How to read a schematic drawing
What is a repeat?
Diagrams are often repeated on the round or in height. 1 repeat is the diagram the way it appears in the pattern. If it says to work 5 repeats of A.1 in the round, then you work A.1 a total of 5 times after/next to each other in the round. If it says to work 2 repeats of A.1 vertically/in height you work the entire diagram once, then begin again at the start and work the entire diagram one more time.
Why does the piece start with more chain stitches than it’s worked with?
Chain stitches are slightly narrower than other stitches and to avoid working the cast-on edge too tight, we simply chain more stitches to begin with. The stitch count will be adjusted on the following row to fit the pattern and measurement sketch.
Why increase before the rib edge when the piece is worked top-down?
The rib edge is more elastic and will contract slightly compared to, for example, stocking stitch. By increasing before the rib edge, you avoid a visible difference in width between the rib edge and the rest of the body.
Why increase in the cast-off edge?
It’s very easy to cast off too tightly, and by making yarn overs while casting off (and simultaneously casting these off) you avoid a too tight cast off edge.
See DROPS video: How to bind off with yarn overs (yo)
How do I increase/decrease on every 3rd and 4th row/round alternately?
To achieve an even increase (or decrease) you can increase on, for example: every 3rd and 4th row alternately, like so: work 2 rows and increase on the 3rd row, work 3 rows and increase on the 4th. Repeat this until the increase is complete.
See DROPS lesson: Increase or decrease 1 st on every 3rd and 4th row alternately
How can I work a jacket in the round instead of back and forth?
Should you prefer to work in the round instead of back and forth, you may of course adjust the pattern. You’ll need to add steeks mid-front (usually 5 stitches), and follow the instructions. When you would normally turn and work from the wrong side, simply work across the steek and continue in the round. At the end you’ll cut the piece open, pick up stitches to work bands, and cover the cut edges.
See DROPS video: How to knit steeks and cut open
Can I work a jumper back and forth instead of in the round?
Should you prefer to work back and forth instead of in the round, you may of course adjust the pattern so you work the pieces separately and then assemble them at the end. Divide the stitches for the body in 2, add 1 edge stitch in each side (for sewing) and work the front and back pieces separately.
See DROPS lesson: Can I adapt a pattern for circular needles into straight needles?
Why is the pattern slightly different than what I see in the photo?
Pattern repeats can vary slightly in the different sizes, in order to get the correct proportions. If you’re not working the exact same size as the garment in the photo, yours might deviate slightly. This has been carefully developed and adjusted so that the complete impression of the garment is the same in all sizes.
Make sure to follow instructions and diagrams for your size!
How do I make a women’s size garment into a men’s size one?
If you have found a pattern you like which is available in women’s size it’s not very difficult to convert it to men’s size. The biggest difference will be the length of sleeves and body. Start working on the women size that you think would fit across the chest. The additional length will be worked right before you cast off for the armhole/sleeve cap. If the pattern is worked top-down you can add the length right after the armhole or before the first decrease on sleeve.
Regarding additional yarn amount, this will depend on how much length you add, but it is better with a skein too many than too few.
How do I prevent a hairy garment from shedding?
All yarns will have excess fibres (from production) that might come off as lint or shedding. Brushed yarns (ie hairier yarns) have more of these loose, excess fibres, causing more shedding.
Shedding also depends on what is worn under or over the garment, and whether this pulls at the yarn fibres. It’s therefore not possible to guarantee that there will be no shedding
Below are some tips on how to get the best result when working with hairier yarns:
1. When the garment is finished (before you wash it) shake it vigorously so the looser hairs come off. NOTE: do NOT use a lint roller, brush or any method that pulls at the yarn.
2. Place the garment in a plastic bag and put it in your freezer - the temperature will cause the fibres to become less attached to each other, and excess fibres will come off easier.
3. Leave in the freezer for a few hours before taking it out and shaking it again.
4. Wash the garment according to the instructions on the yarn label.
Why does my garment pill?
Pilling is a natural process that happens to even the most exclusive of fibers. It's a natural sign of wear and tear that is hard to avoid, and that is most visible in high friction areas of your garment like a sweater's arms and cuffs.
You can make your garment look as new by removing the pilling, using a fabric comb or a pill/lint remover.
Winter Escape |
||||||||||||||||||||||||||||
|
|
|||||||||||||||||||||||||||
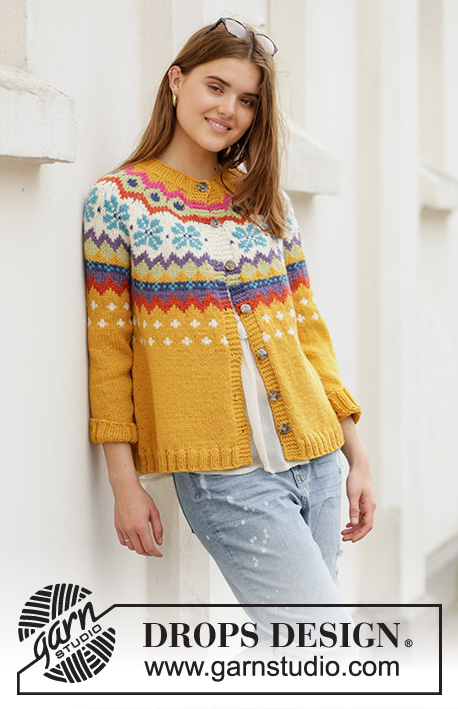
Knitted jumper with round yoke in DROPS Nepal. The piece is worked top down with Nordic pattern. Sizes S - XXXL.
DROPS 205-4 |
||||||||||||||||||||||||||||
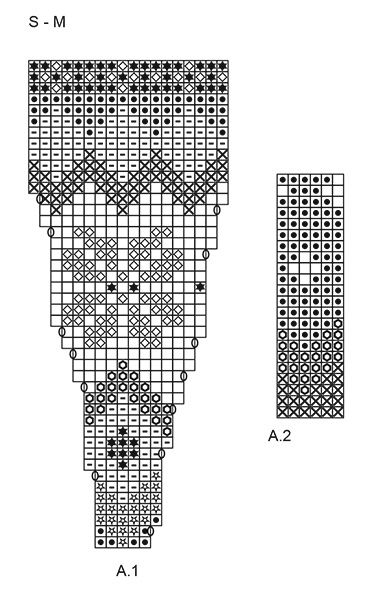
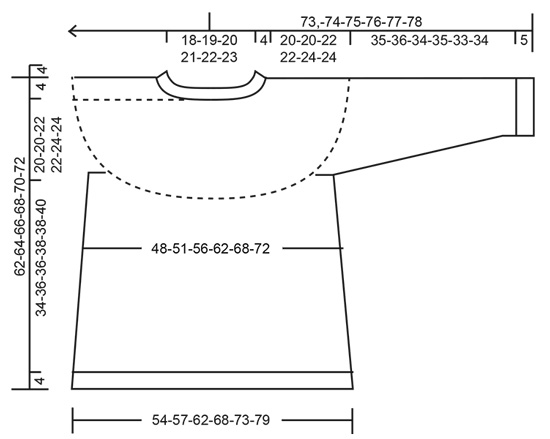
------------------------------------------------------- EXPLANATIONS FOR THE PATTERN: ------------------------------------------------------ PATTERN: See diagrams A.1 and A.2. Choose diagram for your size in A.1. The diagrams show all the rows in the pattern seen from the right side. The whole pattern is worked in stocking stitch. KNITTING TIP: To avoid the knitting tension becoming tighter when working pattern it is important that the strands at the back are not tight. Use a size larger needle when working pattern if this is a problem. Make sure the knitting tension is correct in height as well, if this is too tight the yoke will be too short and the armholes too small! INCREASE TIP-1 (evenly spaced): To work out how to increase evenly, count the total number of stitches on the needle (e.g. 82 stitches) and divide by the number of increases to be made (e.g. 4) = 20.5. In this example, increase by making 1 yarn over after alternately each 20th and 21st stitch. On the next round knit the yarn overs twisted to avoid holes. INCREASE TIP-2 (for sides of body): Work until there are 2 stitches left before the marker thread, make 1 yarn over, knit 4 (marker thread sits between these 4 stitches) make 1 yarn over (= 2 stitches increased at each marker thread; 4 stitches increased on round). On the next round knit the yarn overs twisted to avoid holes. Then work the new stitches in stocking stitch. DECREASE TIP (for sleeves): Decrease 1 stitch on each side of the marker thread as follows: Work until there are 3 stitches left before the marker thread, knit 2 together, knit 2 (marker thread sits between these 2 stitches), slip 1 stitch as if to knit, knit 1 and pass the slipped stitch over the knitted stitch. ------------------------------------------------------- START THE PIECE HERE: ------------------------------------------------------- JUMPER: The piece is worked in the round with circular needle from mid back, top down. You can work an elevation in the back of the neck for a better fit. This elevation can be left out; the neck will then be the same front and back – see description further down the text. After the yoke the body is continued in the round. The sleeves are worked in the round with short circular needle/double pointed needles, top down. ------------------------------------------------------ NECK: Cast on 68-72-84-88-92-100 stitches with circular needle size 4 mm and goldenrod. Knit 1 round then work rib in the round, knit 2, purl 2, for 4 cm. Knit 1 round where you increase 2-3-1-2-3-0 stitches evenly spaced – read INCREASE TIP-1 = 70-75-85-90-95-100 stitches. Change to circular needle size 5 mm and knit 1 round. Now you can work an elevation in the back of the neck or go straight to yoke if you do not want an elevation. ELEVATION (back of neck): So the jumper is slightly higher at the back of the neck when working a round yoke, you can work an elevation as described here. Skip this section if you do not want an elevation. Start from the right side, mid back, using goldenrod: Knit 11-11-12-13-13-14 stitches, turn, tighten the strand and purl 22-22-24-26-26-28 stitches. Turn, tighten the strand and knit 33-33-36-39-39-42 stitches, turn, tighten the strand and purl 44-44-48-52-52-56 stitches. Turn, tighten the strand and knit 55-55-60-65-65-70 stitches, turn, tighten the strand and purl 66-66-72-78-78-84 stitches, turn, tighten strand and knit to mid back. Continue with YOKE as explained below. YOKE: Read KNITTING TIP! Work A.1 over all stitches (= 14-15-17-18-19-20 repeats of 5 stitches). Continue this pattern until there is 1 round left in A.1. There are 252-270-306-324-342-360 stitches on the needle. Work the last round in A.1, AT THE SAME TIME adjust the number of stitches to 246-274-304-322-344-362 stitches. REMEMBER THE KNITTING TENSION! Then work the next round as follows working A.2 over A.1: Work 38-41-45-49-53-56 stitches as shown on the first row in A.2 (= half back piece), place the next 48-56-62-64-66-68 stitches on 1 thread for sleeve, cast on 6-6-6-8-8-10 new stitches on the needle (= in side under sleeve), work 74-80-90-96-106-114 stitches as shown on the first row in A.2 (= front piece), place the next 48-56-62-64-66-68 stitches on 1 thread for sleeve, cast on 6-6-6-8-8-10 new stitches on the needle (= in side under sleeve) and work 38-41-45-49-53-56 stitches as shown on the first row in A.2 (= half back piece). Body and sleeves are finished separately. THE PIECE IS NOW MEASURED FROM HERE! BODY: = 162-174-192-210-228-246 stitches. Insert 1 marker thread in each side, in the middle of the 6-6-6-8-8-10 new stitches. Continue with A.2 over all stitches. When A.2 has been worked 1 time in height continue with stocking stitch and goldenrod. When the piece measures 15 cm, increase 1 stitch on each side of both marker threads. Increase every 4-4-4-5-5-5 cm a total of 5 times = 182-194-212-230-248-266 stitches – read INCREASE TIP-2. When the piece measures 34-36-36-38-38-40 cm from the division, work 1 round where you increase 38-42-44-50-52-58 stitches evenly spaced – read INCREASE TIP-1 = 220-236-256-280-300-324 stitches. Change to circular needle size 4 mm and work rib (knit 2, purl 2) for 4 cm. Cast off with knit over knit and purl over purl. The jumper measures approx. 62-64-66-68-70-72 cm from the shoulder. SLEEVE: Place the 48-56-62-64-66-68 stitches from the thread on the one side of the piece on short circular needle/double pointed needles size 5 mm and knit up 1 stitch in each of the 6-6-6-8-8-10 stitches cast on under the sleeve = 54-62-68-72-74-78 stitches. Insert 1 marker thread in the middle of the 6-6-6-8-8-10 stitches under the sleeve. Work A.2 over all stitches, AT THE SAME TIME on the first round adjust the number of stitches to 54-60-66-72-78-78 stitches. When the piece measures 4 cm, decrease 1 stitch on each side of the marker thread under the sleeve; decrease every 5-3-2½-2-2-2 cm a total of 7-10-12-14-15-15 times = 40-40-42-44-48-48 stitches – read DECREASE TIP. When the sleeve measures 35-36-34-35-33-34 cm from the division (shorter measurements in larger sizes due to longer yoke), knit 1 round with goldenrod where you increase 8-8-6-8-8-8 stitches evenly spaced = 48-48-48-52-56-56 stitches. Change to double pointed needles size 4 mm and work rib (= knit 2, purl 2) for 5 cm. Cast off with knit over knit and purl over purl; make sure the cast-off edge is not tight. Work the other sleeve in the same way. |
||||||||||||||||||||||||||||
Diagram explanations |
||||||||||||||||||||||||||||
|
||||||||||||||||||||||||||||
Have you made this or any other of our designs? Tag your pictures in social media with #dropsdesign so we can see them! Do you need help with this pattern?You'll find tutorial videos, a Comments/Questions area and more by visiting the pattern on garnstudio.com. © 1982-2024 DROPS Design A/S. We reserve all rights. This document, including all its sub-sections, has copyrights. Read more about what you can do with our patterns at the bottom of each pattern on our site. |
With over 40 years in knitting and crochet design, DROPS Design offers one of the most extensive collections of free patterns on the internet - translated to 17 languages. As of today we count 304 catalogues and 11422 patterns - 11422 of which are translated into English (UK/cm).
We work hard to bring you the best knitting and crochet have to offer, inspiration and advice as well as great quality yarns at incredible prices! Would you like to use our patterns for other than personal use? You can read what you are allowed to do in the Copyright text at the bottom of all our patterns. Happy crafting!
Comments / Questions (27)
Catherine Dufour wrote:
Bonjour je viens de terminer ce modèle en taille L par contre il me reste 3 pelotes une ecru une bleu gris et une rouille qui n’étaient pas nécessaires pour effectuer le jacquard dans cette taille pour info j’ai remplacé le vert qui n’était plus disponible par du bleu gris
04.10.2020 - 09:59Diane wrote:
Bonjour Merci pour les explications. Peut-on le faire sur une machine à tricoter ? Si oui comment le faire. Merci Diane
30.08.2020 - 06:10DROPS Design answered:
Bonjour Diane, consultez la notice de votre machine à tricoter et n'hésitez pas à demander conseil à votre magasin DROPS/à un forum spécialisé si nécessaire. Bon tricot!
31.08.2020 - 09:44Janne wrote:
Hei igjen. Midterste? På mønsteret står A1 for S og M, så står det diagram for XXL og XXXL ....hva mener du med det midterste😜 er det jeg som er « fjærn»?
13.02.2020 - 13:37Janne wrote:
Hvilke A1 mønster skal jeg bruke på str. XL?
10.02.2020 - 23:19DROPS Design answered:
Hei Janne, Den midterste A.1 mønster er til størrelse XL. God fornøyelse!
11.02.2020 - 07:09Maria Elena wrote:
Ho eseguito il modello nella taglia L. Segnalo che le quantità di Nepal usate non corrispondono a quelle indicate. Correggerei i materiali come segue: - 100 gr colore n.0100, panna/ecrù - 50 gr colore n.1477, pistacchio - 50 gr colore n.2920, arancione
03.01.2020 - 14:34Antonella wrote:
Rettifico il mio precedente commento... leggevo lo schema al contrario :)
15.11.2019 - 19:01Antonella wrote:
Buongiorno, ma i colori e lo schema non corrispondono al modello della fotografia... oppure sono io che vedo male?
14.11.2019 - 08:25Anne wrote:
Bonjour, je tricote en taille M. Il est écrit qu'il faut ajuster de 270 à 274 mailles au dernier rang de A1. J'ai compris qu'il fallait augmenter de 4 mailles que j'ai réparties sur le rang. Était ce bien cela ? Si oui, je ne comprends pas comment faire A2 car cela ne donne pas un nombre juste de motifs... cela va tout décaler ! Que faire de ces 4 mailles ??? Merci pour votre réponse
27.10.2019 - 09:11DROPS Design answered:
Bonjour Anne, au dernier rang de A.1, on augmente 4 mailles et, au tour suivant = 1er rang de A.2, on va diviser l'ouvrage pour les manches, on tricote toutes les mailles en mauve violet; à la fin de ce tour, vous avez 174 m, soit suffisamment de mailles pour tricoter 29 fois les 6 mailles de A.2. Bon tricot!
04.11.2019 - 12:24Helen wrote:
I love this pattern. In the diagram A.1 when it asks to increase do I just increase the one time at the marker (to end up with 76sts) or do I increase between every 5th and 6th stitch (to end up with 90 stitches on the 3rd row)? I'm not sure if I have explained this properly. Thank you
13.10.2019 - 01:33DROPS Design answered:
Dear Helen, you will increase in each A.1 as shown in diagram, ie on 2nd row, start every A.1 with a yarn over, then work the next 5 sts in A.1 as shown in diagram = you will increase 1 stitch 15 times (in size M) = there are 90 sts at the end of 2nd row in A.1. When working row 7, increase now 1 stitch at the end of each A.1 = you increase 1 stitch 15 times = 105 sts. When all increased are done in A.1, there are 18 sts in each A.1 x 15 = 270 sts on needle. Happy knitting!
14.10.2019 - 10:11Gee Horton wrote:
Can you recommend a non wool substitute yarn for this pattern at all please? I am fine with alpaca but allergic to wool/lanolin
07.10.2019 - 12:53DROPS Design answered:
Dear Mrs Horton, you can try our yarn converter to find the matching alternatives with our Alpaca yarns - your DROPS store will also help you to find the best matching alternatives, even per telephone or per Email. Happy knitting!
07.10.2019 - 13:25