
Popular categories
Looking for a yarn?


Comments / Questions (47)
![]() Kathleen wrote:
Kathleen wrote:
Am I missing something? At the beginning of instructions for BODY it says 'Knit 3 RIBBONS - read description above. I cannot find anything mentioning 'ribbons'. Hope you can help me
20.04.2026 - 05:16DROPS Design answered:
Hi Kathleen, Both the UK and US English versions have "Work 3 RIDGES", which is 6 rows of garter stitch and each row is knitted, both from the right and wrong side. Regards, Drops Team.
20.04.2026 - 05:51
![]() Kristina wrote:
Kristina wrote:
Hej
22.09.2025 - 10:00
![]() Solange wrote:
Solange wrote:
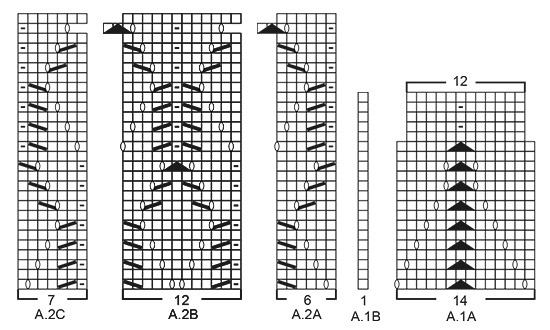
Hi! I’m a little confused with row 27/of A.2B. At the end of the row, there is a triangle (slip 1, knit 2 together and pass slipped stitch over the knitted together stitches). From what I determine, you only do this at the very last time of the row before doing A.2C. I’m also assuming that I just knit 1 stitch before starting A.2A again. Is my interpretation of the pattern correct?
22.08.2025 - 23:50DROPS Design answered:
Hi Solange, You follow the instructions for the triangle at the end of every repeat of A.2B on the row. After the last repeat of A.2B on the row you go straight on to A.2C (make 1 yarn over, K4, P1) before working the band. You then work the final row of each diagram back from the wrong side (first the band, then A.2C, A.2B the correct number of times, A.2A and finally the band) before beginning A.2C. Hope this helps, Regards Drops team.
25.08.2025 - 06:54
![]() Marjon wrote:
Marjon wrote:
Bit confused about the next sentence in the paragraph about the collar: - Continue with pattern as before, back and forth, but now start to increase for the collar. - Verwijst het 'pattern as before' naar het laatste deel van de body, of naar de kaatste 2 pennen, waarin de collar met een shortrow gebreid wordt. Anders gezegd, is de shortrow uitsluitend voor de 1ste pennen van de collar, of herhaalt zich dat?
23.07.2025 - 22:13DROPS Design answered:
Dag Marjon,
Bij het tweede deel van de paragraaf over de sjaalkraag, waar staat 'Ga verder in patroon zoals hiervoor...' gelden de verkorte toeren die daarboven beschreven staan niet meer. De verkorte toeren bij de bies zijn alleen op het punt waar de bies zeg maar een bocht maakt om een v-hals te maken.
31.07.2025 - 21:03
![]() Elvira wrote:
Elvira wrote:
Ich habe ein Problem mit dem Schalkragen,wie stricke ich ihm.Es ist etwas umständlich geschrieben
09.07.2025 - 20:30DROPS Design answered:
Liebe Elvira, der Schalkragen wird mit verkürzten Reihen damit die äusserste Seite länger als die innere Seite wird, so beim linken Vorderteil beginnen die verkürzten Reihe mit einer Rückreihe und beim rechten Vorderteil beginnen Sie mit einer Hinreihe. In diesem Video zeigt man, wie man so eine Blende /Schalkragen (ohne verkürzten Reihen im Video) danach genäht wird. Viel Spaß beim Stricken!
23.07.2025 - 12:47
![]() Elvira wrote:
Elvira wrote:
Ich habe eine Frage zum Schalkragen. Ich bin jetzt am Schalkragen angekommen, wie stricke ich ihn wieder. Es ist etwas umständlich geschrieben. Vielen Dank für Antwort
06.07.2025 - 17:21
![]() Elvira wrote:
Elvira wrote:
In der diagonale sind 8 Rauten zu sehen. Es werden nur 2-5 Strickmuster angezeigt. Manche ich etwas falsch
19.05.2025 - 13:02DROPS Design answered:
Liebe Elvira, die Diagramme enthalten auch halbe Motive am Anfang + am Ende so sind es die richtige Rautenanzahl in der Diagonale am Ende. Viel Spaß beim Stricken!
19.05.2025 - 13:32
![]() Margit wrote:
Margit wrote:
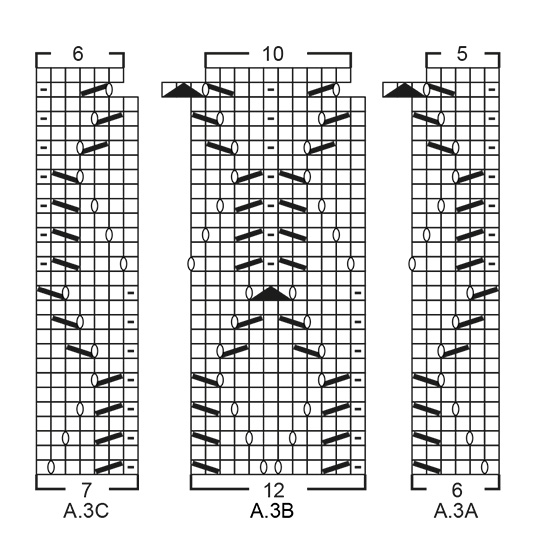
Kann es sein, dass beim Ärmel das Muster A.3B versetzt zum Muster A.6 gestrickt werden muss? Auf dem Foto des Ärmels ist es nämlich so und damit genau wie beim Rumpfteil. In der Anleitung ist es anders beschrieben.
03.11.2024 - 09:41DROPS Design answered:
Liebe Margit, Sie können wahrscheinlich A.3B mit der 15. Reihe A.3B beginnen, damit die linke Masche in A.3B über die linke Masche A.6 gestrickt wird. Viel Spaß beim Stricken !
04.11.2024 - 09:12
![]() Ingerlise Toft wrote:
Ingerlise Toft wrote:
Forstår ikke opskriften. Har flere masker efter 1. mønster, da der tages ud. Ifølge opskrift skal der være færre.
17.04.2024 - 23:19DROPS Design answered:
Hej Ingerlise, du starter nederst i diagram A.1A (strikker opad) og når du strikker pind 15 ifølge diagrammet, så tager du 2 masker ind for hver gang A.1A gentages. God fornøjelse!
18.04.2024 - 11:37
![]() Ulla Lundmark wrote:
Ulla Lundmark wrote:
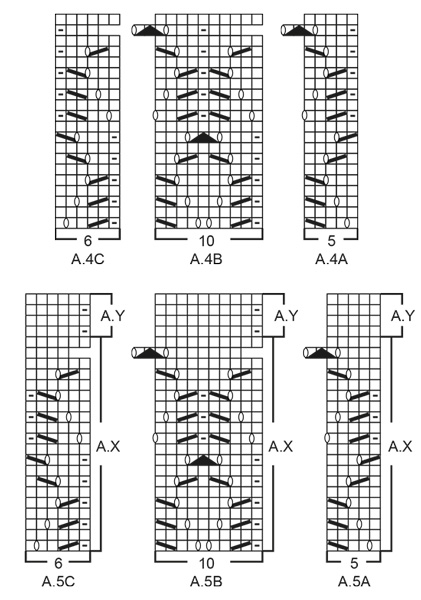
Hej! Jag undrar vad A.X och A.Y betyder i mönstergrupp A5. Tacksam för svar.
12.01.2023 - 16:26DROPS Design answered:
Hei Ulla. Du strikker A.5 (A+B+C) og når du har strikket 20 rader av A.5 (A+B+C) som da også er A.X, måler arbeidet ca 32 cm i alle størrelser. Nå settes det et merke i arbeidet (les oppskriften). Videre strikkes det kun det som er merket med A.Y i A.5 (4 rader) til ferdig mål (A.Y gjentas til ferdig mål). mvh DROPS Design
16.01.2023 - 10:44
|
|||||||||||||||||||
Lady Angelika Jacket#ladyangelikajacket |
|||||||||||||||||||
 |
 |
||||||||||||||||||
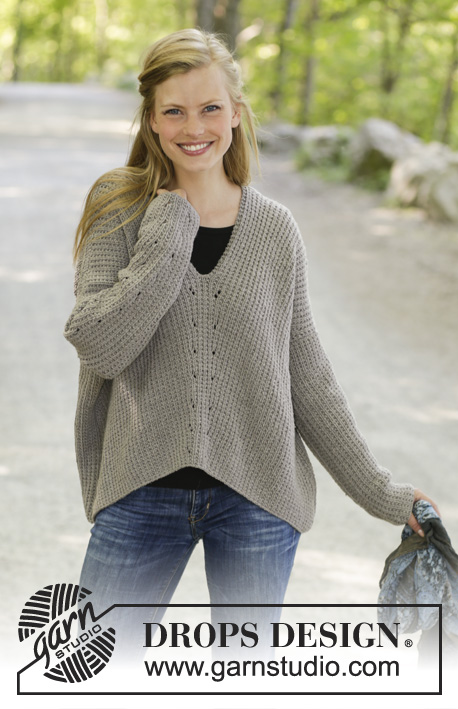
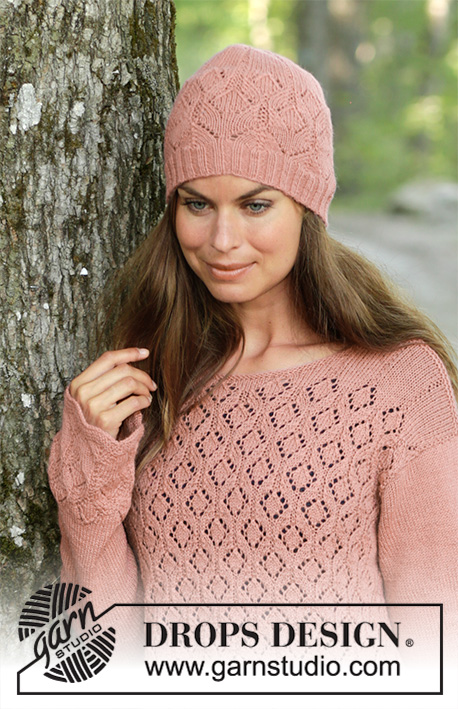
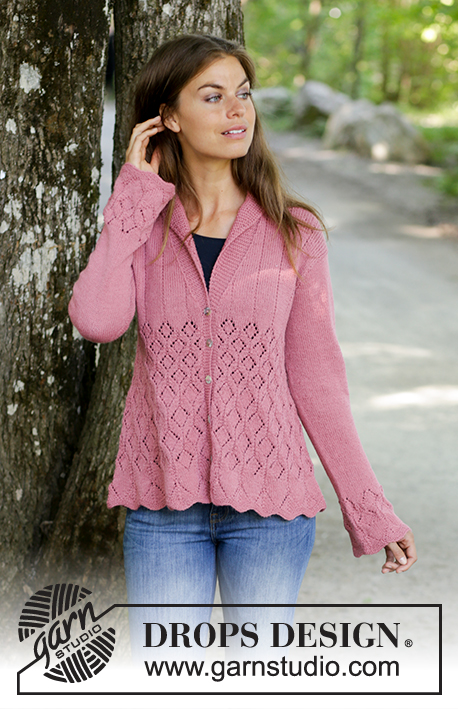
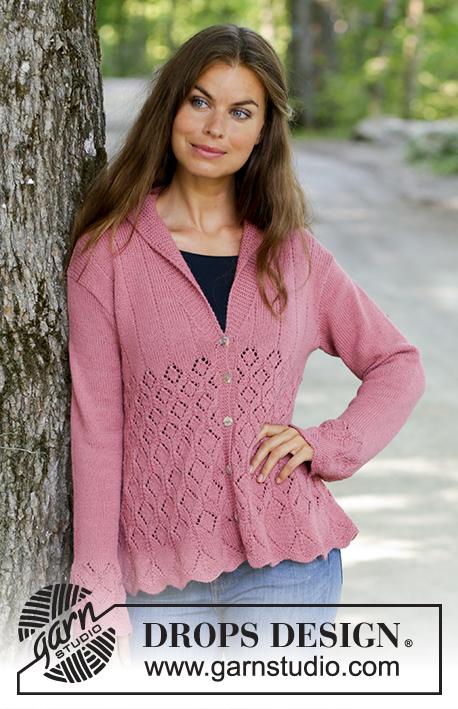
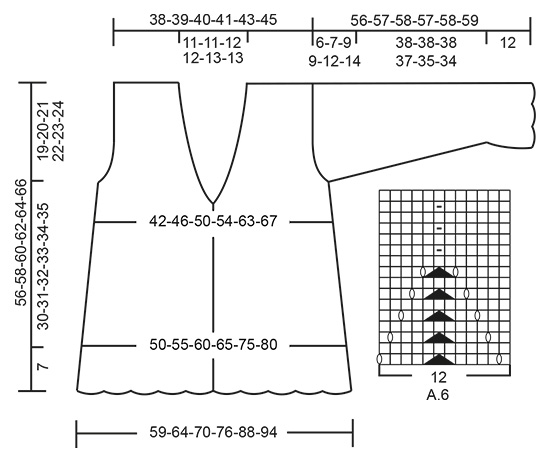
Knitted jacket in DROPS Nord. The piece is worked with lace pattern and shawl collar. Sizes S - XXXL.
DROPS 197-38 |
|||||||||||||||||||
|
EXPLANATIONS FOR THE PATTERN: ------------------------------------------------------- RIDGE/GARTER STITCH (worked back and forth): 1 ridge = Knit 2 rows. RIDGE/GARTER STITCH (worked in the round): 1 ridge = 2 rounds. Knit 1 round and purl 1 round. PATTERN: See diagrams A.1 to A.6. The diagrams show all the rows in the pattern seen from the right side. DECREASE TIP (for neck on front pieces): Decrease for neck on the inside of the 5 band stitches in garter stitch + the increased stitches for collar. All decreases are made from the right side! Decrease like this after the garter stitch on the band/collar: Slip 1 stitch as if to knit, knit 1 and pass the slipped stitch over the knitted stitch. Decrease like this before the garter stitch on the band/collar: Start 2 stitches before the garter stitch on the band/collar and knit 2 together. INCREASE TIP (for sleeves): Start 1 stitch before the stitch with marker thread, make 1 yarn over, knit 3 (marker thread sits in the middle stitch of these 3), make 1 yarn over (= 2 stitches increased). On the next round knit the yarn overs twisted to avoid holes. Then work the increased stitches in stocking stitch. BUTTONHOLES: Work buttonholes on right band (when garment is worn). 1 buttonhole = Start from the right side and knit together the second and third stitch from the edge and then make 1 yarn over. On the next row (wrong side) knit the yarn over to leave a hole. Work buttonholes when the piece measures: S: 5, 12, 19, 26 and 33 cm M: 6, 13, 20, 27 and 34 cm L: 7, 14, 21, 28 and 35 cm L/XL: 8, 15, 22, 29 and 36 cm XXL: 7, 13, 19, 25, 31 and 37 cm XXL/XXXL: 8, 14, 20, 26, 32 and 38 cm ---------------------------------------------------------- START THE PIECE HERE: ------------------------------------------------------- JACKET – SHORT OVERVIEW OF THE PIECE: The piece is worked back and forth with circular needle, from mid front and bottom up as far as the armholes. Then the front and back pieces are finished separately, back and forth on circular needle. The sleeves are worked in the round with double pointed needles / short circular needle, bottom up. BODY: Cast on a little loosely 291-319-347-375-431-459 stitches with circular needle size 3.5 mm and Nord. Work 3 RIDGES – read description above. Work 2 rows stocking stitch with 5 band stitches in garter stitch in each side towards mid front. The next row is worked as follows from the right side: 5 band stitches in garter stitch, work A.1A until there are 6 stitches left on the row (= 20-22-24-26-30-32 repeats of 14 stitches), work A.1B (= 1 stitch) and finish with 5 band stitches in garter stitch. Continue this pattern. REMEMBER THE KNITTING TENSION and work BUTTONHOLE on right band – read description above. When A.1 has been completed there are 251-275-299-323-371-395 stitches on the needle and the piece measures approx. 7 cm from the cast-on edge, measured on the longest part. The next row is worked as follows from the right side: 5 band stitches in garter stitch, work A.2A (= 6 stitches), A.2B until there are 12 stitches left on the row (= 19-21-23-25-29-31 repeats of 12 stitches), A.2C (= 7 stitches) and finish with 5 band stitches in garter stitch. Continue this pattern. When A.2 has been completed, work A.3A, A.3B and A.3C in the same way. When A.3 has been completed there are 211-231-251-271-311-331 stitches on the needle. The next row is worked as follows from the right side: 5 band stitches in garter stitch, work A.4A (= 5 stitches), A.4B until there are 11 stitches left on the row (= 19-21-23-25-29-31 repeats of 10 stitches), A.4C (= 6 stitches) and finish with 5 band stitches in garter stitch. Continue this pattern. When A.4 has been completed, work A.5A, A.5B and A.5C in the same way. When A.X in A.5 has been worked 1 time in height the piece measures approx. 32 cm in all sizes. Insert 1 marker thread in the 56th-61st-66th-71st-81st-86th stitch in from each side (= 99-109-119-129-149-159 stitches between the stitches with marker threads on the back piece). Allow the marker threads to follow your work onwards; they will be used a little later when casting off for the armholes. Then work A.Y in A.5 to finished length. AT THE SAME TIME increase for collar and decrease for neck and armholes as described below – remember the last buttonhole on right band. Read COLLAR, NECK and ARMHOLES before continuing! COLLAR: When the piece measures 34-35-36-37-38-39 cm, starting from the right side, work 1 ridge back and forth over the 5 band stitches on the right band (the other stitches are not worked), then work 1 row from the right side as before over all stitches, turn and work 1 ridge back and forth over the 5 band stitches on the left band (without working the other stitches), then work 1 row from the wrong side as before over all stitches. Continue with pattern as before, back and forth, but now start to increase for the collar. Increase 1 stitch for the collar by making 1 yarn over inside the 2 outermost stitches in each side. On the next row knit the yarn overs twisted to avoid holes. Increase like this every 2nd row a total of 3 times and then every 4th row a total of 12-12-13-13-14-15 times (= 15-15-16-16-17-18 stitches increased for the collar on each side and a total of 20-20-21-21-22-23 garter stitches on each side including the band). NECK: AT THE SAME TIME when the piece measures 36-37-38-39-40-41 cm decrease 1 stitch for the neck on the inside of the 5 band stitches in garter stitch + the increased stitches for collar on each side – read DECREASE TIP. Decrease like this every 2nd row a total of 3 times, every 4th row a total of 7 times and then every 6th row a total of 3-3-4-4-5-6 times (= 13-13-14-14-15-16 stitches decreased for neck in each side). ARMHOLES: AT THE SAME TIME when the piece measures 37-38-39-40-41-42 cm cast off for the armholes in each side as follows: Work from the right side as before until there are 3-3-3-4-4-4 stitches left before the stitch with the marker thread, cast off 7-7-7-9-9-9 stitches for the armhole, work as before until there are 3-3-3-4-4-4 stitches left before the second stitch with marker thread, cast off 7-7-7-9-9-9 stitches for armhole and work to end of row as before. Front and back pieces are finished separately. LEFT FRONT PIECE: Continue back and forth with garter stitch over collar/bands and A.Y over the other stitches (continue to increase for collar and decrease for neck as before). AT THE SAME TIME cast off for the armhole at the beginning of each row from the side as follows: Cast off 3 stitches 0-0-0-1-2-3 times, 2 stitches 1-2-3-3-4-4 times and 1 stitch 1-3-4-4-7-7 times. Continue working until the piece measures approx. 55-57-59-61-63-65 cm from the cast-on edge at the longest part. Knit 1 row from the wrong side over all stitches. On the next row cast off the first 31-32-33-34-35-36 stitches for shoulder = 20-20-21-21-22-23 garter stitches left on needle for collar, knit to end of row. Finish collar as described below. COLLAR LEFT FRONT PIECE: Start from the wrong side and work garter stitch back and forth as follows: * 1 ridge back and forth over all stitches, 1 ridge back and forth over the first 15-15-16-16-17-18 stitches *, work from *-* until the collar measures approx. 7-7-8-8-8-8 cm along the shortest side (collar measures approx. 14-14-16-16-16-16 cm outermost along the longest side). Cast off with knit from the right side. RIGHT FRONT PIECE: Continue back and forth with garter stitch over collar/band and A.Y over the other stitches (increases to collar and decreases for neck continue as before). AT THE SAME TIME cast off for the armhole at the beginning of each row from the side as follows: Cast off 3 stitches 0-0-0-1-2-3 times, 2 stitches 1-2-3-3-4-4 times and 1 stitch 1-3-4-4-7-7 times. Continue working until the piece measures approx. 55-57-59-61-63-65 cm from the cast-on edge on the longest part. Knit 1 row from the wrong side over all stitches. On the next row knit the first 20-20-21-21-22-23 stitches (= collar), and cast off the remaining 31-32-33-34-35-36 stitches for shoulder. Cut the strand and finish collar as described below. COLLAR RIGHT FRONT PIECE: Start from the wrong side and knit over all stitches, * turn the piece and work 1 ridge back and forth over the first 15-15-16-16-17-18 stitches, 1 ridge back and forth over all stitches *, work from *-* until the collar measures approx. 7-7-8-8-8-8 cm along the shortest side and cast off with knit from the right side. BACK PIECE: = 93-103-113-121-141-151 stitches. Continue A.Y back and forth as before and cast off for the armholes at the beginning of each row in each side as follows: Cast off 3 stitches 0-0-0-1-2-3 times, 2 stitches 1-2-3-3-4-4 times and 1 stitch 1-3-4-4-7-7 times = 87-89-93-95-99-103 stitches on needle. When the piece measures 54-56-58-60-62-64 cm cast off the middle 21-21-23-23-25-27 stitches for neck and each shoulder is finished separately. Cast off 2 stitches on the next row from the neck = 31-32-33-34-35-36 stitches left on shoulder. Continue working until the piece measures approx. 55-57-59-61-63-65 cm from the cast-on edge on the longest part. Knit 1 row from the wrong side. Cast off with knit from the right side. Work the other shoulder in the same way. The jacket measures approx. 56-58-60-62-64-66 cm from the cast-off edge and down measured on the longest part. SLEEVE: Cast on a little loosely 60-60-60-72-72-72 stitches with double pointed needles size 3.5 mm and Nord. Work 3 RIDGES in the round – read description above. Work 2 rounds stocking stitch. Then work A.6 in the round (= 5-5-5-6-6-6 repeats of 12 stitches). When A.6 has been completed, work A.3B in the round (= 5-5-5-6-6-6 repeats of 12 stitches). Continue this pattern, but when there are 6 rounds left in A.3 work stocking stitch over the one purled stitch in the pattern until A.3 has been completed. When A.3 is finished, there are 50-50-50-60-60-60 stitches on the needles and the piece measures approx. 12 cm from the cast-on edge on the longest part. Insert 1 marker thread in the first stitch on the round. Allow it to follow your work onwards; it will be used when you increase mid under sleeve. Work stocking stitch in the round. When the piece measures 14-14-14-14-13-13 cm increase 2 stitches mid under sleeve – read INCREASE TIP. Increase like this a total of 14-17-19-17-21-23 times - in S: Every 8th round, in M and L/XL: Every 6th round, in L: Alternately every 5th and 6th round, in XXL: Alternately every 4th and 5th round and in XXL/XXXL: Every 4th round = 78-84-88-94-102-106 stitches. Continue working until the sleeve measures 50-50-50-49-47-46 cm (shorter measurements in larger sizes due to wider shoulders and longer sleeve cap). The next round is worked as follows: Cast off 4-4-4-5-5-5 stitches, work 71-77-81-85-93-97 stitches in stocking stitch and cast off the remaining 3-3-3-4-4-4 stitches. Cut the strand. Then work the sleeve cap back and forth with circular needle size 3.5 mm as follows: Work stocking stitch and cast off at the beginning of each row on each side as follows: Cast off 3 stitches 1 time in all sizes, 2 stitches 2-2-3-3-4-4 times and 1 stitch 1-2-4-4-7-10 times on each side, then cast off 2 stitches on each side until the piece measures 55-56-57-57-58-58 cm. Cast off 3 stitches 1 time on each side and then cast off the remaining stitches. The sleeve measures approx. 56-57-58-58-59-59 cm from the top down. Work the other sleeve in the same way. ASSEMBLY: Sew shoulder seams inside the cast-off edge. Sew collar together mid back (make sure the seam is on the wrong side when the collar is folded down). Sew collar to neck at the back. Sew in sleeves inside the 1 edge stitch on each side. Sew buttons on to left band. |
|||||||||||||||||||
Diagram explanations |
|||||||||||||||||||
|
|||||||||||||||||||
 |
|||||||||||||||||||
 |
|||||||||||||||||||
 |
|||||||||||||||||||
 |
|||||||||||||||||||
Have you finished this pattern?Tag your pictures with #dropspattern #ladyangelikajacket or submit them to the #dropsfan gallery. Do you need help with this pattern?You'll find 27 tutorial videos, a Comments/Questions area and more by visiting the pattern on garnstudio.com. © 1982-2026 DROPS Design A/S. We reserve all rights. This document, including all its sub-sections, has copyrights. Read more about what you can do with our patterns at the bottom of each pattern on our site. |
|||||||||||||||||||


With over 40 years in knitting and crochet design, DROPS Design offers one of the most extensive collections of free patterns on the internet - translated to 17 languages. As of today we count 324 catalogues and 12290 patterns translated into English (UK/cm).
We work hard to bring you the best knitting and crochet have to offer, inspiration and advice as well as great quality yarns at incredible prices! Would you like to use our patterns for other than personal use? You can read what you are allowed to do in the Copyright text at the bottom of all our patterns. Happy crafting!
Post a comment to pattern DROPS 197-38
We would love to hear what you have to say about this pattern!
If you want to leave a question, please make sure you select the correct category in the form below, to speed up the answering process. Required fields are marked *.