
Popular categories
Looking for a yarn?


Comments / Questions (26)
![]() Maureen O'Brien wrote:
Maureen O'Brien wrote:
I can't seem to be able to make the cross over in the head band. I stuck at turn and work 25 sts.... To the end 51 sts. That little paragraph is really getting to me.
06.05.2021 - 03:00DROPS Design answered:
Dear Mrs O'Brien, this video shows how to cross the stitches to make this cable on mid front (time code 06:32) for another pattern but same technique is used here and should help you to visualize how to do. Happy knitting!
06.05.2021 - 07:41
![]() Susan wrote:
Susan wrote:
How do I find. The complete pattern 197-13The winter way Drops design ?
16.11.2020 - 11:10DROPS Design answered:
Dear Susan, you will find the complete pattern for the set Winter Way here - under header you will find yarn required, needle sizes and tension for each piece, then somewhat below you will find the whole pattern. Happy knitting!
16.11.2020 - 11:53
![]() Marianna Capitani wrote:
Marianna Capitani wrote:
Sono riuscita grazie al video con il telefonino faccio fatica a vedere tutta la pagina scusate ......ma sono contentissima perchè mi piace un sacco questo modello e mi sarebbe dispiaciuto non riuscirci
07.10.2020 - 21:22
![]() Marianna Capitani wrote:
Marianna Capitani wrote:
Buonasera io faccio fatica a capire il primo giro dello schema a1 a parte il primo punto che non capisco come va fatto ,ma per il resto è 2 maglie rovescio ,3 dritte,2 rovescio 1 dritta ecc.....????'dovreste essere più semplici nelle spiegazioni per quelli con poca esperienza altrimenti fare i video proprio del modello che è bellissimo spero di riuscirci grazie
07.10.2020 - 21:06DROPS Design answered:
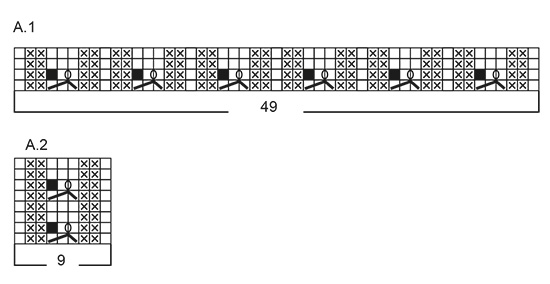
Buongiorno Marianna, i diagrammi si leggono dal basso verso l'alto, da destra verso sinistra per i ferri di andata e da sinistra a destra per quelli di ritorno se si lavora in piano. Il primo ferro di A.1 si lavora come segue: 1 maglia diritto, 2 maglie rovescio, 1 accavallata doppia, 2 maglie rovescio, e ripete questa sequenza per altre 5 volte e poi 1 maglia diritto. Segua la legenda per la spiegazione dei punti. Buon lavoro!
08.10.2020 - 09:44
![]() Susanne wrote:
Susanne wrote:
Hej Jeg forstår ikke, at diagram 1: 1 løs maske tages af - strik 2 ret masker og den løse maske løftes over. Jeg forstår det som, at der så lukkes 2 masker og får dermed for lidt masker på pinden, selvom jeg laver et omslag på næste pind mellem 2 masker.
05.10.2020 - 09:31DROPS Design answered:
Hej Susanne, husk at de 2 masker ikke skal strikkes sammen. Dvs når du løfter den løse over de 2 masker på højre pind, så vil du stadigvæk have de 2 masker på højre pind. God fornøjelse!
07.10.2020 - 10:12
![]() Catherine wrote:
Catherine wrote:
In the pattern for the winter way headband what does plait mean? Thank you.
13.01.2020 - 08:25DROPS Design answered:
Dear Catherine, this plait is when you will work a cable over all stitches to make the plait/cable on mid on headband. Happy knitting!
13.01.2020 - 10:52
![]() Gisela wrote:
Gisela wrote:
Hallo ihr Lieben, bei dieser Anleitung lässt sich das Diagramm nicht mit ausdrucken. Viele Grüße
19.11.2019 - 11:25DROPS Design answered:
Liebe Gisela, wir haben gerade die Anleitung drucken können, prüfen Sie mal die Druckereinstellungen, damit alle Seiten gedruckt wird - Diagramme sind in der letzten Seite sein. Viel Spaß beim stricken!
19.11.2019 - 11:48
![]() Gisele wrote:
Gisele wrote:
How do I make fingerless mittens with this pattern please? So pretty!
03.11.2019 - 18:33DROPS Design answered:
Dear Gisele, we are unfortunately not able to adapt every single pattern to every request, but you can get help from a mitt patterns same tension, you will have to decide where to place thumb in the pattern. Your DROPS store can provide you any further individual assistance even per mail or telephone. Happy knitting!
05.11.2019 - 07:56
![]() Carolin wrote:
Carolin wrote:
Ich verstehe es nicht. 1. Muss ich nicht bei A2 in der 1. Reihe die Masche,die ich abkette auch rechts stricken? Siehe Video How to knit a small simple cable without using a cable needle (mok cable) 2. Muss ich nicht nach der 1. Reihe wie im Videp noch eine Reihe ohne Umschlag stricken, bevor ich eine Reihe mit Umschlag stricke = jetzige 2. Reihe? Siehe auch das o.g. Video Danke
15.10.2019 - 23:03DROPS Design answered:
Liebe Carolin, bei A.1 sowie bei A.2 werden die Maschen links gestrickt, damit sie als rechte Maschen von der Vorderseite aussehen, siehe 1. Symbol = 1 Masche rechts in Hin-Reihen, 1 Masche links in Rück-Reihen. Das Video zeigt die Technick, es kann aber unterschiedlich gestrickt werden, immer stricken wie im Diagram gezeigt ist und in der schriflichen Anleitung erklärt ist. Viel Spaß beim stricken!
17.10.2019 - 08:42
![]() Marit Frøiland wrote:
Marit Frøiland wrote:
Hei! Jeg forstår ikke symbol i A2 som sier: mellom 2 masker lages et kast. Hva gjør jeg med masken foran og bak kastet?
28.02.2019 - 19:59DROPS Design answered:
Hei Marit, Den blanke ruten på hver side av kast-symbolet betyr rett fra retten eller vrang fra vrangen; så hvis du strikker fra retten er det 1 rett, 1 kast, 1 rett osv. God fornøyelse!
01.03.2019 - 08:25
|
||||||||||||||||
The Winter Way#thewinterwayset |
||||||||||||||||
 |
 |
|||||||||||||||
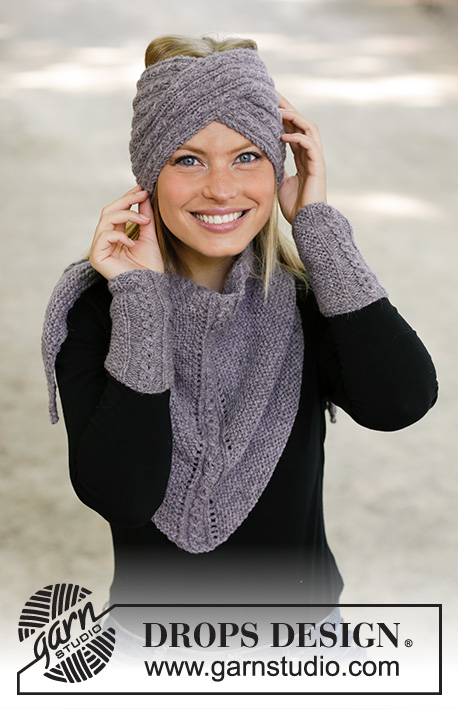
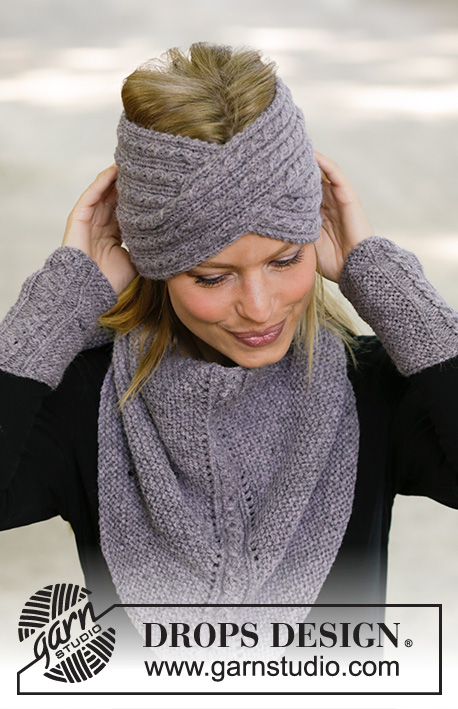
Knitted head band in DROPS Sky. The piece is worked back and forth with cables. Knitted shawl in DROPS Sky. The piece is worked back and forth with cables and garter stitch. Knitted wrist warmers in DROPS Sky. The piece is worked back and forth with cables and garter stitch.
DROPS 197-13 |
||||||||||||||||
|
EXPLANATIONS FOR THE PATTERN: ------------------------------------------------------- RIDGE/GARTER STITCH (worked back and forth): 1 ridge = Knit 2 rows. PATTERN: Head band: See diagram A.1. Shawl: See diagram A.2 Wrist warmers: See diagram A.2. The diagrams show all the rows in the pattern seen from the right side. INCREASE TIP (for wrist warmers): Increase by making 1 yarn over. On the next round knit the yarn over twisted to avoid a hole. Then work the new stitch in garter stitch. ------------------------------------------------------- START THE PIECE HERE: ------------------------------------------------------- HEAD BAND - SHORT OVERVIEW OF THE PIECE: The piece is worked back and forth and sewn together mid back to finish. HEAD BAND: Cast on 51 stitches with needle size 4 mm and Sky. Work 1 RIDGE – read description above. Now work pattern A.1 (= 49 stitches) with 1 edge stitch in garter stitch in each side. Continue back and forth like this until the piece measures approx. 21 cm – adjust so that the next row is the first row in A.1. REMEMBER THE KNITTING TENSION! Place the last 25 stitches on a thread and work the first 26 stitches as follows: Work pattern as before over these 26 stitches and cast on 1 new stitch at the end of the row = 27 stitches. Turn and continue the pattern back and forth with 1 edge stitch in garter stitch in each side until you have worked 16 rows (= 4 repeats of A.1 in height) from the division, but on the last row from the wrong side cast off the last stitch on the row = 26 stitches. Cut the strand. Place these stitches on a new thread. Cast on 2 new stitches on the needles, place the 25 stitches from the first thread back on the needles and then work pattern as before from the right side = 27 stitches. Continue back and forth with pattern as before inside the 1 edge stitch in garter stitch in each side until you have worked 16 rows (= 4 repeats of A.1 in height) from the division, but on the last row cast off the 2 first stitches on the row before the remaining stitches are worked = 25 stitches. Now you plait the head band mid front. Work from the right side as follows: Turn and work the 25 stitches in pattern as before, then lay the first piece in front of the second piece and the 26 stitches are worked in pattern as before = 51 stitches on the needle. Insert a marker thread here. THE PIECE IS NOW MEASURED FROM HERE! Continue pattern A.1 with 1 edge stitch in garter stitch in each side until the head band measures approx. 21 cm – adjust so that you finish after row 2 in A.1. Work 1 ridge. Cast off. Sew the head band together mid back in each and every stitch inside the cast-on and cast-off edges. Cut and fasten the strand. ------------------------------------------------------- SHAWL - SHORT OVERVIEW OF THE PIECE: The piece is worked back and forth with circular needle. SHAWL: All stitches and yarn overs are knitted. Cast on 15 stitches with circular needle size 4.5 mm and Sky. ROW 1 (= right side): Knit 1, 1 yarn over, knit 2, 1 yarn over, A.2 (= 9 stitches), 1 yarn over, knit 2, 1 yarn over, knit 1 = 4 stitches increased. ROW 2 (= wrong side): Knit 1, 1 yarn over, knit as far as A.2, work A.2 over the next 9 stitches, knit until there is 1 stitch left, 1 yarn over, knit 1 = 2 stitches increased. ROW 3: Knit 1, 1 yarn over, knit as far as A.2, 1 yarn over, work A.2 over the next 9 stitches, 1 yarn over, knit until there is 1 stitch left, 1 yarn over, knit 1 = 4 stitches increased. REMEMBER THE KNITTING TENSION! Repeat rows 2 and 3 until the piece measures approx. 36 cm measured along A.2 in middle of shawl – adjust so that you finish after row 1 or 5 in A.2. Loosely cast off with knit from the wrong side. Cut and fasten the strand. ------------------------------------------------------- WRIST WARMERS - SHORT OVERVIEW OF THE PIECE: The piece is worked back and forth and sewn together at the end. WRIST WARMERS: Cast on 35-39-41 stitches with needle size 3.5 mm and Sky. Work pattern as follows: 13-15-16 stitches GARTER STITCH - read description above, A.2 (= 9 stitches), 13-15-16 stitches in garter stitch. Continue back and forth like this. REMEMBER THE KNITTING TENSION! When the piece measures 10-11-12 cm increase 1 stitch inside the 1 edge stitch in garter stitch in each side - read INCREASE TIP = 37-41-43 stitches. The increased stitch is worked in garter stitch. Continue until the piece measures approx. 15-16-17 cm - adjust so that you finish after row 1 or 5 in diagram A.2. Cast off with knit from the wrong side, but to avoid the cast-off edge being tight, make 1 yarn over after each 4th stitch (yarn overs cast off as normal stitches). Cut the strand but leave a length of approx. 25 cm for assembly. Sew the wrist warmer together, sewing inside the 1 edge stitch in garter stitch. Fasten the strand. Work another wrist warmer in the same way. |
||||||||||||||||
Diagram explanations |
||||||||||||||||
|
||||||||||||||||
 |
||||||||||||||||
 |
||||||||||||||||
Have you finished this pattern?Tag your pictures with #dropspattern #thewinterwayset or submit them to the #dropsfan gallery. Do you need help with this pattern?You'll find 19 tutorial videos, a Comments/Questions area and more by visiting the pattern on garnstudio.com. © 1982-2026 DROPS Design A/S. We reserve all rights. This document, including all its sub-sections, has copyrights. Read more about what you can do with our patterns at the bottom of each pattern on our site. |
||||||||||||||||


With over 40 years in knitting and crochet design, DROPS Design offers one of the most extensive collections of free patterns on the internet - translated to 17 languages. As of today we count 324 catalogues and 12290 patterns translated into English (UK/cm).
We work hard to bring you the best knitting and crochet have to offer, inspiration and advice as well as great quality yarns at incredible prices! Would you like to use our patterns for other than personal use? You can read what you are allowed to do in the Copyright text at the bottom of all our patterns. Happy crafting!
Post a comment to pattern DROPS 197-13
We would love to hear what you have to say about this pattern!
If you want to leave a question, please make sure you select the correct category in the form below, to speed up the answering process. Required fields are marked *.