
Popular categories
Looking for a yarn?


Comments / Questions (250)
![]() Ellen wrote:
Ellen wrote:
Ik ben trui nr 197-1 aan het breien maar ik begrijp niet hoe ik de meerderingen in de mouwen mee moet breien
23.05.2023 - 13:57DROPS Design answered:
Dag Ellen,
Je meerdert aan elke kant van de markeerdraad midden onder de mouw, waarbij er telkens 4 steken tussen de meerderingen zitten en de markeerdraad zit in het midden tussen deze 4 steken. Door het meerderen zal het patroon tijdelijk verbreken, maar probeer dit zover mogelijk door te breien tot onder de mouw.
29.05.2023 - 15:16
![]() Ingrid wrote:
Ingrid wrote:
Jeg har nå strikket A.4 (a, b og c) opp til der jeg skal begynne å øke. Hvordan skal man strikke a og c og de økte maskene fortløpende inn i mønster A.4b? Betyr det at jeg bare skal følge b og avpasse ut til sidene?
02.05.2023 - 17:58DROPS Design answered:
Hei Ingrid. Mønstret vil ikke stemme 100% under alle økningene, men ja, følg b og avpasse ut til sidene. mvh DROPS Design
08.05.2023 - 07:24
![]() Elin wrote:
Elin wrote:
Skal A, B og C i diagram A.4 strikkes rett etter hverandre? Hvorfor er det skrå mønsteret så nærme hverandre mellom B og C? Har prøvd å strikke det sånn, men det blir ikke fint.
13.04.2023 - 19:40DROPS Design answered:
Hei Elin. Du skal strikke i den rekkefølgen og det antall masker det er opplyst i den str. du strikker etter. Der vil det stå hvor mange masker du f.eks skal strikke A.4a over og hvor mange ganger A.4b skal gjentas før A.4 c skal strikkes. Følger du rekkefølgen som er oppgitt, vil "skråen" stemme. mvh DROPS Design
17.04.2023 - 14:27
![]() Adriana wrote:
Adriana wrote:
No entiendo , cómo se hace el patrön A3y las disminuciones para ranglan , en el canesú
30.03.2023 - 19:35DROPS Design answered:
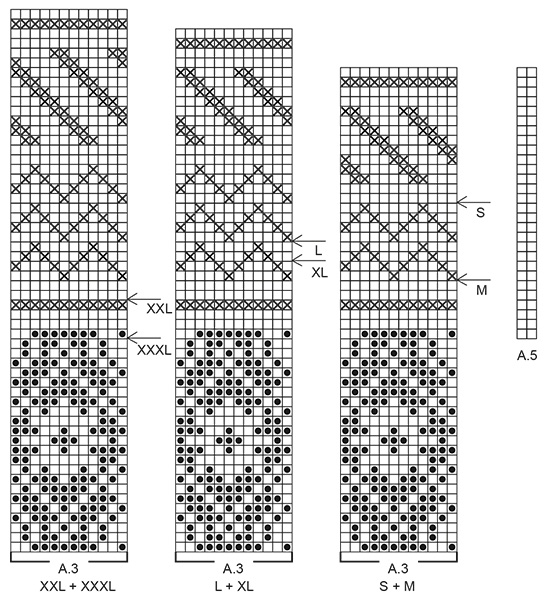
Hola Adriana, el diagrama A.3 es un diagrama de colores simplemente. Tienes que trabajar hasta la flecha en A.3 que se corresponda a tu talla (en el cuerpo) y después se cierran puntos para las sisas. Posteriormente se continúa con A.3 normal, sin tener en cuenta las flechas, hasta el final. Las disminuciones para el raglán se explican arriba y se trabaja a los lados de A.5 (antes y después de A.5).
02.04.2023 - 19:52
![]() Lilian Hagens wrote:
Lilian Hagens wrote:
Goedemorgen, ik heb deze trui klaar (197-1) hij is echter aan de bovenkant veel te groot. Hoe bereken ik dat de pas kleiner en korter wordt? Het liefst haal ik hem niet verder uit tot de armsgaten dus waar de pas begint. Met vriendelijke groet, Lilian Hagens
30.03.2023 - 11:24DROPS Design answered:
Dag Lilian,
In het deel wat je gebreid hebt kun je 10 cm opmeten en dan tellen hoeveel steken erin zitten. Op basis hiervan kun je uitrekenen hoeveel steken je op de naald moet hebben voor een bepaalde afmeting. Dan zou je voor de pas verdeeld kunnen minderen naar dat aantal steken. Houd daarbij wel rekening met het patroon.
01.04.2023 - 19:18
![]() Henriette wrote:
Henriette wrote:
Hei, Jeg er helt nybegynner når det gjelder strikking, men holder på strikke denne genseren. Jeg har kommet til bærestykke, og lurer på om man skal starte en ny mønsterrapport etter hver raglan-felling? Altså etter raglan, begynner man helt til høyre i diagrammet, eller fortsetter man på neste maske i diagrammet etter fellingen?
24.03.2023 - 00:27DROPS Design answered:
Hei Henriette, Du fortsetter mønsteret ved å starte på neste masken etter fellingen, slik at mønsteret fortsetter pent oppover. God fornøyelse!
24.03.2023 - 06:46
![]() Strikkeguri wrote:
Strikkeguri wrote:
I diagram A.4 ( str. M) er det skrå mønsteret så nærme hverandre mellom B og C. Er dette riktig? Og i begynnelsen på skråmønsteret i A, så er det ikke to vrange masker slik som i resten av mønsteret. Er det en grunn for dette, eller er det feil i mønsteret?
08.03.2023 - 16:22DROPS Design answered:
Hej Strikkeguri, vi skal lade design se på diagrammet, hold øje med en opdatering her på siden :)
09.03.2023 - 09:33
![]() Martine wrote:
Martine wrote:
Hei! Hva er omkretsen i cm på størrelsene på genseren? Ser bare at det er oppført maskeantall og størrelse
16.02.2023 - 17:31DROPS Design answered:
Hej Martine, du finde måleskitsen nederst i opskriften. Brystvidden på den mindste størrelse er 54 cm x 2 = 108 cm :)
23.02.2023 - 14:53
![]() Margaretha Parmann wrote:
Margaretha Parmann wrote:
Hei. Har strikket ferdig Valdres genseren. Strikket forhøyningen bak i nakken. Kommet til halskanten og fellingene: Står en skal strikke fra * til * til 0 masker gjenstår? det har jeg problem med å forstå. det. Fint med en forklaring her. Resten er ok. mvh. Margaretha Parmann
15.12.2022 - 15:58DROPS Design answered:
Hei Margaretha, Det som er mellom stjernene i teksten skal gjentas på hele omgangen (til du har 0 masker igjen på omgangen i din størrelse). God fornøyelse!
16.12.2022 - 07:05
![]() Monika Larsen wrote:
Monika Larsen wrote:
Jeg forstår simpelthen ikke ærmerne. Har strikket A4b (str. xxl) 1 gabg i højden - hvad så nu?? Forstår dimpelthen ikke beskrivelsen ! Skal jeg nu gå direkte til A 2?
05.11.2022 - 17:17DROPS Design answered:
Hei Monika. Om du ikke ønsker kortere eller lengre erme, går du videre til A.2. Husk at når arbeidet måler 12 cm økes det 1 maske på hver side av merketråden. A.2 strikkes over A.4b og avpasses ut til hver side, de økte maskene strikkes fortløpende inn i mønsteret. mvh DROPS Design
07.11.2022 - 11:10
|
||||||||||||||||
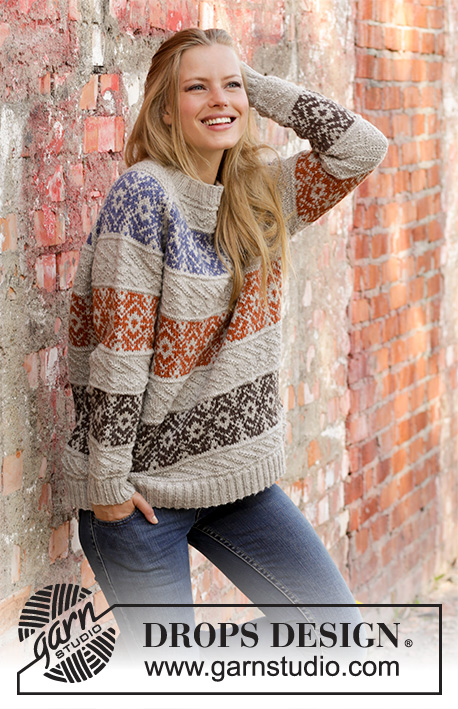
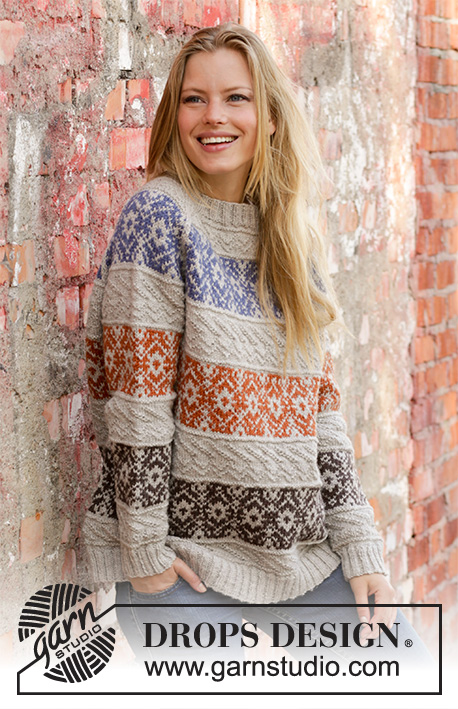
Valdres#valdressweater |
||||||||||||||||
 |
 |
|||||||||||||||
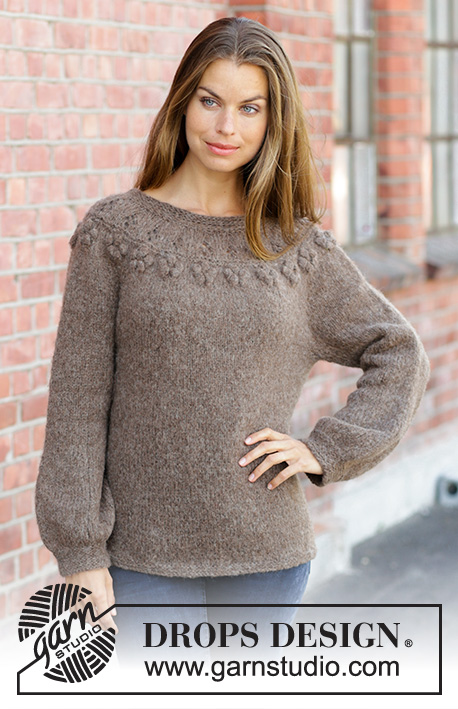
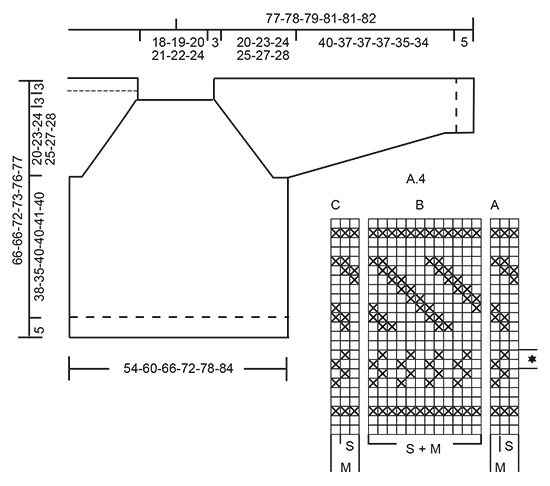
Knitted jumper with raglan in DROPS Karisma. The piece is worked bottom up with Nordic pattern and textured pattern in stripes. Sizes S - XXXL.
DROPS 197-1 |
||||||||||||||||
|
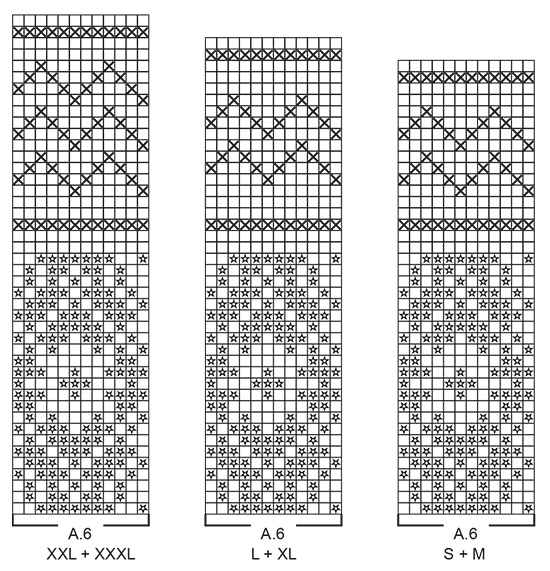
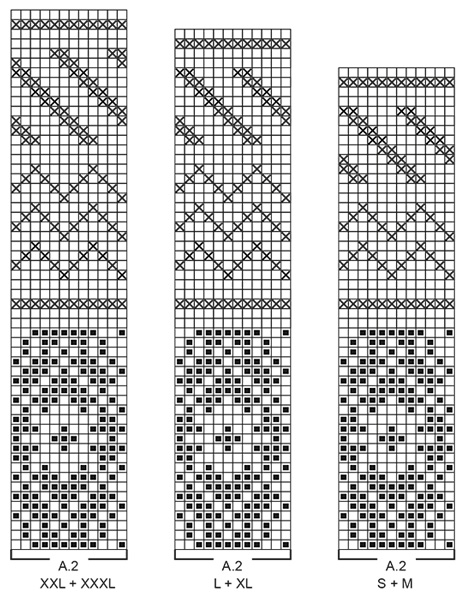
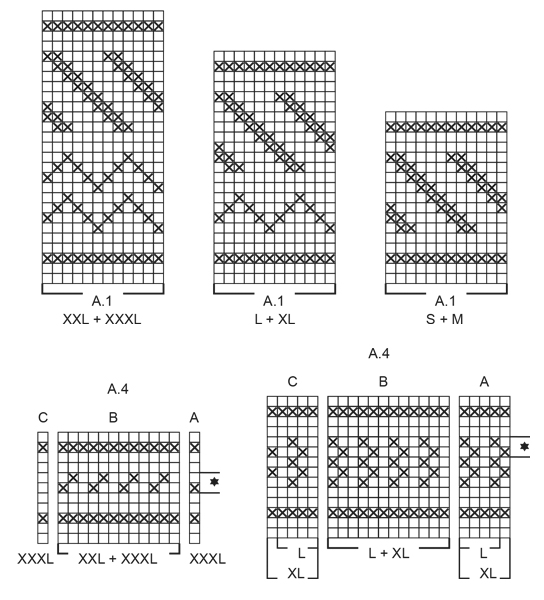
------------------------------------------------------- EXPLANATIONS FOR THE PATTERN: ------------------------------------------------------- PATTERN: See diagrams A.1 to A.6. Choose diagram for your size. DECREASE TIP (evenly spaced): To work out how to decrease evenly, count the total number of stitches on the needle (e.g. 260 stitches) and divide by the number of decreases to be made (e.g. 44) = 5.9. In this example, work together approx. each 5th and 6th stitch. KNITTING TIP-1: To avoid the knitting tension becoming tighter when working Nordic pattern, it is important that the strands at the back of the piece are not tight. You can use a size larger needle when working pattern if this is a problem. KNITTING TIP-2 (for yoke): If the knitting tension is not right in height and you work more rows on 10 cm than described in the text, the yoke will be too short and the armholes too small. This can be adjusted for by working 1 extra row of stocking stitch regularly on the yoke. INCREASE TIP (for sleeves): Work until there are 2 stitches left before the marker thread, make 1 yarn over (= 1 stitch increased), knit 4 (the marker thread sits in the middle of these 4 stitches), make 1 yarn over (= 1 stitch increased). On the next round knit the yarn overs twisted to avoid holes. RAGLAN: Decrease to raglan on each side of each A.5 as follows: Decrease 1 stitch after A.5 as follows: Slip the last stitch in A.5, knit 1, pass the slipped stitch over the knitted stitch (= 1 stitch decreased). Decrease 1 stitch before A.5 as follows: Work until there is 1 stitch left before A.5, knit the next 2 stitches together (= 1 stitch decreased). In other words you decrease 2 stitches by each A.5 and a total of 8 stitches on the round. ------------------------------------------------------- START THE PIECE HERE: ------------------------------------------------------- JUMPER - SHORT OVERVIEW OF THE PIECE: The piece is worked in the round with circular needle, bottom up. The sleeves are worked with short circular needle/double pointed needles. The pieces are placed together and the yoke is worked in the round. BODY: Cast on 260-288-316-344-376-400 stitches with circular needle size 3.5 mm and light oak. Work rib (= knit 2 / purl 2) for 5 cm. Change to circular needle size 4.5 mm and knit 1 round where you decrease 44-48-52-56-64-64 stitches evenly on round – read DECREASE TIP = 216-240-264-288-312-336 stitches. Knit 1 round as follows: Insert 1 marker in the first stitch, knit 107-119-131-143-155-167 stitches, insert 1 marker in the next stitch, knit to end of round. The markers mark the sides of the piece. Then work A.1 over all stitches (= 18-20-22-24-26-28 repeats of 12 stitches). REMEMBER THE KNITTING TENSION! When A.1 has been worked 1 time in height, insert 1 marker in the middle of the round (you will measure from this marker later). Then work A.2 over A.1- read KNITTING TIP-1. When A.2 has been worked 1 time in height, work A.3 over A.2. When you have worked as far as the arrow in A.3 (see arrow for your size) work the next round in A.3 as follows: Cast off 4 stitches, work the next 101-113-125-137-149-161 stitches as before, cast off the next 7 stitches, work the next 101-113-125-137-149-161 stitches as before, cast off the last 3 stitches. The piece measures approx. 32-29-32-32-31-30 cm from the marker (approx. 43-40-45-45-46-45 cm whole length). Lay the piece to one side and work the sleeves. SLEEVES: The piece is worked in the round with double pointed needles; change to short circular needle when necessary. Cast on 48-52-52-56-56-60 stitches with double pointed needles size 3.5 mm and light oak. Work rib (= knit 2 / purl 2) for 5 cm. Change to double pointed needles size 4.5 mm and knit 1 round where you decrease 8-10-8-10-8-10 stitches evenly on round = 40-42-44-46-48-50 stitches. READ THE WHOLE SECTION BEFORE CONTINUING: You work a pattern of approx. 8-8-5-5-4-4 cm, if you wish to adjust the length of the sleeve, do it now – see below. Then work the same pattern stripe as on the body (from the marker to the armhole = approx. 32-29-32-32-31-30 cm), i.e. the whole sleeve should measure approx. 45-42-42-42-40-39 cm. Work as follows: Insert 1 marker thread at the beginning of the round (= mid under sleeve). Work 1 round in stocking stitch, then work the next round as follows: Work A.4a (= 2-3-4-5-0-1 stitches), A.4b (= 12 stitches) a total of 3-3-3-3-4-4 times in width, A.4c (= 2-3-4-5-0-1 stitches). Continue until A.4 has been worked 1 time in height – NOTE: if you would like a longer sleeve, repeat the 2 rows marked with a star to desired length before continuing with the next round in A.4. If you would like a shorter sleeve, just work the desired number of rounds of A.4, but work a minimum of 1 of the purled rounds. – AT THE SAME TIME when the piece measures 10-9-9-10-12-12 cm increase 1 stitch on each side of the marker thread (= 2 stitches increased) – read INCREASE TIP! Increase like this every 2-1½-1½-1½-1-1 cm a total of 16-21-20-19-24-23 times = 72-84-84-84-96-96 stitches. The stitches in A.4a and A.4c and the increased stitches are worked into pattern A.4b as you go. When A.4 has been worked 1 time in height, work A.2 (= 12 stitches) over all stitches – A.2 is worked over A.4b and is adjusted out to each side; the increased stitches are worked into the pattern as you go. When A.2 has been worked 1 time in height, work A.3 (= 12 stitches) over A.2. When all the stitches under the sleeve are increased, work A.3 a total of 6-7-7-7-8-8 times in width. When you have worked as far as the arrow in A.3, work the next round as follows: Cast off 4 stitches, work the next 65-77-77-77-89-89 stitches as before, cast off the last 3 stitches. The sleeve measures approx. 45-42-42-42-40-39 cm. Work 1 more sleeve in the same way. YOKE: Place the sleeves on the same circular needle as the body, where you cast off stitches for the armholes = 332-380-404-428-476-500 stitches. Start the round in the transition between right sleeve and back piece. Work as follows: * A.5 (= 2 stitches, raglan line), continue with A.3 as before over the next 97-109-121-133-145-157 stitches (= front/back piece), A.5 (= 2 stitches, raglan line), work pattern A.3 as before over the next 65-77-77-77-89-89 stitches (= sleeve) *, work from *-* a total of 2 times – read KNITTING TIP-2. Continue this pattern and decrease to RAGLAN – read description above, every 2nd round a total of 27-31-32-33-37-39 times. When A.3 has been completed in height, work A.6 (= 12 stitches) over A.3. After the last decrease to raglan there are 116-132-148-164-180-188 stitches on the round. Continue until A.6 has been completed. The yoke measures approx. 20-23-24-25-27-28 cm. You can now work an elevation in the back of the neck so that the yoke is slightly higher at the back. This elevation can be left out; the neck is then the same both front and back. Work elevation in back of neck or go straight to working neck if you do not want an elevation. ELEVATION IN BACK OF NECK: Skip this section if you do not want an elevation. Insert 1 marker at the beginning of the round (this marks the start of the round after the elevation has been worked). Continue with light oak and knit to mid back, insert 1 marker. Start from the right side and knit as far as 30-30-34-34-40-40 stitches past the marker, turn, tighten the strand and purl 60-60-68-68-80-80 stitches back. Turn, tighten the strand and knit 54-54-61-61-72-72 stitches, turn, tighten the strand and purl 48-48-54-54-64-64 stitches back. Turn, tighten the strand and knit 42-42-48-48-56-56 stitches, turn, tighten the strand and purl 36-36-42-42-48-48 stitches back. Turn, tighten the strand and knit 30-30-35-35-40-40 stitches, turn, tighten the strand and purl 24-24-28-28-32-32 stitches, turn, tighten the strand and knit to mid back. Cut the strand. The round now starts at the marker, i.e. the transition between right sleeve and back piece. NECK: Continue with light oak and work the next round with decreases as follows: Knit * 40-46-54-58-66-70 stitches and decrease 0-6-12-13-19-22 stitches evenly over these stitches – remember DECREASE TIP, knit together the next 18-20-20-24-24-24 stitches 2 and 2 (= 9-10-10-12-12-12 stitches decreased) *, work from *-* a total of 2 times = 98-100-104-114-118-120 stitches. Change to circular needle size 3.5 mm and work the next round as follows: * Knit 2, purl 2, knit 1, 1 yarn over (= 1 stitch increased), purl 2, knit 2, 1 yarn over (= 1 stitch increased), purl 1 *, work from *-* until there are 8-0-4-4-8-0 stitches left, work rib (= knit 2 / purl 2) over the remaining stitches = 116-120-124-136-140-144 stitches. The yarn overs are worked twisted in rib (i.e. knit 2 / purl 2) on the next round to avoid holes. Cast off with knit over knit and purl over purl when the rib measures 3 cm. ASSEMBLY: Sew the openings under the sleeves in the outermost loop of the outermost stitch. |
||||||||||||||||
Diagram explanations |
||||||||||||||||
|
||||||||||||||||
 |
||||||||||||||||
 |
||||||||||||||||
 |
||||||||||||||||
 |
||||||||||||||||
 |
||||||||||||||||
Have you finished this pattern?Tag your pictures with #dropspattern #valdressweater or submit them to the #dropsfan gallery. Do you need help with this pattern?You'll find 31 tutorial videos, a Comments/Questions area and more by visiting the pattern on garnstudio.com. © 1982-2026 DROPS Design A/S. We reserve all rights. This document, including all its sub-sections, has copyrights. Read more about what you can do with our patterns at the bottom of each pattern on our site. |
||||||||||||||||


With over 40 years in knitting and crochet design, DROPS Design offers one of the most extensive collections of free patterns on the internet - translated to 17 languages. As of today we count 325 catalogues and 12298 patterns translated into English (UK/cm).
We work hard to bring you the best knitting and crochet have to offer, inspiration and advice as well as great quality yarns at incredible prices! Would you like to use our patterns for other than personal use? You can read what you are allowed to do in the Copyright text at the bottom of all our patterns. Happy crafting!
Post a comment to pattern DROPS 197-1
We would love to hear what you have to say about this pattern!
If you want to leave a question, please make sure you select the correct category in the form below, to speed up the answering process. Required fields are marked *.