
Popular categories
Looking for a yarn?


Comments / Questions (250)
![]() Nora wrote:
Nora wrote:
Jeg strikker Valdres str S. har begynt på 1 erme nå men skjønner ikke hvordan jeg skal strikke er A4, a, b og c?
26.02.2024 - 13:00DROPS Design answered:
Hej Nora. Det står i texten vilken del av A4 du ska sticka och hur många gånger. Står det kun A.4 så är det alla delar (a,b,c). Mvh DROPS Design
27.02.2024 - 14:08
![]() Leticia wrote:
Leticia wrote:
Hi, where can i see the size guide or even just the size the model is wearing? thanks in advance, also, thanks for all the patterns you are sharing :)
14.01.2024 - 06:52DROPS Design answered:
Dear Leticia, our model is wearing an M size. You can see the list of sizes at the top of the pages, in the materials section. The measurements in cm for each size are indicated in the size charts; you can read more on the size charts here: https://www.garnstudio.com/lesson.php?id=24&cid=19. Happy knitting!
14.01.2024 - 13:17
![]() Helle Krause wrote:
Helle Krause wrote:
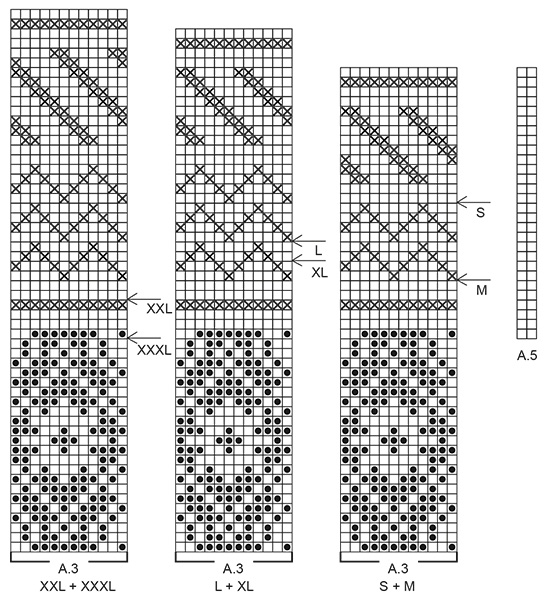
Kan ikke finde A.5 er det det der hedder A .4 ved skitsen af hele trøjen?
21.12.2023 - 13:34DROPS Design answered:
Hej Helle, A.5 består af 2 masker, du finder diagrammet til højre for A.3 :)
21.12.2023 - 15:50
![]() Lola wrote:
Lola wrote:
Hola! En la parte del canesú pone que hay que hacer las disminuciones cada segunda vuelta un total de 32 veces (talla L). No lo entiendo. Por los ejemplos de otros jerséis entiendo que hay que trabajar las disminuciones hasta completar A6 y no dejar de hacerlas una vez hechas 64 vueltas (el doble de las 32) Puede ser un error del patrón? Gracias!
11.11.2023 - 02:56DROPS Design answered:
Hola Lola, en algunos patrones los diagramas tienen también aumentos o disminuciones que se aplican al raglán. En este caso, se trata simplemente de un patrón de colores que es independiente a las disminuciones del canesú. Las disminuciones son para ajustar la diferencia entre las medidas en la parte superior y la parte inferior del canesú. Una vez hayas alcanzado el número de puntos necesario para las medidas deseadas en el ancho, continúas con el patrón de colores hasta terminarlo, tal y como se indica en el patrón, pero sin disminuir más puntos.
12.11.2023 - 23:20
![]() Borghild wrote:
Borghild wrote:
Hei:) Jeg lurer bare på om det er en unisex modell? I tilfelle, hvilken størrelse strikket jeg til mann som bruker M/L til vanlig
23.10.2023 - 15:17DROPS Design answered:
Hei Borghild, Du finner en målskisse på bunnen av oppskriften som du kan sammenligne med hans brystvidde. God fornøyelse!
24.10.2023 - 07:24
![]() Birgitta Mörnefält wrote:
Birgitta Mörnefält wrote:
Stickor 3 och 28m/st = 10 cm Betyder det stickor 4 och 20m/st Kan jag följa mönster 197-1?
23.09.2023 - 16:06DROPS Design answered:
Hej Birgitta, lav en strikkeprøve så du er sikker på at få 20 masker på 10 cm, da vil din størrelse stemme med målene i måleskitsen :)
26.09.2023 - 15:40
![]() Karolina wrote:
Karolina wrote:
Chyba już sama to wywnioskowałam z poprzednich odpowiedzi ;) ale dla upewnienia się- chodzi mi o schemat a.4
21.07.2023 - 10:08DROPS Design answered:
Witaj Karolino, robisz narzut za 2 oczkami schematu A.4a (za markerem na początku okrążenia) i kolejny narzut będzie 2 oczka przed markerem, czyli po przerobieniu 1 oczka w schemacie A.4c. Dodane oczka (narzuty) przerabiasz wg schematu A.4b w miarę postępu robótki. Pozdrawiam!
21.07.2023 - 10:18
![]() Karolina wrote:
Karolina wrote:
Jeśli w schemacie a.2a mam 3 oczka (prawe,lewe,prawe) a w 2b mam kolejne 3 oczka prawe; robie tu narzut w 2a, oczko dodaję po przerobieniu 2 oczek za markerem, czyli mam teraz oczy prawe, lewe i 2 prawe, to później w sekcji 2B przerabiam kolejne 3 oczka na prawo czy tylko 2 żeby skos był wszędzie co 4 oczka prawe?
21.07.2023 - 09:16DROPS Design answered:
Witaj Karolino, piszesz o schemacie A.2 czy A.4?
21.07.2023 - 09:53
![]() Karolina wrote:
Karolina wrote:
Dziękuję bardzo za odpowiedź 😊 mam jeszcze jedno pytanie. Gdy dodaję oczka na rękaw w schemacie a.2a i a.2c a w tym miejscu akurat powinno być oczko lewe to co z tym robię? Może to dziwne pytanie, nie jestem bardzo doświadczona, ale chyba nie mogę zrobić narzutu na lewo?
21.07.2023 - 09:10DROPS Design answered:
Witaj Karolino, narzut to narzut i nie ma tu pola manewru. Ważne jest kolejne okrążenie gdy już przerabiasz narzut (albo na prawo, albo na lewo, zależy od miejsca w ściegu strukturalnym). Pytaj śmiało kiedy tylko potrzebujesz. Pozdrawiam!
21.07.2023 - 09:46
![]() Karolina wrote:
Karolina wrote:
W jaki sposób przerabiać dodawane oczka w rękawach w schemacie A.4? Za każdym razem robię narzut w sekcji a i c? Między tymi narzutami nie ma 4 oczek prawych… To samo z żakardem Jak przerabiać żakard gdy mam np poza tym schematem 12 oczek dodatkowe 4 oczka?
19.07.2023 - 19:58DROPS Design answered:
Witaj, przy dodawaniu o. na rękaw w schemacie A.4, należy przerabiać o. schematów A.4a i A.4c tak samo (czyli jak pokazuje schemat), a dodawane o. przerabiać wg schematu A.4b, w miarę postępu robótki. Dodajesz o. na rękaw wykonując 1 narzut w sekcjach a i c (czyli za 2 o. za markerem i przed 2 o. przed markerem). Schemat A.2 jest przerabiany ponad schematem A.4b i dopasowuje się z każdej strony, czyli należy przerabiać dodawane o. wg schematu w miarę postępu robótki. Żakard nie będzie on idealnie równo wypadał w okrążeniu. Pamiętaj, że ta część znajduje się na środku pod rękawem i nie będzie bardzo widoczna.
21.07.2023 - 08:15
|
||||||||||||||||
Valdres#valdressweater |
||||||||||||||||
 |
 |
|||||||||||||||
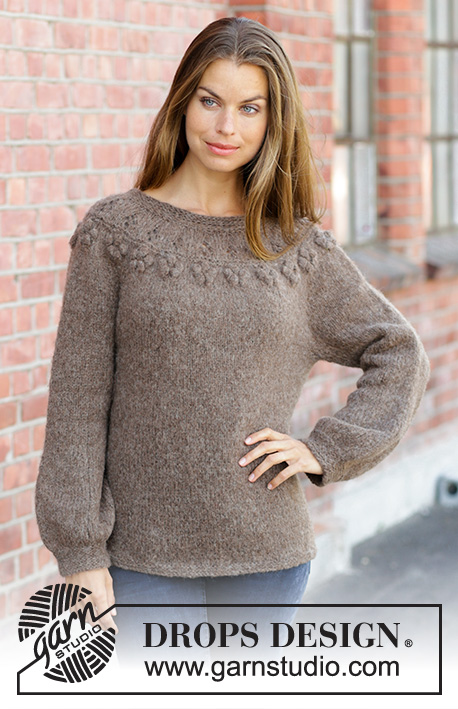
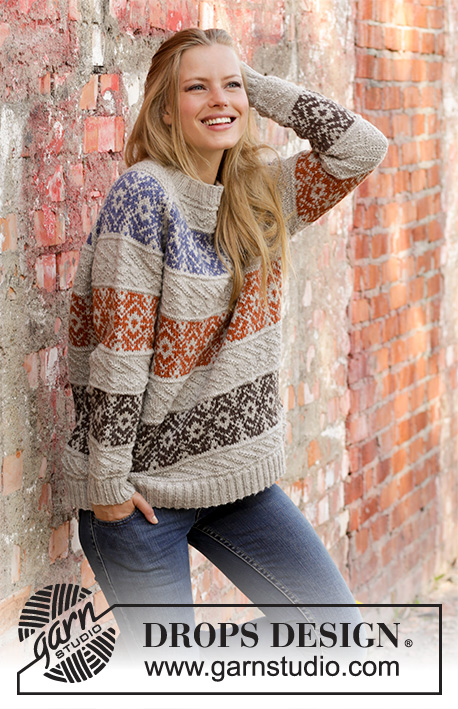
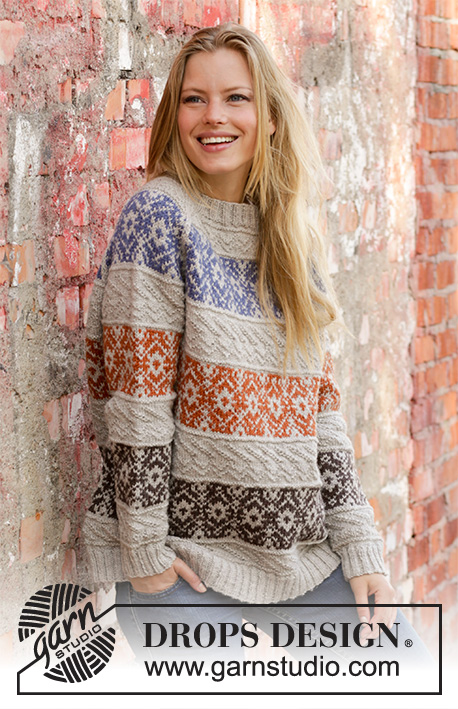
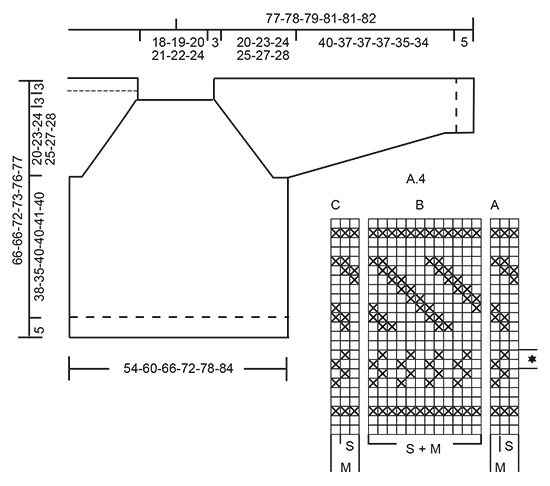
Knitted jumper with raglan in DROPS Karisma. The piece is worked bottom up with Nordic pattern and textured pattern in stripes. Sizes S - XXXL.
DROPS 197-1 |
||||||||||||||||
|
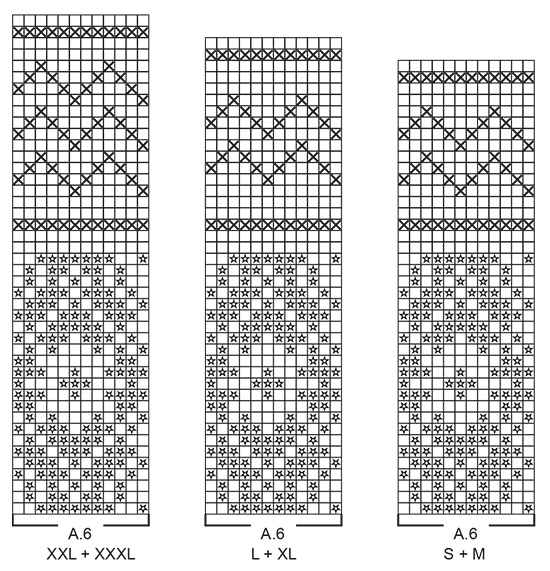
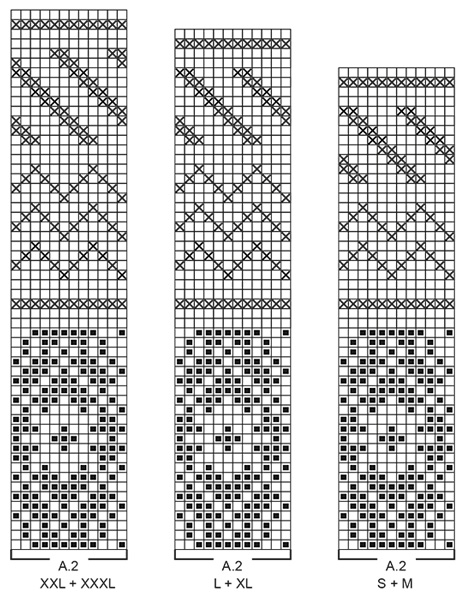
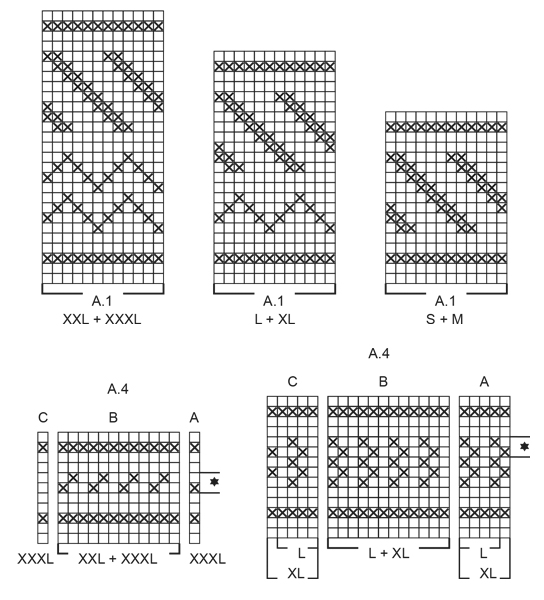
------------------------------------------------------- EXPLANATIONS FOR THE PATTERN: ------------------------------------------------------- PATTERN: See diagrams A.1 to A.6. Choose diagram for your size. DECREASE TIP (evenly spaced): To work out how to decrease evenly, count the total number of stitches on the needle (e.g. 260 stitches) and divide by the number of decreases to be made (e.g. 44) = 5.9. In this example, work together approx. each 5th and 6th stitch. KNITTING TIP-1: To avoid the knitting tension becoming tighter when working Nordic pattern, it is important that the strands at the back of the piece are not tight. You can use a size larger needle when working pattern if this is a problem. KNITTING TIP-2 (for yoke): If the knitting tension is not right in height and you work more rows on 10 cm than described in the text, the yoke will be too short and the armholes too small. This can be adjusted for by working 1 extra row of stocking stitch regularly on the yoke. INCREASE TIP (for sleeves): Work until there are 2 stitches left before the marker thread, make 1 yarn over (= 1 stitch increased), knit 4 (the marker thread sits in the middle of these 4 stitches), make 1 yarn over (= 1 stitch increased). On the next round knit the yarn overs twisted to avoid holes. RAGLAN: Decrease to raglan on each side of each A.5 as follows: Decrease 1 stitch after A.5 as follows: Slip the last stitch in A.5, knit 1, pass the slipped stitch over the knitted stitch (= 1 stitch decreased). Decrease 1 stitch before A.5 as follows: Work until there is 1 stitch left before A.5, knit the next 2 stitches together (= 1 stitch decreased). In other words you decrease 2 stitches by each A.5 and a total of 8 stitches on the round. ------------------------------------------------------- START THE PIECE HERE: ------------------------------------------------------- JUMPER - SHORT OVERVIEW OF THE PIECE: The piece is worked in the round with circular needle, bottom up. The sleeves are worked with short circular needle/double pointed needles. The pieces are placed together and the yoke is worked in the round. BODY: Cast on 260-288-316-344-376-400 stitches with circular needle size 3.5 mm and light oak. Work rib (= knit 2 / purl 2) for 5 cm. Change to circular needle size 4.5 mm and knit 1 round where you decrease 44-48-52-56-64-64 stitches evenly on round – read DECREASE TIP = 216-240-264-288-312-336 stitches. Knit 1 round as follows: Insert 1 marker in the first stitch, knit 107-119-131-143-155-167 stitches, insert 1 marker in the next stitch, knit to end of round. The markers mark the sides of the piece. Then work A.1 over all stitches (= 18-20-22-24-26-28 repeats of 12 stitches). REMEMBER THE KNITTING TENSION! When A.1 has been worked 1 time in height, insert 1 marker in the middle of the round (you will measure from this marker later). Then work A.2 over A.1- read KNITTING TIP-1. When A.2 has been worked 1 time in height, work A.3 over A.2. When you have worked as far as the arrow in A.3 (see arrow for your size) work the next round in A.3 as follows: Cast off 4 stitches, work the next 101-113-125-137-149-161 stitches as before, cast off the next 7 stitches, work the next 101-113-125-137-149-161 stitches as before, cast off the last 3 stitches. The piece measures approx. 32-29-32-32-31-30 cm from the marker (approx. 43-40-45-45-46-45 cm whole length). Lay the piece to one side and work the sleeves. SLEEVES: The piece is worked in the round with double pointed needles; change to short circular needle when necessary. Cast on 48-52-52-56-56-60 stitches with double pointed needles size 3.5 mm and light oak. Work rib (= knit 2 / purl 2) for 5 cm. Change to double pointed needles size 4.5 mm and knit 1 round where you decrease 8-10-8-10-8-10 stitches evenly on round = 40-42-44-46-48-50 stitches. READ THE WHOLE SECTION BEFORE CONTINUING: You work a pattern of approx. 8-8-5-5-4-4 cm, if you wish to adjust the length of the sleeve, do it now – see below. Then work the same pattern stripe as on the body (from the marker to the armhole = approx. 32-29-32-32-31-30 cm), i.e. the whole sleeve should measure approx. 45-42-42-42-40-39 cm. Work as follows: Insert 1 marker thread at the beginning of the round (= mid under sleeve). Work 1 round in stocking stitch, then work the next round as follows: Work A.4a (= 2-3-4-5-0-1 stitches), A.4b (= 12 stitches) a total of 3-3-3-3-4-4 times in width, A.4c (= 2-3-4-5-0-1 stitches). Continue until A.4 has been worked 1 time in height – NOTE: if you would like a longer sleeve, repeat the 2 rows marked with a star to desired length before continuing with the next round in A.4. If you would like a shorter sleeve, just work the desired number of rounds of A.4, but work a minimum of 1 of the purled rounds. – AT THE SAME TIME when the piece measures 10-9-9-10-12-12 cm increase 1 stitch on each side of the marker thread (= 2 stitches increased) – read INCREASE TIP! Increase like this every 2-1½-1½-1½-1-1 cm a total of 16-21-20-19-24-23 times = 72-84-84-84-96-96 stitches. The stitches in A.4a and A.4c and the increased stitches are worked into pattern A.4b as you go. When A.4 has been worked 1 time in height, work A.2 (= 12 stitches) over all stitches – A.2 is worked over A.4b and is adjusted out to each side; the increased stitches are worked into the pattern as you go. When A.2 has been worked 1 time in height, work A.3 (= 12 stitches) over A.2. When all the stitches under the sleeve are increased, work A.3 a total of 6-7-7-7-8-8 times in width. When you have worked as far as the arrow in A.3, work the next round as follows: Cast off 4 stitches, work the next 65-77-77-77-89-89 stitches as before, cast off the last 3 stitches. The sleeve measures approx. 45-42-42-42-40-39 cm. Work 1 more sleeve in the same way. YOKE: Place the sleeves on the same circular needle as the body, where you cast off stitches for the armholes = 332-380-404-428-476-500 stitches. Start the round in the transition between right sleeve and back piece. Work as follows: * A.5 (= 2 stitches, raglan line), continue with A.3 as before over the next 97-109-121-133-145-157 stitches (= front/back piece), A.5 (= 2 stitches, raglan line), work pattern A.3 as before over the next 65-77-77-77-89-89 stitches (= sleeve) *, work from *-* a total of 2 times – read KNITTING TIP-2. Continue this pattern and decrease to RAGLAN – read description above, every 2nd round a total of 27-31-32-33-37-39 times. When A.3 has been completed in height, work A.6 (= 12 stitches) over A.3. After the last decrease to raglan there are 116-132-148-164-180-188 stitches on the round. Continue until A.6 has been completed. The yoke measures approx. 20-23-24-25-27-28 cm. You can now work an elevation in the back of the neck so that the yoke is slightly higher at the back. This elevation can be left out; the neck is then the same both front and back. Work elevation in back of neck or go straight to working neck if you do not want an elevation. ELEVATION IN BACK OF NECK: Skip this section if you do not want an elevation. Insert 1 marker at the beginning of the round (this marks the start of the round after the elevation has been worked). Continue with light oak and knit to mid back, insert 1 marker. Start from the right side and knit as far as 30-30-34-34-40-40 stitches past the marker, turn, tighten the strand and purl 60-60-68-68-80-80 stitches back. Turn, tighten the strand and knit 54-54-61-61-72-72 stitches, turn, tighten the strand and purl 48-48-54-54-64-64 stitches back. Turn, tighten the strand and knit 42-42-48-48-56-56 stitches, turn, tighten the strand and purl 36-36-42-42-48-48 stitches back. Turn, tighten the strand and knit 30-30-35-35-40-40 stitches, turn, tighten the strand and purl 24-24-28-28-32-32 stitches, turn, tighten the strand and knit to mid back. Cut the strand. The round now starts at the marker, i.e. the transition between right sleeve and back piece. NECK: Continue with light oak and work the next round with decreases as follows: Knit * 40-46-54-58-66-70 stitches and decrease 0-6-12-13-19-22 stitches evenly over these stitches – remember DECREASE TIP, knit together the next 18-20-20-24-24-24 stitches 2 and 2 (= 9-10-10-12-12-12 stitches decreased) *, work from *-* a total of 2 times = 98-100-104-114-118-120 stitches. Change to circular needle size 3.5 mm and work the next round as follows: * Knit 2, purl 2, knit 1, 1 yarn over (= 1 stitch increased), purl 2, knit 2, 1 yarn over (= 1 stitch increased), purl 1 *, work from *-* until there are 8-0-4-4-8-0 stitches left, work rib (= knit 2 / purl 2) over the remaining stitches = 116-120-124-136-140-144 stitches. The yarn overs are worked twisted in rib (i.e. knit 2 / purl 2) on the next round to avoid holes. Cast off with knit over knit and purl over purl when the rib measures 3 cm. ASSEMBLY: Sew the openings under the sleeves in the outermost loop of the outermost stitch. |
||||||||||||||||
Diagram explanations |
||||||||||||||||
|
||||||||||||||||
 |
||||||||||||||||
 |
||||||||||||||||
 |
||||||||||||||||
 |
||||||||||||||||
 |
||||||||||||||||
Have you finished this pattern?Tag your pictures with #dropspattern #valdressweater or submit them to the #dropsfan gallery. Do you need help with this pattern?You'll find 31 tutorial videos, a Comments/Questions area and more by visiting the pattern on garnstudio.com. © 1982-2026 DROPS Design A/S. We reserve all rights. This document, including all its sub-sections, has copyrights. Read more about what you can do with our patterns at the bottom of each pattern on our site. |
||||||||||||||||


With over 40 years in knitting and crochet design, DROPS Design offers one of the most extensive collections of free patterns on the internet - translated to 17 languages. As of today we count 325 catalogues and 12298 patterns translated into English (UK/cm).
We work hard to bring you the best knitting and crochet have to offer, inspiration and advice as well as great quality yarns at incredible prices! Would you like to use our patterns for other than personal use? You can read what you are allowed to do in the Copyright text at the bottom of all our patterns. Happy crafting!
Post a comment to pattern DROPS 197-1
We would love to hear what you have to say about this pattern!
If you want to leave a question, please make sure you select the correct category in the form below, to speed up the answering process. Required fields are marked *.