
Popular categories
Looking for a yarn?


Comments / Questions (17)
![]() Marin wrote:
Marin wrote:
Hej! Jag förstår inte diagram A1. Maskorna ökar drastiskt utan förklaring, första varvet förstår jag där symbolen ”V” betyder 2 maskor men ändå går det från 11 till 12 maskor i nästa varv, och från det andra till det tredje varvet ökas maskorna från 12 till 18 st. Hur går detta ihop? Tacksam för svar!
13.01.2026 - 21:56DROPS Design answered:
Hei Marin. Jo, i diagramtekst forklaringen står det hva som skal hekles. Selv om det bare er ett diagram ikon, så står det i teksten at det skal hekles 2 masker (f,eks fastmaske + luftmaske). mvh DROPS Design
29.01.2026 - 10:57
![]() Silvia wrote:
Silvia wrote:
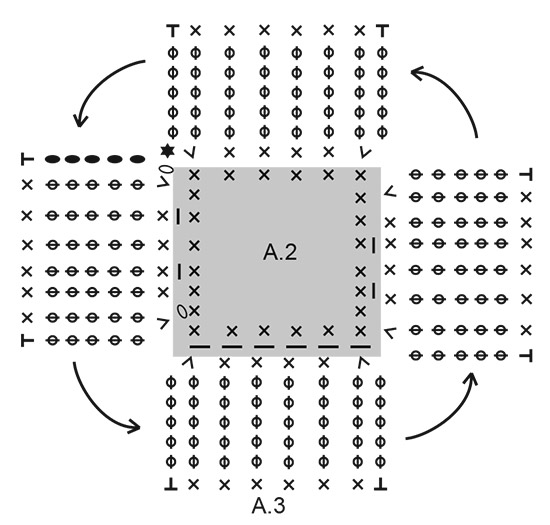
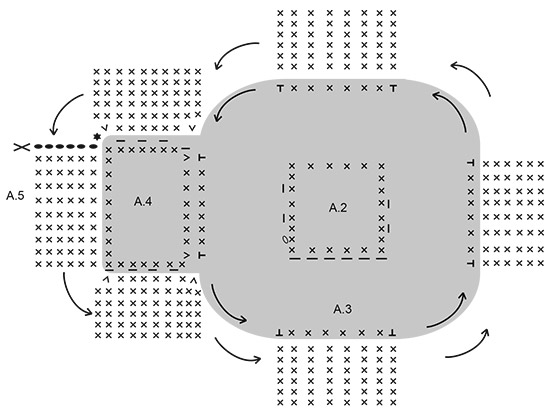
Ich verstehe Diagramm A.3 nicht. Ich habe in A.2 das Dach mit den Streben gehäkelt. Was mache ich mit den Streben in A.3? Wie kann ich da in Runden Häkeln?
01.07.2025 - 21:53DROPS Design answered:
Liebe Silvia, nach A.2, wird man in der Runde um herum A.2 häkeln, beginnen Sie an der oberen Ecke an der linken Seite im Diagram (siehe die Luftmasche in der Ecke), dann häkeln Sie die Symbolen (= 1 oder 2 feste Maschen) bei der 1. Runde, dann mit 1 Kettmaschen schliessen. Bei der 2. Runde häkelt man 1 feste Masche in jeder Masche mit Natur (= 9. Symbol) die ganze Runde. Viel Spaß beim Häklen!
02.07.2025 - 16:24
![]() Suzanne wrote:
Suzanne wrote:
A7 isn't making any sense to me. Does the chain start at the right end? Do you maybe have a image how to follow the round?
22.05.2024 - 21:16DROPS Design answered:
Dear Suzanne, the start of the round is where the chain stitches (black ovals) are. Work accordingly counterclockwise and around the whole chart. Happy crochetting!
27.05.2024 - 00:48
![]() Lis Larsen wrote:
Lis Larsen wrote:
Godaften Jeg kan ikke finde ud af at hækle bunden på bilen. Synes den er svær?
02.03.2024 - 19:09DROPS Design answered:
Hei Lis. Vi skal hjelpe deg så godt vi kan, men fint om du beskriver hva som er vanskelig. Evnt. ta en titt på videoen: "Hækl: På begge sider af luftmaske rækken", samtidig som du følger diagram A.7 med tankene på økningene. mvh DROPS Design
04.03.2024 - 14:00
![]() GERUM wrote:
GERUM wrote:
Merci pour la réponse concernant le fond de la voiture baby 31-26 modèle w-008by j'aurais une autre question concernant les roues, en fait, je ne sais pas vraiment à quelle hauteur les accrochées car en crochetant ce modèle, j'ai un problème avec ces roues, je pense que ce j'ai bricolé n'est pas correct.
24.01.2024 - 12:10DROPS Design answered:
Bonjour Mme Gerum, placez les roues de chaque côté, le long des longs côtés, vous pouvez les épingler auparavant pour vérifier l'emplacement puis, crochetez 1 ms dans les 2 épaisseurs de la roue (on l'a pliée en double/aplatie pour pouvoir crocheter dans le dernier rang) + dans la maille suivante de A.5, crochetez 1 autre maille serrée de la même façon et continuez en mailles serrées jusqu'à la roue suivante, et répétez pour les 2 autres roues le long de l'autre côté de la voiture. Bon crochet!
25.01.2024 - 08:14
![]() GERUM wrote:
GERUM wrote:
Je suis entrain e réaliser au crochet My First Car baby 31-26, je n'arrive absolument pas à comprendre le diagramme A7 concernant le fond de la voiture, pourriez vous m'expliquer svpl.Merci
23.01.2024 - 18:54DROPS Design answered:
Bonjour Mme Gerum, vous allez crocheter en mailles serrées le long des 2 côtés de la chaînette en augmentant en même temps dans les mailles indiquées par le dernier symbole de la légende, autrement dit, au 1er rang crochetez: 1 ml, 1 ms dans la 1ère ml, 1 ms dans chacune des 7 ml suivantes, 3 ms dans la ml suivante, pivotez l'ouvrage pour crocheter de l'autre côté de la chaînette , crochetez 1 ms dans la 1ère ml (la même que là où vous avez crocheté les 3 ms), puis 1 ms dans chacune des 7 ml suivantes, 3 ms dans la ml suivante, 1 mc dans la 1ère ms du début du rang. Bon crochet!
24.01.2024 - 08:24
![]() Paola wrote:
Paola wrote:
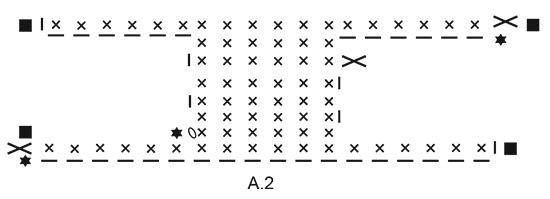
Non ho capito il passaggio da A2 a A3.,.. sul diagramma A3 fanno iniziare sulla 12 cat. della riga con 18 cat. Devo fare 6 m. basse con colore macchina girare ed altre 6 ma basse? (sarebbe il profilo dei finestrini). Poi continuo tutto intorno con colore macchina, Il mio dubbio è se i profili dei finestrini sono formati alla fine da tre giri, compreso il primo del diagramma A2 Grazie
12.05.2023 - 09:39DROPS Design answered:
Buonasera Paola, deve lavorare il primo e ultimo giro di A.3 con il colore della macchina, il resto in panna. Buon lavoro!
14.05.2023 - 13:49
![]() Martine wrote:
Martine wrote:
Bonjour Je voulais savoir si il y avait des explications rangs par rangs pour cette jolie voiture mais sans les grilles. J ai beaucoup de mal avec les grilles. Cordialement
25.10.2022 - 08:31DROPS Design answered:
Bonjour Martine, nous avons seulement des diagrammes pour cette voiture; mais cette leçon explique comment lire des diagramme et devrait ainsi pouvoir vous aider. Bon crochet!
25.10.2022 - 09:06
![]() Kristine Hansen wrote:
Kristine Hansen wrote:
Hei. Finnes denne oppskriften i vanlig hekleoppskrift ? Synes det blir så klønete å hoppe frem og tilbake i diagram, koder og tegn.
25.07.2022 - 08:52DROPS Design answered:
Hei Kristine, Desverre, foreløpig har vi ikke denne oppskriften uten diagrammer. God fornøyelse!
26.07.2022 - 06:54
![]() Betty wrote:
Betty wrote:
Thank you sooo much for your very quick reply to my question. And... yes, I do understand it now. So you made my day !
22.10.2020 - 10:46
|
||||||||||||||||||||||||||||||||||||||||||||||||||||
My First Car#dropsmyfirstcar |
||||||||||||||||||||||||||||||||||||||||||||||||||||
 |
 |
|||||||||||||||||||||||||||||||||||||||||||||||||||
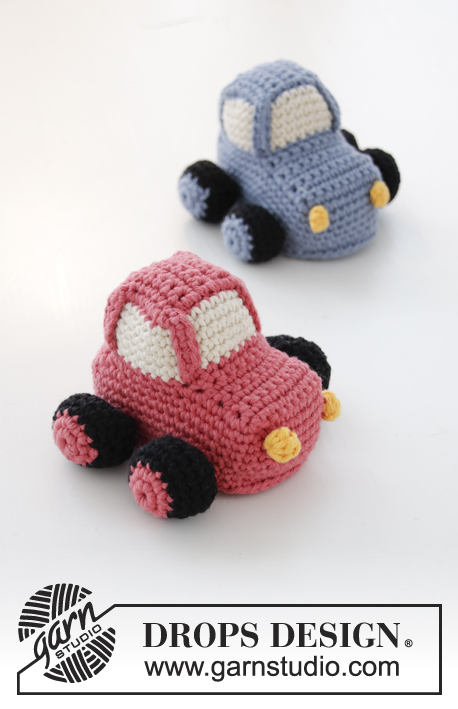
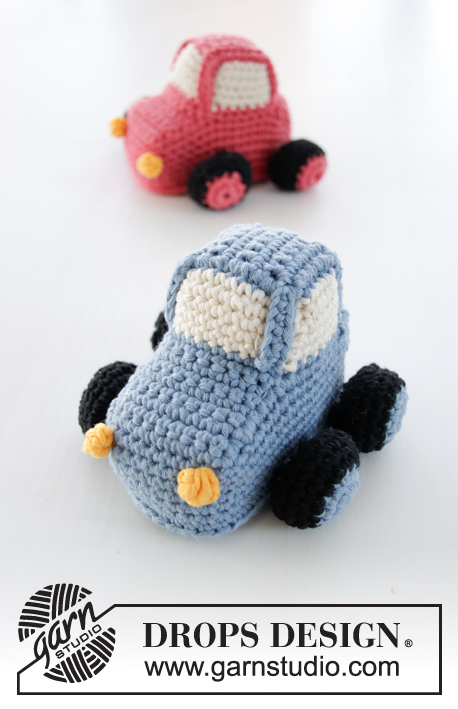
Crocheted car for baby. Piece is crocheted in DROPS Paris.
DROPS Baby 31-26 |
||||||||||||||||||||||||||||||||||||||||||||||||||||
|
INFORMATION FOR PATTERN: PATTERN: See diagrams A.1 to A.7. Diagrams A.2 to A.5 are the car, A.1 is the wheels, A.6 is lights and A.7 is bottom of car. Section marked with grey has already been worked, it only shows how next round should be worked in stitches/rows. ---------------------------------------------------------- CAR: Car worked in several parts. First work 4 wheels, then the car. Finally work light and work the piece together. WHEELS: Work 4 chain stitches on hook size 4 mm with the colour of the car and form a ring with 1 slip stitch in first chain stitch. Work A.1 in the round = 1 wheel. REMEMBER THE CROCHET TENSION! When A.1 has been worked, there are 9 double crochets on last round. Fasten off, fill the wheel with cotton wool and put aside. Work 4 wheels in total. They are worked together with car in diagram A.5. CAR: Work A.2 back and forth (= car roof and flaps down over the windows) with the colour of the car. When A.2 has been worked, work A.3 in the round over stitches/rows in A.2 (= the windows). Section marked with grey = A.2, section has already been worked, it only shows how next round should be worked in stitches. Work first round in A.3 with the colour of the car, then work with off white until 1 round remains. On last round place flaps down over windows and work together with corners in A.3 with the colour of the car (see the squares in A.2). When A.3 has been worked, there are 32 double crochets on last round. Fasten off the off white strand. Work the rest of car in the colour of the car. Work A.4 back and forth over the first 8 stitches (= front of car). Increase 1 double crochet in each side on first round = 10 double crochets. When A.4 has been worked, work A.5 in the round over all stitches/rounds in A.4 and the remaining stitches in A.3 (= the sides, mid front and mid back on car). On 4th round in A.5 work the wheels on car as follows: Fold last round on wheel double and work 1 double crochet through both layers of wheels and 4th row in A.5, work 2 double crochets in total through all 3 layers (= the wheel is now fastened with 2 double crochets to the car), work all 4 wheel to the car the same way. When A.5 has been worked, there are 54 double crochets on last round. Fasten off. LIGHTS: Work A.6 with strong yellow. Cut the thread and tie ends together. Work 2 lights in total. Sew light to the front of car. Fill the car with some cotton wool. Then work the bottom loosely in the round before working it together with the car. BOTTOM: Work 9 chain stitches on hook size 4 mm with the colour of the car and work A.7, work on both sides of chain stitch row. When A.7 has been worked, there are 54 double crochets on last round. Work the bottom to car with 1 double crochet through both layers in the round, over all stitch. Fasten off. |
||||||||||||||||||||||||||||||||||||||||||||||||||||
Diagram explanations |
||||||||||||||||||||||||||||||||||||||||||||||||||||
|
||||||||||||||||||||||||||||||||||||||||||||||||||||
 |
||||||||||||||||||||||||||||||||||||||||||||||||||||
 |
||||||||||||||||||||||||||||||||||||||||||||||||||||
 |
||||||||||||||||||||||||||||||||||||||||||||||||||||
 |
||||||||||||||||||||||||||||||||||||||||||||||||||||
 |
||||||||||||||||||||||||||||||||||||||||||||||||||||
Have you finished this pattern?Tag your pictures with #dropspattern #dropsmyfirstcar or submit them to the #dropsfan gallery. Do you need help with this pattern?You'll find 11 tutorial videos, a Comments/Questions area and more by visiting the pattern on garnstudio.com. © 1982-2026 DROPS Design A/S. We reserve all rights. This document, including all its sub-sections, has copyrights. Read more about what you can do with our patterns at the bottom of each pattern on our site. |
||||||||||||||||||||||||||||||||||||||||||||||||||||


With over 40 years in knitting and crochet design, DROPS Design offers one of the most extensive collections of free patterns on the internet - translated to 17 languages. As of today we count 324 catalogues and 12291 patterns translated into English (UK/cm).
We work hard to bring you the best knitting and crochet have to offer, inspiration and advice as well as great quality yarns at incredible prices! Would you like to use our patterns for other than personal use? You can read what you are allowed to do in the Copyright text at the bottom of all our patterns. Happy crafting!
Post a comment to pattern DROPS Baby 31-26
We would love to hear what you have to say about this pattern!
If you want to leave a question, please make sure you select the correct category in the form below, to speed up the answering process. Required fields are marked *.