
Popular categories
Looking for a yarn?


Comments / Questions (14)
![]() PATRIZIA wrote:
PATRIZIA wrote:
Avorare a diritto fino a quando rimangono 20-20-23-21-24-28 maglie prima del segnapunti sotto la manica sinistra, poi trasferirle sul fermamaglie n° 1 da qua in poi non capisco quante maglie devo tyrasferire totali sui 3 fermaglie ...si parla di 3 fermagli ma poi facendo la somma delle singole parti diventano 5 ......mi sono persa sono giorni che leggo e rileggo ma non trovo soluzione grazie
27.05.2021 - 09:10DROPS Design answered:
Buonasera Patrizia, i fermamaglie sui cui trasferire le maglie sono 3, e il passaggio e ben descritto: se segue fedelmente le indicazioni riuscirà a impostare il lavoro. Buon lavoro!
29.05.2021 - 14:46
![]() Patrizia wrote:
Patrizia wrote:
Qualcuno mi può aiutare x favore con la divisione dei punti sui 3 fermamaglie per iniziare con il domino ?non riesco proprio a capire come fare ..grazie sin da ora
26.05.2021 - 22:05DROPS Design answered:
Buonasera Patrizia, ci può spiegare esattamente in quale punto riscontra difficoltà? Buon lavoro!
27.05.2021 - 00:08
![]() Tikva wrote:
Tikva wrote:
Guten Tag, ich möchte die Jacke für eine Frau mit Brustumfang 144 (ohne Zugaben) stricken, gibt es für diese Größe eine Berechnung, ebenfalls um die Jacke etwas in der Länge zu vergrößern, da ich bei der Größe der Frau eine deutlich längere Jacke für angebracht halte. Ich wäre sehr dankbar, wenn Sie mir auf die o.g. Maße eine Anleitung geben könnten. DANKE SEHR.
28.01.2020 - 13:03DROPS Design answered:
Liebe Tikva, leider können wir jeder Anleitung nach jedem individuellen Frage anpassen und einzelne Modelle auf individuellen Wunsch hin umrechnen. Wenn sie Hilfe damit brauchen, wenden Sie sich bitte an Ihrem DROPS Laden, dort hilft man Ihnen gerne weiter. Viel Spaß beim stricken!
28.01.2020 - 13:26
![]() Marion Jakobsen wrote:
Marion Jakobsen wrote:
Jeg kan ikke få plads til 2 dominoruder på siden af domino 1.1.
17.10.2018 - 08:04DROPS Design answered:
Hei Marion. Jeg antar du snakker om langs siden av domino 1.1? Du må tilpasse slik at du strikker opp 16-17-18-20-25-27 masker langs halve ruten. Det vil si at du må strikke opp 2 masker i noen av maskene. God fornøyelse
17.10.2018 - 08:15
![]() Ana Alfonsín wrote:
Ana Alfonsín wrote:
Muchas gracias por el patrón, mis alumnas lo están disfrutando como niñas!!
09.05.2018 - 22:18
![]() Anna wrote:
Anna wrote:
Ser meget spændende ud
17.02.2018 - 20:48
![]() Anne Curtis wrote:
Anne Curtis wrote:
Love the design, cannot wait for the pattern to start knitting!
08.02.2018 - 08:47
![]() Dubuisson Maud wrote:
Dubuisson Maud wrote:
Bonjour, je trouve ce gilet très original (le dégradé de couleur) quand aurons-nous les explications du modèle ? Merci
01.02.2018 - 18:14
![]() Patricia wrote:
Patricia wrote:
Superbe !!! Quand pourra t-on avoir les explications ?
19.01.2018 - 16:06
![]() Judit Maruzsi wrote:
Judit Maruzsi wrote:
I would love to knit this one! I hope that this pattern will be published!
19.01.2018 - 10:31
|
|||||||||||||||||||
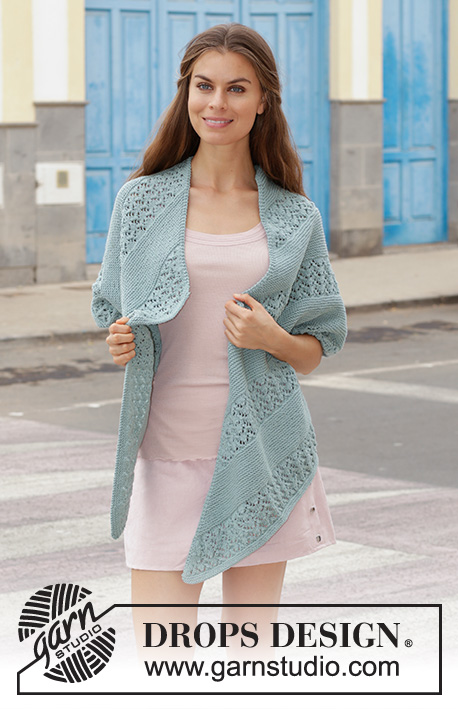
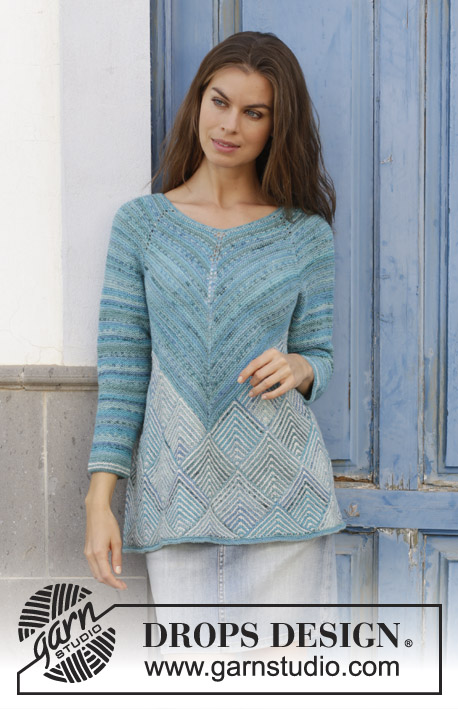
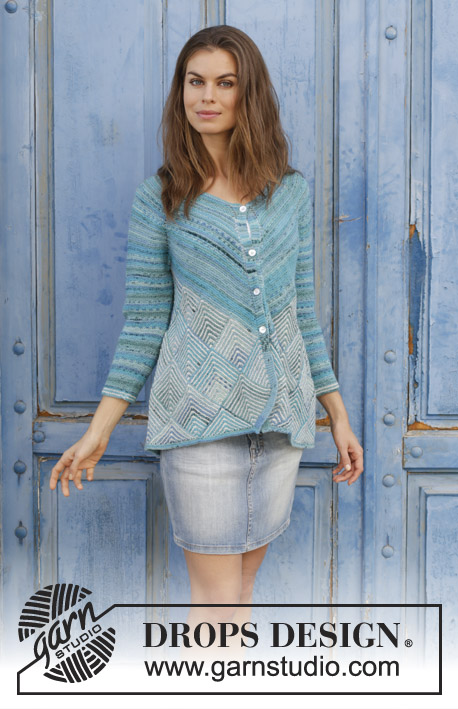
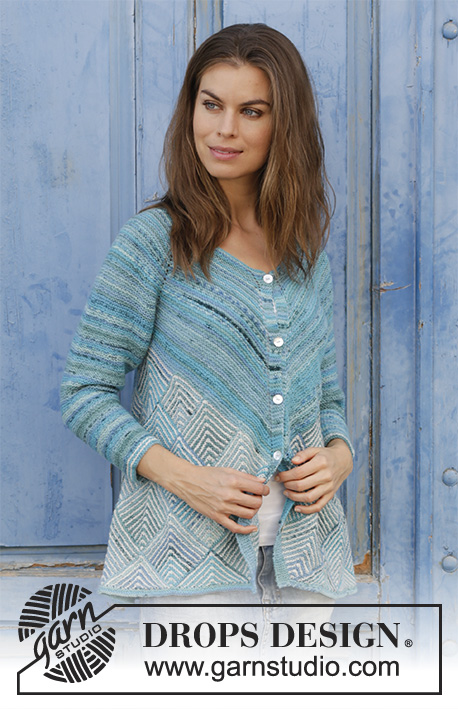
Atlantis Jacket#atlantisjacket |
|||||||||||||||||||
 |
 |
||||||||||||||||||
Jacket with domino squares, garter stitch, stripes and raglan, knitted top down. Size: S - XXXL Piece is knitted in DROPS Fabel.
DROPS 188-14 |
|||||||||||||||||||
|
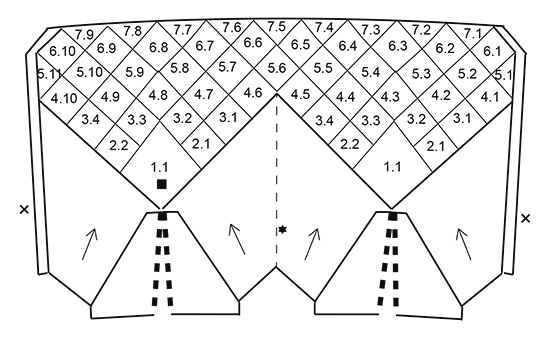
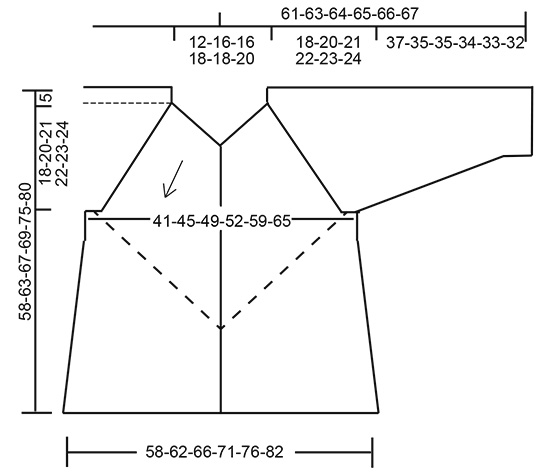
INFORMATION FOR PATTERN: GARTER STITCH (back and forth): 1 ridge = knit 2 rows. GARTER STITCH (in the round - applies to sleeves): 1 ridge = 2 rounds. Knit 1 round and purl 1 round. RAGLAN (applies to yoke): SIZE S-M-L-XL: ROW 1 (= wrong side): Knit all stitches. ROW 2 (= right side): Make 1 yarn over after 1st-2nd-4th-5th marker and 1 yarn over before 3rd-4th-6th-7th marker (= 2 stitches increased on each sleeve, 2 stitches increased on back piece and 1 stitch increased on each front piece = 8 stitches increased in total on row). ROW 3 (and all rows from wrong side): Knit all stitches, do not work yarn overs twisted; they should make holes. ROW 4: Increase 2 yarn overs on each front piece and 4 yarn overs on back piece as follows: Make 2 yarn overs after 1st and 4th marker as follows: Work to and with stitch with marker, 1 yarn over, knit 1, 1 yarn over. Make 2 yarn overs before 4th and 7th marker as follows: Work until 1 stitch remains before stitch with marker, 1 yarn over, knit 1, 1 yarn over (= 4 stitches increased on back piece and 2 stitches increased on each front piece = 8 stitches increased in total on row). ROW 6: Work as 2nd row (= 2 stitches increased on each sleeve and 2 stitches increased on back piece and 1 stitch increased on each front piece = 8 stitches increased in total on row). ROW 8: Make 1 yarn over after 1st and 4th marker and 1 yarn over before 4th and 7th marker (= 2 stitches increased on back piece and 1 stitch increased on each front piece = 4 stitches increased in total on row). ROW 10: Work as 2nd row (= 2 stitches increased on each sleeve and 2 stitches increased on back piece and 1 stitch increased on each front piece = 8 stitches increased in total on row). SIZE XXL-XXXL: ROW 1 (= wrong side): Knit all stitches. ROW 2 (= right side): Make 1 yarn over after 1st-2nd-4th-5th marker and 1 yarn over before 3rd-4th-6th-7th marker (= 2 stitches increased on each sleeve, 2 stitches increased on back piece and 1 stitch increased on each front piece = 8 stitches increased on row). ROW 3 (and all rows from wrong side): Knit all stitches, do not work yarn overs twisted; they should make holes. ROW 4: Increase 2 yarn overs on each front piece and 4 yarn overs on back piece as follows: Make 2 yarn overs after 1st and 4th marker as follows: Work to and with stitch with marker, 1 yarn over, knit 1, 1 yarn over. Make 2 yarn overs before 4th and 7th marker as follows: Work until 1 stitch remains before stitch with marker, 1 yarn over, knit 1, 1 yarn over (= 4 stitches increased on back piece and 2 stitches increased on each front piece = 8 stitches increased in total on row). ROW 6: Work as 2nd row (= 2 stitches increased on each sleeve and 2 stitches increased on back piece and 1 stitch increased on each front piece = 8 stitches increased on row). ROW 8: Work as 4th row (= 4 stitches increased on back piece and 2 stitches increased on each front piece = 8 stitches increased in total on row). ROW 10: Work as 2nd row (= 2 stitches increased on each sleeve and 2 stitches increased on back piece and 1 stitch increased on each front piece = 8 stitches increased on row). ROW 12: Work as 2nd row (= 2 stitches increased on each sleeve and 2 stitches increased on back piece and 1 stitch increased on each front piece = 8 stitches increased on row). INCREASE TIP-1: Work 2 stitches in 1 stitch. INCREASE TIP-2: Increase with 1 yarn over between 2 stitches. Knit yarn over twisted on next row, it should not make holes. DECREASE TIP (applies to mid under sleeve): All decreases are made on a row with knit. Decrease on each side of marker as follows: Begin 4 stitches before marker, knit 2 together, knit 4 (marker is in the middle of these stitches), slip 1 stitch knitwise, knit 1, pass slipped stitch over stitch worked (= 2 stitches decreased). KNITTING TIP (applies to domino squares): Always pick up stitches from right side. STRIPES: Work first row in every stripe from right side (applies to domino squares). Knit first round in every stripe (applies to sleeves). Work 1 ridge with light pearl grey. Work 1 ridge with blue lagoon. WHOLE DOMINO SQUARE: Insert 1 marker thread in the middle stitch. ROW 1 (= wrong side): Knit all stitches. ROW 2 (= right side): Knit until 1 stitch remains before marker thread, slip 1 stitch knitwise, knit 2 together, pass the slipped stitch over stitches worked, knit the rest of row. Repeat 1st and 2nd row, i.e. decrease 2 stitches in the middle of the square on every other row until 1 stitch remains, cut the yarn and pull it through stitch. HALF DOMINO SQUARE (vertical): ROW 1 (= wrong side): Knit all stitches. ROW 2 (= right side): Knit 2 together, knit the rest of row. Work opposite on the square in the other side of piece, i.e. knit until 2 stitches remain, knit 2 together (i.e. decrease is done towards mid front). Repeat 1st and 2nd row, i.e. decrease 1 stitch on square on every other row until 1 stitch remains. Cut the yarn and pull it through stitch. HALF DOMINO SQUARE (horizontal): Work as whole domino square but in addition to decreasing in the middle of square, slip last stitch at the end of every row on 1 stitch holder. Continue until 7-5-7-7-7-7 stitches remain on needle (= 9-10-10-11-12-13 stitches on stitch holder in each side). Knit 1 row from wrong side and slip last stitch at the end of row on stitch holder = 6-4-6-6-6-6 stitches on needle. Work next row (= from right side) as follows: Knit 1-0-1-1-1-1, slip 1 stitch knitwise, knit 2 together, pass slipped stitch over the 2 stitches worked together (= 2 stitches decreased), knit 1-0-1-1-1-1, slip last stitch at the end of row on stitch holder = 3-1-3-3-3-3 stitches. Slip these stitches on stitch holder as well. Cut and fasten the yarn. There are now 23-23-25-27-29-31 stitches in total on stitch holder. BUTTONHOLES: Decrease for buttonholes on right band (when garment is worn). Decrease from right side when 3 stitches remain on row as follows: Make 1 yarn over, knit the next 2 stitches together, knit last stitch. On next row knit yarn over to make holes. Decrease first buttonhole when yoke measures approx. 1½-2 cm. Then decrease the next 5-5-5-6-6-6 buttonholes, approx. 7-8 cm between each. ---------------------------------------------------------- JACKET: Piece is worked back and forth, top down. Increase out for raglan on each side of each sleeve and mid front and mid back. When yoke is done, work 1 and 1 domino square. Work sleeves in garter stitch in the round at the end. YOKE: Cast on 117-133-133-145-145-153 stitches (including 5 band stitches in each side of piece) on circular needle size 2.5 mm with blue lagoon. Work 2 ridges in GARTER STITCH - see explanation above. Switch to circular needle size 3.5 mm. Work next row as follows from right side: Left front piece: Work 5 band stitches in garter stitch, work 1 stitch in garter stitch and insert 1st marker in this stitch, 1 yarn over, work 14-18-18-21-21-23 stitches in garter stitch and increase 0-0-4-0-2-7 stitches evenly (= 21-25-29-28-30-37 stitches). Left sleeve: Work 1 stitch in garter stitch and insert 2nd marker in this stitch, 1 yarn over, work 22 stitches in garter stitch and increase 0-0-2-2-0-0 stitches evenly, 1 yarn over, work 1 stitch in garter stitch and insert 3rd marker in this stitch (= 26-26-28-28-26-26 stitches). Back piece: Work 14-18-18-21-21-23 stitches in garter stitch and increase 0-0-4-0-2-7 stitches evenly, 1 yarn over, work 1 stitch in garter stitch and insert 4th marker in this stitch (= mid back), 1 yarn over, work 14-18-18-21-21-23 stitches in garter stitch and increase 0-0-4-0-2-7 stitches evenly (= 31-39-47-45-49-63 stitches). Right sleeve: Work 1 stitch in garter stitch and insert 5th marker in this stitch, 1 yarn over, work 22 stitches in garter stitch and increase 0-0-2-2-0-0 stitches evenly, 1 yarn over, work 1 stitch in garter stitch and insert 6th marker in this stitch (= 26-26-28-28-26-26 stitches). Right front piece: Work 14-18-18-21-21-23 stitches in garter stitch and increase 0-0-4-0-2-7 stitches evenly, 1 yarn over, work 1 stitch in garter stitch and insert 7th marker in this stitch, work 5 band stitches in garter stitch (= 21-25-29-28-30-37 stitches) = 125-141-161-157-161-189 stitches in total. Work and increase for RAGLAN – see explanation above, begin to work 3rd row (i.e. 1st row is from wrong side). Remember BUTTONHOLES - see explanation above. REMEMBER THE KNITTING TENSION! Work 3rd to 10th-10th-10th-10th-12th-12th row 1 time = 153-169-189-185-201-229 stitches (= 26-30-34-33-37-44 stitches on each front piece and 30-30-32-32-32-32 stitches on each sleeve and 41-49-57-55-63-77 stitches on back piece). Repeat 1st to 10th-10th-10th-10th-12th-12th row 7-7-8-8-7-7 times = 405-421-477-473-537-565 stitches (= 68-72-82-81-93-100 stitches on each front piece and 72-72-80-80-88-88 stitches on each sleeve and 125-133-153-151-175-189 stitches on back piece). Then work the first 0-6-0-4-4-8 rows 1 more time = 405-445-477-489-553-597 stitches (= 68-76-82-84-96-106 stitches on each front piece and 72-76-80-82-90-92 stitches on each sleeve and 125-141-153-157-181-201 stitches on back piece). Piece now measures approx. 18-20-21-22-23-24 cm measured along the shoulder. Knit 1 row from wrong side. Now divide piece on next row from right side as follows: Left front piece: Work 6 band stitches in garter stitch (including stitch with marker), 1 yarn over (= 1 stitch increased), knit until 2 stitches remain before 2nd marker (= 60-68-74-76-88-98 stitches), knit 2 together (= 1 stitch decreased = 68-76-82-84-96-106 stitches) Left sleeve: Slip the next 72-76-80-82-90-92 stitches (including stitches with 2nd and 3rd marker) on a stitch holder for sleeve, cast on 8-8-8-12-12-12 stitches under sleeve (insert 1 marker thread in the middle of these new stitches). Back piece: Knit 2 together (= 1 stitch decreased), knit until 4th marker (= 60-68-74-76-88-98 stitches), 1 yarn over (= 1 stitch increased), knit 1 (= stitch with 4th marker), 1 yarn over (= 1 stitch increased), knit until 2 stitches remain before 5th marker (= 60-68-74-76-88-98 stitches), knit 2 together (= 1 stitch decreased = 125-141-153-157-181-201 stitches). Right sleeve: Slip the next 72-76-80-82-90-92 stitches (including stitches with 5th and 6th marker) on a stitch holder for sleeve, cast on 8-8-8-12-12-12 stitches under sleeve (insert 1 marker thread in the middle of these new stitches). Right front piece: Knit 2 together (= 1 stitch decreased), knit until 7th marker (= 60-68-74-76-88-98 stitches), 1 yarn over (= 1 stitch increased), 6 band stitches in garter stitch (including stitch with marker = 68-76-82-84-96-106 stitches) = 277-309-333-349-397-437 stitches in total (= 72-80-86-90-102-112 stitches on each front piece and 133-149-161-169-193-213 stitches on back piece). Work 1 row from wrong side, do not work yarn overs twisted to avoid holes AT THE SAME TIME increase 5-0-0-0-0-0 stitches evenly before marker under first sleeve, 5-0-0-0-0-0 stitches evenly before tip mid back, 5-0-0-0-0-0 stitches evenly before marker under next sleeve and 5-0-0-0-0-0 stitches evenly before band mid front – read INCREASE TIP-1 = 20-0-0-0-0-0 stitches increased in total = 297-309-333-349-397-437 stitches. Now slip stitches on 3 stitch holders while at the same time working them from right side (i.e. work from left front piece over back piece and to right front piece) as follows: Knit until 20-20-23-21-24-28 stitches remain before marker thread under sleeve, then slip them on stitch holder number 1 (= 57-60-63-69-78-84 stitches slipped on 1st stitch holder), knit the next 20-20-23-21-24-28 stitches (= until marker thread), work 2 stitches in next stitch (= 1 stitch increased), knit the next 19-19-22-20-23-27 stitches (work first domino square on left front piece/back piece over these 41-41-47-43-49-57 stitches and keep them therefore on needle), knit until 20-20-23-21-24-28 stitches remain before marker thread under right sleeve, then slip them on stitch holder number 2 (= 103-109-115-127-145-157 stitches on 2nd stitch holder), knit 19-19-22-20-23-27, work 2 stitches in next stitch (= 1 stitch increased), knit 20-20-23-21-24-28, leave stitches on needle (work first domino square on right front piece/back piece over these 41-41-47-43-49-57 stitches), knit the rest of row, then slip them on stitch holder number 3 (= 57-60-63-69-78-84 stitches on 3rd stitch holder).Cut and fasten the thread. Stitches are now slipped on 3 stitch holders, 57-60-63-69-78-84 stitches in each side of piece, 103-109-115-127-145-157 stitches in the middle of piece and 41-41-47-43-49-57 stitches on needle in each side of piece (= mid under sleeves). DOMINO SQUARES: See chart below, numbers on chart describe which domino square you are working. First work 1 domino square mid under right sleeve (= 1.1). Then work 1 and 1 domino square. Work domino squares with 2 double pointed needles size 3.5 mm. Pick up stitches with blue lagoon. Work all domino squares in STRIPES – see explanation above, (i.e. work first row in lagoon from wrong side, change colour to light pearl grey and then work stripes). RIGHT FRONT/BACK PIECE: 1ST ROW WITH DOMINO: DOMINO 1.1: Now work WHOLE DOMINO SQUARE – see explanation above, over the 41-41-47-43-49-57 stitches under right sleeve. 2ND ROW WITH DOMINO: DOMINO 2.1: Slip the last 15-16-17-19-24-26 stitches from stitch holder towards mid front/mid back back on double pointed needles 3.5 mm and pick up 16-17-18-20-25-27 stitches – read KNITTING TIP, on half right side of 1st domino square (pick up more stitches in right side of 1st domino square on 3rd row with domino square later) = 31-33-35-39-49-53 stitches. Work the whole domino square. DOMINO 2.2: Pick up 16-17-18-20-25-27 stitches from middle of left side (= half side) of 1st domino square (= towards mid front/mid back), and slip the first 15-16-17-19-24-26 stitches from stitch holder towards mid front/mid back back on double pointed needles size 3.5 mm = 31-33-35-39-49-53 stitches. Work the whole domino square. Now there is 2 whole domino squares on 2nd row with domino, i.e. 1 domino on each side of the 1st domino square has been worked. 3RD ROW WITH DOMINO: DOMINO 3.1: Slip the next 17-18-19-21-24-26 stitches from stitch holder towards mid back/mid front back on double pointed needles 3.5 mm and pick up 18-19-20-22-25-27 stitches in right side of domino square 2.1 = 35-37-39-43-49-53 stitches. Work whole domino square. DOMINO 3.2: Pick up 18-19-20-22-25-27 stitches in left side of domino square 2.1 and pick up 17-18-19-21-24-26 stitches on last half in right side of 1st domino square = 35-37-39-43-49-53 stitches. Work whole domino square. DOMINO 3.3: Pick up 17-18-19-21-24-26 stitches in last half on left side of 1st domino square and pick up 18-19-20-22-25-27 stitches in right side of domino square 2.2 = 35-37-39-43-49-53 stitches. Work whole domino square. DOMINO 3.4: Pick up 18-19-20-22-25-27 stitches in left side of domino square 2.2 and slip the next 17-18-19-21-24-26 stitches from stitch holder towards mid front/mid back back on double pointed needles size 3.5 mm = 35-37-39-43-49-53 stitches. Work whole domino square. 4 domino squares have been worked on 3rd row with domino. LEFT FRONT/BACK PIECE: Work 1st to 3rd row with dominos as on right front/back piece. Now work dominos over both left front piece/back piece and right front piece/back piece. Begin to work dominos over left front piece, then left back piece, right back piece and then right front piece as explained below and as numbers on chart show. 4TH ROW WITH DOMINO: DOMINO 4.1: Slip the next 19-20-21-23-24-26 stitches from stitch holder towards mid front back on double pointed needles 3.5 mm and pick up 20-21-22-24-25-27 stitches in right side of domino square 3.1 = 39-41-43-47-49-53 stitches. Work whole domino square. Now 6 stitches remain on stitch holder towards mid front. DOMINO 4.2 TO 4.4: Pick up 19-20-21-23-24-26 stitches in one side of domino square from 3rd row and pick up 20-21-22-24-25-27 stitches in one side of next domino square from 3rd row = 39-41-43-47-49-53 stitches. Work whole domino square. DOMINO 4.5: Pick up 19-20-21-23-24-26 stitches in left side of domino square 3.4 and slip the next 20-21-22-24-25-27 stitches from stitch holder towards mid back back on double pointed needles size 3.5 mm = 39-41-43-47-49-53 stitches. Work whole domino square. DOMINO 4.6: Slip the last 19-20-21-23-24-26 stitches from stitch holder mid back back on double pointed needles 3.5 mm and pick up 20-21-22-24-25-27 stitches in right side of domino square 3.1 = 39-41-43-47-49-53 stitches. Work whole domino square. DOMINO 4.7 TO 4.9: Pick up 19-20-21-23-24-26 stitches in one side of domino square from 3rd row and pick up 20-21-22-24-25-27 stitches in one side of next domino square from 3rd row = 39-41-43-47-49-53 stitches. Work whole domino square. DOMINO 4.10: Pick up 20-21-22-24-25-27 stitches in left side of domino square 3.4 and slip the next 19-20-21-23-24-26 stitches from stitch mid front back on double pointed needles size 3.5 mm = 39-41-43-47-49-53 stitches. Work whole domino square. Now 6 stitches remain on stitch holder towards mid front. 10 domino squares have been worked on 4th row with domino. 5TH ROW WITH DOMINO: DOMINO 5.1: Pick up 21-22-23-25-27-29 stitches in right side of domino square 4.1 and work HALF DOMINO SQUARE (vertical) – see explanation above. DOMINO 5.2 TO 5.10: Pick up 21-22-23-25-27-29 stitches in one side of domino square from 4th row and pick up 22-23-24-26-28-30 stitches in one side of next domino square from 4th row = 43-45-47-51-55-59 stitches. Work whole domino square. DOMINO 5.11: Pick up 21-22-23-25-27-29 stitches in left side of domino square 4.10 and work half domino square (vertical). 9 whole domino squares and 2 half domino squares (vertically) have been worked on 5th row with domino. 6TH ROW WITH DOMINO: DOMINO 6.1 TO 6.10: Pick up 21-22-23-25-27-29 stitches in one side of domino square from 5th row and pick up 22-23-24-26-28-30 stitches in one side of next domino square from 5th row = 43-45-47-51-55-59 stitches. Work whole domino square. 10 domino squares have been worked on 6th row with domino. 7TH ROW WITH DOMINO: DOMINO 7.1 TO 7.9: Pick up 21-22-23-25-27-29 stitches in one side of domino square from 6th row and pick up 22-23-24-26-28-30 stitches in one side of next domino square from 6th row = 43-45-47-51-55-59 stitches. Work HALF DOMINO SQUARE (horizontal) - see explanation above. 9 half domino squares have been worked (horizontally) on 7th row with domino. On each domino 23-23-25-27-29-31 stitches have been slipped on a stitch holder (work an edge over these stitches later). Fasten all yarns. LEFT BAND: Work band in blue lagoon. Slip the 6 stitches from stitch holder in left side of piece back on double pointed needles size 3.5 mm. Work in garter stitch back and forth for approx. 13-14-14-15-17-18 cm, adjust measurement to domino square mid front (= domino square 5.1). Then work short rows over band stitch, begin from right side as follows: ROW 1: Work until 1 stitch remains, turn piece. ROW 2: Slip 1 stitch knitwise, tighten yarn and work back. ROW 3: Work until 2 stitches remain, turn piece. ROW 4: Work as 2nd row. ROW 5: Work until 3 stitches remain, turn piece. ROW 6: Work as 2nd row. ROW 7: Work until 4 stitches remain, turn piece. ROW 8: Work as 2nd row. Insert 1 marker in band, NOW MEASURE PIECE FROM HERE! Then work in garter stitch over all stitches. When band measures 9-10-10-11-12-13 cm from marker (adjust measurement according to domino 6.1) slip stitches on a stitch holder. Sew band to domino square 5.1 and 6.1 in outermost loop of edge stitch. RIGHT BAND: Work as left band, but sew the first 13-14-14-15-17-18 cm to domino square 5.11. Work the short rows over band stitches as on left band but begin from wrong side. Sew the last 9-10-10-11-12-13 cm to domino square 6.10. Slip stitches on a stitch holder. Sew band to domino square 5.11 and 6.10 in outermost loop of edge stitch. EDGE: Work edge in blue lagoon. Band (= 6 stitches) in each side of piece has been slipped on stitch holders and every domino has 23-23-25-27-29-31 stitches slipped on stitch holder = 219-219-237-255-273-291 stitches in total on stitch holders. Slip stitches back on circular needle size 3.5 mm. Work 2 ridges AT THE SAME TIME on first row (= from right side) increase 4-6-6-7-6-7 stitches evenly over every half domino square (= 27-29-31-34-35-38 stitches on every domino = 36-54-54-63-54-63 stitches increased in total) – read INCREASE TIP-2 = 255-273-291-318-327-354 stitches in total. NOTE! If the edge is tight, increase more stitches in every domino. Loosely cast off. SLEEVE: Work sleeves in blue lagoon. Slip the 72-76-80-82-90-92 stitches from stitch holder back on double pointed needles size 3.5 mm and pick up 1 stitch in each of the 8-8-8-12-12-12 stitches cast on under sleeve = 80-84-88-94-102-104 stitches. Insert 1 marker in the middle of the new stitches under the sleeve. Work sleeves in the round in GARTER STITCH - see explanation above. When piece measures 2 cm, decrease 1 stitch on each side of marker (= 2 stitches decreased) - read DECREASE TIP. Decrease like this every 9th-8th-8th-7th-6th-5th round 16-17-17-19-22-22 times in total = 48-50-54-56-58-60 stitches. When piece measures 35-33-33-32-31-30 cm, adjust so that last round is purled. Work 4 ridges in stripes, work first stripes in light pearl grey. Cast off, make sure to avoid a tight cast-off edge, cast off with 1 larger needle size if needed. Sleeve measures approx. 37-35-35-34-33-32 cm from where sleeve was divided from body. Work the other sleeve the same way. ASSEMBLY: Sew on buttons on left band. |
|||||||||||||||||||
Diagram explanations |
|||||||||||||||||||
|
|||||||||||||||||||
 |
|||||||||||||||||||
 |
|||||||||||||||||||
Have you finished this pattern?Tag your pictures with #dropspattern #atlantisjacket or submit them to the #dropsfan gallery. Do you need help with this pattern?You'll find 28 tutorial videos, a Comments/Questions area and more by visiting the pattern on garnstudio.com. © 1982-2026 DROPS Design A/S. We reserve all rights. This document, including all its sub-sections, has copyrights. Read more about what you can do with our patterns at the bottom of each pattern on our site. |
|||||||||||||||||||


With over 40 years in knitting and crochet design, DROPS Design offers one of the most extensive collections of free patterns on the internet - translated to 17 languages. As of today we count 324 catalogues and 12290 patterns translated into English (UK/cm).
We work hard to bring you the best knitting and crochet have to offer, inspiration and advice as well as great quality yarns at incredible prices! Would you like to use our patterns for other than personal use? You can read what you are allowed to do in the Copyright text at the bottom of all our patterns. Happy crafting!
Post a comment to pattern DROPS 188-14
We would love to hear what you have to say about this pattern!
If you want to leave a question, please make sure you select the correct category in the form below, to speed up the answering process. Required fields are marked *.