
Popular categories
Looking for a yarn?


Comments / Questions (61)
![]() Sabine wrote:
Sabine wrote:
Bonjour, Comment s'appelle ce point fantaisie SVP, est-ce qu'il porte un nom ? Il n'y a pas de vidéo pour ce point ? Point fantaisie : (sur un nombre de mailles multiple de 2) R 1 : *glisser 1 m à l'end, 1 m end, passer la m glissée par dessus la m tricotée, puis la tricoter à l'end* répéter de * à* R 2 : à l'envers Répéter les rangs 1 et 2
01.02.2021 - 23:26DROPS Design answered:
Bonjour Sabine, s'il porte un nom, nous ne le connaissons pas, désolés. Nous n'avons pas encore de vidéo sur ce point. Tricotez bien comme indiqué au 1er rang par ex: glissez 1 m comme pour la tricoter à l'endroit, tricotez la maille suivante à l'endroit, avec l'aiguille gauche, passez la maille glissée par-dessus la maille tricotée, et tricotez maintenant cette maille à l'endroit. Répétez ces 2 mailles tout le long du rang, sur l'envers, tricotez à l'envers. Bon tricot!
02.02.2021 - 10:23
![]() Linda Palmer wrote:
Linda Palmer wrote:
The pattern in the knitting direction consists of two stitches. There is no mention of how to do the increases. If I have a marker at 55 stitches, (odd number) how do I increase , breaking up the two-stitch pattern of: “S1, K1, PSSO, leaving it on the left needle then knit?” There is much information regarding the decreases, but none on the increases.
16.08.2020 - 22:20DROPS Design answered:
Dear Mrs Palmer, you first slip 1 stitch as if to purl, then knit the next stitch, then pass the slipped stitch back onto left needle and knit this stitch = you still have 2 stitches. Repeat all the row. Happy knitting!
17.08.2020 - 09:10
![]() Giovanna wrote:
Giovanna wrote:
Cortesemente vorrei sapere come riprendere le maglie dai quadrati ad uncinetto per poi lavorare 220 punti a maglia, non ho trovato un video esplicativo. Grazie per la disponibilità
11.08.2020 - 22:00DROPS Design answered:
Buongiorno Giovanna. Riprende le maglie nelle catenelle dei quadrati sottostanti. Può aiutarsi con un uncinetto, puntandolo nelle catenella, prendendo il filo e mettendo poi il filo sul ferro. Buon lavoro!
12.08.2020 - 10:08
![]() House wrote:
House wrote:
Je tricote la taille S du modèle. j'en suis au moment où je dois partager le travail , donc à 29 CMS de hauteur totale. je lis un peu plus loin qu'il faut tricoter chaque partie séparément. ok. et horreur, un peu plus loin, je lis qu'il faut rabattre pour l'encolure à 26 CMS de hauteur totale! Est-ce que j'aurais dû rabattre pour l'encolure avant de séparer le travail? Je ne comprends pas! Merci de m'éclairer.
30.06.2020 - 16:41DROPS Design answered:
Bonjour Mme House, et oops faute de frappe, en taille S, il fallait lire 19 cm pour la division de l'ouvrage - correction faite. Vous continuez ensuite chaque partie séparément et rabattez pour l'encolure à 23 cm. Désolée pour cette erreur. Bonne continuation!
30.06.2020 - 18:36
![]() SusanneH wrote:
SusanneH wrote:
Danke für die Erläuterung zum Muster von 64-8. Um sicher zu gehen: Wenn ich wie zum linksstricken abheben, habe ich dann den Faden VOR der Arbeit? Nochmals Danke!
09.06.2020 - 10:33DROPS Design answered:
Liebe SusanneH, Faden muss immer hinter sein. Viel Spaß beim stricken!
09.06.2020 - 13:32
![]() SusanneH wrote:
SusanneH wrote:
Wenn ich dem Muster folge, sieht es nicht aus, wie auf dem Bild. Muss ich die übergezogene Masche von der linken Nadel rechts oder rechtsverschränkt abstricken? Letzteres sieht eher aus wie auf dem Bild, aber nicht genau. Könnte es ein kurzes Video dazu geben?
08.06.2020 - 20:04DROPS Design answered:
Liebe SusanneH, die 1. Masche wie beim links abheben, die 2. Masche rechts stricken, dann die abgehobene Maschen über die 1. Masche ziehen, und diese Masche wieder auf linken Nadeln um diese Masche "normal" rechts zu stricken, dh nicht verschränkt sondern in den vorderen Glied der Masche. Viel Spaß beim stricken!
09.06.2020 - 09:56
![]() MARGHERITA wrote:
MARGHERITA wrote:
DOPO AVER LASCIATO LA MAGLIA NON LAVORATA SUL FERRO SINISTRO COME BISOGNA LAVORARLA AL DRITTO SUL DAVANTI O SUL DIETRO? GRAZIE
08.06.2020 - 14:18DROPS Design answered:
Buongiorno Margherita. Lavora la maglia a diritto normale. Buon lavoro!
09.06.2020 - 11:00
![]() Wenche Aasprong wrote:
Wenche Aasprong wrote:
Mønsteret mitt blir skjevt og ikke rett over hverandre, hva gjør jeg feil? Synes mønsteret er kjempevanskelig.
29.03.2020 - 13:32
![]() Norah wrote:
Norah wrote:
Comme plusieurs autres tricoteuses en commençant à faire le point fantaisie de ce modèle je constate que le point fait partir le travail en biais, j'ai essayé en faisant bien les mailles qui se croisent les unes au dessus des autres mais la côte ainsi obtenue part en biais, j'ai également essayé en décalant le motif d'une maille et le travail part aussi sur le côté et en plus il n'y a plus de côtes ! Du coup, je vais essayer de le réaliser en point de riz...
13.03.2020 - 13:31DROPS Design answered:
Bonjour Norah, quand vous tricotez le 1er rang procédez ainsi sur 2 mailles: *glissez la 1ère m comme pour la tricoter à l'endroit sur l'aiguille droite, tricotez la 2ème maille à l'endroit, attrapez la 1ère maille avec l'aiguille gauche et passez-la par-dessus la 2ème maille (celle que vous avez tricoté à l'endroit) puis tricotez cette maille (= la 1ère, celle que vous aviez glissé) à l'endroit*. Répétez toujours de *à* et tricotez les mailles à l'envers sur l'envers. Ce sont toujours les 2 mêmes mailles que vous tricotez ainsi, donc le tricot doit rester droit. Bon tricot!
13.03.2020 - 14:46
![]() Brili wrote:
Brili wrote:
Bonjour, Pensez-vous qu'il serait possible de convertir ce modèle pour qu'il soit entièrement réalisé au crochet, en ms ou en brides?
29.02.2020 - 20:58
|
|
Beachside Garden#beachsidegardentop |
|
 |
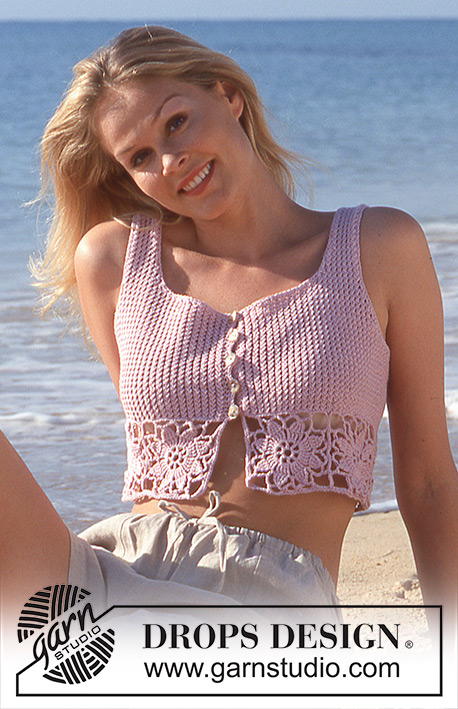 |
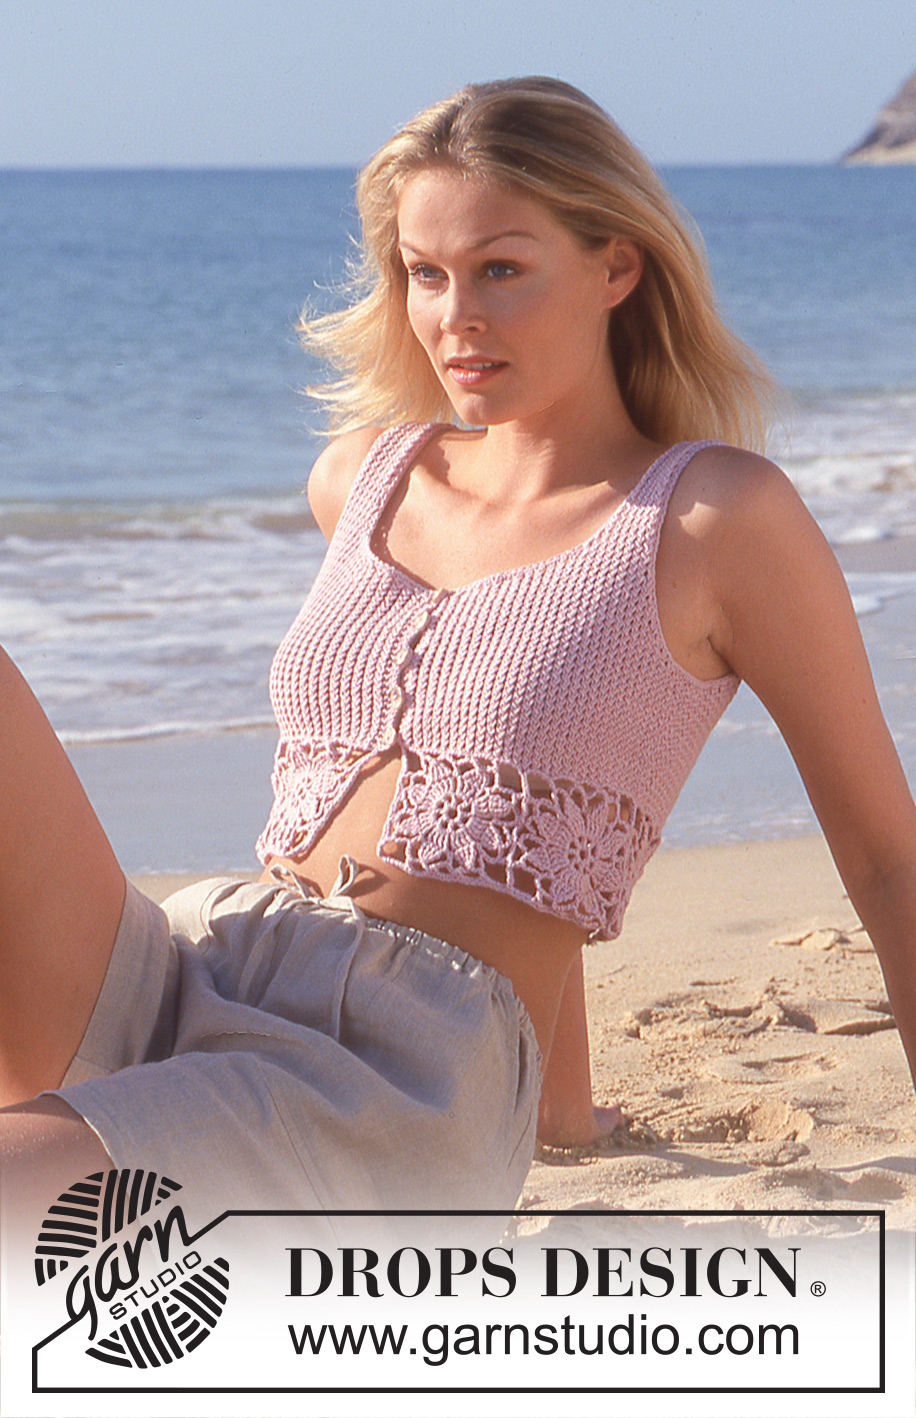
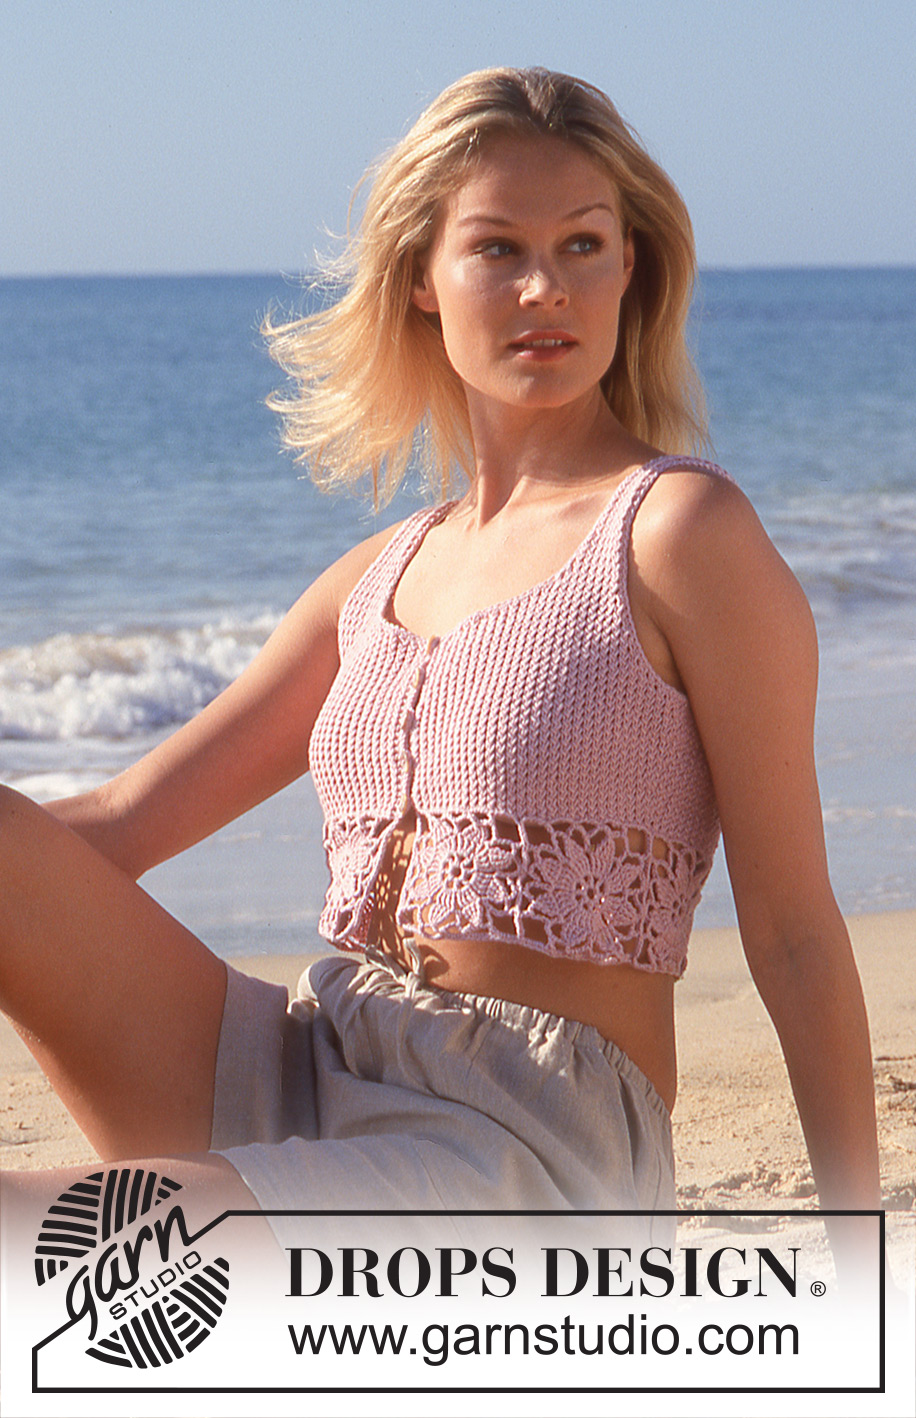
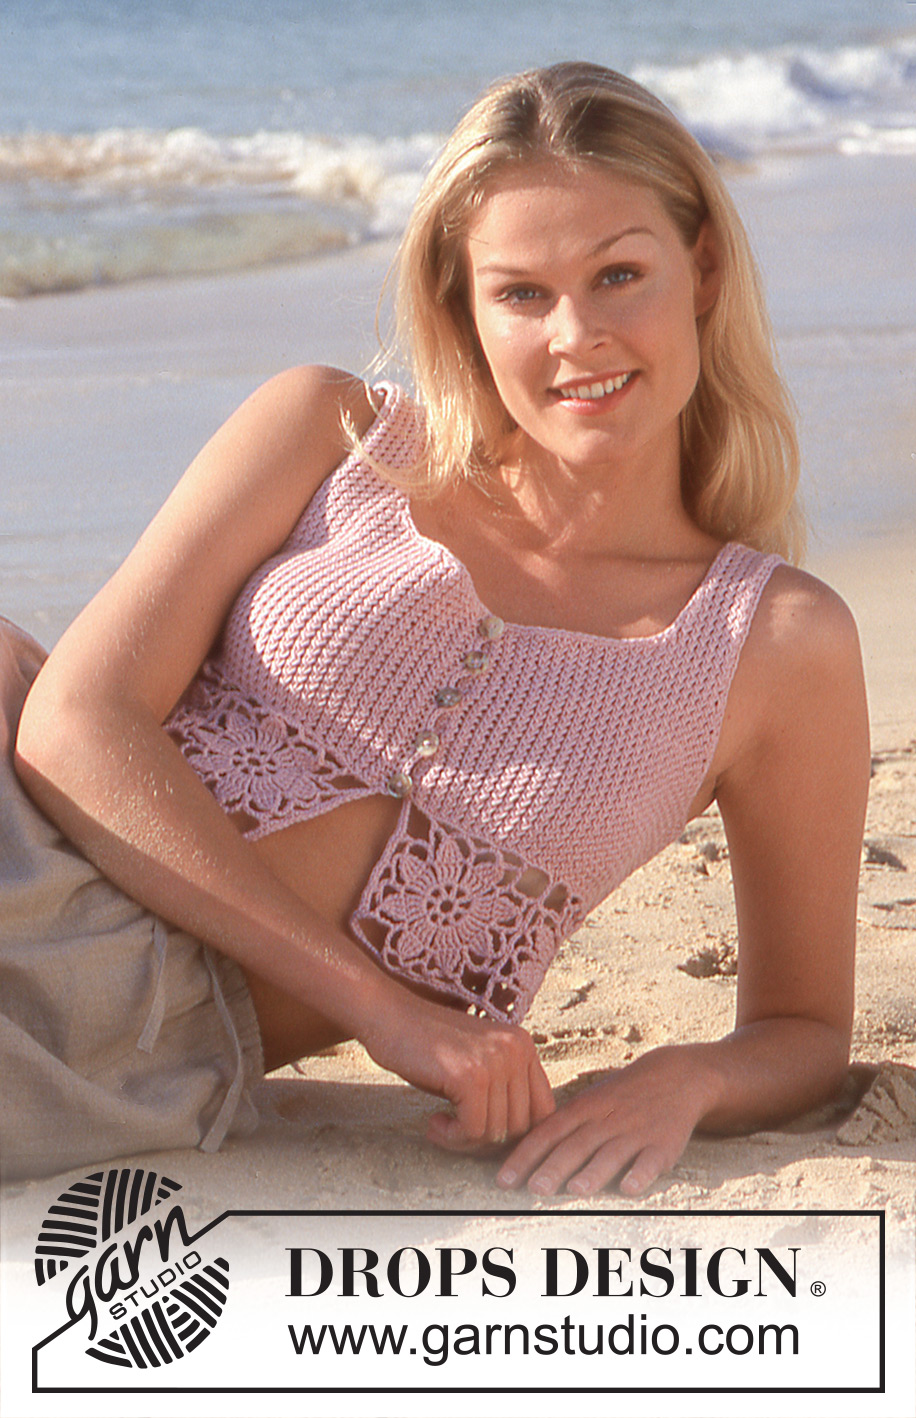
Knitted DROPS short top with crochet flower squares in Safran
DROPS 64-8 |
|
|
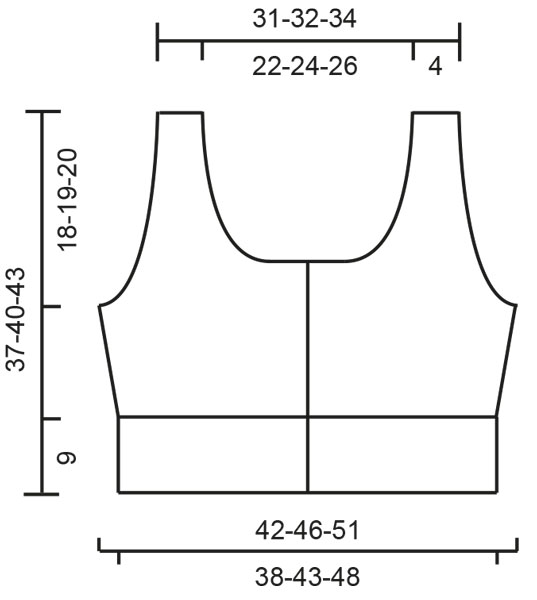
PATTERN: Pattern is divisible by 2. Row 1: * slip one st as if to K, K 1, pass the slipped st over 1 K and leave the slipped st on left needle, K the slipped st *, repeat from *-*. Row 2: K2, purl all stitches and finish with K2. Repeat 1st and 2nd row. Garter st: 1 ridge = 2 rows. Row 1: K all sts, 2nd row: K all sts. Knitting tip: All dec are done on RS of piece inside 1 edge st that is worked in garter st. Dec 2 st as follows: After 1 edge st: Slip 1 st as if to K, K 2 tog, pass slipped st over 2 K tog. Before 1 edge st: K 3 tog. Dec 1 st as follows: After 1 edge st: Slip 1 st as if to K, K 1, pass slipped st over 1 K. Before 1 edge st: K 2 tog. Crochet flower square: Work 8 ch on hook size 3.5 mm with light pink and form a ring with 1 sl st. ROW 1: * 1 tr (first tr is replaced with 3 ch) 2 ch *, repeat from *-* 8 times, finish with 1 sl st in first tr. ROW 2: * 4 dtr (first dtr is replaced with 4 ch), around ch-space, 2 ch *, repeat from *-* 8 times, finish with 1 sl st in first tr. ROW 3: * work 4 dtr tog (first dtr is replaced with 4 ch) = wait with last YO and pull through in each dtr until all dtr are worked, YO and pull YO through all sts on hook (work 1 dtr in each of the dtr from previous row), 6 ch, 1 tr around the 2 ch from previous row, 6 ch, * repeat from *-* 8 times, finish with 1 sl st in first dtr-group. ROW 4: Work sl sts until middle of ch-space, 1 ch, 1 dc around ch-space, * 5 ch, 1 dc around next ch-space, 5 ch, 1 tr around next ch-space, 10 ch, 1 tr around next ch-space (= corner), 5 ch, 1 dc around next ch-space *, repeat from *-* 3 times in total, then 5 ch, 1 dc around next ch-space, 5 ch, 1 tr around next ch-space, 10 ch, 1 tr around next ch-space (= corner), 5 ch, finish with 1 sl st in first dc. Top: Work 8-9-10 flower squares - see explanation above. Sew them tog in to a long strip - sew edge to edge in outer loops of edge sts. Pick up 220-244-272 sts (incl 2 edge sts in each side towards mid front) on needle size 3 mm with light pink in ch-row at the top of the crochet strip - pick up sts with 1 strand to get a nice transition. Insert 1 marker in piece after 55-61-68 sts and 1 marker after 165-183-204 sts. Work Pattern - see explanation above, but work the outermost 2 sts in each side in garter st. Remember the knitting tension! At the same time after 1 cm, inc at markers in each side: 2 sts 5 times every 7th-8th-10th row - inc 2 sts next to each other and work them in pattern so that pattern still fits = 240-264-292 sts. When piece measures 19-21-23 cm, work next row as follows: 57-62-68 sts front piece, cast off 8-10-12 sts for armhole, 110-120-132 sts back piece, cast off 8-10-12 sts for armhole, 57-62-68 sts front piece. Now finish each part separately. Right front piece: = 57-62-68 sts. Then cast off for armhole every other row - see Knitting tip: 2 sts 3-5-6 times, 1 st 6-5-6 times = 45-47-50 sts. When piece measures 23-24-26 cm, cast off 24-26-29 sts towards mid front for neck line. Continue to cast off towards the neck on every other row - see Knitting tip: 2 sts 3 times, 1 st 3 times = 12-12-12 sts remain on each shoulder. Then work Pattern, but work 1 st in each side in garter st. Cast off when piece measures 37-40-43 cm. Left front piece: Work as right front piece but reversed. Back piece: 110-120-132 sts. Then cast off for armholes as on front piece = 86-90-96 sts. When piece measures 23-24-26 cm, cast off the middle 44-48-54 sts for neck line. Continue to cast off towards the neck on every other row - see Knitting tip: 2 sts 3 times, 1 st 3 times = 12-12-12 sts remain on each shoulder. Then work Pattern, but work 1 st in each side in garter st. Cast off when piece measures 37-40-43 cm. Assembly: Sew tog straps on shoulder. Crochet around the armholes on hook size 3.5 mm with light pink: 1 row with dc - inside 1 edge st. Work 5 buttonholes evenly down along right band - work first buttonhole at the top, work the last before flower squares beg. Work - inside 2 edge sts - beg at the top as follows: ROW 1: 5 ch (= 1 buttonhole), skip 1 cm, work dc until next buttonhole. ROW 2: Work 4 dc around ch-space (= buttonhole) and work sl sts between buttonholes. After 2nd row: Continue to work dc around the neck line, down along left front piece and around the entire flower row. Sew on buttons. |
|
 |
|
Have you finished this pattern?Tag your pictures with #dropspattern #beachsidegardentop or submit them to the #dropsfan gallery. Do you need help with this pattern?You'll find 28 tutorial videos, a Comments/Questions area and more by visiting the pattern on garnstudio.com. © 1982-2026 DROPS Design A/S. We reserve all rights. This document, including all its sub-sections, has copyrights. Read more about what you can do with our patterns at the bottom of each pattern on our site. |
|


With over 40 years in knitting and crochet design, DROPS Design offers one of the most extensive collections of free patterns on the internet - translated to 17 languages. As of today we count 325 catalogues and 12298 patterns translated into English (UK/cm).
We work hard to bring you the best knitting and crochet have to offer, inspiration and advice as well as great quality yarns at incredible prices! Would you like to use our patterns for other than personal use? You can read what you are allowed to do in the Copyright text at the bottom of all our patterns. Happy crafting!
Post a comment to pattern DROPS 64-8
We would love to hear what you have to say about this pattern!
If you want to leave a question, please make sure you select the correct category in the form below, to speed up the answering process. Required fields are marked *.