
Popular categories
Looking for a yarn?


Comments / Questions (48)
![]() Gitte wrote:
Gitte wrote:
Jeg kan ikke finde video på opskrift 176-25 Strikkes der på vangpinden uden mønster og bare rat?
06.04.2026 - 21:49DROPS Design answered:
Hei Gitte. Har dessverre ingen video. Når det strikkes fra vrangen (blank firkant i diagrammet) strikkes disse vrang (fra vrangen). mvh DROPS Design
07.04.2026 - 13:21
![]() Laura wrote:
Laura wrote:
Quanti gr di filato sono necessari per la taglia S/M ? grazie
09.02.2025 - 10:59DROPS Design answered:
Buongiorno Laura, può trovare la quantità di filato necessaria per i modelli DROPS di fianco alla foto. Per questo modello nella taglia S/M sono necessari 350 g di Bomull-Lin. Buon lavoro!
09.02.2025 - 11:08
![]() Sussie Rosberg wrote:
Sussie Rosberg wrote:
Vet inte vad jag gör för fel,jag har dragit upp arbetet 8 ggr nu. Rad 3,5,9,11 det är alltid på dessa rader det blir fel när halva ihoptagningen är mellan A o B Eller/och B och C Jag får bara inte ihop det oavsett om jag skjuter på mönstret eller stickar som det är där sista och första ihoptagningen blir en maska när jag repeterar B. Provar en gång till sen lägger jag ner.
20.02.2024 - 13:31DROPS Design answered:
Hej Sussie, hvis du prøver at tænke på hele rækken, så på pind 3 har du altid 3 r imellem hver hulmønster. På pind 5 har du 2 hulm, 1rm, 2hulm, 1rm, 2hulm, 2r osv...
23.02.2024 - 13:11
![]() Susan Hoff wrote:
Susan Hoff wrote:
Hello! I am new to chart reading and am having trouble deciphering how to properly do the A.2 B repeat on rows 3,7,11, and 15. There are "knit 2 tog" stitches between A.2 A and A.2 B. Where do I start and end the repeat? Thank you so much for your time. Susan H.
27.10.2023 - 19:09DROPS Design answered:
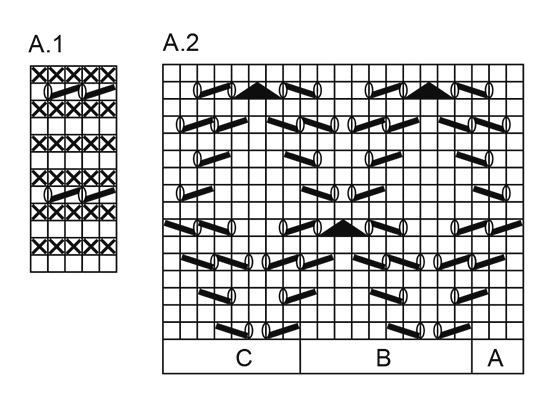
Dear Mrs Hoff, on row 3 for ex, work the last st in A.together with the first stitch B = this is now the new last st in A and the yarn over is now the first st in B; at the end of B, work tog the last st B with the first st next B / C; this is now the new last stitch B and the yarn over is the new first st next B/C. Same for all these row where the sts are worked together with the next stitch. Happy knitting!
28.10.2023 - 08:55
![]() Vanessa wrote:
Vanessa wrote:
This is my first ever chart! Why is A.1 shorter than A.2..? The shortness is making me so confused as the pattern instructions include A.1 from the beginning but comparing the charts makes it looks like it doesn't start until row 9, as that is where it lines up with A.2! Thank you 😊
26.10.2023 - 08:25DROPS Design answered:
Dear Vanessa, different charts may have different lengths because the pattern is shorter. So A.1 is a 12-row pattern, which will start over after every 12th row. Meanwhile, A.2 is a 16-row pattern, which will be repeated vertically/ start over after every 16th row. They don't need to be aligned between themselves; A.1 are the edges of the piece and A.2 the rest of the poncho. Happy knitting!
29.10.2023 - 19:46
![]() Sheila wrote:
Sheila wrote:
Hi. I’ve been working on this and I am almost halfway and still am confused on how to make the side piece that connects to the front. The diagram is showing it as an “L” shape but the directions tell me to make it as just a “l” shape. This would mean that the back goes straight across and not down to a point as the front goes. Am I missing something? Is there a view of the back once assembled? Do I make a separate piece and attach it ?
21.09.2023 - 15:59DROPS Design answered:
Dear Sheila, in this video we are showing how to sew this kind of poncho, ie you work a long band then one of the short side is sewn along the side of the long side. Hope it will help you. Happy knitting!
21.09.2023 - 16:58
![]() Sharon Hunt wrote:
Sharon Hunt wrote:
Hello! I am knitting the 7th of 8 balls of yarn and the length is 96 cm. Will this be enough to get to the length stayed in the pattern? Am a chubby, short girl would that affect how long to make this? I would really hate to have to rip this our since everything else is going ok. I am also still confuse as to how this is supposed to be sewn.
26.04.2023 - 17:29DROPS Design answered:
Dear Mrs Hunt, did you get correct tension in both width (17 sts = 10 cm) and height (22 rows = 10 cm)? If you need more rows for 10 cm, you might require more yarn. In this video, we show how to assembly such a poncho, this might help you. Happy knitting!
27.04.2023 - 08:06
![]() Sharon Hunt wrote:
Sharon Hunt wrote:
Hi started making this poncho and bought 8 balls of yarn for the project. Am still making the largest size but the length of the small size. The yarn is still not enough. I have used up 5 and half balls and the length is 33.5 inches. This is really strange. Disappointing that yarn bought for the large is not enough for the small. Are measurements before or after blocking? Seems like I have to order more yarn to finish this. Am knitting to gauge. Ladies at the drops store is confused too
22.04.2023 - 15:57DROPS Design answered:
Dear Sharon, if the gauge matches the one in the pattern, then the quantities should be correct. The measurements are from before assembling. That is, it's the final measument of the rectangle right before you start to sew it. In any case, if you have 5.5/8 balls used and you are 3/4 of the garment done, you should have enough to finish. Happy knitting!
23.04.2023 - 18:29
![]() Sharon Hunt wrote:
Sharon Hunt wrote:
Glad to report that I figured it out. The chart is correct and the problem was me. The pattern is a joy to knit once one figures it out.
08.04.2023 - 20:07
![]() Sharon Hunt wrote:
Sharon Hunt wrote:
Hi! I have been working on this pattern for days now ripping and starting multiple time. I have inserted markers after each repeat and have colour coded Lines between a, b, c pattern. I have double checked after each pattern repeat to make sure that I have the amount of stitches between same. I have counted after each row to make sure I have 91 sts every time but twice now I have ended up with 1 stitch more on one row. Now am on row 11 and there is not enough stitches to complete this row.
08.04.2023 - 11:43
|
|||||||||||||||||||
Inayah#inayahponcho |
|||||||||||||||||||
|
|
|||||||||||||||||||
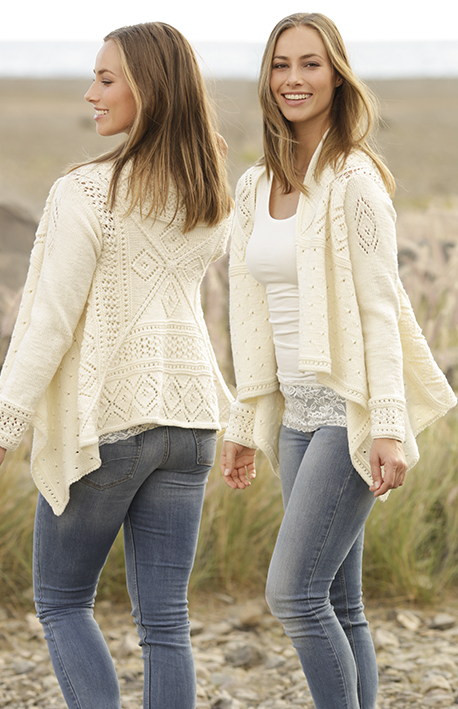
Knitted poncho with lace pattern in DROPS Bomull-Lin. Sizes S - XXXL.
DROPS 176-25 |
|||||||||||||||||||
|
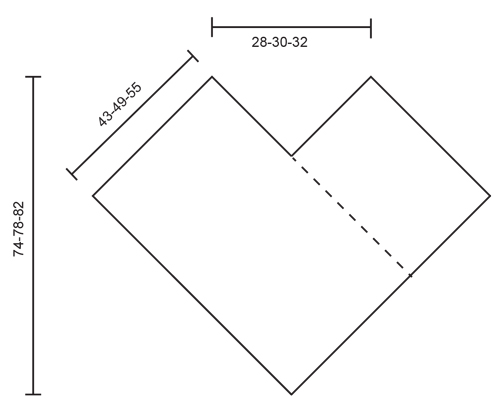
RIDGE/GARTER STITCH (worked back and forth): 1 ridge = Knit 2 rows. PATTERN: See diagrams A.1 and A.2. The diagrams show all rows in the pattern from the right side. ---------------------------------------------------------- PONCHO: The piece is worked back and forth like a scarf and is sewn into a poncho at the end. Cast on 71-81-91 stitches with circular needle size 5 mm and Bomull-Lin. Work 2 RIDGES – see description above, then work as follows – from the right side: A.1 (= 5 stitches), A.2 A (= 3 stitches), A.2 B across the next 50-60-70 stitches, A.2 C (= 8 stitches), finish with A.1. REMEMBER THE KNITTING TENSION! Repeat the pattern in height. Continue in this way until the piece measures 43-49-55 cm. Insert 1 marker in the side of the piece, the cast-off edge will be sewn from this marker later. Continue to work with the pattern as before until the piece measures 112-121-130 cm. Cast off. ASSEMBLY: Sew the short side (= cast-off edge) together with the long side, from the marker and down to the cast-on edge. Sew in the outermost loop of the outermost stitch. The opposite long side now makes a tip mid front. |
|||||||||||||||||||
Diagram explanations |
|||||||||||||||||||
|
|||||||||||||||||||
 |
|||||||||||||||||||
 |
|||||||||||||||||||
Have you finished this pattern?Tag your pictures with #dropspattern #inayahponcho or submit them to the #dropsfan gallery. Do you need help with this pattern?You'll find 18 tutorial videos, a Comments/Questions area and more by visiting the pattern on garnstudio.com. © 1982-2026 DROPS Design A/S. We reserve all rights. This document, including all its sub-sections, has copyrights. Read more about what you can do with our patterns at the bottom of each pattern on our site. |
|||||||||||||||||||


With over 40 years in knitting and crochet design, DROPS Design offers one of the most extensive collections of free patterns on the internet - translated to 17 languages. As of today we count 324 catalogues and 12290 patterns translated into English (UK/cm).
We work hard to bring you the best knitting and crochet have to offer, inspiration and advice as well as great quality yarns at incredible prices! Would you like to use our patterns for other than personal use? You can read what you are allowed to do in the Copyright text at the bottom of all our patterns. Happy crafting!
Post a comment to pattern DROPS 176-25
We would love to hear what you have to say about this pattern!
If you want to leave a question, please make sure you select the correct category in the form below, to speed up the answering process. Required fields are marked *.