
Popular categories
Looking for a yarn?


Comments / Questions (169)
![]() Kat White wrote:
Kat White wrote:
I'm very glad that the comments are on here because the pattern is very hard to follow, and I've been knitting since I was 6 years old. Reading other people's questions and the answers to them has been the most helpful thing! For anyone else starting out and getting confused, make sure you look out for the tiny little ovals in the chart that indicate a yarn over between stitches - I missed those and will have to undo and redo an entire round. And I only realised thanks to other comments.
15.01.2020 - 23:59
![]() Lies wrote:
Lies wrote:
In het patroon 171-1 Emerald Queen, moet je beginnen met de opzet met 2 draden. als je 1 draad verwijdert heb je losse steken over, die niet geborgd zijn. hoe werkt dit? je zet op met een hulpdraad, maar hoe krijg je de onderste rij steden dan afgehecht?
29.12.2019 - 14:56DROPS Design answered:
Dag Lies,
Je hoeft de draad niet letterlijk te verwijderen, maar je knipt 1 draad af (welke je later afhecht en wegwerkt) en breit verder met 1 draad. Verwijderen is wat verwarrend opgeschreven :)
04.01.2020 - 19:46
![]() Sandra wrote:
Sandra wrote:
So ich habe zu meiner Frage gerade nochmal nachgedacht.... Stimmt das so? A2a =18 Maschen dann 4 rechte Maschen= Ärmel A3 = 20 Maschen 13 rechte Maschen dann A2b und A2a = insgesamt 20 Maschen 4 rechte Maschen Ärmel A3 dann 13 rechte Maschen und A2b. Insgesamt 110 Maschen. Die folgende Reihe mit Zunahmen wie beschrieben also 122 Maschen? Vielen Dank
06.10.2019 - 22:28DROPS Design answered:
Liebe Sandra, bei der nächsten Zunahmenrunde nehmen Sie 2 M auf jedem Ärmel zu (=insg. 4Maschen) + 4 Maschen bei Vorderteil + 4 Maschen beim Rückenteil = 110+4+4+4= 122 Maschen. Viel Spaß beim stricken!
07.10.2019 - 10:07
![]() Sandra wrote:
Sandra wrote:
Hallo liebes Drops Team. Erstmal vielen Dank für die tollen kostenlosen Anleitungen die ihr immer für uns habt. Ich habe soeben die Tunika in der Größe XXXL angefangen und habe nun 110 Maschen auf der Nadel. Da ich mir nicht ganz sicher über die nächsten 2 Runden bin, können sie mir diese ausnahmsweise nochmals kurz beschreiben wie die Runde mit 110 Maschen. Ich fürchte wenn ich einen Fehler mache habe ich bei dieser Wolle Probleme beim wieder auftrennen. Vielen lieben Dank.
06.10.2019 - 21:44DROPS Design answered:
Liebe Sandra, nach der 1. Runde im Muster haben Sie 110 M, bei der nächsten Runde stricken Sie alle Maschen ohne Zunahmen. Bei der nächsten Runde nehmen Sie bei den Ärmeln (= in jeder 2. Runde 27 x insgesamt + in jeder 4. Reihe 4 x) und gleichzeitig beim Vorder- und Rückenteil nehmen Sie zuerst 2 M beidseitig der M mit der Mark. in jeder 2. Runde 25 x insgesamt dann nur 1 M beidseitig der M mit der Mark in jeder 2. Runde 18 x. dann haben Sie 510 M. Viel Spaß beim stricken!
07.10.2019 - 10:04
![]() Connie wrote:
Connie wrote:
Hvis i skal sætte en sværhed på den her - er den så til at have med at gøre når man ikke er den store strikkeekspert ? er de her snoninger svære ?
10.09.2019 - 20:59DROPS Design answered:
Hej Connie, nej egentlig er den ikke svær, bare man følger opskriften sætning efter sætning. Du kan også se en instruktionsvideo på selve snoningerne, så dem kan du let lære - God fornøjelse :)
12.09.2019 - 10:31
![]() Seija A Skrifvars wrote:
Seija A Skrifvars wrote:
I am looking at the pattern Drops 171-1 on Sept 7, 2019. are the corrections from 2017 included in those diagrams?
07.09.2019 - 17:54DROPS Design answered:
Dear Seija, yes the patterns online include all the corrections reported. Happy crafting!
07.09.2019 - 22:12
![]() Malene Holmboe wrote:
Malene Holmboe wrote:
Kan jeg strikke denne model uden at den kommer til at gå ned i en spids foran og bagpå? Jeg vil gerne strikke den så den bliver lidt lang, men så den går lige over forneden.
10.08.2019 - 18:12DROPS Design answered:
Hej Malene, det er udtagningerne midt foran og bagpå som gør at det formes som en poncho. Men husk at hvis du undlader dem, så vil omkredsen også blive smallere. Vi kan desværre ikke hjælpe dig med at skrive opskriften om :)
16.08.2019 - 10:52
![]() Bonita Poirier wrote:
Bonita Poirier wrote:
Thank you, yes. I tried to delete my question but did not know how. I figured out what to do after I went to bed. Could not sleep and after thinking about it for some time, I figured out how it was to be done. Thank you!
16.05.2019 - 11:51
![]() Bonita Poirier wrote:
Bonita Poirier wrote:
I am making the size large and have the correct number of stitches after the inc. row (94) but can't get the next row to fit. Inc. row has A1's with 18 stitches but next row has A3's with 20 stitches. I have put markers to mark off the A1 groups, the sleeves and the 9 stitches for front and back. Are you able to advise what I am misinterpreting regarding the second row, that is making it not fit the 94 stitches?
16.05.2019 - 06:07DROPS Design answered:
Dear Mrs Poirier, see answer below and let us know if you get it. Happy knitting!
16.05.2019 - 10:11
![]() Bonita Poirier wrote:
Bonita Poirier wrote:
I am making the size large. After the increase row, I have the correct number of stitches, 94. But with that row having all A1, groups of 18 stitches, the next row doesn't fit because of A3 groups that have 20 stitches. Am I misinterpreting something in the row following the increase row? I am using markers to mark the stitches for the A1,groups, the sleeves, and the 9 stitches for the front and back. I can't get the A3 group to fit. Any advice or suggestion?
16.05.2019 - 05:56DROPS Design answered:
Dear Mrs Poirier, A.3 will be worked over the 18 sts in A.1 + the next 2 sts (front piece), then work the next 7 sts on front piece as follows: K1, (inc 2= K1, YO, K1, YO), K1 (=marker), (inc 2= YO, K1, YO, K1), K1, work the next 2 sts in A.2B then A.2A over the next 18 sts - repeat on back piece, ending with A.2B (last 2 sts of the 9 sts of the round). Happy knitting!
16.05.2019 - 10:06
|
|||||||||||||||||||||||||
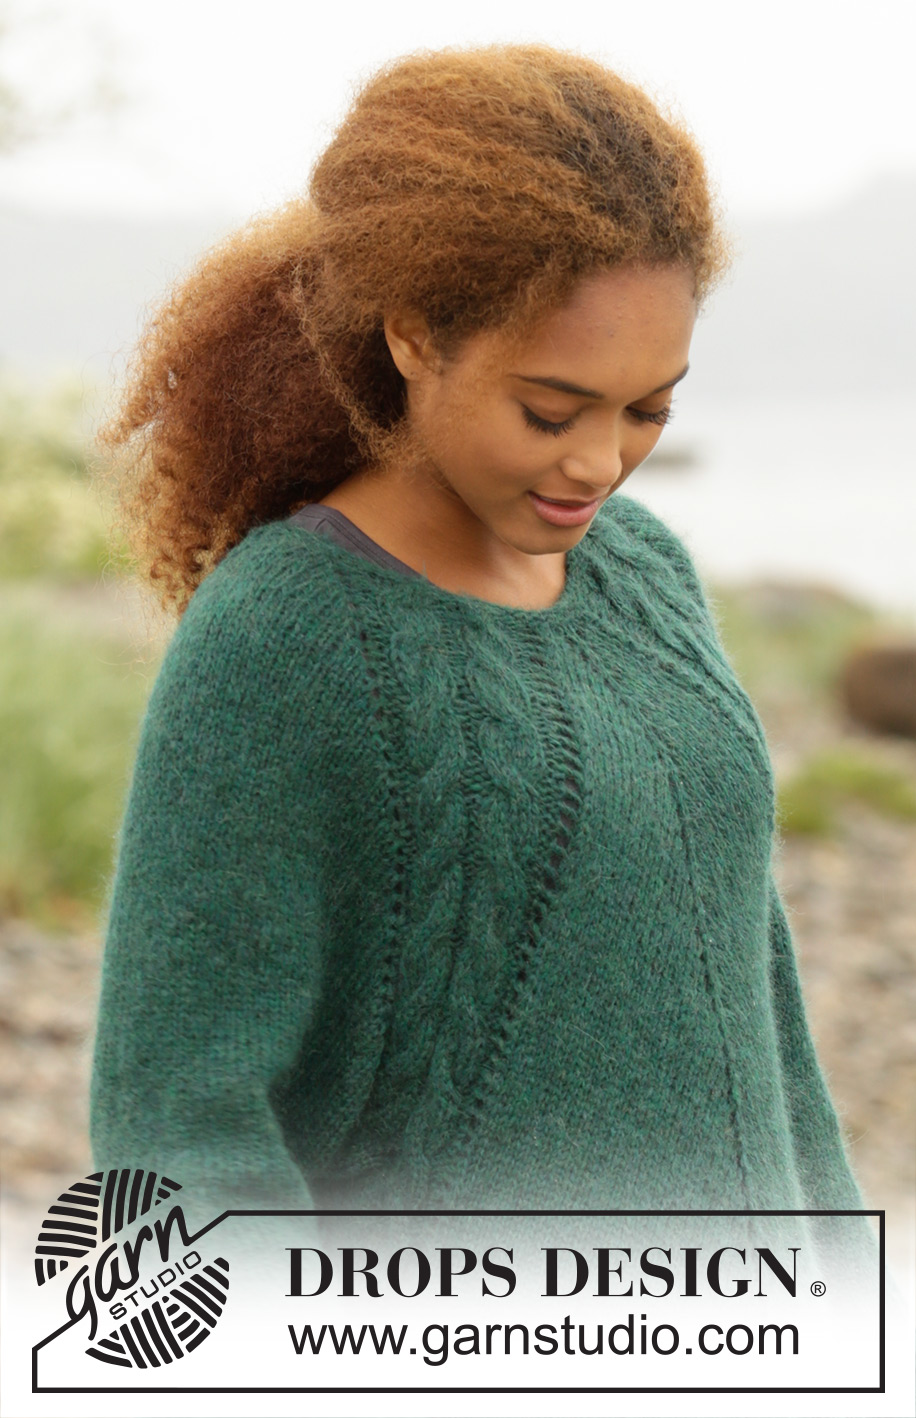
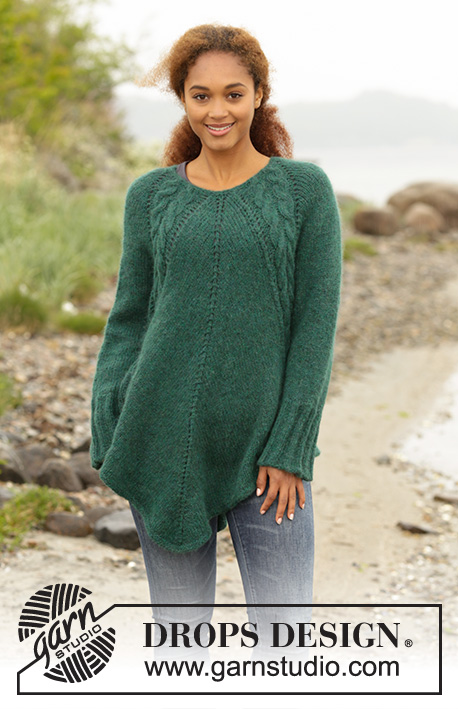
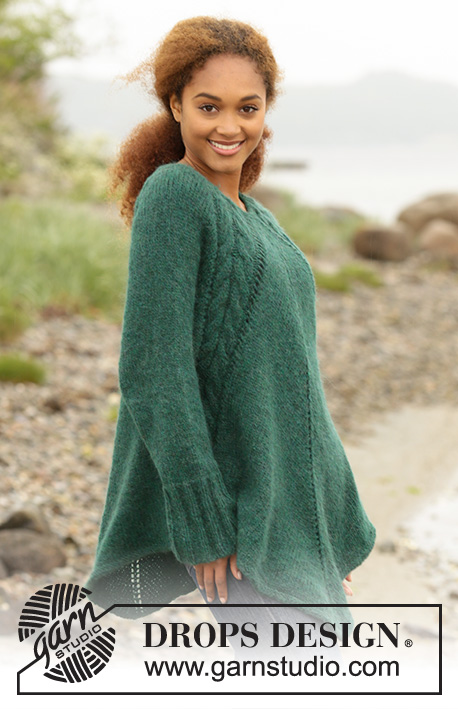
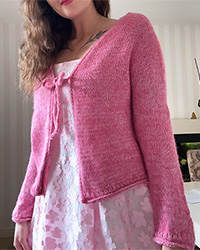
Emerald Queen#emeraldqueensweater |
|||||||||||||||||||||||||
 |
 |
||||||||||||||||||||||||
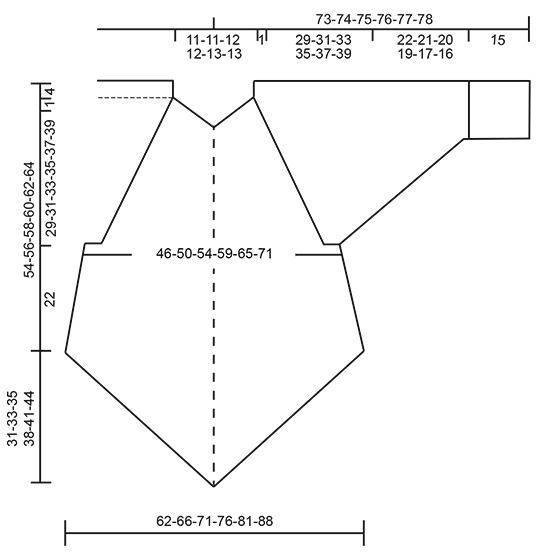
Knitted DROPS tunic with deep raglan and cables, worked top down in ”Air”. Size: S - XXXL.
DROPS 171-1 |
|||||||||||||||||||||||||
|
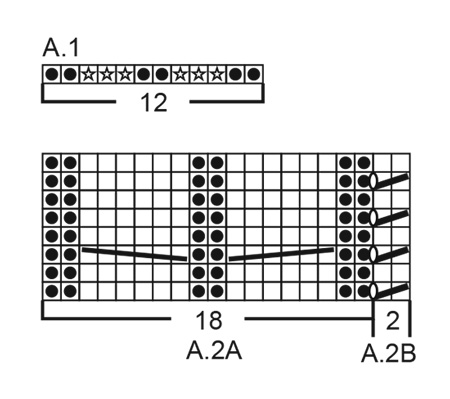
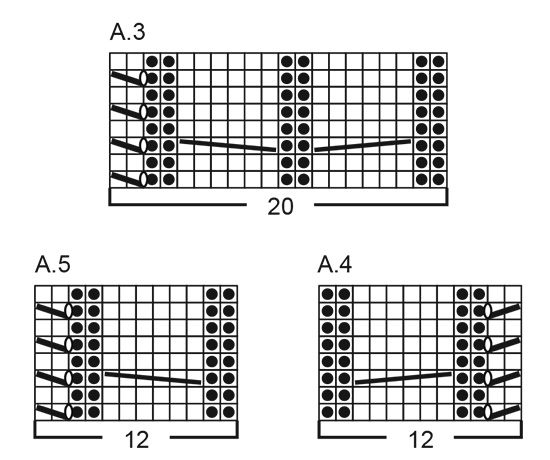
GARTER ST (worked in the round): 1 ridge = 2 rounds. * K 1 round and P 1 round *, repeat from *-*. PATTERN: See diagrams A.1 to A.5. INCREASE FOR SLEEVES: Increase 1 st in each side on each sleeve by increasing after A.2 and before A.3 (= 2 st inc on each sleeve and 4 sts in total on round). Inc 1 st by making 1 yarn over, on next round knit yarn over to make holes. INCREASE MID FRONT AND MID BACK: Increase 2 sts on each side of st with marker thread on mid front and mid back as follows: Knit until 1 st before st with marker thread, make 1 yarn over, knit 1, make 1 yarn over, knit st with marker thread, make 1 yarn over, knit 1, make 1 yarn over (= 4 sts inc mid front/mid back and 8 sts in total on round). On next round knit the 2 yarn overs closest to the st with mid-st to make holes, the outermoste 2 sts should be knit twisted to avoid holes. Increase 1 st on each side of st with marker thread on mid front and mid back as follows: Work until st with maker thread, make 1 yarn over, knit st with maker thread (mid-st), make 1 yarn over (= 2 sts inc mid front/mid back and 4 sts in total on round).On next round knit yarn overs to make holes. KNITTING TIP-1: To avoid the eye let row being interrupted while increasing for sleeves on every 4th row and not on every 2nd row as before, work as follows on the rows that previously had increases: After A.2: Make 1 yarn over, slip 1 st knitvise, knit 1 and pass slipped st over the knit st. Before A.3: Knit until 2 sts before A.3, knit 2 st tog and make 1 yarn over. KNITTING TIP-2: If you want a little less volume on body, it is possible to make some adjustments after dividing for sleeves. Decrease 2 sts mid front and mid back on i.e every 8th round as follows (decrease on a round with increases): Knit until 2 sts before st with marker (= mid-st), knit 2 tog, make 1 yarn over, knit 1 (= mid-st), make 1 yarn over, slip 1 st knitvise, knit 1 and pass slipped st over the knit st (this decrease vil give approx 8 cm less width in total at the end of body). DECREASE TIP (applies to sleeves): Beg 3 sts before marker and dec as follows: K 2 tog, K 2 (marker is in the middle of these 2 sts), slip 1 st as if to K, K 1, psso. ---------------------------------------------------------- TUNIC: Worked in the round on circular needle, top down. YOKE: Cast on 66-66-70-70-74-74 sts on a short circular needle size 4 mm with 2 strands Air. Remove 1 strand and continue with 1 strand Air as follows: Work 2 ridges in GARTER ST - see explanation above. Switch to a short circular needle size 5 mm, work next round as follows: Work A.1 (= 12 sts inc to 18 sts), 2 sts in stocking st (= sleeve), A.1 (= 12 sts inc to 18 sts), 7-7-9-9-11-11 sts in stocking st (insert 1 marker in the middle of these sts = mid front), A.1 (= 12 sts inc to 18 sts), 2 sts in stocking st (= sleeve), A.1 (= 12 sts inc to 18 sts) and 7-7-9-9-11-11 sts in stocking st (insert 1 marker in the middle of these sts = mid back) = 90-90-94-94-98-98 sts on needle. Next round work as follows: Work A.2A (= 18 sts), inc 1 st – READ INCREASE FOR SLEEVES, knit 2, inc 1 st for sleeve, work A.3 (= 20 sts), knit 0-0-1-1-2-2 s, inc 2 sts on each side of st with marker thread – READ INCREASE MID FRONT AND MID BACK, knit 0-0-1-1-2-2 sts, work A.2B (= 2 sts), work A.2A (=18 sts), inc 1 st for sleeve, knit 2 sts, inc 1 st for sleeve, work A.3 (= 20 sts), knit 0-0-1-1-2-2 sts, inc 2 sts on each side of st with marker thread (= mid back) and knit 0-0-1-1-2-2 sts and work A.2B (= 2 sts) = 102-102-106-106-110-110 sts on needle. Then work stocking st in the round with A.2 and A.3 in every transition between body and sleeves. AT THE SAME TIME continue increase for sleeves and increase mid front and mid back as follows: SLEEVES: Increase on every 2nd round 10-13-15-21-23-27 times in total (including the increase explained on firste round), then increase on every 4th round 11-11-11-9-9-8 times in total - READ KNITTING TIP-1. MID FRONT AND MID BACK : Inc 2 sts on every side of st with marker in it on every 2nd round 11-14-15-18-21-25 times in total (including the increases explained on first round). Then increase 1 st on each side of st with marker in it on every 2nd round 21-20-21-21-20-18 times in total. REMEMBER THE KNITTING TENSION! After last increase on body and sleeves there are 346-378-402-442-474-510 sts on needle. Work next round as follows: Work as before over the first 11 sts (= until middle of 2 P sts in A.2), slip the next 62-68-72-80-84-90 sts on a stitch holder (= sleeve), cast on 6-6-8-8-10-12 new sts under sleeve, work as before over the next 111-121-129-141-153-165 sts on front piece(i.e 11 st in A.3, 89-99-107-119-131-143 knit sts, 11 sts in A.2)slip the next 62-68-72-80-84-90 sts on a stitch holder (= sleeve), cast on 6-6-8-8-10-12 new sts under sleeve and work the remaining 100-110-118-130-142-154 sts on back piece as before (i.e 11 sts in A.3 and 89-99-107-119-131-143 knit sts). Finish body and sleeves separately. BODY: = 234-254-274-298-326-354 sts. Insert 1 marker in the piece. Work next round as follows: Work A.4 (12 sts), knit 4-4-6-6-8-10 sts, A.5 (=11 sts), knit until mid-st, make 1 yarn over, knit 1 (= mid-st), make 1 yarn over, knit until A.2, work A.4 (= 12 sts), knit 4-4-6-6-8-10 sts, A.5 (= 12 sts), knit until mid-st, make 1 yarn over, knit 1 (= mid-st), make 1 yarn over and knit the rest of round (= 4 sts increased). Continue pattern like this while AT THE SAME TIME continuing to increase mid front and mid back on every 2nd round until inc has been done 20 times on each side of mid front/mid back from marker - READ KNITTING TIP-2 = 314-334-354-378-406-434 sts on needle (or work until desired length). On next round work sts in each cable K tog 2 by 2 (= 12 sts dec) = 302-322-342-366-394-422 sts. Switch to circular needle size 4 mm and work 2 ridges in garter st in the round over all sts. Switch back to circular needle size 5 mm and cast off (this is done to avoid a tight cast-off edge). SLEEVE: Worked in the round on a short circular needle, switch to double pointed needles when needed. Slip the sts from stitch holder in one side of piece on a short circular needle size 5 mm and pick up 1 st in each of the 6-6-8-8-10-12 sts cast on under sleeve on body = 68-74-80-88-94-102 sts on needle. Insert 1 marker at beg of round (= mid under sleeve) - NOW MEASURE PIECE FROM HERE. Work in stocking st in the round over all sts AT THE SAME TIME on first round dec over the two cables by working sts in each cable K tog 2 by 2 (= 6 sts dec) = 62-68-74-82-88-96 sts. When piece measures 2 cm, dec 2 sts mid under sleeve - READ DECREASE TIP. Dec a total of 12-14-17-20-22-25 times in Size S: On every 4th round, in size M: On every 3rd round, in size L: Alternately on every 2nd and 3rd round, in size XL: On every other round, in size XXL: Alternately on every and every other round and size XXXL. On every round = 38-40-40-42-44-46 sts on needle. Continue to work until piece measures 22-21-20-19-17-16 cm (NOTE: Shorter measurements in the larger sizes because of wider shoulders). K 1 round while AT THE SAME TIME inc 7-10-10-8-11-9 sts evenly = 45-50-50-50-55-55 sts. Switch to double pointed needles size 4 mm and work rib in the round = K 2/P 3. When rib measures 15 cm, switch back to double pointed needles size 5 mm before casting off with K over K and P over P (this is done to avoid a tight cast-off edge). Work the other sleeve the same way. |
|||||||||||||||||||||||||
Diagram explanations |
|||||||||||||||||||||||||
|
|||||||||||||||||||||||||
 |
|||||||||||||||||||||||||
 |
|||||||||||||||||||||||||
 |
|||||||||||||||||||||||||
Have you finished this pattern?Tag your pictures with #dropspattern #emeraldqueensweater or submit them to the #dropsfan gallery. Do you need help with this pattern?You'll find 26 tutorial videos, a Comments/Questions area and more by visiting the pattern on garnstudio.com. © 1982-2026 DROPS Design A/S. We reserve all rights. This document, including all its sub-sections, has copyrights. Read more about what you can do with our patterns at the bottom of each pattern on our site. |
|||||||||||||||||||||||||


With over 40 years in knitting and crochet design, DROPS Design offers one of the most extensive collections of free patterns on the internet - translated to 17 languages. As of today we count 324 catalogues and 12232 patterns translated into English (UK/cm).
We work hard to bring you the best knitting and crochet have to offer, inspiration and advice as well as great quality yarns at incredible prices! Would you like to use our patterns for other than personal use? You can read what you are allowed to do in the Copyright text at the bottom of all our patterns. Happy crafting!
Post a comment to pattern DROPS 171-1
We would love to hear what you have to say about this pattern!
If you want to leave a question, please make sure you select the correct category in the form below, to speed up the answering process. Required fields are marked *.