
Popular categories
Looking for a yarn?


Comments / Questions (67)
![]() Astasia Leblanc wrote:
Astasia Leblanc wrote:
Does this pattern start from the bottom up or top to the bottom???
18.12.2018 - 18:58DROPS Design answered:
Dear Mrs Leblanc, this jumper is worked bottom up, first work the bottom of back and front piece separately for the vents on the side, then work them together in the round to the armholes. Work now the sleeves separately and now work yoke in the round to the elevation on back piece (worked back and forth), then work neck edge. Happy knitting!
19.12.2018 - 08:57
![]() Susanne Thesbjerg wrote:
Susanne Thesbjerg wrote:
Ang. ærmerne; Skal man starte med mønster A1 lige efter udtagning (midt på ærmet) eller? Kan ikke få det til at passe, når man skal strikke de nye masker med. Venlig hilsen Susanne Thesbjerg
13.12.2018 - 15:07
![]() Anita Gregersen wrote:
Anita Gregersen wrote:
Jeg vil gerne strikke denne bluse. Men jeg syntes at Garner er for tykt. Findes der noget garn uden uld? Som måske passer til pinde 3,5 og 4
02.11.2018 - 09:58DROPS Design answered:
Hei Anita. Det er strikkefastheten som avgjør hvilke garn du kan strikke med og hvilken pinnestørrelse du trenger. Denne er strikket med garn fra garngruppe C, og alle garn i denne gruppen har i utgangspunktet samme strikkefasthet. Bomull-Lin og Paris begge bomullsbaserte garn i garngruppe C, om du ikke vil strikke med ull. Vær obs på at bomull har andre kvaliteter enn ull og genseren vil derfor ikke se helt ut som på bildet. Om du vil strikke med tynnere garn anbefaler vi at du finner en oppskrift som er skrevet med garn fra gruppe A eller B, da målene på denne genseren vil bli endret om du har en annen strikkefasthet enn angitt. God fornøyelse.
02.11.2018 - 14:55
![]() Helle Zinck Høegh wrote:
Helle Zinck Høegh wrote:
Kan man ikke med fordel atrikke den på rundpind fra starten? Hvad er tanken med at starte med at strikke frem og tilbage de første 18 cm? Super flot, jeg glæder mig til at komme i gang :)
21.10.2018 - 14:58DROPS Design answered:
Hei Helle. Du strikker forstykke og bakstykke hver for seg de første 18 cm fordi det skal være en splitt i hver side. God fornøyelse.
22.10.2018 - 07:58
![]() Chrystel Bouché wrote:
Chrystel Bouché wrote:
Vous nous demandez de réunir les manches avec le tronc du pull alors que notre ouvrage ne mesure que 39 cm est-ce normal ( 18cm d'uni et 18 cm de A1) ? Alors que sur le patron dessiné la réunification s'opère à 66cm. A quel moment me suis-je trompée? Merci d'avance Chrystel
15.10.2018 - 08:38DROPS Design answered:
Bonjour Mme Bouché, les 66 cm indiqués à gauche du schéma représentent la longueur totale du pull à partir de l'épaule. En taille S, on rabat les mailles des emmanchures à 40 cm (= au dernier tour de A.1). Bon tricot!
15.10.2018 - 10:59
![]() Smile wrote:
Smile wrote:
Hallo, waarom word het voorpand en achterpand niet meteen van begin af aan samen op een rondbreinaald gebreit? Dat is toch veel gemakkelijker.
03.09.2018 - 15:53DROPS Design answered:
Dag Smile, Er is niet een speciale reden voor; je kunt er ook voor kiezen om de voor- en achterpanden vanaf het begin in de rondte te breien. Je hoeft dan geen kantsteken te breien.
06.09.2018 - 11:11
![]() Lousha wrote:
Lousha wrote:
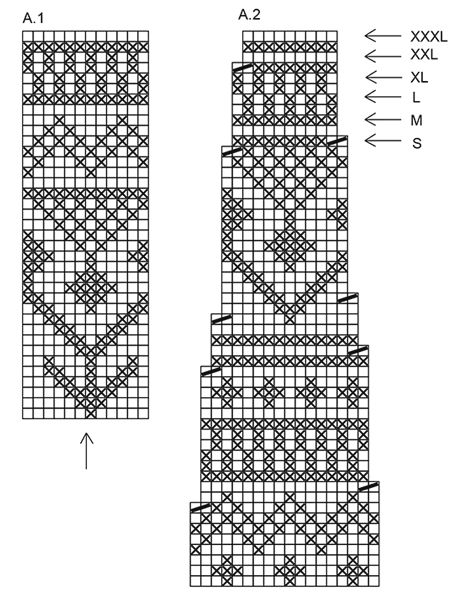
Mistakes in the A.2? End of row 8 the pattern will be off. There should be 3 white ss between every grey-white-grey ss. But according to the chart after the last g-w-g you k2tog, that makes ONE stitch, then start the chart with ONE white. This way it's 2 whites instead of 3. In the next row this causes 4 whites instead of 5 if you look at the end and the beginning of the chart. Also k2tog in rows 43 and 50 schould indicate grey.
18.07.2018 - 20:23DROPS Design answered:
Dear Lousha, when you repeat the diagram in width make sure to continue the pattern as it should look at, so that the st in grey on 9th round should be on the right place. When you decrease in A.1 you should dec in the background colour, ie on row 49, K2 tog with grey. Happy knitting!
19.07.2018 - 09:26
![]() Lavendeltje wrote:
Lavendeltje wrote:
Hallo, ik heb heel wat truien gebreid in het verleden, maar een trui op een rondbreinaald is voor mij nieuw. Daarbij zie ik ook geen omschrijving van een voorpand, alleen van een achterpand... ? Ik wil deze trui heel graag breien, maar zoals ik het patroon bekijk, lijkt het onbegonnen werk. Mvg
17.03.2018 - 18:20DROPS Design answered:
Hallo Lavendeltje, Het voor en achterpand worden eerst los van elkaar gebreid (evt. kun je dit eerste )ook op rechte naalden doen. (Aan het eind van de paragraaf staat dat je het voorpand op dezelfde manier als het achterpand breit.). Daarna zet je beide panden samen op een rondbreinaald en brei je in de rondte. Het is eerst even wennen op een rondbreinaald, maar na verloop van tijd gaat het je steeds makkelijker af. Bekijk evt. wat instructievideo's. In deze video zie bijvoorbeeld hoe je tricotsteek in de rondte breit. Succes!
19.03.2018 - 07:49Elnor Elis-Williams wrote:
Can you explain what the back elevation portion contributes to the pattern? I am about to begin the youke in the round having just attached the arms and don't understand the Elevation at the back instructions or what this bit creates?
13.12.2017 - 00:09DROPS Design answered:
Hi Elnor, The back elevation makes the back of the neck higher than the front and also helps the collar to lie nicely when folded down. The elevation is short rows over the mid back of neck, back and forth with the number of stitches on each row as described in the text. I hope this helps and happy knitting!
13.12.2017 - 08:19
![]() Anna Vohs wrote:
Anna Vohs wrote:
Hej jeg skal til at starte med Raglan på denne super flotte trøje. Mit spørgsmål er om hvor man skal starte henne? Midt bagpå eller ved et af ærmerne?
23.10.2017 - 02:27DROPS Design answered:
Hei Anna. Du kan fint starte ved en overgang mellom erme og bolen. God Fornøyelse!
23.10.2017 - 14:14
|
||||||||||
Black Ice#blackicesweater |
||||||||||
|
|
||||||||||
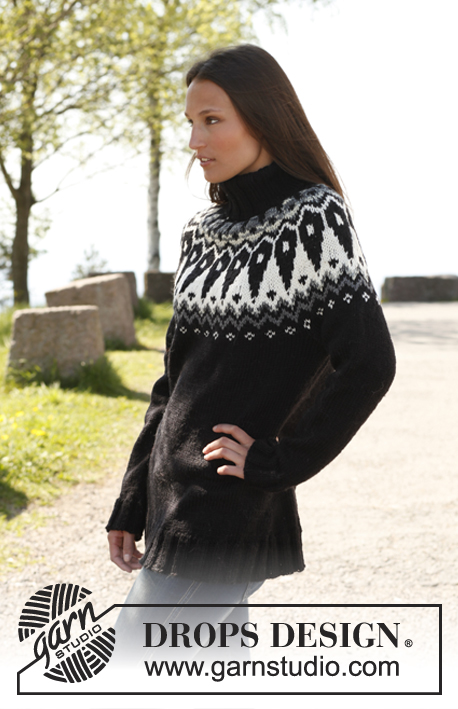
Knitted DROPS jumper with round yoke and Nordic pattern in "Nepal". Size: S - XXXL.
DROPS 173-5 |
||||||||||
|
GARTER ST (back and forth): K all rows. 1 ridge = 2 rows K. GARTER ST (worked in the round): 1 ridge = 2 rounds. * K 1 round and P 1 round *, repeat from *-*. DECREASE TIP: To calculate how often dec should be done, use the total no of sts on row (e.g. 148 sts) and divide by no of dec to be done (e.g. 34) = 4.3. I.e. in this example K approx. every 3rd and 4th st tog. INCREASE TIP (applies to sleeve): Inc on each side of marker as follows: Beg 1 sts before marker and make 1 YO, K 2 sts (marker is in the middle of these 2 sts), make 1 YO (= 2 sts inc). On next round K YOs twisted to avoid holes. PATTERN: See diagrams A.1 to A.2. Work entire pattern in stocking st. KNITTING TIP: To avoid the knitting tension to tighten when working pattern, it is important not to tighten the strands on back side of piece. Switch to a higher needle no when working pattern if the pattern is somewhat tight. ---------------------------------------------------------- BODY: First work back and forth on circular needle in 2 parts, then put piece tog and work in the round on circular needle. BACK PIECE: Cast on 92-100-112-124-132-148 sts on circular needle size 4.5 mm with off white. P 1 row from WS, then work as follows from RS: 3 sts in GARTER ST - see explanation above, K 2, rib (= P 2/K 2) until 3 sts remain, finish with 3 sts in garter st. When rib measures 8 cm, switch to circular needle size 5.5 mm, K 1 row while dec 20-22-28-28-30-34 sts evenly = 72-78-84-96-102-114 sts - READ DECREASE TIP. Continue in stocking st with 3 sts in garter st in each side until piece measures 18 cm. Put piece aside and knit front piece the same way. BODY: Slip the 2 parts tog on to same circular needle size 5,5 then work in the round over all sts = 144-156-168-192-204-228 sts. Continue in stocking st. REMEMBER THE KNITTING TENSION When piece measures 21-22-23-24-25-26 cm, work A.1 over all sts (= 12-13-14-16-17-19 repetitions in width) - READ KNITTING TIP. When 1 round remains in A.1 (piece measures approx. 40-41-42-43-44-45 cm), work next round as follows (= last round in A.1): Cast off 3-3-4-4-5-5 sts for armhole, work 66-72-76-88-92-104 sts (= front piece), cast off 6-6-8-8-10-10 sts for armhole, work 66-72-76-88-92-104 sts (= back piece) and cast off the last 3-3-4-4-5-5 sts for armhole. Put piece aside and knit the sleeves. SLEEVE: Worked in the round on double pointed needles. Switch to a short circular needle when enough sts have been inc. Cast on 52-52-52-56-56-56 sts on double pointed needle size 4.5 mm with off white. K 1 round. Then work rib = K 2/P 2 for 6 cm. K 1 round while dec 12 sts evenly in all sizes = 40-40-40-44-44-44 sts. Insert 1 marker at the beg of round. Switch to double pointed needles size 5.5 mm and work in stocking st with off white. When piece measures 11-11-13-13-10-12 cm, inc 2 sts mid under sleeve - READ INCREASE TIP. Inc like this every 3½-3-2½-2½-2½-2 cm 10-11-12-12-13-15 times in total = 60-62-64-68-70-74 sts. AT THE SAME TIME when piece measures 24-24-23-23-23-22 cm, work A.1, arrow in A.1 shows middle of sleeve, count outwards from arrow and work so that pattern is the same in both sides, work the inc sts in pattern, NOTE: Pattern will not fit one whole repetition. On last round in A.1 (piece measures 43-43-42-42-42-41 cm, NOTE: Shorter measurements in the larger sizes because of wider shoulders), cast off the middle 6-6-8-8-10-10 sts mid under sleeve = 54-56-56-60-60-64 sts remain on needle. Put piece aside and knit another sleeve. YOKE: Slip sleeves on to same circular needle size 5.5 mm as body where armholes were cast off = 240-256-264-296-304-336 sts. Work first round in A.2 AT THE SAME TIME adjust no of sts to 234-252-270-288-306-324. Continue pattern and dec as shown in A.2 (= 13-14-15-16-17-18 repetitions). READ KNITTING TIP! When A.2 has been worked - see arrow for your size, there are 130-140-150-160-153-162 sts on round. K 1 round while at the same time dec 34-44-50-56-49-54 sts evenly = 96-96-100-104-104-108 sts. ELEVATION AT THE BACK: Insert 1 marker mid front. Beg mid back and work an elevation at the back on circular needle size 5.5 mm with off white as follows: K until 10-10-12-12-14-16 sts remain before marker at the front, turn and P until 10-10-12-12-14-16 sts remain before marker in the other side. Turn and K until 20-20-22-22-24-26 sts remain before marker at the front, turn and P until 20-20-22-22-24-26 sts remain before marker in the other side. Turn and K until 30-30-32-32-34-36 sts remain before marker, turn and P until 30-30-32-32-34-36 sts remain before marker in the other side. Turn and K until mid back. Piece measures 66-68-70-73-75-77 cm from bottom edge to shoulder. NECK: = 96-96-100-104-104-108 sts. Work 1 ridge in GARTER ST – see explanation above, switch to a short circular needle size 6 mm, then work rib in the round (K 2/P 2). Continue with rib until piece measures 22-22-22-24-24-24 cm. Cast off sts with K over K and P over P. ASSEMBLY: Sew the openings under the sleeves. |
||||||||||
Diagram explanations |
||||||||||
|
||||||||||
 |
||||||||||
 |
||||||||||
Have you finished this pattern?Tag your pictures with #dropspattern #blackicesweater or submit them to the #dropsfan gallery. Do you need help with this pattern?You'll find 31 tutorial videos, a Comments/Questions area and more by visiting the pattern on garnstudio.com. © 1982-2026 DROPS Design A/S. We reserve all rights. This document, including all its sub-sections, has copyrights. Read more about what you can do with our patterns at the bottom of each pattern on our site. |
||||||||||


With over 40 years in knitting and crochet design, DROPS Design offers one of the most extensive collections of free patterns on the internet - translated to 17 languages. As of today we count 325 catalogues and 12298 patterns translated into English (UK/cm).
We work hard to bring you the best knitting and crochet have to offer, inspiration and advice as well as great quality yarns at incredible prices! Would you like to use our patterns for other than personal use? You can read what you are allowed to do in the Copyright text at the bottom of all our patterns. Happy crafting!
Post a comment to pattern DROPS 173-5
We would love to hear what you have to say about this pattern!
If you want to leave a question, please make sure you select the correct category in the form below, to speed up the answering process. Required fields are marked *.