
Popular categories
Looking for a yarn?


Comments / Questions (70)
![]() Frida wrote:
Frida wrote:
Hej, Hur ska jag sticka: "upprepa de 2 första v i A1-A4 till arb mäter 8 cm"? I vilken ordning ska jag sticka diagrammen? Ska jag börja och sluta med 18maskor? Ska jag sticka resår 36m två gånger per varv? Size L.
28.02.2025 - 16:55DROPS Design answered:
Hej Frida, ja de stickas i samma ordning som vi beskrev på första varvet, och sedan med rm över rm och am över am :)
06.03.2025 - 13:39
![]() Rosemary Simone wrote:
Rosemary Simone wrote:
I’ve knit the pattern repeats 3 times. It doesn’t look at all like the picture. It’s lovely and I like it I just wonder how can I figure out what I’m doing wrong?
10.08.2024 - 00:03DROPS Design answered:
Dear Rosemary, could you specify which size, chart and section of the piece you are working? What is it that doesn't match the photo?
11.08.2024 - 14:02
![]() Jean Thurlow wrote:
Jean Thurlow wrote:
Thank you for your quick respond your answer helps my fault I don’t always read the pattern correctly As I tend to get carried away Have knitted several items without a problem Great site and thanks again
28.03.2024 - 11:15
![]() Jean Thurlow wrote:
Jean Thurlow wrote:
I’m not at the armholes I am at the beginning of the body and 8 stitches decrease from 215 does not make 182 stitches so therefore the pattern does not work out
28.03.2024 - 08:30DROPS Design answered:
Dear Jean, Looking at the smallest sizes: in the first row, you knit the A.1 pattern 2 times, A.2 pattern 4 times, , A 3 pattern 2 times, and A4 patterns 1 time. In the 3d row of these patterns you decrese A.1 = -3 stitch, A2=+2 stitch, A.3=-3 stitch, A.4-5 stitch. So if you look at the row, you decrease alltogether 25 stitches (215-3-2-2-3-5-3-2-2-3= 190 stitches) Then the pattern tells you to decrese evenly 4 stitches on the ribbing at both side, that is another 8 stitches minus, and there you have the 182 stitches. I hope that helps. Happy Knitting!
28.03.2024 - 09:27
![]() Jean Thurlow wrote:
Jean Thurlow wrote:
On the cardigan I cast on 215 stitches then it says to cast off 4 stitches on each side before changing needles making a total of 207 stitches but pattern says 182 stitches left Is there a fault or am I not reading it correctly Help
27.03.2024 - 21:12DROPS Design answered:
Dear Jane, there are decreases in the pattern to ive tha cardigan a strong A shape, that is whiy you have less stitches at the armholes, than you started with. Happy Knitting!
27.03.2024 - 22:26
![]() Veerle Van Coillie wrote:
Veerle Van Coillie wrote:
Waarom krijg ik geen antwoord op mijn opmerking over het foute patroon ? Het zou jammer zijn voor alle anderen na mij !
11.02.2024 - 09:56DROPS Design answered:
Dag Veerle,
Je vraag was als opmerking geplaatst, vandaar dat hij niet in beeld kwam bij mij in eerste instantie. Nu het antwoord op je vraag: Het klopt dat de bovenwijdtes verschillend zijn, dit is ook aangegeven in de maattekening onderaan het patroon. Het ene vest is dus wijder dan het andere vest en heeft dus een andere pasvorm.
14.02.2024 - 20:16
![]() Veerle Van Coillie wrote:
Veerle Van Coillie wrote:
Dat is dan ook nog inclusief de boord aan weerszijde van 10 cm voor de sluiting die over elkaar moet met de knoopsluiting.
22.01.2024 - 20:38
![]() Veerle Van Coillie wrote:
Veerle Van Coillie wrote:
Nog niet lang geleden patroon 172-39 gebreid in maat L prima ! Ik maak altijd een proeflapje en gebruik de aangegeven wol. Nu vest 173-22 af en de maat L is veel kleiner ! Dus te klein ! Van het eerst genoemde vest is de bovenwijdte 58 cm maat L van het laatst gebreide maat L 48 cm ? Ik ben heel erg teleurgesteld, het is dus veel te klein !!!!!!
22.01.2024 - 16:30
![]() Li wrote:
Li wrote:
Hej! Har stickat denna modell nu och blir besviken över att den sitter så tätt på kroppen och går inte helt omlott i framkanten. Vågar jag blocka den och i så fall hela eller bara delar av den, t ex bara i sidan eller framstycket?? Är rädd att hålmönstret ska töjas ut för mycket bl a. Förklara gärna hur det är tänkt vad gäller bl a blockning eller hur ni tycker man ska göra. Mvh Li
21.10.2022 - 21:30DROPS Design answered:
Hej, ja du kan prøve forsigtigt på den nederste ribkant. Mål før og efter så du ser hvor meget det påvirker :)
25.10.2022 - 13:15
![]() Margret Scipio wrote:
Margret Scipio wrote:
Lijf na de boord: je volgt patroon 5 t/m 9 met daar tussen rechte en av steken aan de goede kant. Brei je dezelfde steken ook aan de verkeerde kant? Dus ook bijv. 8 AV en 22 R (in maat S)? Of juist andersom?
24.09.2022 - 18:36DROPS Design answered:
Dag Margret,
De steken die je recht breit aan de goede kant, brei je averecht aan de verkeerde kant en vice versa. Dus zoals ook aangegeven staat bij de symboolverklaring boven de telpatronen.
27.09.2022 - 18:16
|
||||||||||||||||||||||||||||
Arrowhead#arrowheadcardigan |
||||||||||||||||||||||||||||
 |
 |
|||||||||||||||||||||||||||
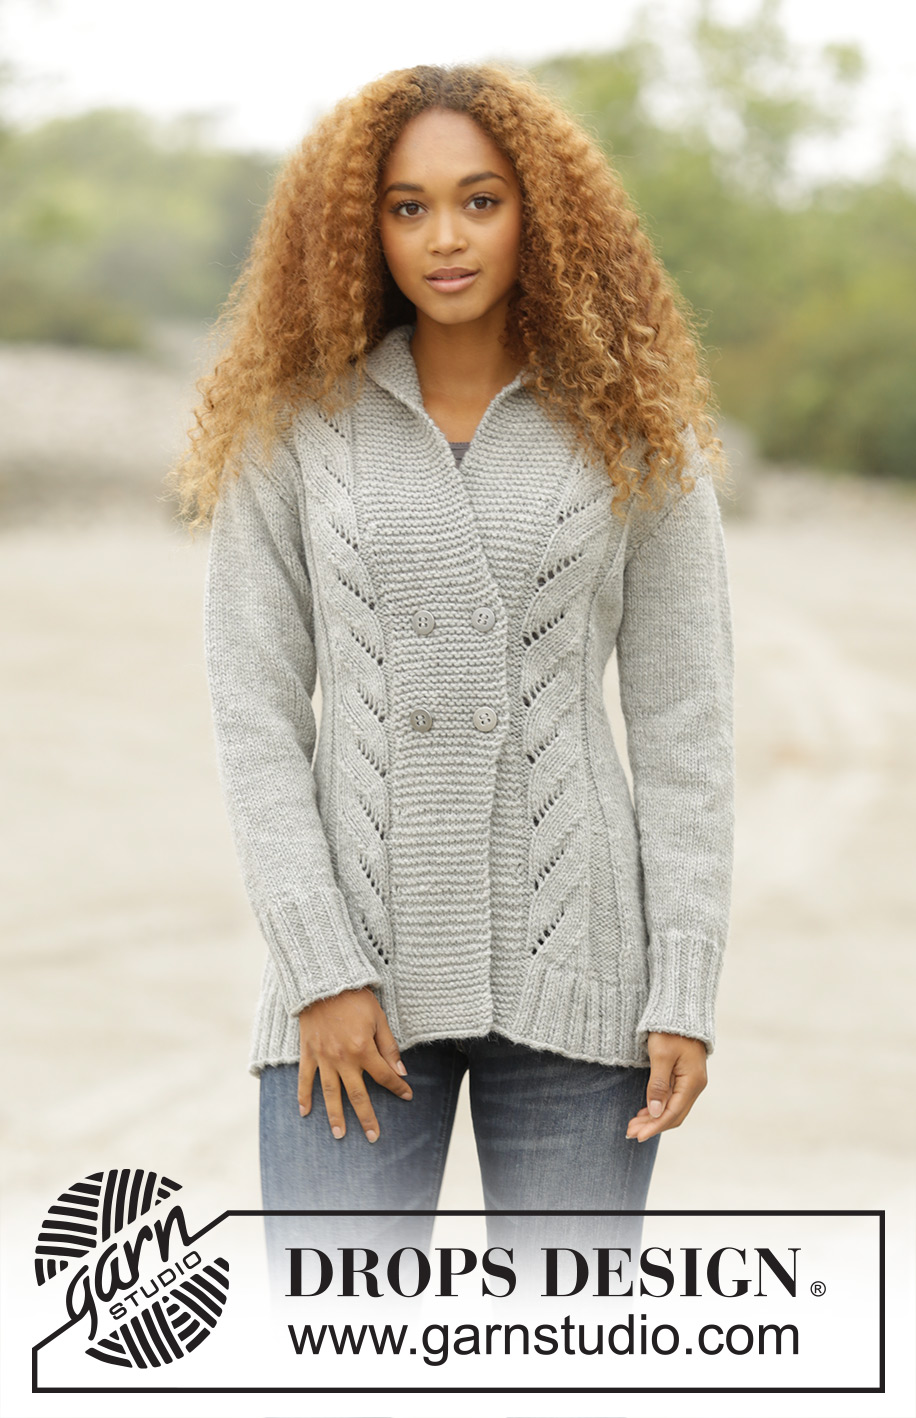
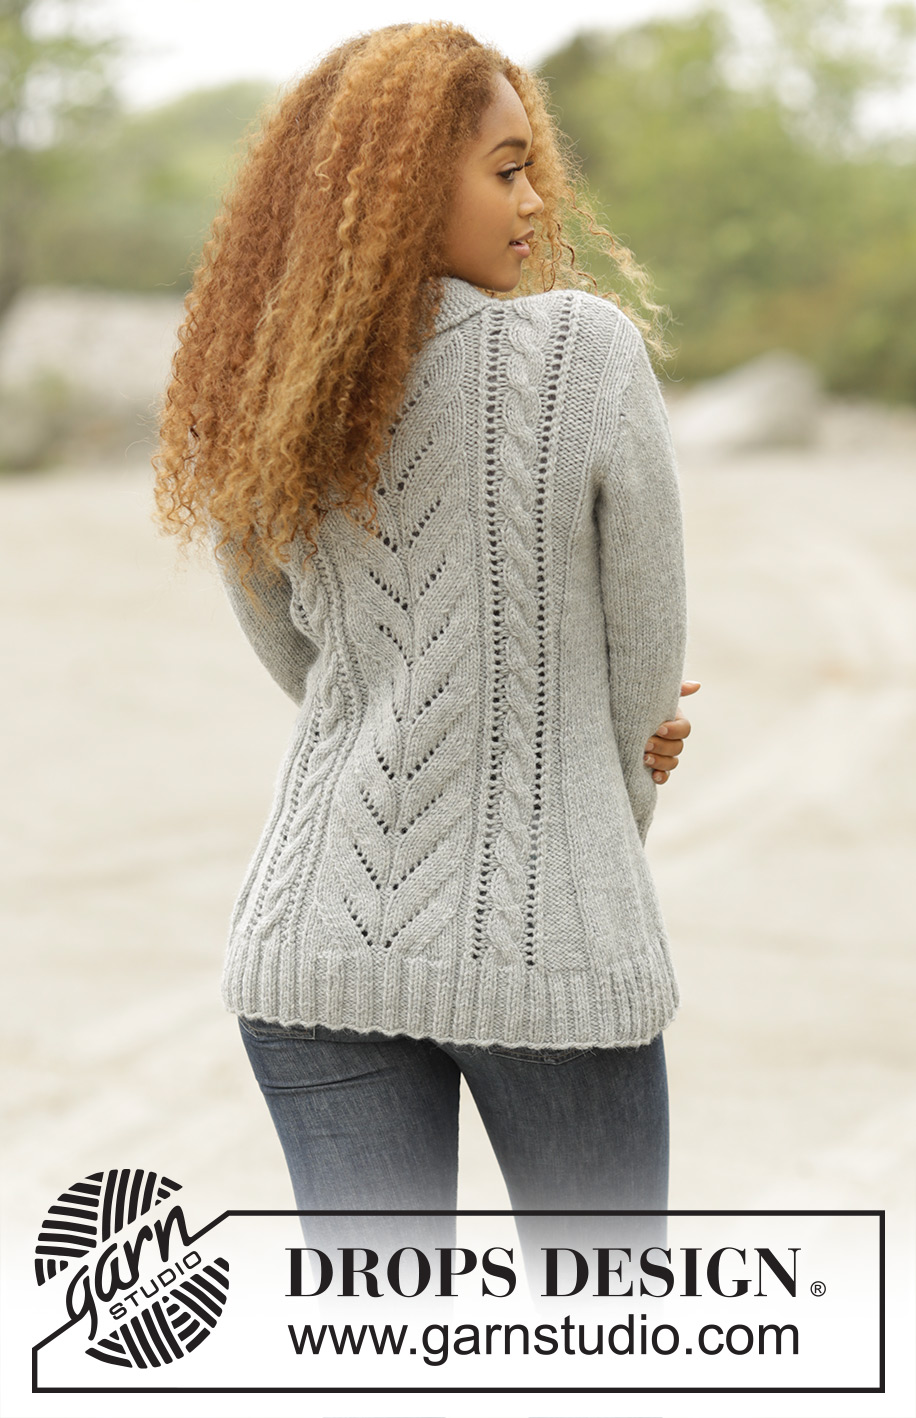
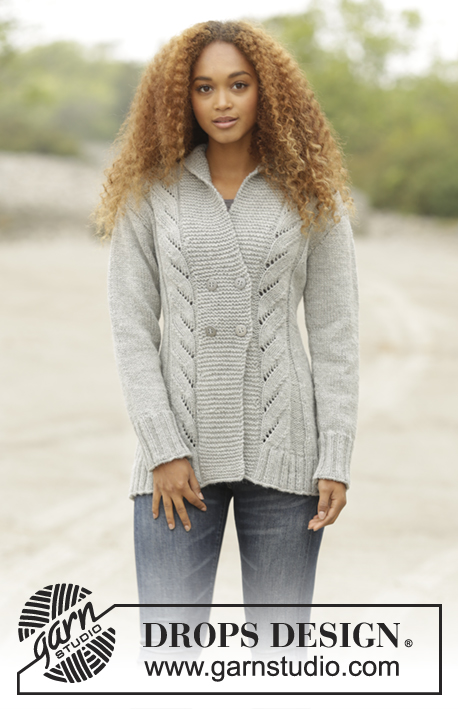
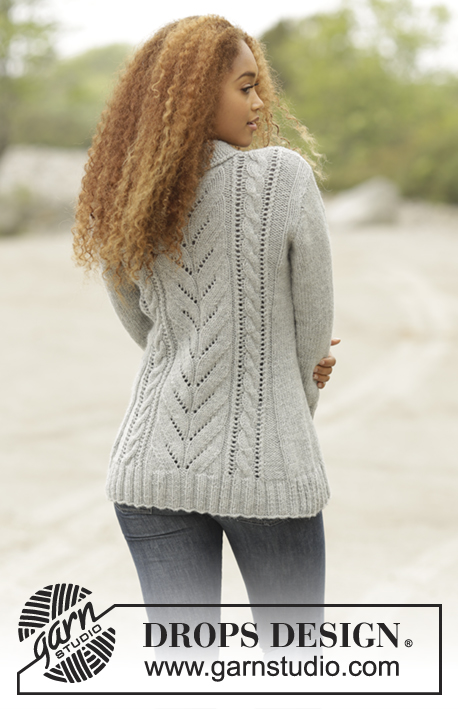
Knitted DROPS jacket with cables and shawl collar in ”Alaska”. Size: S - XXXL.
DROPS 173-22 |
||||||||||||||||||||||||||||
|
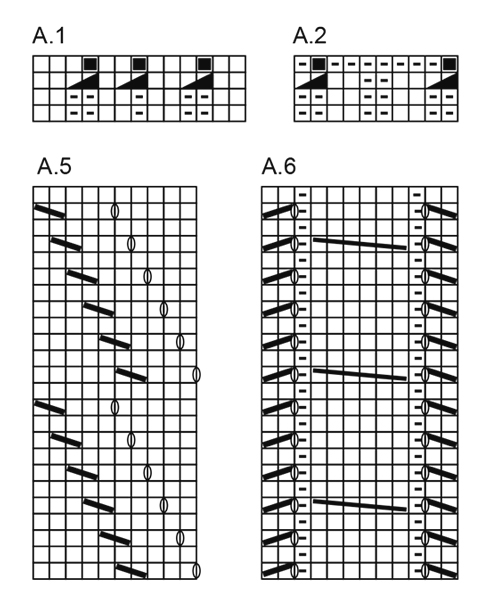
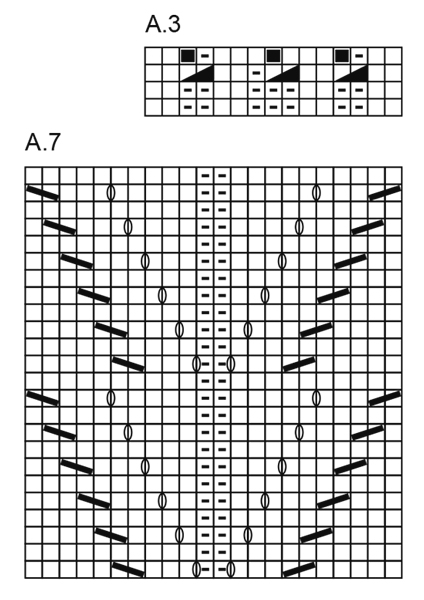
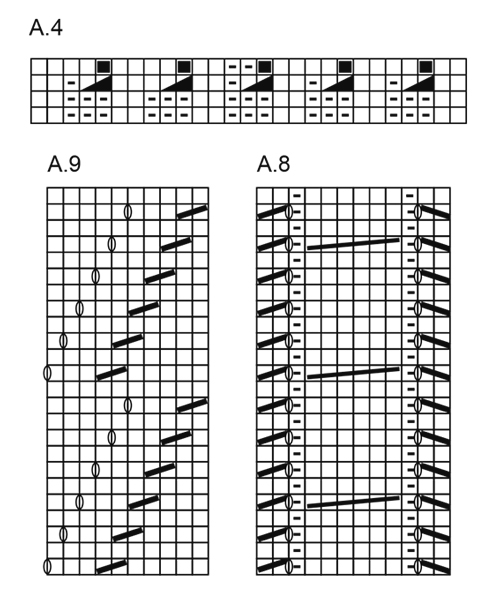
GARTER ST (back and forth): K all rows. 1 ridge = 2 rows K. PATTERN: See diagrams A.1 to A.9. The diagrams show all rows in pattern seen from RS. SHORT ROWS BAND: For every 20 rows worked, work as follows: Work over the first 16-17-18-19-20-21 sts from RS, turn and work back over these sts, work 1 row from RS (with pattern and garter st as before) over all sts. Work over the first 16-17-18-19-20-21 sts from WS, turn and work back over these sts, work 1 row from WS (with pattern and garter st as before) over all sts. DECREASE TIP: Dec 1 st in each side of section in stocking st as follows: K 1, slip next st as if to K, K 1, psso, work until 3 sts remain, K 2 tog, K 1. INCREASE TIP: Inc with 1 YO inside first and last st in stocking st, P the inc sts twisted on next row to avoid holes. BUTTONHOLES: Dec for 4 buttonholes on right front piece (from RS): Work 3 sts, K 2 tog, 1 YO, work 6-7-8-9-10-11 sts, K 2 tog, 1 YO = 2 buttonholes on same row (3 sts remain on band). Dec for buttonholes when piece measures: SIZE S: 28 and 36 cm SIZE M: 29 and 37cm Size L: 30 and 38 cm SIZE XL: 31 and 39 cm Size XXL: 32 and 40 cm SIZE XXXL: 33 and 41 cm. ---------------------------------------------------------- JACKET: Worked back and forth on circular needle from mid front. BODY: Cast on 215-233-243-269-295-313 sts on circular needle size 4.5 mm with Alaska. P 1 row from WS, then work as follows - from RS: 16-17-18-19-20-21 sts in garter st (= band), P 2, A.1 (= 13 sts), A.2 (= 10 sts), rib K 2/P 2 over the next 24-32-36-48-60-68 sts, K 2, A.2, A.3 (= 15 sts), P 2, A.4 (= 27 sts), P 2, A.3, A.2, rib K 2/P 2 over the next 24-32-36-48-60-68 sts, K 2, A.2, A.1, P 2, 16-17-18-19-20-21 sts in garter st (= band). Work SHORT ROWS over sts in band – see explanation above. REMEMBER THE KNITTING TENSION Repeat the first 2 row in A.1 - A.4 until piece measures 8 cm, AT THE SAME TIME adjust so that next row is worked from RS, then work the last 2 row in A.1 - A.4, AT THE SAME TIME dec 4-5-6-9-12-11 sts evenly over the 26-34-38-50-62-70 sts rib in each side = 182-198-206-226-246-266 sts. Switch to circular needle size 5 mm. Then work as follows from RS: 16-17-18-19-20-21 sts in garter st, P 2, A.5 (= 10 sts), P 8, K 22-29-32-41-50-59, P 8, A.6 (= 12 sts), P 2, A.7 (= 22 sts), P 2, A.8 (= 12 sts), P 8, K 22-29-32-41-50-59, P 8, A.9 (= 10 sts), P 2, 16-17-18-19-20-21 sts in garter st. When piece measures 10 cm, dec 1 st in every P section with P 8 and dec 1 st in each side of section in stocking st - READ DECREASE TIP (= 8 sts dec), dec the same way every 4 cm, 6 times in total, dec alternately on right and left side of P sections = 134-150-158-178-198-218 sts. Dec for BUTTONHOLES on right band - see explanation above. When piece measures 34 cm, inc 1 st in every P section with a dec, and 1 st in each side of every section in stocking st (= 8 sts inc) - READ INCREASE TIP, repeat inc when piece measures 46-47-48-49-50-51 cm = 150-166-174-194-214-234 sts. When piece measures 50-51-52-53-54-55 cm, work as follows from RS: Work the first 38-41-43-48-53-58 sts as before, cast off the next 4-6-6-6-6-6 sts, work the next 66-72-76-86-96-106 sts as before, cast off the next 4-6-6-6-6-6 sts and work the last 38-41-43-48-53-58 sts as before. Now finish each part separately. BACK PIECE: = 66-72-76-86-96-106 sts. Continue pattern as before, AT THE SAME TIME continue cast off in each side for armholes on every other row: Dec 2 sts 0-1-1-2-3-4 times and 1 st 0-0-1-3-5-7 times = 66-68-70-72-74-76 sts. Continue the pattern as before. When piece measures 66-68-70-72-74-76 cm, cast off the middle 20-22-24-26-28-30 sts for neck and finish each shoulder separately. On next row cast off 1 st towards the neck = 22 sts remain on each shoulder. Cast off when piece measures 68-70-72-74-76-78 cm. RIGHT FRONT PIECE: = 38-41-43-48-53-58 sts. Continue pattern as before, AT THE SAME TIME continue cast off for armhole in the side as on back piece = 38-39-40-41-42-43 sts. When piece measures 68-70-72-74-76-78 cm, cast off the first 22 sts from WS = 16-17-18-19-20-21 sts remain on needle (= band). Work the rest of row. Then work short rows over the 16-17-18-19-20-21 sts as follows - beg from RS: * Work 2 rows back and forth over the first 8-8-9-9-10-10 sts, work 2 rows back and forth over all sts *, repeat from *-* until neck edge measures 9-9-10-10-11-11 cm at the shortest. Cast off. LEFT FRONT PIECE: Work as right but reversed. Cast off for shoulder from RS and beg short rows from WS. SLEEVE: Worked in the round on double pointed needles. Cast on 45-45-50-50-50-50 sts on double pointed needle size 4.5 mm with Alaska. K 1 round, then work rib = K 2/P 3. When rib measures 10 cm, K 1 round while dec 11-9-12-10-10-8 sts evenly = 34-36-38-40-40-42 sts. Switch to double pointed needles size 5 mm and continue in stocking st. Insert 1 marker at the beg of round. When piece measures 11 cm, inc 1 st on each side of marker, inc every 4-3½-3-2½-2-1½ cm a total of 9-10-11-13-15-17 times = 52-56-60-66-70-76 sts. When piece measures 47-47-47-46-45-44 cm (NOTE! Shorter measurements in the larger sizes because of broader shoulders), cast off 6 sts mid under sleeve (= 3 sts on each side of marker), now finish piece back and forth on needle. Cast off for sleeve cap at beg of every row in each side as follows: 2 sts 3 times and 1 st 0-1-1-2-3-5 times, cast off 2 sts in each side of piece until piece measures 53-53-54-54-54-55 cm, cast off 3 sts in each side and cast off the remaining sts. Piece measures 54-54-55-55-55-56 cm in total. ASSEMBLY: Sew shoulder seams and sew in sleeves. Sew the collar tog mid back and sew it to neck line. Sew the buttons on to the left band. |
||||||||||||||||||||||||||||
Diagram explanations |
||||||||||||||||||||||||||||
|
||||||||||||||||||||||||||||
 |
||||||||||||||||||||||||||||
 |
||||||||||||||||||||||||||||
 |
||||||||||||||||||||||||||||
 |
||||||||||||||||||||||||||||
Have you finished this pattern?Tag your pictures with #dropspattern #arrowheadcardigan or submit them to the #dropsfan gallery. Do you need help with this pattern?You'll find 27 tutorial videos, a Comments/Questions area and more by visiting the pattern on garnstudio.com. © 1982-2026 DROPS Design A/S. We reserve all rights. This document, including all its sub-sections, has copyrights. Read more about what you can do with our patterns at the bottom of each pattern on our site. |
||||||||||||||||||||||||||||


With over 40 years in knitting and crochet design, DROPS Design offers one of the most extensive collections of free patterns on the internet - translated to 17 languages. As of today we count 324 catalogues and 12290 patterns translated into English (UK/cm).
We work hard to bring you the best knitting and crochet have to offer, inspiration and advice as well as great quality yarns at incredible prices! Would you like to use our patterns for other than personal use? You can read what you are allowed to do in the Copyright text at the bottom of all our patterns. Happy crafting!
Post a comment to pattern DROPS 173-22
We would love to hear what you have to say about this pattern!
If you want to leave a question, please make sure you select the correct category in the form below, to speed up the answering process. Required fields are marked *.