
Popular categories
Looking for a yarn?


Comments / Questions (38)
![]() Fabienne wrote:
Fabienne wrote:
Bonjour, Une question concernant les manches. Les manches doivent faire 42cm. Vous n'indiquez pas le nombre de rang total. Comme on ne tricote pas tous avec la même tension de fil, le nombre de rangs peut en effet varier d'une personne à l'autre. J'aimerais savoir combien de mailles je dois garder sur mes aiguilles au moment de rabattre les dernières mailles et terminer la manche. Merci
16.01.2026 - 15:11DROPS Design answered:
Bonjour Fabienne, comme vous l'indiquez à juste titre, on n'a pas toute la même tension en hauteur, ce qui compte ici, c'est bien la hauteur plus que le. nombre de rangs/mailles restants, autrement dit, rabattez 2 mailles de chaque côté jusqu'à ce que la manche mesure 42 cm, la tête de manche doit mesurer environ 7 cm de hauteur totale (cf schéma). Votre manche s'ajustera ainsi joliment dans l'emmanchure. Bon tricot!
19.01.2026 - 07:44
![]() HECTOR wrote:
HECTOR wrote:
Bonjour je suis arrivée en haut du diagramme avec 232 mailles au total et 43 mailles pour le point ajouré. Jusque la tout va bien mais je ne comprends pas la suite. Comment utiliser ces 43 mailles merci de m aider c est un très beau modèle
09.10.2024 - 11:38DROPS Design answered:
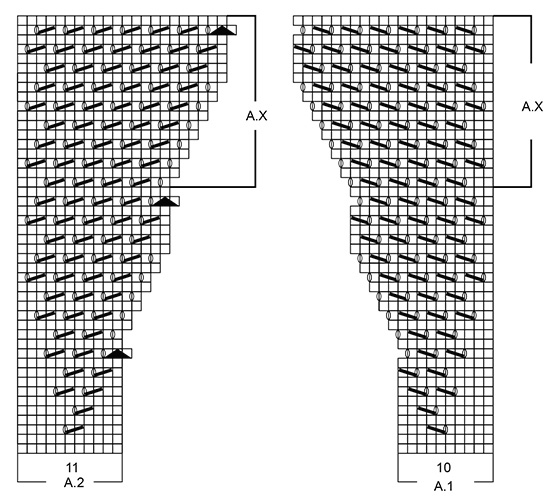
Bonjour Mme Hector, commencez et terminez le point ajouré comme avant = continuez à augmenter au milieu sur les côtés, vous aurez juste davantage de mailles entre les premières et les dernières mailles de A.1x et A.2x, le point ajouré va ainsi simplement augmenter en largeur. Bon tricot!
09.10.2024 - 15:34
![]() Lucy Ellen Matheson wrote:
Lucy Ellen Matheson wrote:
When working the back (or front) I don't understand the armhole increases. I have 85 stitches and work measures 15cm. The instructions say to increase at the end of each row. If I only increase at the end of the row I increase by 17 stitches. The total stitches though should be 119 so this would be 17 plus 17. I conclude that this means I increase at the beginning and at the end of each row? Please clarify. I am very confused.
07.07.2022 - 14:41DROPS Design answered:
Dear Mrs Matheson, you have to cast on new stitches at the end of every row, this means both from RS and from WS, so that you will have 1 st x 2 + 2 sts x 3 + 3 sts x 3 = 17 new sts on each side side=17+85+17=119 sts. Happy knitting!
07.07.2022 - 16:03
![]() Magda wrote:
Magda wrote:
Cześć, nadal ilość oczek mi nie pasuje. Robię rozmiar S. Tył i przód to 156 oczek, po przerobieniu. Po przerobieniu A1 i A2 ilość oczek zwiększa się o 10 na każdym boku., jak wynika ze schematu. Chyba, że trzeba przerobić schemat A1 i A2 włącznie z częścią AX. I dopiero od tego momentu powtarzać AX? Tak to należy rozumieć? Po przerobieniu kolejnych czterech schematów AX mam juz 42 cm, ale 296 oczek. Nie wiem czy robić dalej, czy wystarczyli włoczki?
30.08.2021 - 12:47
![]() Magda wrote:
Magda wrote:
Cześć, mam pytanie co do długości. Przerobiłam A1 i A2, a potem AX w sumie 5 razy. Długość robótki od podkroju rękawa to 41 cm i mam 276 oczek. Czy robić dalej, żeby uzyskać ok. 320 oczek?
26.08.2021 - 15:27DROPS Design answered:
Witaj Magdo, ścieg ażurowy zwiększa się o 12 o. z każdej strony (24 o. w okrążeniu). Skoro po przerobieniu schematów A.1 i A.2 liczba oczek była poprawna, czyli 200, to po powtórzeniu 5 x schematu A.x powinnaś otrzymać 320 oczek: 200+(5x24). W twoim przypadku mogą być 2 przyczyny: 1. niewłaściwa liczba dodawanych oczek na bokach, 2. niezgodna próbka. Przymierz sweterek i zobacz jak będzie leżał. Jak nie jesteś zadowolona, trzeba będzie poprawiać, czyli niestety szukać błędu i pruć :( Pozdrawiamy!
27.08.2021 - 09:13
![]() Paige wrote:
Paige wrote:
I do not understand the instructions below, where to start on the chart the A1 and A2 patterns for the increase stitches. Do you start over on line one at the bottom of the chart? Then repeat A.X vertically AT THE SAME TIME continue inc in diagram as before: I.e. lace pattern in each side inc with 12 sts and there are 2 eyelet rows (1 eyelet row = 1 dec + 1 YO) more in A.1 and A.2 in each side every time A.X is worked 1 time vertically.
01.01.2021 - 20:16DROPS Design answered:
Dear Paige, A.1 and A.2 are worked in the middle of the sides, the first stitch in A.2 is the middle stitch on the sides. When diagrams have been worked in height, repeat A.x, ie work lace pattern as shown in A.x (begin/end lace pattern as shown in diagram and increase on each side of the middle stitch (1st stitch in A.2) as shown in diagram. Happy knitting!
04.01.2021 - 14:39
![]() Manuela wrote:
Manuela wrote:
Hallo vielen Dank, der Pullover ist wunderschön geworden.
21.10.2020 - 11:50
![]() Arlenproject wrote:
Arlenproject wrote:
Pattern descritto piuttosto male (sia in italiano che in inglese); ho visto che altre si sono scontrate con i miei stessi problemi (p.es. continuazione del diag. AX). E poi non vedo la necessità di fare il capo top down dal momento che ci sono troppi tagli e riprese successive o cuciture. Per non dire della manica! Il bello del topdown è lavorare in circolare senza cuciture e senza sprecare filato. Spero che queste osservazioni possano essere costruttive per migliorare.
22.08.2020 - 16:49
![]() Manuela wrote:
Manuela wrote:
Hilfe ich komme nicht weiter. Ich habe alle Maschen 232 auf der Nadel .A1 A2 bis AX ergibt gerechnet und gestrickt(wieder aufgetrennt) 252. Wo muss ich noch zunehmen um auf 276 M zu kommen?
15.07.2020 - 13:09DROPS Design answered:
Liebe Manuela, Sie stricken die 232 M mit A.1, A.2 auf beiden Seiten = 11 M werden in jedem beiden A.1 und 11 M in jedem beiden A.2 zugenommen = 232 +(11+11)x2= 276 Maschen wenn beide A.x fertig in der Höhe sind. Viel Spaß beim stricken!
15.07.2020 - 16:06
![]() Manuela wrote:
Manuela wrote:
Hallo, habe gerade diese schöne Stück in Arbeit. Die cm Angabe beim Vorderteil im letzten Absatz ist nicht richtig, da die Schulter schon 8 cm misst und dann noch die Zunahme am Ausschnitt. Das sind natürlich mehr als die 20 cm wie der Rücken. Freue mich auf den fertigen Pulli in malve. MfG Manuela
14.07.2020 - 09:17
|
||||||||||||||||
Venezia#veneziasweater |
||||||||||||||||
|
|
||||||||||||||||
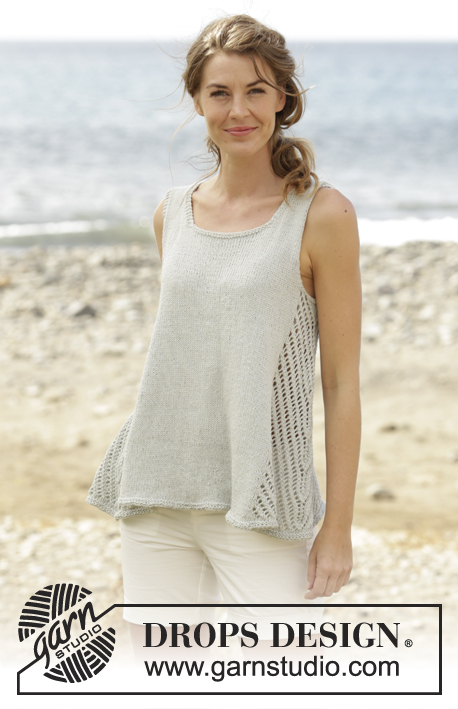
Knitted DROPS jumper with lace pattern in the sides and A-shape, worked top down in ”Belle”. Size: S - XXXL.
DROPS 168-34 |
||||||||||||||||
|
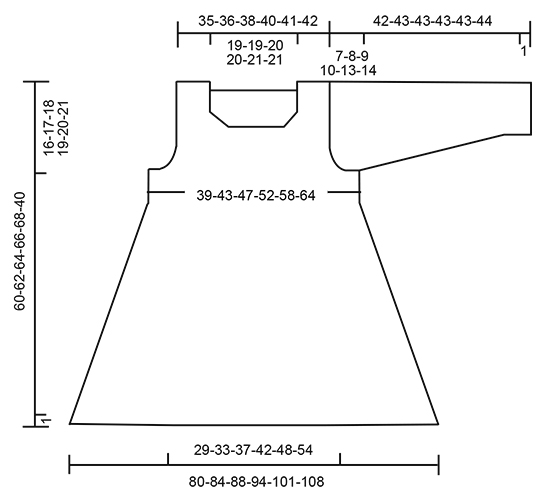
GARTER ST (worked in the round): 1 ridge = 2 rounds. * K 1 round and P 1 round *, repeat from *-*. GARTER ST (back and forth): K all rows. 1 ridge = 2 rows K. PATTERN: See diagrams A.1 and A.2. INCREASE TIP: Inc 1 st by making a YO. On next row P YO twisted (i.e. work in back loop of YO instead of front) to avoid holes. ---------------------------------------------------------- JUMPER: The piece is worked top down. Work first front and back piece separately, back and forth down to armhole. Then work in the round. BACK PIECE: Work right shoulder as follows: Cast on 17-18-19-21-21-22 sts on circular needle size 4.5 mm with Belle. Work as follows (1st row = from RS): 3 sts in GARTER ST - see explanation above (= towards the neck), work 13-14-15-17-17-18 sts in stocking st, 1 edge st in garter st (= towards armhole). Continue like this until 4 row have been worked. On next row inc 1 st inside the 3 sts in garter st towards the neck - READ INCREASE TIP = 18-19-20-22-22-23 sts. Work 1 row from WS and put piece aside. Work left shoulder as follows: Cast on and work as right shoulder but reversed. I.e. inc 1 st before the 3 sts in garter st towards the neck on 5th row in stocking st = 18-19-20-22-22-23 sts. Work 1 row from WS. Turn and work as before over all sts. At the end of row cast on 35-35-37-37-39-39 new sts for neck and then work the 18-19-20-22-22-23 sts from right shoulder on to needle = 71-73-77-81-83-85 sts. Work the new sts cast on for neck in garter st = 41-41-43-43-45-45 sts in garter st in the middle of back piece (incl the 3 sts in garter st worked on each side of neck). When 2 ridges have been worked over these sts, continue in stocking st with 1 st in garter st in each side. REMEMBER THE KNITTING TENSION When piece measures 15 cm in all sizes, cast on new sts for armhole at the end of every row as follows: Cast on 1 st 1-2-3-3-2-2 times, 2 sts 0-1-1-1-2-3 times and 3 sts 0-0-0-1-2-3 times = 73-81-87-97-107-119 sts. Work 1 row from WS after last inc and put piece aside. Piece measures 16-17-18-19-20-21 cm from shoulder. FRONT PIECE: Work left shoulder as follows: Cast on 17-18-19-21-21-22 sts on circular needle size 4.5 mm with Belle. Work as follows (1st row = from RS): Work 3 sts in garter st (= towards neck), work 13-14-15-17-17-18 sts in stocking st, 1 edge st in garter st (= towards armhole). Continue like this back and forth. When piece measures 7-8-7-8-8-8 cm, inc 1 st for neck inside the 3 sts in garter st towards the neck. Repeat inc every other row 4-4-5-5-6-6 more times = 22-23-25-27-28-29 sts. When all inc are done, work 1 row from WS. Put piece aside. Work right shoulder as follows: Cast on and work as left shoulder but reversed. When all inc for neck are done, there are 22-23-25-27-28-29 sts on needle. Work 1 row from WS. Turn and work as before over all sts. At the end of row cast on 27 new sts in all sizes for neck, then work all sts from left shoulder on to needle = 71-73-77-81-83-85 sts. Continue back and forth in stocking st with 1 edge st in garter st in each side and work in garter st over the middle 33 sts in all sizes (= the 27 new sts cast on for neck + 3 sts on each side of these). When 2 ridges have been worked over the middle 33 sts in all sizes, continue in stocking st and 1 edge st in garter st in each side. When piece measures 15 cm in all sizes, cast on new sts for armhole at the end of every row towards armhole the same way as on back piece, then work 1 row from WS = 73-81-87-97-107-119 sts. Piece measures 16-17-18-19-20-21 cm from shoulder. Now work as follows: Work in stocking st over all sts on front piece, cast on 5-5-7-7-9-9 new sts for armhole, continue in stocking st over all sts on back piece, cast on 5-5-7-7-9-9 new sts for armhole. There are now 156-172-188-208-232-256 sts for body. BODY: Then work in the round on circular needle. NOW MEASURE THE PIECE FROM HERE. Work 1 more round in stocking st but stop 12-13-14-15-16-17 sts before beg of round. Insert a marker here. This is now beg of round. Now work pattern as follows: Work A.1 (= 10 sts), A.2 (= 11 sts), insert a marker here, work in stocking st over the next 57-65-73-83-95-107 sts, insert a marker here, A.1, A.2, insert a marker here, work in stocking st over the remaining 57-65-73-83-95-107 sts. NOTE: Move the 4 markers upwards when working to make it easier to tell the section with lace pattern and stocking st apart. No of sts in section in stocking st on front and back piece is constant and inc sts in the section with lace pattern in the sides. Continue pattern like this until entire A.1 and A.2 have been worked vertically. There are now 200-216-232-252-276-300 sts on round and piece measures approx. 19 cm in all sizes. Then repeat A.X vertically AT THE SAME TIME continue inc in diagram as before: I.e. lace pattern in each side inc with 12 sts and there are 2 eyelet rows (1 eyelet row = 1 dec + 1 YO) more in A.1 and A.2 in each side every time A.X is worked 1 time vertically. When piece measures 43-44-45-46-47-48 cm, there are approx. 320-336-352-376-404-432 sts on round. Work 1 round in stocking st. Then work 2 ridges. Cast off. SLEEVE: Worked in the round on double pointed needles up to sleeve cap, then work back and forth on needle. Cast on 53-55-57-59-61-63 sts on double pointed needles size 4.5 mm. Work 2 ridges in GARTER ST in the round - see explanation above. Insert 1 marker at beg of round (1st st on round is mid under sleeve). Then work in stocking st. When piece measures 3-4-5-5-3-5 cm, inc 1 st on each side of st mid under sleeve (= 2 sts inc). Repeat inc every 5½-4½-3½-3-2½-2 cm 5-6-7-8-9-10 more times in total = 65-69-73-77-81-85 sts. When piece measures 34-34-33-32-29-29 cm (shorter measurements in the larger sizes because of longer sleeve cap and wider shoulders), cast off 5-5-7-7-9-9 sts mid under sleeve and work back and forth until finished measurements. Cast off for sleeve cap at beg of every row in each side as follows: 2 sts 4-4-4-4-3-3 times and 1 st 2-3-3-3-3-8 times. Then cast off 2 sts in each side until piece measures 42-43-43-43-43-44 cm. Loosely cast off. Knit another sleeve the same way. ASSEMBLY: Sew the shoulder seams tog. Make sure that to avoid a tight seam. Sew in sleeves in body inside 1 edge st in garter st. |
||||||||||||||||
Diagram explanations |
||||||||||||||||
|
||||||||||||||||
 |
||||||||||||||||
 |
||||||||||||||||
Have you finished this pattern?Tag your pictures with #dropspattern #veneziasweater or submit them to the #dropsfan gallery. Do you need help with this pattern?You'll find 30 tutorial videos, a Comments/Questions area and more by visiting the pattern on garnstudio.com. © 1982-2026 DROPS Design A/S. We reserve all rights. This document, including all its sub-sections, has copyrights. Read more about what you can do with our patterns at the bottom of each pattern on our site. |
||||||||||||||||


With over 40 years in knitting and crochet design, DROPS Design offers one of the most extensive collections of free patterns on the internet - translated to 17 languages. As of today we count 324 catalogues and 12290 patterns translated into English (UK/cm).
We work hard to bring you the best knitting and crochet have to offer, inspiration and advice as well as great quality yarns at incredible prices! Would you like to use our patterns for other than personal use? You can read what you are allowed to do in the Copyright text at the bottom of all our patterns. Happy crafting!
Post a comment to pattern DROPS 168-34
We would love to hear what you have to say about this pattern!
If you want to leave a question, please make sure you select the correct category in the form below, to speed up the answering process. Required fields are marked *.