DROPS Belle
DROPS Belle
53% Cotton, 33% Viscose, 14% Linen
from 2.00 £ /50g
Get the yarn to make this pattern from 18.00£.

The yarn cost is calculated from the pattern’s smallest size and the yarn’s cheapest product type. Looking for an even better price? You might find it on the DROPS Deals!

DROPS SS24

Venezia

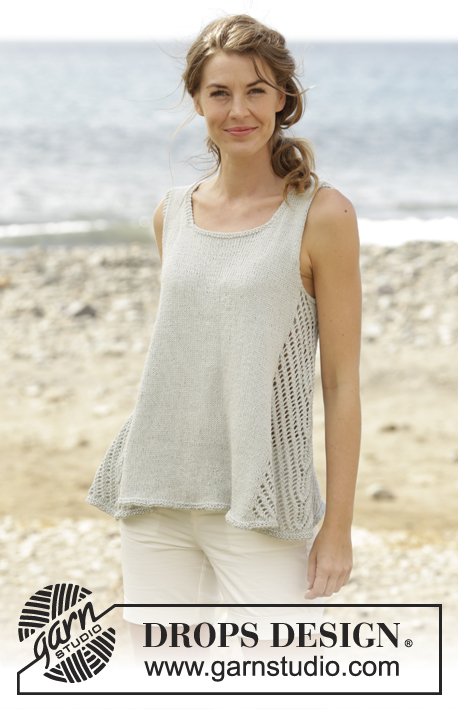
Knitted DROPS jumper with lace pattern in the sides and A-shape, worked top down in ”Belle”. Size: S - XXXL.

DROPS 168-34
DROPS design: Pattern no vs-013
Yarn group B
----------------------------------------------------------
Size: S - M - L - XL - XXL - XXXL
Materials:
DROPS BELLE from Garnstudio
450-500-550-650-700-750 g colour no 06, silver

DROPS DOUBLE POINTED NEEDLES AND CIRCULAR NEEDLE (60 and 80 cm) SIZE 4.5 mm - or size needed to get 20 sts x 26 rows in stocking st = 10 x 10 cm.

-------------------------------------------------------

Alternative Yarn – See how to change yarns here
Yarn Groups A to F – Use the same pattern and change the yarn here
Yarn usage using an alternative yarn – Use our yarn converter here

-------------------------------------------------------

DROPS Belle
DROPS Belle
53% Cotton, 33% Viscose, 14% Linen
from 2.00 £ /50g
Get the yarn to make this pattern from 18.00£.

The yarn cost is calculated from the pattern’s smallest size and the yarn’s cheapest product type. Looking for an even better price? You might find it on the DROPS Deals!

Pattern instructions

NOTE: This pattern is written in British English. All measurements in charts are in cm. For conversion from cm to inches - click here. There are different terms for crocheting in British and American English. If this pattern includes crochet, click for "crochet terms" here. For this pattern in American English, please click here.
GARTER ST (worked in the round):
1 ridge = 2 rounds. * K 1 round and P 1 round *, repeat from *-*.

GARTER ST (back and forth):
K all rows. 1 ridge = 2 rows K.

PATTERN:
See diagrams A.1 and A.2.

INCREASE TIP:
Inc 1 st by making a YO.
On next row P YO twisted (i.e. work in back loop of YO instead of front) to avoid holes.
----------------------------------------------------------

JUMPER:
The piece is worked top down. Work first front and back piece separately, back and forth down to armhole. Then work in the round.

BACK PIECE:
Work right shoulder as follows:
Cast on 17-18-19-21-21-22 sts on circular needle size 4.5 mm with Belle. Work as follows (1st row = from RS): 3 sts in GARTER ST - see explanation above (= towards the neck), work 13-14-15-17-17-18 sts in stocking st, 1 edge st in garter st (= towards armhole). Continue like this until 4 row have been worked. On next row inc 1 st inside the 3 sts in garter st towards the neck - READ INCREASE TIP = 18-19-20-22-22-23 sts. Work 1 row from WS and put piece aside.
Work left shoulder as follows:
Cast on and work as right shoulder but reversed. I.e. inc 1 st before the 3 sts in garter st towards the neck on 5th row in stocking st = 18-19-20-22-22-23 sts. Work 1 row from WS. Turn and work as before over all sts. At the end of row cast on 35-35-37-37-39-39 new sts for neck and then work the 18-19-20-22-22-23 sts from right shoulder on to needle = 71-73-77-81-83-85 sts. Work the new sts cast on for neck in garter st = 41-41-43-43-45-45 sts in garter st in the middle of back piece (incl the 3 sts in garter st worked on each side of neck). When 2 ridges have been worked over these sts, continue in stocking st with 1 st in garter st in each side. REMEMBER THE KNITTING TENSION When piece measures 15 cm in all sizes, cast on new sts for armhole at the end of every row as follows: Cast on 1 st 1-2-3-3-2-2 times, 2 sts 0-1-1-1-2-3 times and 3 sts 0-0-0-1-2-3 times = 73-81-87-97-107-119 sts. Work 1 row from WS after last inc and put piece aside. Piece measures 16-17-18-19-20-21 cm from shoulder.

FRONT PIECE:
Work left shoulder as follows:
Cast on 17-18-19-21-21-22 sts on circular needle size 4.5 mm with Belle. Work as follows (1st row = from RS): Work 3 sts in garter st (= towards neck), work 13-14-15-17-17-18 sts in stocking st, 1 edge st in garter st (= towards armhole). Continue like this back and forth. When piece measures 7-8-7-8-8-8 cm, inc 1 st for neck inside the 3 sts in garter st towards the neck. Repeat inc every other row 4-4-5-5-6-6 more times = 22-23-25-27-28-29 sts. When all inc are done, work 1 row from WS. Put piece aside.
Work right shoulder as follows:
Cast on and work as left shoulder but reversed. When all inc for neck are done, there are 22-23-25-27-28-29 sts on needle. Work 1 row from WS. Turn and work as before over all sts. At the end of row cast on 27 new sts in all sizes for neck, then work all sts from left shoulder on to needle = 71-73-77-81-83-85 sts.

Continue back and forth in stocking st with 1 edge st in garter st in each side and work in garter st over the middle 33 sts in all sizes (= the 27 new sts cast on for neck + 3 sts on each side of these). When 2 ridges have been worked over the middle 33 sts in all sizes, continue in stocking st and 1 edge st in garter st in each side. When piece measures 15 cm in all sizes, cast on new sts for armhole at the end of every row towards armhole the same way as on back piece, then work 1 row from WS = 73-81-87-97-107-119 sts. Piece measures 16-17-18-19-20-21 cm from shoulder.
Now work as follows: Work in stocking st over all sts on front piece, cast on 5-5-7-7-9-9 new sts for armhole, continue in stocking st over all sts on back piece, cast on 5-5-7-7-9-9 new sts for armhole. There are now 156-172-188-208-232-256 sts for body.

BODY:
Then work in the round on circular needle. NOW MEASURE THE PIECE FROM HERE. Work 1 more round in stocking st but stop 12-13-14-15-16-17 sts before beg of round. Insert a marker here. This is now beg of round. Now work pattern as follows: Work A.1 (= 10 sts), A.2 (= 11 sts), insert a marker here, work in stocking st over the next 57-65-73-83-95-107 sts, insert a marker here, A.1, A.2, insert a marker here, work in stocking st over the remaining 57-65-73-83-95-107 sts. NOTE: Move the 4 markers upwards when working to make it easier to tell the section with lace pattern and stocking st apart. No of sts in section in stocking st on front and back piece is constant and inc sts in the section with lace pattern in the sides. Continue pattern like this until entire A.1 and A.2 have been worked vertically. There are now 200-216-232-252-276-300 sts on round and piece measures approx. 19 cm in all sizes. Then repeat A.X vertically AT THE SAME TIME continue inc in diagram as before: I.e. lace pattern in each side inc with 12 sts and there are 2 eyelet rows (1 eyelet row = 1 dec + 1 YO) more in A.1 and A.2 in each side every time A.X is worked 1 time vertically. When piece measures 43-44-45-46-47-48 cm, there are approx. 320-336-352-376-404-432 sts on round. Work 1 round in stocking st. Then work 2 ridges. Cast off.

SLEEVE:
Worked in the round on double pointed needles up to sleeve cap, then work back and forth on needle.
Cast on 53-55-57-59-61-63 sts on double pointed needles size 4.5 mm. Work 2 ridges in GARTER ST in the round - see explanation above. Insert 1 marker at beg of round (1st st on round is mid under sleeve). Then work in stocking st. When piece measures 3-4-5-5-3-5 cm, inc 1 st on each side of st mid under sleeve (= 2 sts inc). Repeat inc every 5½-4½-3½-3-2½-2 cm 5-6-7-8-9-10 more times in total = 65-69-73-77-81-85 sts. When piece measures 34-34-33-32-29-29 cm (shorter measurements in the larger sizes because of longer sleeve cap and wider shoulders), cast off 5-5-7-7-9-9 sts mid under sleeve and work back and forth until finished measurements. Cast off for sleeve cap at beg of every row in each side as follows: 2 sts 4-4-4-4-3-3 times and 1 st 2-3-3-3-3-8 times. Then cast off 2 sts in each side until piece measures 42-43-43-43-43-44 cm. Loosely cast off. Knit another sleeve the same way.

ASSEMBLY:
Sew the shoulder seams tog. Make sure that to avoid a tight seam. Sew in sleeves in body inside 1 edge st in garter st.

This pattern has been corrected.

Updated online: 16.09.2016
BODY:
Then work in the round on circular needle. NOW MEASURE THE PIECE FROM HERE. Work 1 more round in stocking st but stop 12-13-14-15-16-17 sts before beg of round...
Updated online: 11.10.2016
Correction diagram A.1

Diagram

symbols = K
symbols = 1 YO between 2 sts On next round K the YO to make hole.
symbols = K 2 tog
symbols = slip 1 st as if to K, K 1, psso
symbols = slip 1 st as if to K, K 2 tog, psso
diagram
diagram

Each of our patterns has specific tutorial videos to help you.

Do you have a question? See a list of frequently asked questions (FAQ)

Knitting tension is what determines the final measurements of your work, and is usually measured per 10 x 10 cm. It is provided like so: number of stitches in width x number of rows in height - eg: 19 stitches x 26 rows = 10 x 10 cm.

The knitting tension is very individual; some people knit/crochet loosely while others work tightly. You adjust the knitting tension with the needle size, which is why the suggested needle size is only meant as a guide! You need to adjust this (up or down) to ensure that YOUR knitting tension matches the knitting tension provided in the pattern. If you work with a different knitting tension than provided you will have a different yarn consumption, and your work will have different measurements than what the pattern suggests.

The knitting tension also determines which yarns can replace each other. As long as you achieve the same knitting tension you can replace one yarn with another.

See DROPS lesson: How to measure your tension/gauge

See DROPS video: How to make a gauge tension swatch

The required amount of yarn is provided in grams, eg: 450 g. To calculate how many balls you’ll need you first need to know how many grams are in 1 ball (25g, 50g or 100g). This information is available if you click on the individual yarn quality on our pages. Divide the amount required with the amount of each ball. For example, if each ball is 50g (the most common amount), the calculation will be as follows: 450 / 50 = 9 balls.

The important thing when changing from one yarn to another is that the knitting/crochet tension remains the same. This is so that the measurements of the finished piece will be the same as on the sketch provided. It is easier to achieve the same knitting tension using yarns from the same yarn group. It is also possible to work with multiple strands of a thinner yarn to achieve the knitting tension of a thicker one. Please try our yarn converter. We recommend you to always work a test swatch.

Please NOTE: when changing yarn the garment might have a different look and feel to the garment in the photo, due to individual properties and qualities of each yarn.

See DROPS lesson: Can I use a different yarn than the one mentioned in the pattern?

All our yarns are categorised into yarn groups (from A to F) according to thickness and knitting tension – group A contains the thinnest yarns and group F the thickest. This makes it easier for you to find alternative yarns to our patterns, should you wish to switch yarn. All yarns within the same group have a similar knitting tension and can easily replace each other. However, different yarn qualities have different structures and properties which will give the finished work a unique look and feel.

Click here for an overview of the yarns in each yarn group

At the top of all our patterns you’ll find a link to our yarn calculator, which is a helpful tool should you wish to use a different yarn than suggested. By filling in the yarn quality you wish to replace, the amount (in your size) and number of strands, the calculator will present good alternative yarns with the same knitting tension. Additionally it will tell you how much you’ll require in the new qualities and whether you’ll need to work with multiple strands. Most skeins are 50g (some are 25g or 100g).

If the pattern is worked with multiple colours, every colour will have to be calculated separately. Similarly, if the pattern is worked with several strands of different yarns (for example 1 strand Alpaca and 1 strand Kid-Silk) you will have to find alternatives for each, individually.

Click here to see our yarn calculator

Since different yarns have different qualities and textures we have chosen to keep the original yarn in our patterns. However, you can easily find options among our available qualities by using our yarn calculator, or simply pick a yarn from the same yarn group.

It is possible that some retailers still have discontinued yarns in stock, or that someone has a few skeins at home that they would like to find patterns for.

The yarn calculator will provide both alternative yarn as well as required amount in the new quality.

If you think it's hard to decide what size to make, it can be a good idea to measure a garment you own already and like the size of. Then you can pick the size by comparing those measures with the ones available in the pattern's size chart.

You'll find the size chart at the bottom of the pattern.

See DROPS lesson: How to read size chart

The needle size provided in the pattern serves only as a guide, the important thing is to follow the knitting tension. And since knitting tension is very individual, you will have to adjust the needle size to ensure that YOUR tension is the same as in the pattern – maybe you’ll have to adjust 1, or even 2 needle sizes, up or down to achieve the correct tension. For this, we recommend that you work test swatches.

Should you work with a different knitting tension than the one provided, the measurements of the finished garment might deviate from the measurement sketch.

See DROPS lesson: How to measure your tension/gauge

See DROPS video: How to make a tension/gauge swatch

Working a garment top-down provides more flexibility and room for personal adjustment. For example it is easier to try the garment on while working, as well as making adjustments to length of yoke and shoulder caps.

The instructions are carefully explaining every step, in the correct order. Diagrams are adjusted to the knitting direction and are worked as usual.

The diagram depicts all rows/rounds, and every stitch seen from the right side. It is read from bottom to top, from right to left. 1 square = 1 stitch.

When working back and forth, every other row is worked from the right side and every other row is worked from the wrong side. When working from the wrong side, the diagram will have to be worked reversed: from left to right, knit stitches are purled, purl stitches are knit etc.

When working in the round every round is worked from the right side and the diagram are worked from right to left on all rounds.

See DROPS lesson: How to read knitting diagrams

The diagram depicts all rows/rounds, and every stitch seen from the right side. It is worked from bottom to top, from right to left.

When working back and forth every other row is worked from the right side: from right to left and every other row is worked from the wrong side: from left to right.

When working in the round, every row in the diagram are worked from the right side, from right to left.

When working a circular diagram you start in the middle and work your way outwards, counter clockwise, row by row.

The rows usually start with a given number of chain stitches (equivalent to the height of the following stitch), this will either be depicted in the diagram or explained in the pattern.

See DROPS lesson: How to read crochet diagrams

Instructions for working several diagrams after each other on the same row/round, will often be written like so: “work A.1, A.2, A.3 a total of 0-0-2-3-4 times". This means you work A.1 once, then A.2 is worked once, and A.3 is repeated (in width) the number of times provided for your size – in this case like so: S = 0 times, M = 0 times, L=2 times, XL= 3 times and XXL = 4 times.

The diagrams are worked as usual: begin with the first row in A.1, then work the first row in A.2 etc.

See DROPS lesson: How to read knitting diagrams

See DROPS lesson: How to read crochet diagrams

The total width of the garment (from wrist-to-wrist) will be larger in the larger sizes, despite the actual sleeves being shorter. The larger sizes have longer sleeve caps and wider shoulders, so there will be a good fit in all sizes.

The measurement sketch/schematic drawing provides information regarding the full length of the garment. If it’s a jumper or a jacket the length is measured from the highest point on the shoulder closest to the neckline, and straight down to the bottom of the garment. It is NOT measured from the tip of shoulder. Similarly, the length of yoke is measured from the highest point on the shoulder and down to where yoke is split into body and sleeves.

On a jacket measures are never taken along bands, unless specifically stated. Always measure inside band stitches when measuring the length.

See DROPS lesson: How to read a schematic drawing

Diagrams are often repeated on the round or in height. 1 repeat is the diagram the way it appears in the pattern. If it says to work 5 repeats of A.1 in the round, then you work A.1 a total of 5 times after/next to each other in the round. If it says to work 2 repeats of A.1 vertically/in height you work the entire diagram once, then begin again at the start and work the entire diagram one more time.

Chain stitches are slightly narrower than other stitches and to avoid working the cast-on edge too tight, we simply chain more stitches to begin with. The stitch count will be adjusted on the following row to fit the pattern and measurement sketch.

The rib edge is more elastic and will contract slightly compared to, for example, stocking stitch. By increasing before the rib edge, you avoid a visible difference in width between the rib edge and the rest of the body.

It’s very easy to cast off too tightly, and by making yarn overs while casting off (and simultaneously casting these off) you avoid a too tight cast off edge.

See DROPS video: How to bind off with yarn overs (yo)

To achieve an even increase (or decrease) you can increase on, for example: every 3rd and 4th row alternately, like so: work 2 rows and increase on the 3rd row, work 3 rows and increase on the 4th. Repeat this until the increase is complete.

See DROPS lesson: Increase or decrease 1 st on every 3rd and 4th row alternately

Should you prefer to work in the round instead of back and forth, you may of course adjust the pattern. You’ll need to add steeks mid-front (usually 5 stitches), and follow the instructions. When you would normally turn and work from the wrong side, simply work across the steek and continue in the round. At the end you’ll cut the piece open, pick up stitches to work bands, and cover the cut edges.

See DROPS video: How to knit steeks and cut open

Should you prefer to work back and forth instead of in the round, you may of course adjust the pattern so you work the pieces separately and then assemble them at the end. Divide the stitches for the body in 2, add 1 edge stitch in each side (for sewing) and work the front and back pieces separately.

See DROPS lesson: Can I adapt a pattern for circular needles into straight needles?

Pattern repeats can vary slightly in the different sizes, in order to get the correct proportions. If you’re not working the exact same size as the garment in the photo, yours might deviate slightly. This has been carefully developed and adjusted so that the complete impression of the garment is the same in all sizes.

Make sure to follow instructions and diagrams for your size!

If you have found a pattern you like which is available in women’s size it’s not very difficult to convert it to men’s size. The biggest difference will be the length of sleeves and body. Start working on the women size that you think would fit across the chest. The additional length will be worked right before you cast off for the armhole/sleeve cap. If the pattern is worked top-down you can add the length right after the armhole or before the first decrease on sleeve.

Regarding additional yarn amount, this will depend on how much length you add, but it is better with a skein too many than too few.

All yarns will have excess fibres (from production) that might come off as lint or shedding. Brushed yarns (ie hairier yarns) have more of these loose, excess fibres, causing more shedding.

Shedding also depends on what is worn under or over the garment, and whether this pulls at the yarn fibres. It’s therefore not possible to guarantee that there will be no shedding

Below are some tips on how to get the best result when working with hairier yarns:

1. When the garment is finished (before you wash it) shake it vigorously so the looser hairs come off. NOTE: do NOT use a lint roller, brush or any method that pulls at the yarn.

2. Place the garment in a plastic bag and put it in your freezer - the temperature will cause the fibres to become less attached to each other, and excess fibres will come off easier.

3. Leave in the freezer for a few hours before taking it out and shaking it again.

4. Wash the garment according to the instructions on the yarn label.

Pilling is a natural process that happens to even the most exclusive of fibers. It's a natural sign of wear and tear that is hard to avoid, and that is most visible in high friction areas of your garment like a sweater's arms and cuffs.

You can make your garment look as new by removing the pilling, using a fabric comb or a pill/lint remover.

Still can't find the answer you need? Then scroll down and leave your question so one of our experts can try to help you. This will be done normally within 5 to 10 working days.
In the meantime, you can read the questions and answers that others have left to this pattern or join the DROPS Workshop on Facebook to get help from fellow knitters/crocheters!

You might also like...

Post a comment to pattern DROPS 168-34

We would love to hear what you have to say about this pattern!

If you want to leave a question, please make sure you select the correct category in the form below, to speed up the answering process. Required fields are marked *.

Comments / Questions (36)

country flag Julie St-Arnaud wrote:

Bonjour, De combien de pelotes vais-je avoir besoin pour faire la taille large? Merci!

25.10.2019 - 20:41

DROPS Design answered:

Bonjour Julie. Pour la taille L, vous aurez besoin de 11 pelotes. Bon tricot!

30.10.2019 - 16:57

country flag Aliki wrote:

DROPS Design 29.03.2016 kl. 09:46: Hi, loving this pattern but could you clarify your comments (below) please? Do you mean that after the AX is worked the A1 & A2 are repeated again & do this until numbers/length are reached? Thank you Dear Mrs Poggi, after you have worked A.X 1 time in height, repeat lace pattern as before with inc as before too (inc are included in diagram), ie repeat A.X in height with lace pattern and inc as before. Happy knitting!

27.07.2019 - 14:54

DROPS Design answered:

Dear Mrs Aliki, correct, after A.X has been worked once in height, continue as before with the lace pattern (there will be more stitches than on first repeat) increasing at the same time as shown in A.X = the lace panels on each side will be always wider. Happy knitting!

06.08.2019 - 10:46

country flag Cheryl wrote:

For the back instructions of knit for 6", is that from the cast on edge of the shoulder, or the cast on of the 30+ stitches to join the two shoulder pieces? Also, do we need for 6" according to our blocked swatched, or 6" as we are knitting (so the piece will be longer than 6" once we block the piece)?

12.05.2019 - 14:39

DROPS Design answered:

Dear Cheryl, the 15 cm/ 6 inches should be measured from cast on edge + the rows casting on new stitches at the end of each row on each side you should have 16-17-18-19-20-21 cm / 6¼''-6¾''-7''-7½''-8''-8¼'' from shoulder - as in measurement chart. Happy knitting!

13.05.2019 - 09:46

country flag Ingrid Ziedins wrote:

Sleeve: After bind off of mid under sleeve stitches, ‘work back and forth until finished measurements’. Then come the sleeve cap. Where do I find the ‘until finished measurements?’ Otherwise, lovely pattern! I cannot wait to get clarification so I can get the sleeves finished.

29.03.2018 - 14:42

DROPS Design answered:

Dear Mrs Ziedins, you continue working sleeve in stocking stitch back and forth for sleeve cap until sleeve is finished, ie until all sts have been bound off and sleeve measures 42-43-44 cm - see size. Happy knitting!

30.03.2018 - 11:55

country flag Clare wrote:

...sorry typo * is something I don't quite understand...

03.08.2017 - 15:20

country flag Clare wrote:

This pattern is coming up well - thanks. My question is about the sleeve cast off - there is ss Omething I don't quite understand which may be in the translation. When you say ' cast off for sleeve at beg of every row in each side as follows: 2 sts 3 times.' Can I please check this means I decrease 2 stitches at the beginning AND END of the next 3 rows I.e. 12 stitches in all? Thank you

03.08.2017 - 15:11

DROPS Design answered:

Dear Clare, that's right, you cast off 2 sts at the beg of each row on each side a total of 3 times = 6 sts cast off on each side = total 12 sts cast off. Happy knitting!

03.08.2017 - 15:23

country flag Patricia wrote:

In der deutschen Übersetzung ist der Ärmelanschlag falsch angegeben. Bitte um Korrektur. Desweiteren ist der Lacechart sehr unverständlich erläutert. Zum einen Fehler in Rd. 3, zum anderen ist Wdh. Ab Ax nicht nachvollziehbar. Bitte um Korrektur!

04.06.2017 - 18:39

DROPS Design answered:

Liebe Patricia, Deutsche Anleitung wurde geprüft und stimmt originale Anleitung. Haatten Sie die Korrektur gesehen bzw gedrückt?

06.06.2017 - 09:51

country flag Laura wrote:

Quando si finisce di lavorare AX la prima volta ci sono 43 m, quindi quando ricomincio la prima riga di AX c'è ne sOno 30 secondo schema. Come devono essere lavorate queste 13 m? E dove devono essere lavorate ai lati o al centro? Grazie

27.05.2017 - 18:57

DROPS Design answered:

Buonasera Laura. Deve lavorare tutte le 43 maglie seguendo il motivo traforato dei diagrammi Ax. Lavora Ax (quello sopra A1) sulle prime 21 maglie riprendendendo dalla prima riga (anche sulle maglie con il motivo traforato che non sono rappresentate sulla riga) e finendo con 1 gettato e poi lavora Ax (quello sopra A2). Il numero di maglie con il motivo traforato deve aumentare, quello a maglia rasata rimane uguale. Buon lavoro!

27.05.2017 - 19:23

country flag Laura wrote:

Buonasera, so che c'é stata una domanda uguale alla mia ma non mi é ancora chiaro. sono arrivata alla lavorazione delle 200 m ; ora devo ripetere il motivo AX in verticale ma devo ricominciare a lavorare daccapo anche A1 e A2 e al centro lavorare AX? Grazie sempre. Laura

26.05.2017 - 19:40

DROPS Design answered:

Buonasera Laura. Lavora solo il diagramma AX. Lavora AX (quello sopra A1) fino alla maglia prima della maglia centrale della parte traforata. La prima maglia di AX (sopra A2) coincide con la maglia centrale. Lavora poi AX fino al segnapunti. Buon lavoro!

26.05.2017 - 20:00

country flag Christie wrote:

Ok so i looked over the chart more carefully and I see where the increases are, but according to the written portion of the pattern, it says I will go from 175 to 216 sts in size M when I finish working a1 and a2 one time vertically; meaning I will have inc 44 sts. But I counted the chart increases and there seems to only be about 11 inc in both a1 and a2 leaving only 22 sts of inc. should I be double inc, or am I wrong in the amount of inc I managed to count?

24.10.2016 - 19:20

DROPS Design answered:

Dear Christie, these inc are included in diagrams A.1 and A.2, ie when you have worked the diagrams 1 time in height, you will have inc a total of 22 sts inc in A.1/A.2 on each side (44 sts inc in total). Just work diagrams you will see the number of sts inc. Happy knitting!

25.10.2016 - 09:08