
Popular categories
Looking for a yarn?


Comments / Questions (60)
![]() Claudia wrote:
Claudia wrote:
Ho seguito con la massima attenzione le istruzioni ed i video, ma l'effetto è molto diverso. In particolare nella parte centrale risulta poco pieno e compatto. Non capisco come avete fatto
12.04.2017 - 15:12DROPS Design answered:
Buonasera Claudia, ci dispiace per questa segnalazione: questo modello è stato riprodotto moltissime volte e nessuna ha evidenziato il suo problema. Oltre ad aver seguito le istruzioni e i video, il suo campione corrisponde a quello indicato? Da questo dipende la buona riuscita del modello. Buon lavoro!
12.04.2017 - 20:09
![]() Alexandra Wärn wrote:
Alexandra Wärn wrote:
Hejsan, jag har kommit så långt med detta mönster att jag nu kontrollerade stickfastheten. Jag har stickat med nr5 stickor och ändå mäter arbetet 20cm från mitten och inte 15 som i mönstret. Hur går jag vidare?
09.04.2017 - 06:50DROPS Design answered:
Hej, stickfastheten bör du alltid kontrollera innan du påbörjar själva arbetet. Detta kan spara dig mycket tid och besvär. I detta fall bör du byta till tunnare stickor, men kontrollera nu först vilken storlek du behöver!
13.04.2017 - 13:42
![]() Donatella wrote:
Donatella wrote:
Buongiorno, volendo fare il maglione con la lana quale mi consiglierebbe? Grazie e buona giornata. Donatella
05.02.2017 - 10:29DROPS Design answered:
Buongiorno Donatella, questo modello è lavorato con 2 capi di un filato appartenente al gruppo A come Alpaca o Flora oppure 1 capo di un filato appartenente al gruppo C come Nepal o Alaska. Provi a vedere qui i gruppi di filato. Buon lavoro!
05.02.2017 - 10:52
![]() Gisela wrote:
Gisela wrote:
Hallo liebes Team, vielen Dank für Eure Hilfe. Wenn ich die Antwort richtig verstanden habe, ist A2 8x über alle Maschen mit den Zunahmen zu stricken und es geht dann weiter mit A3 über die ausgewählten Rapporte. Ist das so richtig? Oder ist A2 nur 4x über alle Maschen mit allen Zunahmen zu stricken? Vielen Dank für die Unterstützung.
31.01.2017 - 08:04DROPS Design answered:
Liebe Gisela, es stimmt so, vergessen Sie nur nicht, in der nächsten Rd die Umschläge im ersten, dritten, fünften und siebten Rapport re verschränkt str (um Löcher zu vermeiden), in den anderen Rappporten die Umschläge re str (sodass sich Löcher ergeben). Viel Spaß beim stricken!
31.01.2017 - 09:30
![]() Gisela wrote:
Gisela wrote:
Hallo liebes DROPS-Team, finde das Modell sehr schön, zumal es ein Pullover ist. Da würde ich mir noch mehr Modelle wünschen. Habe mich auch gleich ans Werk gemacht und das Blattmotiv fertig. Lt. Anleitung soll nun mit A2 weitergestrickt werden. Unklar ist mir dabei, wieviel mal A 2 gestrickt werden soll. Habe ich da evtl. etwas in der Anleitung übersehen? Gibt es weitere Videos wie A2 und A3 zu stricken sind? Vielen Dank für Eure Hilfe.
28.01.2017 - 19:25DROPS Design answered:
Liebe Gisela, Sie stricken zuerst A.2 über A.1 (= 8 x wie mit A.2), dann stricken Sie A.3 nur über über den zweiten, vierten, sechsten und achten Rapport von A.2, und über die 4 letzten Rapporte von A.2 stricken Sie einfach Krausrechts, dh nur 4 x A.2 stricken dann bekommen Sie einen Quadrat. Viel Spaß beim stricken!
30.01.2017 - 11:31
![]() Claudine Bucaille wrote:
Claudine Bucaille wrote:
Désolée, j'ai trouver réponse à ma question , il se trouve que l'aiguille circulaire que j'utilise est trop petite (pas assez longue)
15.12.2016 - 01:22
![]() Claudine Bucaille wrote:
Claudine Bucaille wrote:
Je voudrais savoir comment procéder car après la rosace , rien ne va plus , ça ressemble à tout ce qu'on veut, sauf l'ébauche d'un pull , pourtant suis pas une débutante !! et je trouve pas de vidéo montrant comment procéder après la rosace !!!
14.12.2016 - 22:54DROPS Design answered:
Bonjour Mme Bucaille, quand A.1 est terminé, on tricote ensuite A.2 puis A.3 au-dessus du 2ème, 4ème, 6ème et 8ème motif de A.2 seulement on augmente maintenant 8 m tous les 2 tours avec A.3 pour augmenter le carré. Une fois que le carré est fait, on va mettre les mailles de l'encolure en attente et continuer en aller-retour en formant l'encolure de chaque côté, puis en fonction de la taille, on continue un peu sur les mailles du bas ou bien on rabat toutes les mailles. Bon tricot!
15.12.2016 - 09:30
![]() Barbara Warnecke wrote:
Barbara Warnecke wrote:
Zu meinem Kommentar vom 03.08.2016 möchte ich noch folgende Frage hinzu fügen: Was mache ich falsch, wie bekomme ich das Motiv wie in der Abbildung zu sehen richtig schön hin, welche Stricknadelgröße, oder?
06.08.2016 - 10:59DROPS Design answered:
Liebe Barbara, passen Sie die Nadelstärke so lange nach unten an, bis die Maschenprobe erreicht ist.
08.08.2016 - 09:16
![]() Barbara Warnecke wrote:
Barbara Warnecke wrote:
Wunderschönes Modell, allerdings bekomme ich das Motiv nicht hin. Habe mit Nadeln Nr. 5 versucht, das Blatt zu Stricken, bekomme nur große Löcher. Mit Nadeln 4 1/2 oder sogar 3 1/2 sind die Maschen genau so weit, so dass es nicht gut aussieht und kein Blatt zu erkennen ist.
03.08.2016 - 10:01DROPS Design answered:
Liebe Barbara, Sie müssen die Nadelgrösse so lange anpassen, bis Sie die angegebene Maschenprobe erhalten.
08.08.2016 - 09:15
![]() Simona wrote:
Simona wrote:
Buongiorno, per cortesia, dove posso trovare le tabelle per le taglie dei vostri modelli? grazie Simona
21.07.2016 - 11:56DROPS Design answered:
Buongiorno Simona. Nel diagramma in basso, alla fine delle spiegazioni del modello, trova le misure del capo espresse in cm. Confrontando queste misure con quelle di un indumento analogo e di cui è soddisfatta, dovrebbe riuscire ad individuare la taglia corretta da seguire. Buon lavoro!
21.07.2016 - 12:07
|
|||||||||||||||||||
Morning Star#morningstarsweater |
|||||||||||||||||||
 |
 |
||||||||||||||||||
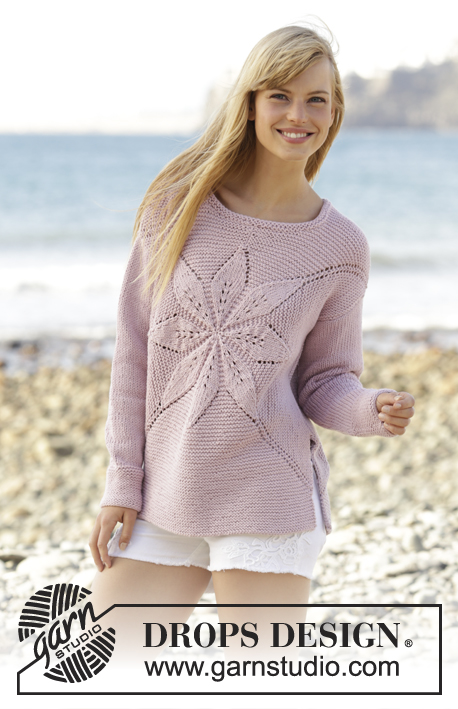
Knitted DROPS jumper worked in a square with leaf pattern in ”Paris”. Size: S - XXXL.
DROPS 167-4 |
|||||||||||||||||||
|
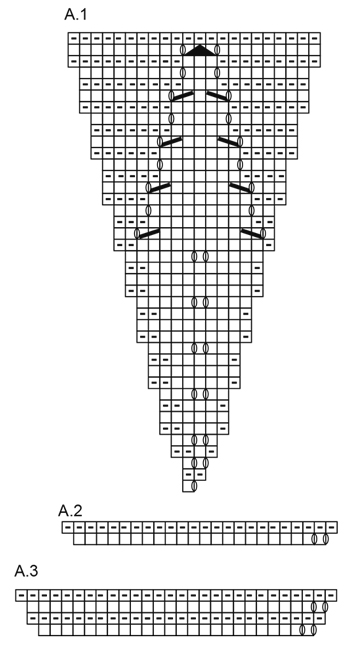
GARTER ST (worked in the round): 1 ridge = 2 rounds. * K 1 round and P 1 round *, repeat from *-*. GARTER ST (back and forth): K all rows. 1 ridge = 2 rows K. PATTERN: See diagrams A.1 to A.3. ---------------------------------------------------------- JUMPER: Body worked in 2 parts from mid front / mid back. Piece is first worked in the round, then worked back and forth. Cast on and work in the round on double pointed needles, switch to circular needle when needed. Finish by working the sleeves. FRONT PIECE: Cast on 8 sts with Paris and divide them on 4 double pointed needles size 5 mm (= 2 sts on every needle). Work according to A.1 (= 8 repetitions of A.1 in width). When the first 21 rounds in A.1 have been worked, displace the start of round 1 st towards the left, first on every other round, then every 4th round – i.e. beg of round is always right before the first YO in the diagram to make it less visible. Beg of round at the end will be in the midle of 1st repetition of A.1. REMEMBER THE KNITTING TENSION When A.1 has been worked one time vertically, there are 176 sts on round, piece measures approx. 15 cm from the middle, approx. 30 cm in diameter. Work first round in A.2 over all sts – make sure that YOs are directly above YOs from A.1, on next round K YO twisted in the first, third, fifth and seventh repetition (to avoid holes), K the YOs in the other repetitions (to make holes) = 192 sts. Then continue to work according to A.3 over the second, fourth, sixth and eighth repetition of A.2, over the 4 other repetitions work in GARTER st – see explanation above – now inc 8 sts every other round as shown in A.3. Continue in garter st and with inc as before until inc have been done 7-10-12-15-20-25 times in A.3, there are now 248-272-288-312-352-392 sts on round, finish after 1 P round. Work next round as follows: Slip the first 11-11-12-12-13-13 sts on a stitch holder for neck (work them first), continue with inc in A.3 and in garter st as before until 11-11-12-12-13-13 sts remain on round, slip the last 11-11-12-12-13-13 sts on a stitch holder for neck (work them first). Cut the yarn. Turn, now work piece back and forth. Continue with inc in A.3 on every row from RS, AT THE SAME TIME cast off in each side towards the neck on every other row as follows: 2 sts 1 time and 1 st 2 times. Continue like this until inc have been done 17-20-24-27-34-39 times in total in A.3 – there are now 298-322-352-376-430-470 sts on needle and piece measures approx. 25-27-29-31-35-38 cm from the middle and 50-54-58-62-70-76 cm in diameter. Size S-M-L-XL: Cast off the first 108-117-128-137 sts, slip the next 82-88-96-102 sts on a stitch holder, and cast off the last 108-117-128-137 sts. Cut the yarn. Work in garter st back and forth over the 82-88-96 sts in bottom edge for 8-6-4-2 cm. Cast off. Size XXL-XXXL: Cast off when all inc are done. Insert a marker in each side, 18-19-20-21-22-23 cm down from shoulder. This shows where sleeve is sewn in. BACK PIECE: Cast on and work as front piece until inc have been done 14-17-21-24-31-36 times in A.3, there are now 304-328-360-384-440-480 sts on round, finish with P 1 round. Piece measures approx. 23-25-27-30-33-36 cm from the middle and 46-50-54-60-66-72 cm in diameter. Then work next round as follows: Cast off the first 15-15-16-16-17-17 sts on round, continue with A.3 with inc as before until 15-15-16-16-17-17 sts remain on round, cast off these sts. Cut the yarn. Then work piece back and forth until inc have been done 17-20-24-27-34-39 times in total in A.3 – there are now 298-322-352-376-430-470 sts on needle and piece measures approx. 25-27-29-32-35-38 cm from the middle and 50-54-58-64-70-76 cm in diameter. Size S-M-L-XL: Cast off the first 108-117-128-137 sts, slip the next 82-88-96-102 sts on a stitch holder, and cast off the last 108-117-128-137 sts. Cut the yarn. Work in garter st back and forth over the 82-88-96 sts in bottom edge for 8-6-4-2 cm. Cast off. Size XXL-XXXL: Cast off when all inc are done. Insert a marker in each side, 18-19-20-21-22-23 cm down from shoulder. This shows where sleeve is sewn in. SLEEVE: Worked back and forth on circular needle. Cast on 32-34-36-38-40-42 sts (incl 1 edge st in each side) on circular needle size 5 mm with Paris. Work 16 ridges, then work in stocking st with 1 edge st in garter st in each side. When piece measures 10 cm, inc 1 st in each side. Repeat inc every 2½-2½-2-2-1½-1½ cm 14-14-15-16-16-17 more times = 62-64-68-72-74-78 sts. Cast off when piece measures 48-47-46-44-42-40 cm (shorter measurements in the larger sizes because of wider shoulders). Work another sleeve the same way. ASSEMBLY: Sew the shoulder seams. Sew in sleeves, down to markers on front/back piece. Sew underarm seams and side seams in one inside 1 edge st, stop when 20 cm remain at the bottom of body = vents. NECK EDGE: Pick up approx. 70 to 86 sts (incl sts on stitch holder) around the neck on double pointed needles size 5 mm. Work 2 ridges. Cast off. |
|||||||||||||||||||
Diagram explanations |
|||||||||||||||||||
|
|||||||||||||||||||
 |
|||||||||||||||||||
 |
|||||||||||||||||||
Have you finished this pattern?Tag your pictures with #dropspattern #morningstarsweater or submit them to the #dropsfan gallery. Do you need help with this pattern?You'll find 29 tutorial videos, a Comments/Questions area and more by visiting the pattern on garnstudio.com. © 1982-2026 DROPS Design A/S. We reserve all rights. This document, including all its sub-sections, has copyrights. Read more about what you can do with our patterns at the bottom of each pattern on our site. |
|||||||||||||||||||


With over 40 years in knitting and crochet design, DROPS Design offers one of the most extensive collections of free patterns on the internet - translated to 17 languages. As of today we count 324 catalogues and 12290 patterns translated into English (UK/cm).
We work hard to bring you the best knitting and crochet have to offer, inspiration and advice as well as great quality yarns at incredible prices! Would you like to use our patterns for other than personal use? You can read what you are allowed to do in the Copyright text at the bottom of all our patterns. Happy crafting!
Post a comment to pattern DROPS 167-4
We would love to hear what you have to say about this pattern!
If you want to leave a question, please make sure you select the correct category in the form below, to speed up the answering process. Required fields are marked *.