
Popular categories
Looking for a yarn?


|
|||||||||||||||||||
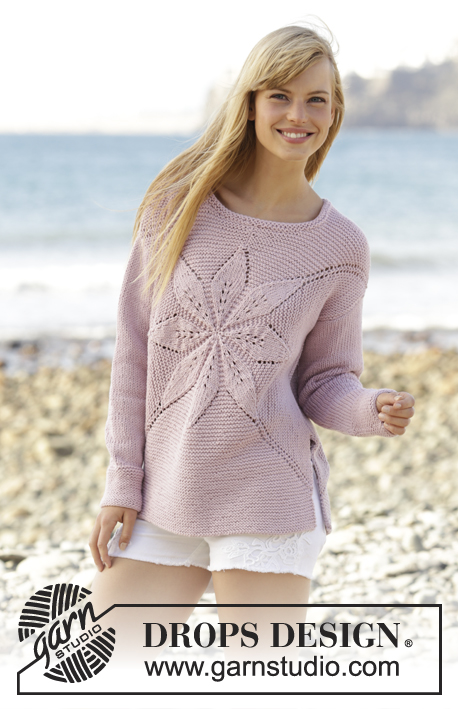
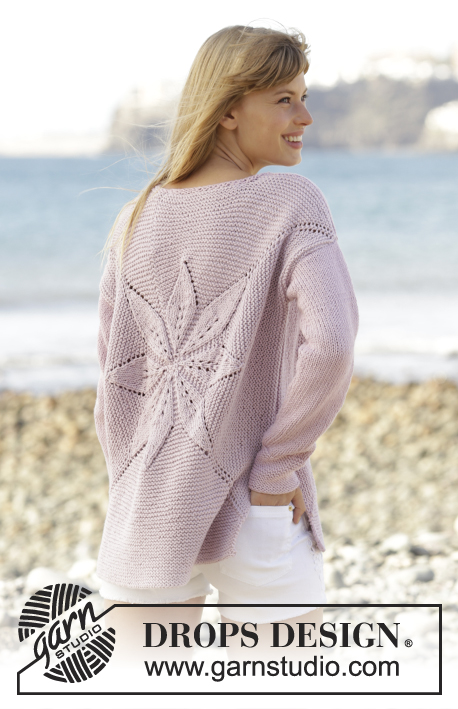
Morning Star |
|||||||||||||||||||
 |
 |
||||||||||||||||||
Knitted DROPS jumper worked in a square with leaf pattern in ”Paris”. Size: S - XXXL.
DROPS 167-4 |
|||||||||||||||||||
|
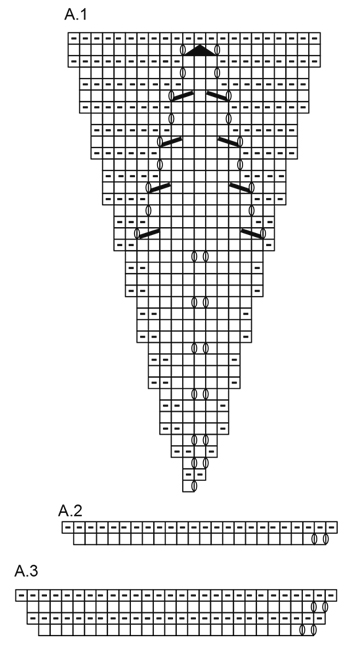
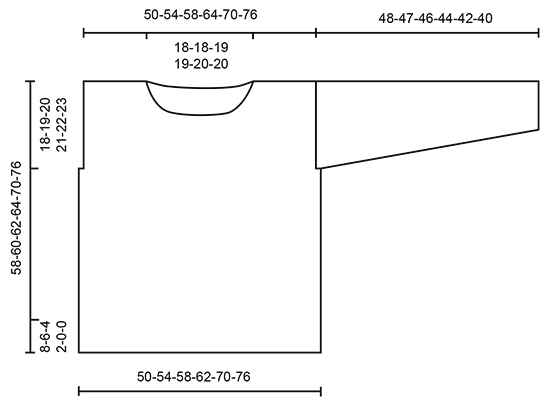
GARTER ST (worked in the round): 1 ridge = 2 rounds. * K 1 round and P 1 round *, repeat from *-*. GARTER ST (back and forth): K all rows. 1 ridge = 2 rows K. PATTERN: See diagrams A.1 to A.3. ---------------------------------------------------------- JUMPER: Body worked in 2 parts from mid front / mid back. Piece is first worked in the round, then worked back and forth. Cast on and work in the round on double pointed needles, switch to circular needle when needed. Finish by working the sleeves. FRONT PIECE: Cast on 8 sts with Paris and divide them on 4 double pointed needles size 5 mm (= 2 sts on every needle). Work according to A.1 (= 8 repetitions of A.1 in width). When the first 21 rounds in A.1 have been worked, displace the start of round 1 st towards the left, first on every other round, then every 4th round – i.e. beg of round is always right before the first YO in the diagram to make it less visible. Beg of round at the end will be in the midle of 1st repetition of A.1. REMEMBER THE KNITTING TENSION When A.1 has been worked one time vertically, there are 176 sts on round, piece measures approx. 15 cm from the middle, approx. 30 cm in diameter. Work first round in A.2 over all sts – make sure that YOs are directly above YOs from A.1, on next round K YO twisted in the first, third, fifth and seventh repetition (to avoid holes), K the YOs in the other repetitions (to make holes) = 192 sts. Then continue to work according to A.3 over the second, fourth, sixth and eighth repetition of A.2, over the 4 other repetitions work in GARTER st – see explanation above – now inc 8 sts every other round as shown in A.3. Continue in garter st and with inc as before until inc have been done 7-10-12-15-20-25 times in A.3, there are now 248-272-288-312-352-392 sts on round, finish after 1 P round. Work next round as follows: Slip the first 11-11-12-12-13-13 sts on a stitch holder for neck (work them first), continue with inc in A.3 and in garter st as before until 11-11-12-12-13-13 sts remain on round, slip the last 11-11-12-12-13-13 sts on a stitch holder for neck (work them first). Cut the yarn. Turn, now work piece back and forth. Continue with inc in A.3 on every row from RS, AT THE SAME TIME cast off in each side towards the neck on every other row as follows: 2 sts 1 time and 1 st 2 times. Continue like this until inc have been done 17-20-24-27-34-39 times in total in A.3 – there are now 298-322-352-376-430-470 sts on needle and piece measures approx. 25-27-29-31-35-38 cm from the middle and 50-54-58-62-70-76 cm in diameter. Size S-M-L-XL: Cast off the first 108-117-128-137 sts, slip the next 82-88-96-102 sts on a stitch holder, and cast off the last 108-117-128-137 sts. Cut the yarn. Work in garter st back and forth over the 82-88-96 sts in bottom edge for 8-6-4-2 cm. Cast off. Size XXL-XXXL: Cast off when all inc are done. Insert a marker in each side, 18-19-20-21-22-23 cm down from shoulder. This shows where sleeve is sewn in. BACK PIECE: Cast on and work as front piece until inc have been done 14-17-21-24-31-36 times in A.3, there are now 304-328-360-384-440-480 sts on round, finish with P 1 round. Piece measures approx. 23-25-27-30-33-36 cm from the middle and 46-50-54-60-66-72 cm in diameter. Then work next round as follows: Cast off the first 15-15-16-16-17-17 sts on round, continue with A.3 with inc as before until 15-15-16-16-17-17 sts remain on round, cast off these sts. Cut the yarn. Then work piece back and forth until inc have been done 17-20-24-27-34-39 times in total in A.3 – there are now 298-322-352-376-430-470 sts on needle and piece measures approx. 25-27-29-32-35-38 cm from the middle and 50-54-58-64-70-76 cm in diameter. Size S-M-L-XL: Cast off the first 108-117-128-137 sts, slip the next 82-88-96-102 sts on a stitch holder, and cast off the last 108-117-128-137 sts. Cut the yarn. Work in garter st back and forth over the 82-88-96 sts in bottom edge for 8-6-4-2 cm. Cast off. Size XXL-XXXL: Cast off when all inc are done. Insert a marker in each side, 18-19-20-21-22-23 cm down from shoulder. This shows where sleeve is sewn in. SLEEVE: Worked back and forth on circular needle. Cast on 32-34-36-38-40-42 sts (incl 1 edge st in each side) on circular needle size 5 mm with Paris. Work 16 ridges, then work in stocking st with 1 edge st in garter st in each side. When piece measures 10 cm, inc 1 st in each side. Repeat inc every 2½-2½-2-2-1½-1½ cm 14-14-15-16-16-17 more times = 62-64-68-72-74-78 sts. Cast off when piece measures 48-47-46-44-42-40 cm (shorter measurements in the larger sizes because of wider shoulders). Work another sleeve the same way. ASSEMBLY: Sew the shoulder seams. Sew in sleeves, down to markers on front/back piece. Sew underarm seams and side seams in one inside 1 edge st, stop when 20 cm remain at the bottom of body = vents. NECK EDGE: Pick up approx. 70 to 86 sts (incl sts on stitch holder) around the neck on double pointed needles size 5 mm. Work 2 ridges. Cast off. |
|||||||||||||||||||
Diagram explanations |
|||||||||||||||||||
|
|||||||||||||||||||
|
|||||||||||||||||||
|
|||||||||||||||||||
|
Have you made this or any other of our designs? Tag your pictures in social media with #dropsdesign so we can see them! Do you need help with this pattern?You'll find tutorial videos, a Comments/Questions area and more by visiting the pattern on garnstudio.com. © 1982-2024 DROPS Design A/S. We reserve all rights. This document, including all its sub-sections, has copyrights. Read more about what you can do with our patterns at the bottom of each pattern on our site. |
|||||||||||||||||||


With over 40 years in knitting and crochet design, DROPS Design offers one of the most extensive collections of free patterns on the internet - translated to 17 languages. As of today we count 304 catalogues and 11422 patterns - 11422 of which are translated into English (UK/cm).
We work hard to bring you the best knitting and crochet have to offer, inspiration and advice as well as great quality yarns at incredible prices! Would you like to use our patterns for other than personal use? You can read what you are allowed to do in the Copyright text at the bottom of all our patterns. Happy crafting!
Comments / Questions (58)
Hi, I love this pattern it's so beautiful, but after row 21 is that the first row with a yarn over at the edge of the petal? So when I displace the start of the round I should do a stocking stitch over what was previously in the garter stitch section? Many thanks, Suzie
04.06.2016 - 22:49DROPS Design answered:
Dear Suzie, the YO belong to the garter st section, ie you have to work it alternately K and P. Happy knitting!
06.06.2016 - 09:26Oxana wrote:
Very beautiful!!!
11.05.2016 - 13:24Hallo liebes Drops-Team! Ich stricke dies Modell in Größe L, habe jetzt die Maschen für den Halsabschnitt stillgelegt und die Abnahmen zum Halsausschnitt gestrickt. Nun steht in der Anleitung, daß ich weiter nach A3 stricken soll, bis 352 M auf der Nadel sind. Geh ich recht in der Annahme, daß da die stillgelegten Maschen mitzählen?
07.05.2016 - 20:48DROPS Design answered:
Liebe Sylvia, hier zählen nur die "aktiven" (also nicht die stillgelegten) Maschen.
06.07.2016 - 11:18Why do all the patterns suddenly have to be charts. We old birds who have been knitting with written patterns for years find it very difficult to follow the charts. Is it possible to get a written pattern for this sweater. Thank you.
03.03.2016 - 04:07DROPS Design answered:
Dear Memerelina, there is no written pattern to the diagrams, but you can read here how to work each of them. They are here worked in the round, start at the very bottom on the right side of each diagram and read from the right towards the left on every round - 1 square = 1 st x 1 round. For any individual assistance, you are welcome to contact your DROPS store they will give you tips & advices. Happy knitting!
03.03.2016 - 09:03Super: Endlich ein "KreisPULLI" und keine Jacke (stehen mir nicht)!
17.02.2016 - 19:43Suzanne Weber wrote:
Concerning the displacement of first stitch to the left, I understand that the row starts immediately in front of the y/o, but exactly how is this done and where in the repetition is that first stitch knitted that has now been moved. Could you please post a video of this process, it is difficult to understand.
10.02.2016 - 17:39DROPS Design answered:
Dear Mrs Weber, when you start round 22, work 1st st, and insert marker for beg of round, then work YO, K2 tog etc as shown in diagram, and continue like this until next to last round, where marker will be in the middle of the first A.1 on round. Happy knitting!
11.02.2016 - 09:47Einfach fantastisch, diese Kollektion, wo soll ich nur anfangen, eins schöner als das andere, herrlich, danke, tausendmal danke!!!
10.02.2016 - 09:09Thank you for your reply, I understand what you say, but I need to know on A3 if I work 16 inc into the round as on A2, or is it just 8 inc to give diagonal holes ?
05.02.2016 - 16:05DROPS Design answered:
Dear Mrs Barne, you work A.3 only 4 times (= over the second, fourth, sixth and eighth repetition of A.2) so that you will get only 8 inc (2 inc x 4 repeats) for the diagonal holes. Happy knitting!
05.02.2016 - 16:33When working front A3, do you work 2 inc on every repetition giving 16 inc on that round twisting every other repetition to avoid holes, or is it just 8 inc over 14 rounds to get 248 st......hope that makes sense to you, but find it very difficult to follow the pattern...Yarn is lovely and just hope I can manage the pattern.
05.02.2016 - 15:35DROPS Design answered:
Dear Mrs Barnes, when repeating A.3 work P Yo's on next round to continue holes diagonnaly as before. Happy knitting!
05.02.2016 - 15:44I cannot understand pattern from working 21st round on front ? Displace the start of round 1 st towards left, etc , I took pattern to your stockist and they also did not understand ? Can you please help. Many Thanks Eileen
30.01.2016 - 17:33DROPS Design answered:
Dear Mrs Hollins, when you work round 21, adjust so that your rounds now start with the first YO in first repeat of A.1 so that the end of row will be less visible. Happy knitting!
01.02.2016 - 09:26