
Popular categories
Looking for a yarn?


Comments / Questions (60)
![]() Gun-Britt wrote:
Gun-Britt wrote:
Hur är det möjligt med 34 varv på 10 cm? Jag fick 24 varv och 17 maskor på 10x10 cm. Jag använder ert rekommenderade garn Paris och stickor nr 5. Hur får jag nu mönstret att stämma?
02.11.2021 - 14:35DROPS Design answered:
Hej Gun-Britt, det går flera varv när du stickar rätstickad (än när du stickar slätst) När du stickar din provlapp fram och tillbaka på raka stickor, stickar du rät på alla varv. När du stickar tröjan runt på rundsticka stickas rätst såhär; 1 v rätt och 1 v avigt. Lycka till!
02.11.2021 - 14:59
![]() Gun-Britt wrote:
Gun-Britt wrote:
Hur kan det vara möjligt att få 34 varv rätstickning på 10 cm? På 10 cm så får jag nog 17 maskor men blir 24 varv. Alltså 10x10 cm så ger mig bara 24 varv och 17 maskor på bredden med stickor nr 5. Tar jag mindre stickor så stämmer det ju inte alls med maskantalet. Är det säkert rätt att det ska vara 34 varv som det står i mönstret?Jag använder Paris garnet som ni rekommenderar.Så hur ska jag göra föra att få rätt maskantal o stickgrovlek?
01.11.2021 - 21:17
![]() Petra wrote:
Petra wrote:
Hallo, wenn ich mit dem Rückenteil fertig bin, habe ich ein Oval und kein Rechteck. Ich stricke Größe XXL. Es ist nicht klar beschrieben, wie es mit den Abnahmen funktioniert. In der Beschreibung wäre es schön, wenn mehr beschrieben wird, was Seitenteile, Schulterteile etc. sind.
21.02.2021 - 19:06DROPS Design answered:
Liebe Petra, Rückenteil in XXL ist fertig wenn alle Zunahmen fertig sind, dann ketten Sie alle Maschen ab. Da Sie immer in den jeweiligen 4 Ecke 2 Maschen zugenommen haben, haben Sie eine Vierecke. Viel Spaß beim stricken!
22.02.2021 - 09:06
![]() Bärbel wrote:
Bärbel wrote:
Hallo liebes DROPS-Team, ich habe noch eine Frage, und zwar komme ich mit dem Verschieben am Rd-Beginn um 1M nach links nicht zurecht. Wenn ich eine M (bei mir ist es nach rechts) verschiebe, fehlt mir doch die M im Rapport. Und nehme ich die eine M mit über alle Rapporte bis zum Ende/Anfang?
03.05.2020 - 20:06DROPS Design answered:
Liebe Bärbel, damit die Krausrippen schön passen, sollen Sie ab Runde 21 die Runde mit die glatt rechten Maschen anfangen, dh das erste Mal, die erste Masche abheben und diese am Ende der Runde stricken. So beginnen die nächsten Runden mit den Umschlägen/Löchern. Viel Spaß beim stricken!
12.05.2020 - 10:20
![]() Bärbel wrote:
Bärbel wrote:
Hallo, Ich habe jetzt das Blatt fertig gestrickt. Wie bekomme ich nun das Blatt rechteckig. A3 stricke ich nur den 2., 4., 6., u. 8. Rapport. Aber dazwischen muß ich die übrigen Rapporte zuerst frei lassen und nachher kraus rechts stricken?
01.05.2020 - 19:36DROPS Design answered:
Liebe Bärbel, mit A.3 nehmen Sie jetzt nur noch in 4 Ecken zu, dh über jedes 2. Blatt stricken Sie nur noch krausrechts und über jedes 2. anderes Blatt nehmen Sie wie im A.3 gezeigt. Viel Spaß beim stricken!
04.05.2020 - 11:06
![]() Sandra wrote:
Sandra wrote:
I am ready to finish the front. Do I not cut the yarn between the first number of cast offs, the stitches put on a holder, and the final stitches to be cast off? Thank you.
23.03.2020 - 18:17DROPS Design answered:
Dear Sandra, you are right, you don't have to cut theyarn between putting the stitches on a stitch holder (you can do this if you knit the stitches first and the cast off stitches. Happy Knitting!
23.03.2020 - 20:23
![]() Agnieszka wrote:
Agnieszka wrote:
Dzień Dobry. Planuję wykonać ten sweterek i mam jedną wątpliwość. Od którego miejsca liczymy motywy lub gdzie znajduje się pierwszy motyw wzoru A1? Chodzi mi o to czy kolejność motywu liczymy od np. środka dekoltu czy np. od środka boku swetra? Pozdrawiam.
09.03.2020 - 14:39DROPS Design answered:
Witaj Agnieszko! Ze zdjęć widzę, że kolejność motywu liczy się od środka przodu i tyłu. Pozdrawiam!
10.03.2020 - 17:55
![]() Magdalena wrote:
Magdalena wrote:
Hello :) When working the A3 diagram, should I keep moving the beginning of the repetition to the left to align the holes or let them drift to the right? From the pictures of the knitted work it looks like the holes are aligned, so the beginning had to be moved but the pattern doesn't say anything about it and the A3 diagram shows the holes drifting to the right...
24.04.2019 - 23:31DROPS Design answered:
Dear Magdalena, beginning of rounds are not displaced anymore, you work A.3 over 2nd, 4th, 6th and 8th repeat of A.2 (the 2nd stitch in A.3(A.2) should match the middle stitch in A.1 so that the holes will continue. Happy knitting!
25.04.2019 - 09:10Margarete wrote:
Servus liebes Team! gibt es diese Anleitung auch auf deutsch? LG Grete
17.11.2018 - 10:30DROPS Design answered:
Liebe Margarete, alle unsere Anleitungen sind auch auf deutsch, einfach über das Menü unter dem Foto Klicken und die Sprache ändern. Viel Spaß beim stricken!
19.11.2018 - 08:06
![]() Ellen Anne wrote:
Ellen Anne wrote:
Jeg har lyst til å strikke denne genseren i merino ekstra fine. Hvor mye mer garn må jeg da ha i str large?
10.09.2018 - 18:07DROPS Design answered:
Hei Ellen Anne, Det finnes en garnkalkulator ved siden av fotoen på toppen av oppskriften. God fornøyelse!
11.09.2018 - 09:00
|
|||||||||||||||||||
Morning Star#morningstarsweater |
|||||||||||||||||||
 |
 |
||||||||||||||||||
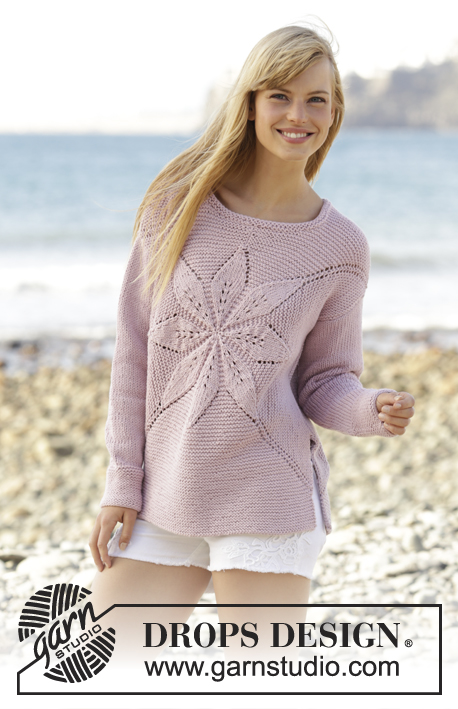
Knitted DROPS jumper worked in a square with leaf pattern in ”Paris”. Size: S - XXXL.
DROPS 167-4 |
|||||||||||||||||||
|
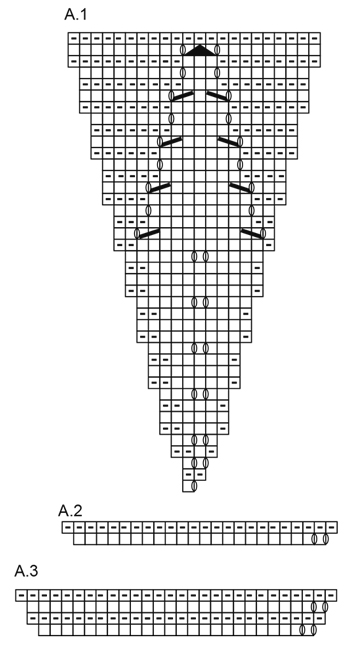
GARTER ST (worked in the round): 1 ridge = 2 rounds. * K 1 round and P 1 round *, repeat from *-*. GARTER ST (back and forth): K all rows. 1 ridge = 2 rows K. PATTERN: See diagrams A.1 to A.3. ---------------------------------------------------------- JUMPER: Body worked in 2 parts from mid front / mid back. Piece is first worked in the round, then worked back and forth. Cast on and work in the round on double pointed needles, switch to circular needle when needed. Finish by working the sleeves. FRONT PIECE: Cast on 8 sts with Paris and divide them on 4 double pointed needles size 5 mm (= 2 sts on every needle). Work according to A.1 (= 8 repetitions of A.1 in width). When the first 21 rounds in A.1 have been worked, displace the start of round 1 st towards the left, first on every other round, then every 4th round – i.e. beg of round is always right before the first YO in the diagram to make it less visible. Beg of round at the end will be in the midle of 1st repetition of A.1. REMEMBER THE KNITTING TENSION When A.1 has been worked one time vertically, there are 176 sts on round, piece measures approx. 15 cm from the middle, approx. 30 cm in diameter. Work first round in A.2 over all sts – make sure that YOs are directly above YOs from A.1, on next round K YO twisted in the first, third, fifth and seventh repetition (to avoid holes), K the YOs in the other repetitions (to make holes) = 192 sts. Then continue to work according to A.3 over the second, fourth, sixth and eighth repetition of A.2, over the 4 other repetitions work in GARTER st – see explanation above – now inc 8 sts every other round as shown in A.3. Continue in garter st and with inc as before until inc have been done 7-10-12-15-20-25 times in A.3, there are now 248-272-288-312-352-392 sts on round, finish after 1 P round. Work next round as follows: Slip the first 11-11-12-12-13-13 sts on a stitch holder for neck (work them first), continue with inc in A.3 and in garter st as before until 11-11-12-12-13-13 sts remain on round, slip the last 11-11-12-12-13-13 sts on a stitch holder for neck (work them first). Cut the yarn. Turn, now work piece back and forth. Continue with inc in A.3 on every row from RS, AT THE SAME TIME cast off in each side towards the neck on every other row as follows: 2 sts 1 time and 1 st 2 times. Continue like this until inc have been done 17-20-24-27-34-39 times in total in A.3 – there are now 298-322-352-376-430-470 sts on needle and piece measures approx. 25-27-29-31-35-38 cm from the middle and 50-54-58-62-70-76 cm in diameter. Size S-M-L-XL: Cast off the first 108-117-128-137 sts, slip the next 82-88-96-102 sts on a stitch holder, and cast off the last 108-117-128-137 sts. Cut the yarn. Work in garter st back and forth over the 82-88-96 sts in bottom edge for 8-6-4-2 cm. Cast off. Size XXL-XXXL: Cast off when all inc are done. Insert a marker in each side, 18-19-20-21-22-23 cm down from shoulder. This shows where sleeve is sewn in. BACK PIECE: Cast on and work as front piece until inc have been done 14-17-21-24-31-36 times in A.3, there are now 304-328-360-384-440-480 sts on round, finish with P 1 round. Piece measures approx. 23-25-27-30-33-36 cm from the middle and 46-50-54-60-66-72 cm in diameter. Then work next round as follows: Cast off the first 15-15-16-16-17-17 sts on round, continue with A.3 with inc as before until 15-15-16-16-17-17 sts remain on round, cast off these sts. Cut the yarn. Then work piece back and forth until inc have been done 17-20-24-27-34-39 times in total in A.3 – there are now 298-322-352-376-430-470 sts on needle and piece measures approx. 25-27-29-32-35-38 cm from the middle and 50-54-58-64-70-76 cm in diameter. Size S-M-L-XL: Cast off the first 108-117-128-137 sts, slip the next 82-88-96-102 sts on a stitch holder, and cast off the last 108-117-128-137 sts. Cut the yarn. Work in garter st back and forth over the 82-88-96 sts in bottom edge for 8-6-4-2 cm. Cast off. Size XXL-XXXL: Cast off when all inc are done. Insert a marker in each side, 18-19-20-21-22-23 cm down from shoulder. This shows where sleeve is sewn in. SLEEVE: Worked back and forth on circular needle. Cast on 32-34-36-38-40-42 sts (incl 1 edge st in each side) on circular needle size 5 mm with Paris. Work 16 ridges, then work in stocking st with 1 edge st in garter st in each side. When piece measures 10 cm, inc 1 st in each side. Repeat inc every 2½-2½-2-2-1½-1½ cm 14-14-15-16-16-17 more times = 62-64-68-72-74-78 sts. Cast off when piece measures 48-47-46-44-42-40 cm (shorter measurements in the larger sizes because of wider shoulders). Work another sleeve the same way. ASSEMBLY: Sew the shoulder seams. Sew in sleeves, down to markers on front/back piece. Sew underarm seams and side seams in one inside 1 edge st, stop when 20 cm remain at the bottom of body = vents. NECK EDGE: Pick up approx. 70 to 86 sts (incl sts on stitch holder) around the neck on double pointed needles size 5 mm. Work 2 ridges. Cast off. |
|||||||||||||||||||
Diagram explanations |
|||||||||||||||||||
|
|||||||||||||||||||
 |
|||||||||||||||||||
 |
|||||||||||||||||||
Have you finished this pattern?Tag your pictures with #dropspattern #morningstarsweater or submit them to the #dropsfan gallery. Do you need help with this pattern?You'll find 29 tutorial videos, a Comments/Questions area and more by visiting the pattern on garnstudio.com. © 1982-2026 DROPS Design A/S. We reserve all rights. This document, including all its sub-sections, has copyrights. Read more about what you can do with our patterns at the bottom of each pattern on our site. |
|||||||||||||||||||


With over 40 years in knitting and crochet design, DROPS Design offers one of the most extensive collections of free patterns on the internet - translated to 17 languages. As of today we count 324 catalogues and 12290 patterns translated into English (UK/cm).
We work hard to bring you the best knitting and crochet have to offer, inspiration and advice as well as great quality yarns at incredible prices! Would you like to use our patterns for other than personal use? You can read what you are allowed to do in the Copyright text at the bottom of all our patterns. Happy crafting!
Post a comment to pattern DROPS 167-4
We would love to hear what you have to say about this pattern!
If you want to leave a question, please make sure you select the correct category in the form below, to speed up the answering process. Required fields are marked *.