
Popular categories
Looking for a yarn?


Comments / Questions (33)
![]() Seonad Wright wrote:
Seonad Wright wrote:
I am really looking forward to starting this
28.06.2020 - 21:36
![]() Sandrene Johnson wrote:
Sandrene Johnson wrote:
How do i get to print this pattern what must I do
14.06.2020 - 00:11DROPS Design answered:
Dear Sandrene, there is a button which says print, located under the materials. Happy knitting!
14.06.2020 - 22:52
![]() Emma wrote:
Emma wrote:
Hej, vad betyder stl i cl? Antar att stl står. för storlek med vad betyder cl? Verkar vara något underliga mått då på vanliga kläder är 86 12-18mån men på lista ser jag att det står 74-80 i cl ska motsvara12-18mån??? Hälsningsr emma
23.04.2020 - 22:52DROPS Design answered:
Hej Det ska stå cm där, det är nu rättat på den svenska översättningen. Om du har svårt att veta vilken storlek du ska göra kan du alltid se på måttskissen längst ner för att se hur stor åkpåsen kommer att bli. Mvh DROPS Design
24.04.2020 - 09:30
![]() Grace wrote:
Grace wrote:
Jet holder på å strikker oppskriften som pose til bilsete, men klarer ikke å forstå om det skal lages hull til setebeltet på begge forstykkene eller bare på høyre side.? Så forstår jeg heller ikke hvordan jeg evt skal måle 47 cm fra skulderen for å lage hullet til beltet. Dette må jo måles fra venstre side som jeg allerede har strikket ferdig, eller måljeger rekke opp igjen .? Dette burde vært bedre beskrevet i oppskriften syns jeg.
03.04.2020 - 23:52DROPS Design answered:
Du strikker kjøreposen i et stykke. Du starter med bakstykket, fell av til det første hullet til setebelte på bakstykket når arbeidet måler ca 16-20-23 (28-33) cm. Nå strikkes det videre oppover, det legges ut til ermene, erme strikkes ferdig, det felles til ermene, strikk til riktig mål og fell til hals, nå settes maskene i høyre side på 1 tråd og venstre forstykke strikkes. Her settes det et merke du skal måle fra når du skal lage hull til setebelte på forstykket. Det 2. hullet til setebeltet lages når venstre og høyre forstykket er satt sammen og arbeidet målt fra skulderen er 42-47-52 (58-59) cm. God Fornøyelsen!
17.04.2020 - 12:06
![]() Sarah wrote:
Sarah wrote:
När rändern med rätstickning är gjorda på framstyckena så ska båda framstyckena sättas på samma sticka. Innebär det att man stickar ihop dessa stycken från och med där? Jag har ju bara hunnit göra 3 knapphål fram till dess och det blir ju väldigt kort öppning eftersom arbetet endast mäter ca 22 cm. Ska man sticka slätstickning på varje framstycke, var för sig tills alla knapphål är gjorda? Detta framgår inte i beskrivningen.
22.04.2019 - 22:22DROPS Design answered:
Hej, jo höger och vänster framst stickas ihop, men du hinner göra alla knapphål innan dess (sista knapphål görs då framkanten mäter 19-20-21-22-23 cm.
23.04.2019 - 14:28
![]() Marie-Josée Bédard wrote:
Marie-Josée Bédard wrote:
J'aimerais trouver un nid d'ange facile à faire et le patron gratuit
11.02.2019 - 00:55DROPS Design answered:
Chere Marie-Josee, cliquez sur ce lien: https://www.garnstudio.com/search.php?action=search&w=nid+d%27ange&mt=0&c=0&k=0&y=0&yg=0&lang=fr. Bon tricot!
11.02.2019 - 06:53
![]() Jackie Weatherall wrote:
Jackie Weatherall wrote:
Do you add the 7 stitches at the end of rowr or after the band
31.05.2018 - 19:18DROPS Design answered:
Dear Mrs Weatherall, on left front piece, you cast on 7 sts at the end of a row from WS (= towards mid front) = after the 6 sts in garter st. Happy knitting!
01.06.2018 - 09:08
![]() Loredana wrote:
Loredana wrote:
Buongiorno! Vorrei realizzare questo modello....l'unico dubbio mi viene dal filato utilizzato. Non rilascia troppi peletti? Eventualmente come sostituirlo? Grazie Loredana
16.08.2017 - 10:43DROPS Design answered:
Buongiorno Loredana. Può usare un altro filato del gruppo filato E oppure un filato del gruppo filato C messo doppio. Può per esempio valutare di usare Big Merino messa doppia. Verifichi sempre di ottenere lo stesso campione indicato nel modello. Buon lavoro!
16.08.2017 - 11:18
![]() Nancy wrote:
Nancy wrote:
Beste, Bij de linkervoorpand worden 8 nieuwe steken opgezet. Worden die steken later als de 6 ribbelsteken van de voorbies gebreid
22.12.2016 - 10:53DROPS Design answered:
Hoi Nancy. Ja, klopt.
22.12.2016 - 14:25
![]() Judy wrote:
Judy wrote:
When picking up the 37 stitches for the hood do you pick up the the stitches along the two front bands? Or start picking them after the band and include the stitches on the other band? Or don't pick up stitches on any of the two front bands?
26.11.2016 - 04:41DROPS Design answered:
Dear Judy, sts for hood are picked up over the front band sts on each side + around whole neckline. Happy knitting!
28.11.2016 - 09:04
|
|
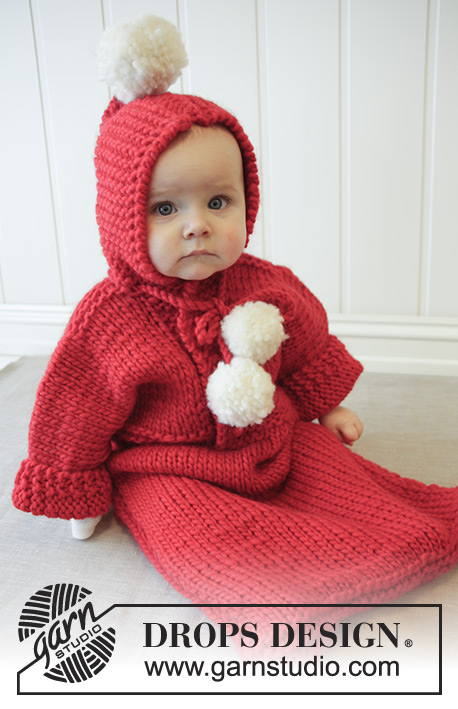
The First Noel#thefirstnoelbuntingbag |
|
 |
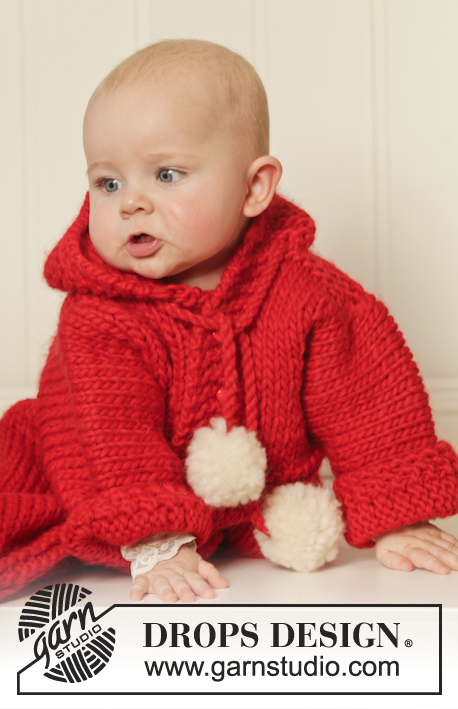 |
Knitted bunting bag for baby and children in DROPS Snow. Piece is worked with hood and pompoms. Size 1 month - 4 years. Theme: Christmas
DROPS Extra 0-1052 |
|
|
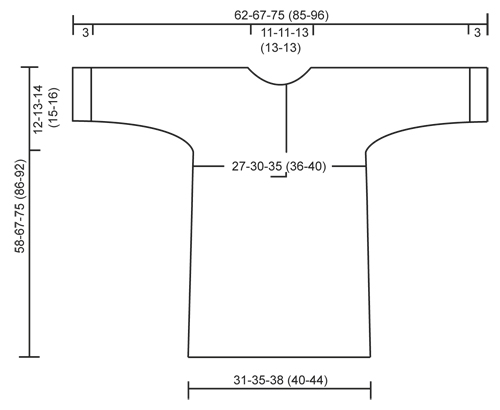
GARTER ST (back and forth): K all rows. 1 ridge = 2 rows K. INCREASE TIP: Inc by making 1 YO. On next round work YO twisted, i.e. work in the back loop of st, to avoid holes. HOLE FOR SEAT BELT IN CAR SEAT: You can make a hole at the front and back for the belt in the car seat. Make the first hole on back piece when piece measures approx. 16-20-23 (28-33) cm (or desired measurements) by casting off the middle 4 sts on needle. On next row cast on 4 new sts over the cast off sts and continue as before. Repeat on front piece when piece measures from shoulder 42-47-52 (58-59) cm. BUTTONHOLES: Dec for buttonholes on right band. 1 buttonhole = cast off third st from mid front and cast on 1 new st over the cast off st on next row. Dec for buttonholes when band measures: SIZE 1/3 months: 1, 6, 10, 14 and 19 cm SIZE 6/9 months: 1, 5, 10, 15 and 20 cm SIZE 12/18 months: 1, 6, 11, 16 and 21 cm SIZE 2 years: 1, 7, 12, 17 and 22 cm SIZE 3/4 years: 1, 6, 10, 14, 18 and 23 cm. ---------------------------------------------------------- BUNTING BAG: Work bag in one - beg at bottom of back piece, cast on sts for sleeve, dec for neck and finish at the bottom of front piece. Worked back and forth on a circular needle to make room for all the sts. If you want you can make a HOLE FOR SEAT BELT IN CAR SEAT - see explanation above. BACK PIECE: Cast on 36-40-44 (46-50) sts (incl 1 edge st in each side) on circular needle size 8 mm with Christmas red. Work 3 ridges in garter st - SEE EXPLANATION ABOVE. Continue in stocking st until piece measures 37-45-52 (62-67) cm – AT THE SAME TIME on last row dec 4 sts evenly = 32-36-40 (42-46) sts. REMEMBER THE KNITTING TENSION! Work 3 ridges over all sts, continue in stocking st. When piece measures 46-54-61 (71-76) cm, cast on new sts in each side for sleeves. Cast on sts at the end of every row: 4 sts 1 time, 5 sts 1-1-1 (2-2) times and 9-10-12 (12-16) sts 1 time = 68-74-82 (94-106) sts. Work the new sts in stocking st. NOTE! After last inc work the outermost 3 sts in each side (= at the bottom of sleeve) in garter st. When piece measures 54-63-71 (82-88) cm, continue as follows: 3 sts in garter st, 19-22-25 (31-37) sts in stocking st, 24-24-26 (26-26) sts in garter st (= back of neck), 19-22-25 (31-37) sts in stocking st, 3 sts in garter st. When 3 ridges have been worked over sts in the back of neck, cast off the middle 12-12-14 (14-14) sts for neck and finish each side separately. Slip sts in the right side on 1 stitch holder. LEFT FRONT PIECE: = 28-31-34 (40-46) sts. Continue in stocking st with 6 sts in garter st towards the neck and 3 sts in garter st at the bottom of sleeve. When piece measures 58-67-75 (86-92) cm, insert 1 marker = mid on top of shoulder - NOW MEASURE PIECE FROM HERE! Work as before. When piece measures 1-1-2 (2-2) cm, inc 1 st towards the neck on next row from RS inside 6 sts in garter st - see INCREASE TIP. Work 1 row from WS and repeat inc on next row from RS. Work 1 row from WS, at the end of this row cast on 7-7-8 (8-8) new sts towards mid front = 37-40-44 (50-56) sts. Work 1 ridge in garter st over the 7-7-8 (8-8) new sts, work the other sts as before. Then work in stocking st with 6 sts in garter st towards mid front (= band) and 3 sts in garter st at the bottom of sleeve. When piece measures 8-9-10 (11-12) cm, cast off sleeve sts, cast off in the side at beg of row as follows: 9-10-12 (12-16) sts 1 time, 5 sts 1-1-1 (2-2) times and 4 sts 1 time = 19-21-23 (24-26) sts. Continue in stocking st with 6 band sts until piece measures approx. 18-19-20 (21-22) cm (fold the piece double at the marker on shoulder and make sure to work same no of row in stocking st on back and front piece) – adjust so that next row is worked from RS. Work 3 ridges in garter st over all sts. Work 2 rows while continuing stocking st and band sts in garter st – AT THE SAME TIME on 1st row inc 2 sts evenly (do not inc over band) = 21-23-25 (26-28) sts. Slip sts on a stitch holder. RIGHT FRONT PIECE: Slip the stitches on the stitch holder back on needle (= 28-31-34 (40-46) sts) and work as left front piece but reversed. Then slip sts from left front piece on to same needle = 42-46-50 (52-56) sts. On next row (= RS) dec band sts tog as follows: Work in stocking st over the first 15-17-19 (20-22) sts, slip 6 band sts from right front piece on a cable needle in front of piece, * K 1 st from cable needle tog with 1 st from left band *, repeat from *-* 6 times = 6 sts dec, then work in stocking st the rest of row = 36-40-44 (46-50) sts. Continue in stocking st over all sts. When piece measures approx. 55-64-72 (83-89) cm (fold piece at the marker on the shoulder and make sure that front and back pieces are the same length except the 3 bottom ridges on back piece). Work 3 ridges in garter st over all sts. LOOSELY cast off. ASSEMBLY: Fold piece double at the shoulder and sew under arm and side seams inside 1 edge st. Sew cast-on edge to cast-off edge at the bottom of back - sew edge to edge to avoid a chunky seam. Sew bottons on left front piece. HOOD: Pick up 37-39-41 (45-47) sts with Christmas red on circular needle size 8 mm around the neck (beg mid front and pick up in outer loops of edge sts from RS). Work in garter st back and forth on needle until hood measures 18-20-22 (24-26) cm. LOOSELY cast off. Sew hood tog edge to edge at the top. POMPOMS AND TIE: Make 2 small pompoms in off white with a diameter of approx. 6 cm and 1 large pompom with a diameter of 8 cm. Pompoms should not be too compact. Cut 1 strand of approx. 1 m, fold it double and twine the strand. Fasten tie to 1 small pompom, sew the other end to band by first threading it through band. Make another the same way but fasten in the opposite band. Fasten the large pompom at the top of hood. Fold the sleeves if necessary. |
|
 |
|
Have you finished this pattern?Tag your pictures with #dropspattern #thefirstnoelbuntingbag or submit them to the #dropsfan gallery. Do you need help with this pattern?You'll find 29 tutorial videos, a Comments/Questions area and more by visiting the pattern on garnstudio.com. © 1982-2026 DROPS Design A/S. We reserve all rights. This document, including all its sub-sections, has copyrights. Read more about what you can do with our patterns at the bottom of each pattern on our site. |
|


With over 40 years in knitting and crochet design, DROPS Design offers one of the most extensive collections of free patterns on the internet - translated to 17 languages. As of today we count 324 catalogues and 12291 patterns translated into English (UK/cm).
We work hard to bring you the best knitting and crochet have to offer, inspiration and advice as well as great quality yarns at incredible prices! Would you like to use our patterns for other than personal use? You can read what you are allowed to do in the Copyright text at the bottom of all our patterns. Happy crafting!
Post a comment to pattern DROPS Extra 0-1052
We would love to hear what you have to say about this pattern!
If you want to leave a question, please make sure you select the correct category in the form below, to speed up the answering process. Required fields are marked *.