
Popular categories
Looking for a yarn?


Comments / Questions (72)
![]() Jacqueline wrote:
Jacqueline wrote:
Beim Hosenteil steht bzgl. Der Zunahme: "Diese Zunahmen noch (3) 3-4-4-4 (4-4) x in jeder 4.Rd wdh" Da ich aber immer in einer Linksreihe zunehmen muss, sollte ich doch in jeder 3. Oder 5. Rd zunehmen. Die 4. Rd ist eine Rechtsreihe. Danke
21.12.2022 - 18:03DROPS Design answered:
Liebe Jacqueline, die Zunahmen werden in jede 4. Runde gestrickt, wenn Sie in einer Runde mit linken Masche zunehmen, dann stricken Sie noch 3 Runden (1 mit rechten Maschen, 1 mit linken Maschen, 1 mit rechten Maschen) und die nächste Zunahmen stricken Sie in der nächsten Runde = eine Runde mit linken Maschen. Viel Spaß beim stricken!
22.12.2022 - 08:47
![]() Buggy wrote:
Buggy wrote:
Randmaschen markieren: von Hüfte zu Hüfte oder von Bauch zu Po? Danke
23.11.2022 - 11:20Buggy answered:
Wer lesen kann ist klar im Vorteil! Vielen Dank
23.11.2022 - 11:25
![]() Gerd Lillegaard wrote:
Gerd Lillegaard wrote:
Takk for fin oppskrift, men skulle ønske rettelsene også var utført i hjelpe videoen. Tror mange med meg blir litt forvirret og har vanskeligheter med å forstå oppskriften!
01.10.2022 - 13:28
![]() Julia wrote:
Julia wrote:
Hej! Jag stickar just nu förhöjningen på resåren i början på arbetet. Jag följde videon som det hänvisas till där man ser att varannat varv görs med räta/aviga maskor. Instruktionen säger ju inte vilken sorts maskor, så då utgick jag från att det ska göras enligt videon. Men efter förhöjningen ska man ju fortsätta resårstickning runt hela arbetet. Jag tycker att det känns konstigt att ha en slät förhöjning omringad av resår. Ska det vara så? Tacksam för snabb hjälp!
30.01.2022 - 12:28DROPS Design answered:
Hej Julia. Förhöjningen stickas i resår i detta mönster ("...stickas det förhöjning i resåren..."). Mvh DROPS Design
01.02.2022 - 09:26
![]() Mimi wrote:
Mimi wrote:
Guten Tag, werden die Beine auf dem Nadelspiel gestrickt? Die Rundnadel mit 60cm wird wohl zu groß sein für die kleinen Beinchen, oder? Liebe Grüße
15.11.2021 - 17:37DROPS Design answered:
Liebe Mimi, ja stimmt, die Beine werden auf Nadelspiel Nr 3 - gerne können Sie auch mit Magic Loop stricken. Viel Spaß beim stricken!
16.11.2021 - 08:27
![]() Susanne Pawelzik wrote:
Susanne Pawelzik wrote:
Meine 14. Reihe im rippenmuster ist eine Rückreihe. Muss ich wenden, damit ich wieder bei der Virderseite weiterstricken kann
27.08.2021 - 19:15DROPS Design answered:
Liebe Frau Pawelzik, wenden Sie noch einmal und bis hintere Mitte stricken (= Begin der Runden) und dann in Runden von der Vorderseite weiterstricken. Viel Spaß beim stricken!
30.08.2021 - 07:11
![]() Monika Koch wrote:
Monika Koch wrote:
Hallo, ich kann den Hinweis sehen, dass die Anleitung korrigiert wurde (Zu- und Abnahmetipp), aber die Korrektur ist für mich nicht ersichtlich. Meiner Meinung nach fehlt bei der Zunahme ein Umschlag vor der letzten linken Masche, denn es sollen ja in der Zunahmerunde 4 Maschen zugenommen werden.
06.07.2021 - 23:14
![]() Margarita wrote:
Margarita wrote:
Me gustaría un tutorial paso a paso en video con sonido al spain
03.06.2021 - 03:57
![]() Mago wrote:
Mago wrote:
Su tutoríal en video no se escucha me gustaría en video un pasa a paso
03.06.2021 - 03:54
![]() Barbara wrote:
Barbara wrote:
Grüezi Ich stricke die Hose und bin bei den Aufnahmen. Ich nehme die Markierung immer mit. Wenn ich vor der Markierung und nach der Markierung einen umschlag stricke, habe ich zwei Umdchläge neben einander.und die Markierung dazwischen. Ist das richtig so oder soll ich eine Masche zwischen den Aufnahmen stricken.
07.05.2021 - 08:51DROPS Design answered:
Liebe Barbara, ja stricken Sie 2 Maschen zwischen jede Aufnahme - siehe ZUNAHMETIPP, so haben Sie nicht 2 Umschläge nebeneindander noch Löcher; Viel Spaß beim stricken!
07.05.2021 - 09:23
|
|
Smarty Pants#smartypants |
|
|
|
|
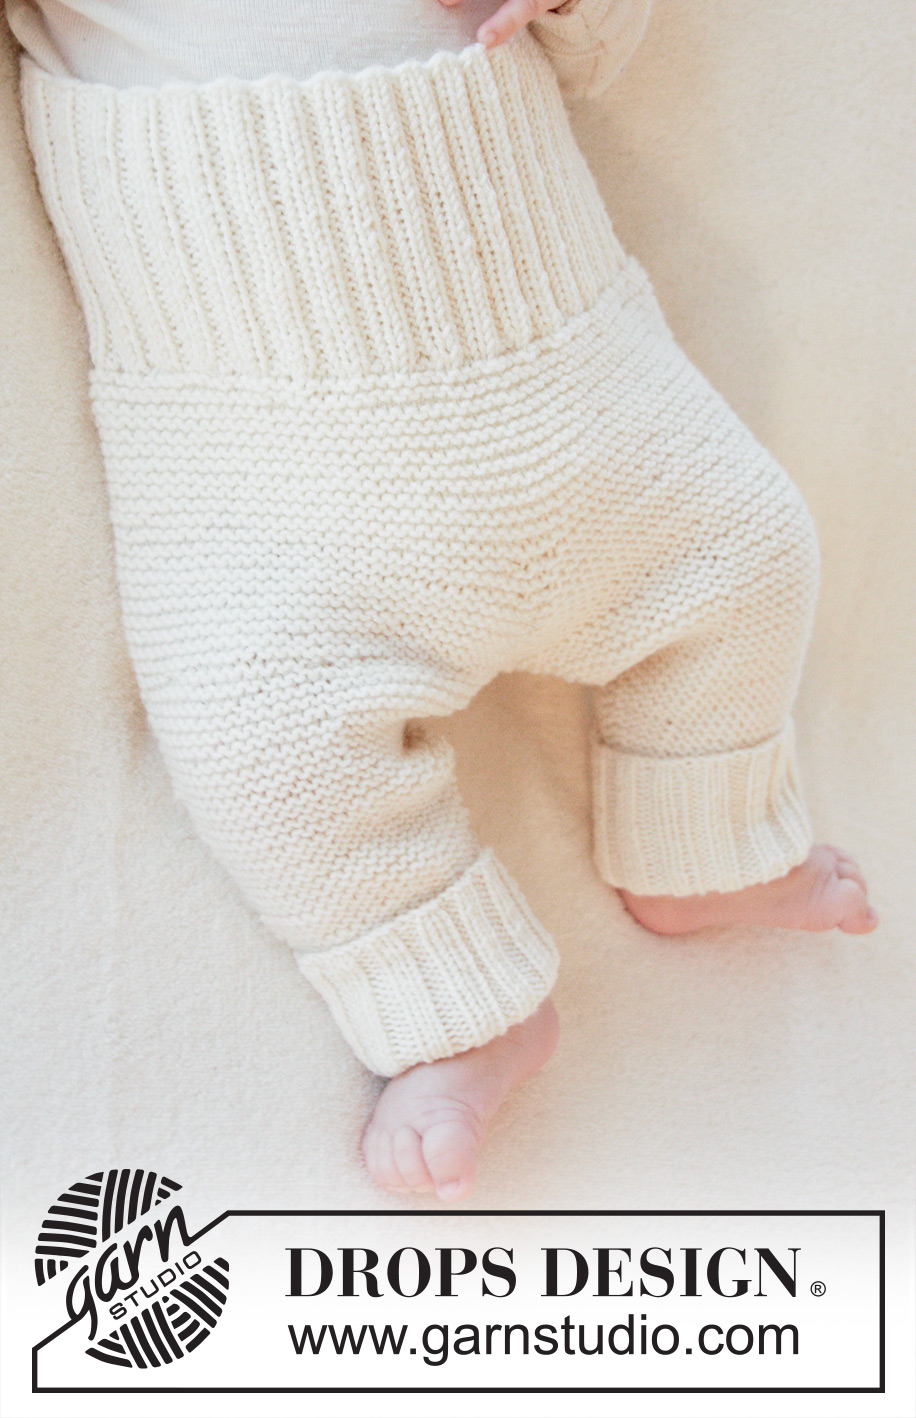
Knitted pants in garter st for baby in DROPS BabyMerino. Size premature – 4 years.
DROPS Baby 25-7 |
|
|
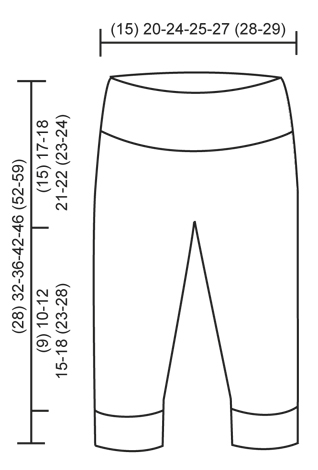
KNITTING TIP: Tighten yarn a little extra when turning in the middle of row to avoid holes. GARTER ST (in the round on double pointed needles/circular needle): * K 1 round and P 1 round *, repeat from *-*. INCREASE TIP: Inc on 1 round with P and inc 1 st by making 1 YO as follows: P1, 1 YO, purl until 1 st remains before marker thread, 1 YO, P2 (marker thread sits in the middle of these 2 st), 1 YO, purl until 1 st remains before marker thread, 1 YO, P1. On next round K YO twisted to avoid holes. DECREASE TIP: Dec on 1 round with K. Slip 1 st as if to K, K 1, psso, K until 2 st remain before marker thread, K 2 tog. -------------------------------------------------------- PANTS: Worked in the round from the waist down. Cast on (84) 112-136-140-152 (156-164) sts on circular needle size 2.5 mm with Baby Merino - beg of round = mid back. Work rib = K 2/P 2. When rib measures (2) 2-3-3-3 (3-4) cm, work an elevation in rib at the back of pants as follows: Beg mid back and work (4) 6-8-8-8 (8-8) sts, turn piece - READ KNITTING TIP. Work (8) 12-16-16-16 (16-16) sts and turn piece. Work (12) 18-24-24-24 (24-24) sts and turn piece. Work (16) 24-32-32-32 (32-32) sts and turn piece. Continue rib like this by working (4) 6-8-8-8 (8-8) sts more on every turn 10 more times (= 14 short rows). Then continue rib in the round over all sts. When rib measures (6) 7-8-8-8 (8-9) cm (measured mid front), switch to circular needle size 3 mm. K 1 round while AT THE SAME TIME dec (12) 16-20-20-22 (22-24) sts evenly = (72) 96-116-120-130 (134-140) sts. Then work in GARTER ST in the round on needle - see explanation above. When piece measures (12) 14-14-17-18 (19-20) cm from cast-on edge (measured mid front), insert 1 marker at beg of round and 1 marker after (36) 48-58-60-65 (67-70) sts (marks mid front and mid back on pants). Then inc 1 st on each side of both markers (= 4 sts inc) - READ INCREASE TIP. Repeat inc every 4th round (3) 3-4-4-4 (4-4) more times (= (4) 4-5-5-5 (5-5) inc in total) = (88) 112-136-140-150 (154-160) sts. After last inc piece measures approx. (15) 17-18-21-22 (23-24) cm from cast-on edge (measured mid front). LEG: Beg mid back, work (44) 56-68-70-75 (77-80) sts and slip the other sts on 1 stitch holder. Work GARTER ST in the round on needle - insert 1 marker at beg of round (= inside of leg). When leg has been worked for (1) 1-1-1-1 (2-2) cm – adjust so that next round is a K round, dec 1 st on each side of marker – READ DECREASE TIP. Repeat dec (4) 8-11-10-10 (9-8) more times (= (5) 9-12-11-11 (10-9) dec in total) as follows: SIZE PREMATURE: Every 8th round. SIZE 0/1 + 1/3 MONTHS: Every 4th round. SIZE 6/9 MONTHS: Every 6th round. SIZE 12/18 MONTHS: Every 8th round. SIZE 2 YEARS: Every 10th round. SIZE 3/4 YEARS: Every 14th round. After dec there are (34) 38-44-48-53 (57-62) sts on needle. Continue to work until piece measures (24) 27-30-36-40 (46-52) cm from cast-on edge and down (measured mid front). Switch to double pointed needles size 2.5 mm and K 1 round while AT THE SAME TIME inc (10) 10-8-8-11 (11-10) sts evenly = (44) 48-52-56-64 (68-72) sts. Then work rib = K 2/P 2 until pants measures (28) 32-36-42-46 (52-59) cm from the waist (rib measures approx. (4) 5-6-6-6 (6-7) cm). Loosely cast off with K over K and P over P. Work the other leg the same way. |
|
 |
|
Have you finished this pattern?Tag your pictures with #dropspattern #smartypants or submit them to the #dropsfan gallery. Do you need help with this pattern?You'll find 25 tutorial videos, a Comments/Questions area and more by visiting the pattern on garnstudio.com. © 1982-2026 DROPS Design A/S. We reserve all rights. This document, including all its sub-sections, has copyrights. Read more about what you can do with our patterns at the bottom of each pattern on our site. |


With over 40 years in knitting and crochet design, DROPS Design offers one of the most extensive collections of free patterns on the internet - translated to 17 languages. As of today we count 325 catalogues and 12298 patterns translated into English (UK/cm).
We work hard to bring you the best knitting and crochet have to offer, inspiration and advice as well as great quality yarns at incredible prices! Would you like to use our patterns for other than personal use? You can read what you are allowed to do in the Copyright text at the bottom of all our patterns. Happy crafting!
Post a comment to pattern DROPS Baby 25-7
We would love to hear what you have to say about this pattern!
If you want to leave a question, please make sure you select the correct category in the form below, to speed up the answering process. Required fields are marked *.