
Popular categories
Looking for a yarn?


Comments / Questions (145)
![]() Irene Kirchner wrote:
Irene Kirchner wrote:
I have finished the main body of the cardigan but I don't seem to have enough wool over for the sleeves. Could you tell me how many stitches to cast on and the increases for a short sleeve, or would it be OK to leave it without sleeves. I would appreciate your reply.
02.02.2021 - 01:01DROPS Design answered:
Dear Mrs Kirchner, we are unfortunately not able to adjust every pattern to every single request - please contact the store where you bought the yarn, even per mail or telephone - or any knitting forum. Thanks for your comprehension. Happy knitting!
02.02.2021 - 10:39
![]() Hanne Krogvig wrote:
Hanne Krogvig wrote:
Opskriften er i 5 STR. Og målene er jo også i 5 varianter. Men i maskeantal bliver der kun budt på 3 forskellige? Jeg strikker STR 9/10 år hvor en samlet omkreds forneden er 90 cm, men arbejdet måler 100 cm. Min strikkefasthed er korrekt. Jeg benytter Drops safran bomulds garn. Hvordan får jeg en omkreds på 90 cm? Jeg er en rutineret strikker, men det her driller, så hjælp venligst
28.01.2021 - 12:32
![]() Irene Kirchner wrote:
Irene Kirchner wrote:
Thank you so much for your help
05.01.2021 - 09:21
![]() Irene Kirchner wrote:
Irene Kirchner wrote:
How far do I space the buttonholes on size 3/4
02.01.2021 - 23:41DROPS Design answered:
Dear Irene Kirchner! Cast off for button holes when piece measures for size 3/4: 21, 27 and 33 cm from the bottom row. Happy knitting!
03.01.2021 - 02:14
![]() Elke wrote:
Elke wrote:
Hallo liebe Strickereien, ich habe das Jäckchen fast vollendet und dabei ein Problem: Das kraus rechts gestrickte Bündchen rollt sich nach oben. Gibt es einen Trick, wie man es abeheben kann? Herzliche Grüße Elke
02.12.2020 - 16:19DROPS Design answered:
Liebe Elke, Sie können die Jacke mit Stecknadeln auf einer geeigneten Unterlage spannen, anfeuchten (z.B. mit einer Sprühflasche für Blumen) und trocknen lassen, danach entfernen Sie die Stecknadeln, dann sollte sich der Rand nicht mehr rollen. Viel Spaß beim stricken!
03.12.2020 - 08:52
![]() Anna wrote:
Anna wrote:
Non mi è chiaro perché sidebbano fare quegli aumenti in corrispondenza del cambio da maglia rasata a lavorato...forse perché il nido d\'ape ha bisogno di più punti per lavorarlo. Vorrei capire. Grazie mille
26.10.2020 - 13:32DROPS Design answered:
Buongiorno Anna. Si suggerisce di aumentare perchè il punto nido d'ape stringe un po' il lavoro rispetto alla maglia rasata. Buon lavoro!
26.10.2020 - 22:09
![]() Vasiliki wrote:
Vasiliki wrote:
How i will cast off 4 sts on each side of every marker before separate each part? I have to decrease 16 sts in one row and then separate in three parts?
07.10.2020 - 23:34DROPS Design answered:
Dear Mrs Vasiliki, at the end of bottom of jacket, you should have inserted markers 62-62-70-70-78 sts in from each side so that you have 62-62-70-70-78 sts for each front piece and 112-112-128-128-144 sts for back piece. Now work front piece until 4 sts remain before marker, cast off the next 8 sts (= 4 sts before marker + 4 sts after marker), work back piece and repeat cast off for 2nd armhole on next marker. Work is now divided in 3 parts; Happy knitting!
08.10.2020 - 11:07
![]() Lelletta wrote:
Lelletta wrote:
Ora è tutto chiarissimo! Grazie ancora e buon lavoro anche a Voi!
07.10.2020 - 16:53
![]() Lelletta wrote:
Lelletta wrote:
Buongiorno! Grazie per la risposta ma sono i suggerimenti per le diminuzioni che parla di 8m a legaccio,(4+4) mentre nel giacchino 3+3=6.vi incollo le parti che non mi sono chiare: "Quando il lavoro misura 27-29-32-33-34 cm, lavorare 2 f. a m. legaccio su *8* m. da ogni lato dei segnapunti". E poi per il dietro " sulle 96-96-112-112-128 m. successive, finire con 1 m. dir. e *3* m. a m. legaccio. Grazie per la vostra disponibilità e pazienza.... 😁
07.10.2020 - 12:24DROPS Design answered:
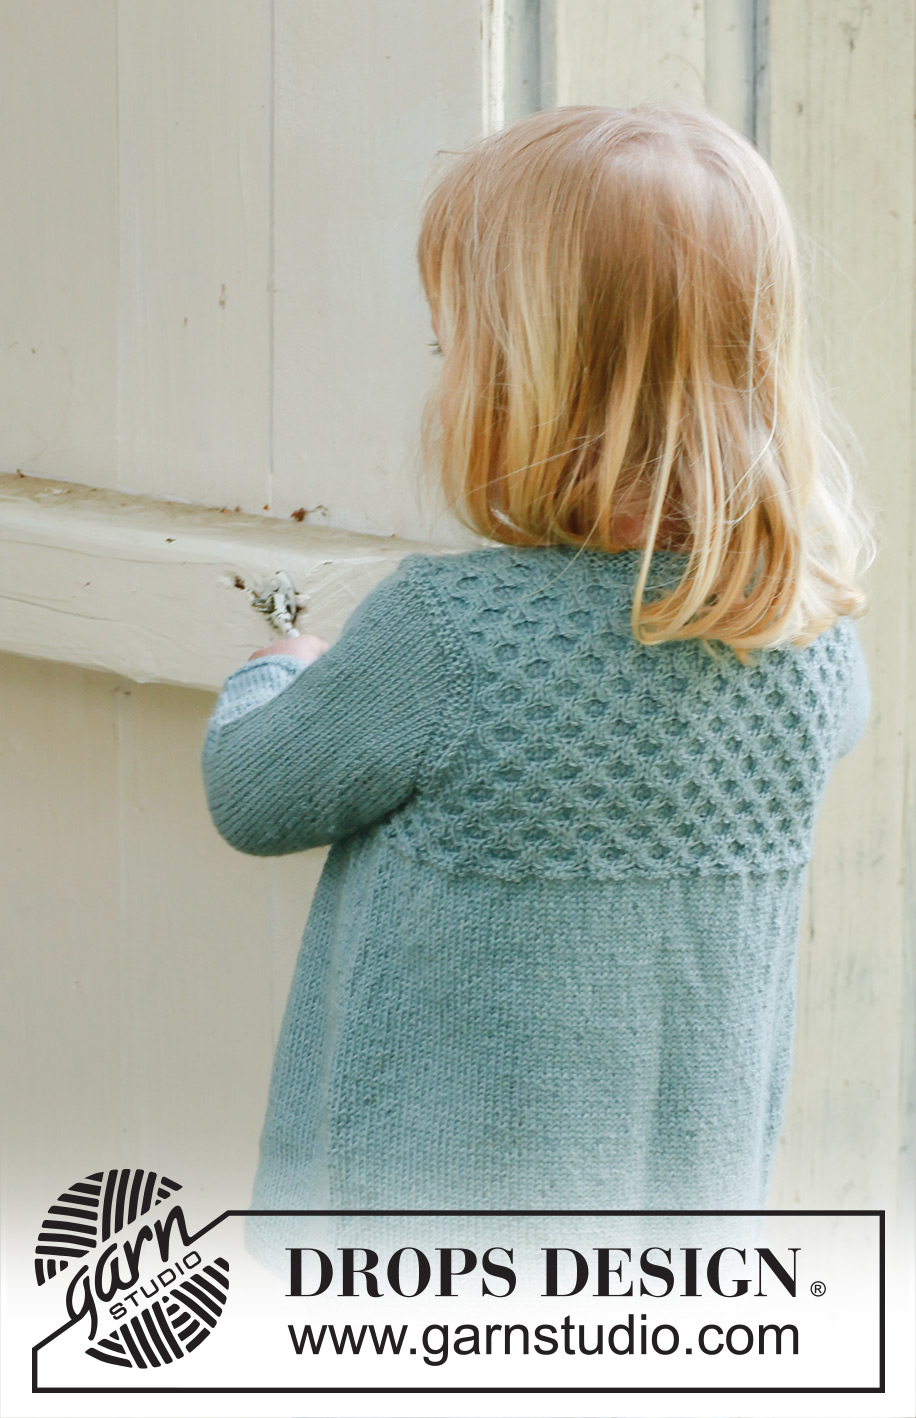
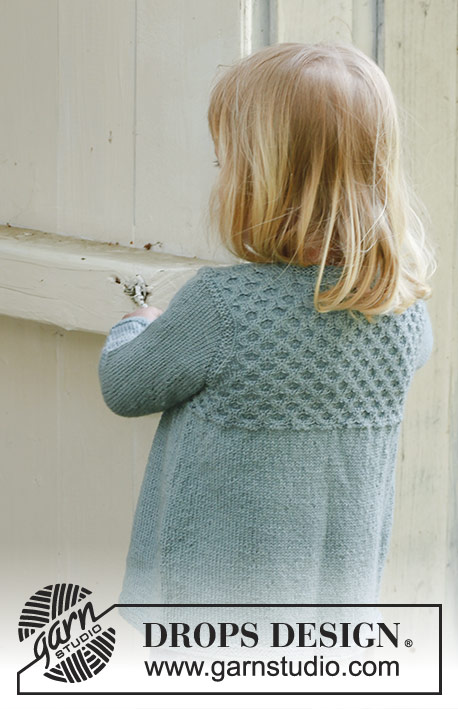
Buongiorno Lelletta. Lavora 2 ferri a legaccio sulle 8 m che precedono e che seguono il segnapunti. Poi intreccia le 4 m che precedono e che seguono il segnapunti (quindi rimangono 4 m a legaccio). Le 3 m più esterne continua a lavorarle a legaccio. Diminuisce poi per gli scalfi prima / dopo queste 3 m a legaccio seguendo le indicazioni del suggerimento per le diminuzioni. La fotografia che mostra il dietro del cardigan può aiutarla a capire la posizione delle diminuzioni. Buon lavoro!
07.10.2020 - 13:22
![]() Lelletta wrote:
Lelletta wrote:
Buon pomeriggio! Vorrei un chiarimento per le diminuzioni degli scalfi: nella spiegazione per le diminuzioni parlate di 3 maglie a legaccio, ma nella schema sono 4,(4+4)!Inoltre le 8 diminuzioni devo farle lasciando intatte queste 3 (4) maglie? Spero di essere riuscita a farmi capire! Grazie in anticipo e buon lavoro!
06.10.2020 - 16:05DROPS Design answered:
Buonasera Lelletta, per lavorare gli scalfi deve leggere il suggerimento per le diminuzioni: le diminuzioni vanno fatte prima/dopo le 3 maglie di vivagno, che vengono lavorate a maglia legaccio. Buon lavoro!
06.10.2020 - 19:28
|
||||||||||
My honey#myhoneycardigan |
||||||||||
 |
 |
|||||||||
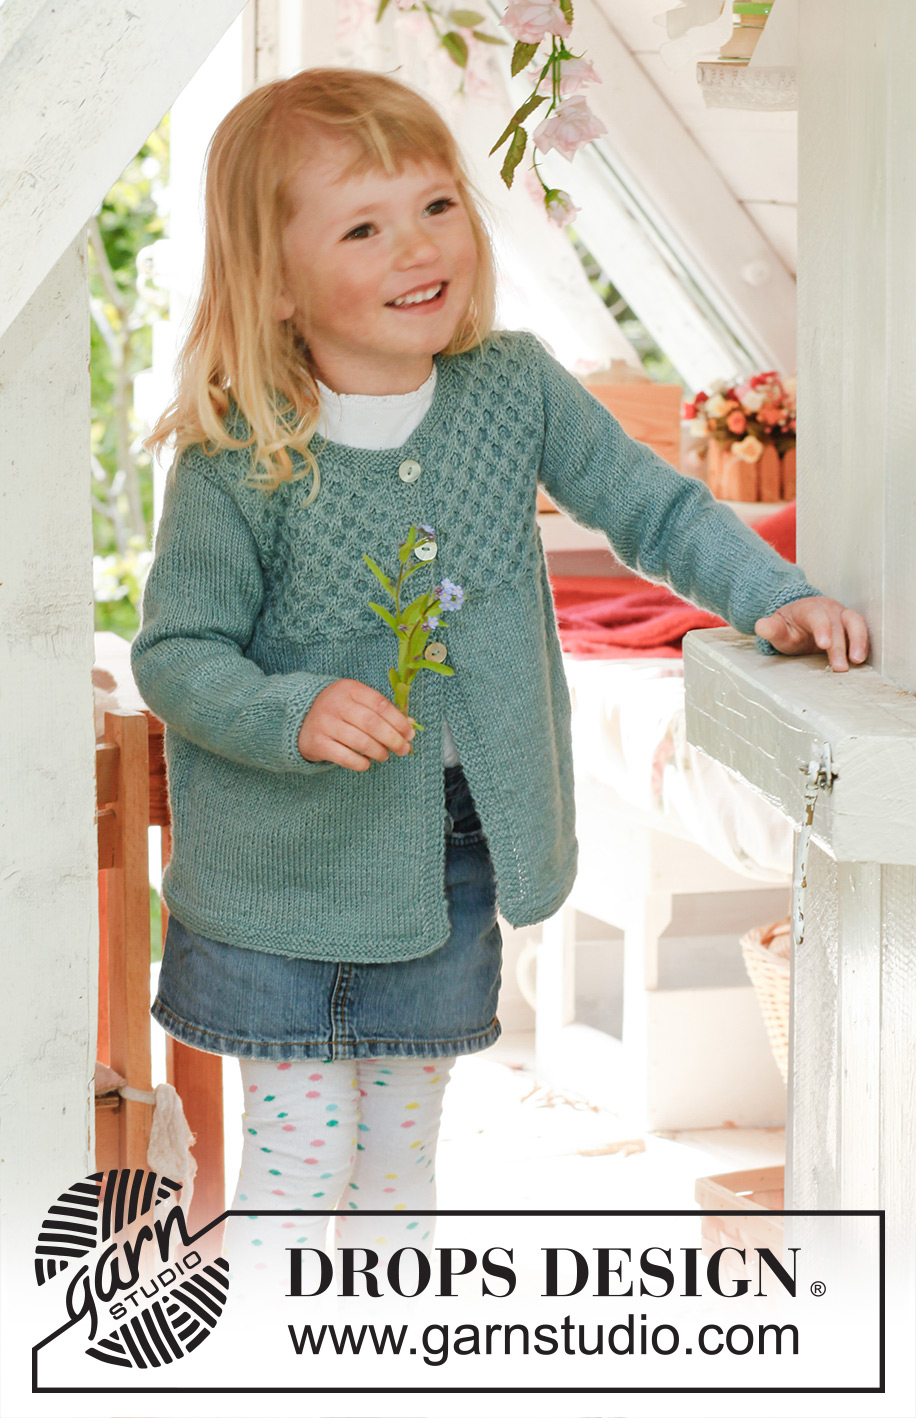
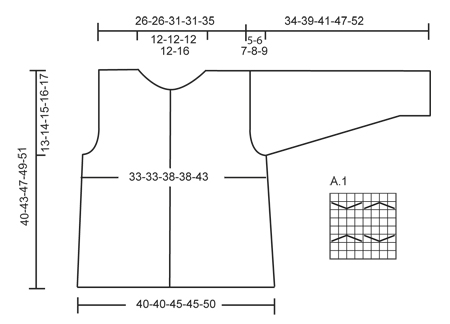
Knitted jacket with honeycomb pattern in DROPS Alpaca. Size children 3 to 12 years.
DROPS Children 23-19 |
||||||||||
|
GARTER ST (back and forth on needle): K all rows. 1 ridge = 2 rows K. GARTER ST (in the round): 1 ridge = 2 rounds * K 1 round and P 1 round *, repeat from *-*. PATTERN: See diagram A-1. Diagram shows the pattern from RS. BUTTON HOLES: Cast off for button holes on right band. 1 button hole = cast off 3rd st from mid front. On next row cast on 1 new st over the cast off st. Cast off for button holes when piece measures: Size 3/4: 21, 27 and 33 cm Size 5/6: 24, 30 and 36 cm Size 7/8: 25, 30, 35 and 40 cm Size 9/10: 27, 32, 37 and 42 cm Size 11/12: 29, 34, 39 and 44 cm DECREASE TIP (applies to armholes): All dec are done from RS. Dec inside 3 sts in garter st. Work sts that do not fit A.1 in stocking st. Dec after 3 sts in garter st as follows: Slip 1 st as if to K, K 1, psso. Dec before 3 sts in garter st as follows: K 2 tog. --------------------------------------------------------- JACKET: Worked back and forth on circular needle. Cast on 202-202-226-226-250 sts on circular needle size 3 mm with Alpaca. P 1 row from WS. Then work 6 rows in garter st - see explanation above. REMEMBER THE KNITTING TENSION! Then work in stocking st but work the 5 outermost sts (= band) in each side in garter st until finished measurements. When piece measures 24-26-28-29-30 cm, work 2 rows in garter st AT THE SAME TIME on 1st row inc 34-34-42-42-50 sts evenly = 236-236-268-268-300 sts on needle. Work next row from RS as follows: 5 sts in garter st, K 1, A-1 over the next 224-224-256-256-288 sts, finish with K 1 and 5 sts in garter st. Remember to cast off for button holes - see explanation above. Insert 2 markers in the piece; 62-62-70-70-78 sts in from each side (back piece = 112-112-128-128-144 sts). When piece measures 27-29-32-33-34 cm, work 2 rows in garter st over 8 sts on each side of markers, work the other sts as before. On next row cast off 4 sts on each side of every marker and finish each part separately. BACK PIECE: = 104-104-120-120-136 sts. Work as follows from RS: 3 sts in garter st, K 1, work diagram A-1 over the next 96-96-112-112-128 sts, finish with K 1 and 3 sts in garter st. Dec for armholes in each side every other row as follows - read DECREASE TIP: 1 st 8 times = 88-88-104-104-120 sts. When piece measures 38-41-45-47-49 cm, cast off the middle 40-40-40-40-56 sts for neck = 24-24-32-32-32 sts remain on each shoulder. Finish each part separately. Cast off when piece measures 40-43-47-49-51 cm. RIGHT FRONT PIECE: = 58-58-66-66-74 sts. Work as follows from RS: 5 sts in garter st, K 1, A.1 over the next 48-48-56-56-64 sts, finish with K 1 and 3 sts in garter st. Dec for armhole in the side as on back piece. Remember to cast off for button holes. AT THE SAME TIME when piece measures 34-37-41-43-45 cm, insert 14-14-14-14-22 sts towards mid front on a stitch holder. Then cast off for neck every other row as follows: 2 sts 4 times, and 1 st 4 times – work the sts that do not fit A-1 in stocking st. After all cast offs, 24-24-32-32-32 sts remain on shoulder. Cast off when piece measures 40-43-47-49-51 cm. LEFT FRONT PIECE: Work as right front piece but reversed. SLEEVE: Worked in the round on double pointed needles. Cast on 44-48-48-52-52 sts on double pointed needles size 3 mm with Alpaca. Insert a marker at the beg of round. Work 6 rounds in garter st, then work in stocking st until finished measurements. When piece measures 5 cm, inc 1 st on each side of marker, repeat every 3½-4-3½-4½-4 cm a total of 7-7-8-8-9 times = 58-62-64-68-70 sts. When piece measures 29-33-34-39-43 cm, cast off 3 sts on each side of marker, now work piece back and forth. Then cast off for sleeve cap in each side at beg of every row as follows: 2 sts 3 times and 1 st 0-1-3-5-6 times, then cast off 2 sts in each side until piece measures 33-38-40-46-51 cm, cast off 3 sts 1 time in each side. Cast off the remaining sts, piece measures approx. 34-39-41-47-52 cm. ASSEMBLY: Sew the shoulder seams. Sew in sleeves. Sew the buttons on to left front piece. NECK EDGE: Knit up 74 to 94 sts (incl sts on stitch holders) around the neck on circular needle size 3 mm. Work 6 rows in garter st. Cast off. |
||||||||||
Diagram explanations |
||||||||||
|
||||||||||
 |
||||||||||
Have you finished this pattern?Tag your pictures with #dropspattern #myhoneycardigan or submit them to the #dropsfan gallery. Do you need help with this pattern?You'll find 16 tutorial videos, a Comments/Questions area and more by visiting the pattern on garnstudio.com. © 1982-2026 DROPS Design A/S. We reserve all rights. This document, including all its sub-sections, has copyrights. Read more about what you can do with our patterns at the bottom of each pattern on our site. |
||||||||||


With over 40 years in knitting and crochet design, DROPS Design offers one of the most extensive collections of free patterns on the internet - translated to 17 languages. As of today we count 324 catalogues and 12290 patterns translated into English (UK/cm).
We work hard to bring you the best knitting and crochet have to offer, inspiration and advice as well as great quality yarns at incredible prices! Would you like to use our patterns for other than personal use? You can read what you are allowed to do in the Copyright text at the bottom of all our patterns. Happy crafting!
Post a comment to pattern DROPS Children 23-19
We would love to hear what you have to say about this pattern!
If you want to leave a question, please make sure you select the correct category in the form below, to speed up the answering process. Required fields are marked *.