
Popular categories
Looking for a yarn?


Comments / Questions (145)
![]() Christiane Jakoby wrote:
Christiane Jakoby wrote:
Danke für eure rasche Antwort. Hier meine nächste Frage. Ich stricke die Jacke 3/4 und will mit der Halskante beginnen. In der Anleitung steht man soll 74 M aufnehmen. Nun habe ich ja schon 40 M vom Rückenteil und 2 x 24 M an den Vorderteilen, da bin ich schon bei 68 M und es kommen noch beidseitig die abk. M hinzu, da komme ich doch nicht mit 74 M aus. Habe ich einen Fehler gemacht ?
11.05.2016 - 14:34DROPS Design answered:
Liebe Christina, ja sie haben völlig recht. Aber nehmen Sie doch alle Maschen auf und reduzieren Sie in der zweiten Reihe die Maschenzahl.
12.05.2016 - 07:12
![]() Christiane Jakoby wrote:
Christiane Jakoby wrote:
Hallo, kann man das Muster oben auch durch doppeltes Perlmuster ersetzen ?
26.04.2016 - 14:55DROPS Design answered:
Liebe Christiane, das können Sie gerne, aber das Muster wird sich nicht zusammenziehen, wie es beim Originalmuster der Fall ist.
28.04.2016 - 09:46
![]() Ann Nørrestrand wrote:
Ann Nørrestrand wrote:
Jeg forstår ikke hvordan jakken kan være 40cm forneden og 33cm i brystmål uden er i opskriften er skrevet noget om indtagninger
30.03.2016 - 22:30DROPS Design answered:
Hej Ann, Snoningerne trækker arbejdet sammen fra 40 cm til 33 cm. God fornøjelse!
31.03.2016 - 08:29
![]() Ann-Christin wrote:
Ann-Christin wrote:
Ich bin gerade beim Vorderteil. "Gegen die Mitte 14 M auf eine Hilfsnadel legen" 14 M auf der Seite der Knopflöcher oder auf der Seite des Rückenteils?
10.03.2016 - 10:55DROPS Design answered:
Mit "Gegen die Mitte" ist die vordere Mitte gemeint, also zu den Knopflöchern zu.
10.03.2016 - 13:49
![]() Ann-Christin wrote:
Ann-Christin wrote:
Hallo, wenn ich beim Rückenteil sowie bei den beiden Vorderteilen die Maschen für das Armloch abkette, stricke ich dann die restlichen Maschen glatt oder im Muster A-1?
06.03.2016 - 08:51DROPS Design answered:
Liebe Ann-Christin, die restlichen Maschen werden im Muster A.1 gestrickt.
06.03.2016 - 14:47
![]() Rama Laurence wrote:
Rama Laurence wrote:
Que fait on des mailles en attente? merci
02.03.2016 - 12:13DROPS Design answered:
Bonjour Mme Rama, les mailles des devants mises en attente sont ensuite reprises quand on fait le col: on reprend les mailles en attente du devant droit, on relève les mailles jusqu'à celles en attente du devant gauche et on les reprend également pour tricoter le col. Bon tricot!
02.03.2016 - 14:54
![]() Linnea wrote:
Linnea wrote:
När jag ska sticka halskanten står det att jag ska sticka upp 74 till 94 maskor. Är det valfritt antal maskor mellan de två talen då? Jag stickar storlek 3/4.
02.02.2016 - 18:05DROPS Design answered:
Hej. Ja det är cirka så många maskor som ska stickas upp, men mindre i de mindre storlekarna och tvärt om, så i ditt fall blir det ca 74 m. Lycka till!
05.02.2016 - 12:27
![]() UllaBritt wrote:
UllaBritt wrote:
Hur räknar jag om maskorna till vanliga stickor? Har svårt att hålla rundstickor med mina artrosfingrar. Tack för hjälp!
20.12.2015 - 17:40DROPS Design answered:
Hej! Här kan du läsa om hur du gör för att anpassa ett mönster gjort för rundstickor till att sticka fram och tillbaka. Lycka till!
21.12.2015 - 07:38
![]() Gamers Rosmarie wrote:
Gamers Rosmarie wrote:
Bonjour, je suis en train de tricoter ce gilet. Est-ce possible que les dimensions notées sont trop grandes? Une erreur peut-être? Je suis obligée de diminuer tout. Cordialement
26.11.2015 - 15:39DROPS Design answered:
Bonjour Mme Gamers, vous trouverez à la fin des explications un schéma avec, pour chaque taille, toutes les mesures prises à plat. Comparez-les avec un vêtement analogue pour trouver la taille correspondante. voir aussi ici. Bon tricot!
26.11.2015 - 15:52
![]() Indra Arfert wrote:
Indra Arfert wrote:
Guten Abend, ich versuche mich gerade an den Armkugeln und verstehe das abketten nicht. Es müsste dann in Reihen gestrickt werden, richtig? Und die Abnahmen finden nur zu Beginn der Reihe statt? Sollen es dann 3 x2 Abnahmen pro Reihe sein, also 6 Reihen?
18.11.2015 - 21:21DROPS Design answered:
Ja, Sie stricken die Armkugel in Hin- und Rück-R weiter. Das Abketten machen Sie immer beidseitig, d.h. am Anfang jeder R, d.h. Sie ketten an der einen Seite der Armkugel immer in Hin-R ab und an der anderen Seite immer in Rück-R. Sie ketten beidseitig 3x je 2 M ab, d.h. in insgesamt 6 R. Dann ketten Sie beidseitig je 1 M ab, je nachdem, welche Größe Sie stricken, und dann ketten Sie so lange beidseitig je 2 M ab, bis die genannte Ärmellänge erreicht ist. Zuletzt beidseitig 3 M je 1x.
24.11.2015 - 21:46
|
||||||||||
My honey#myhoneycardigan |
||||||||||
 |
 |
|||||||||
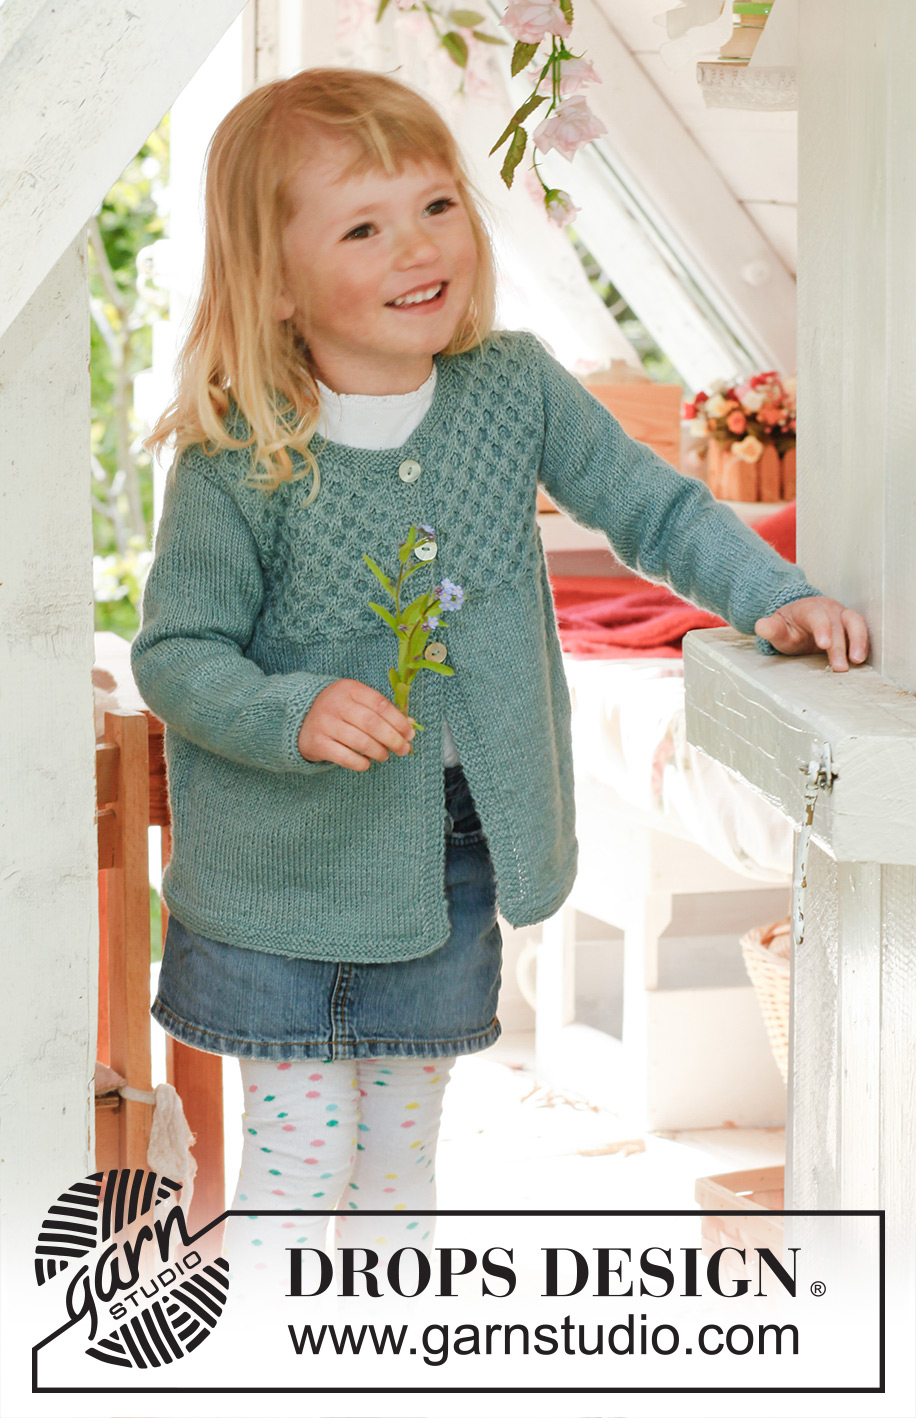
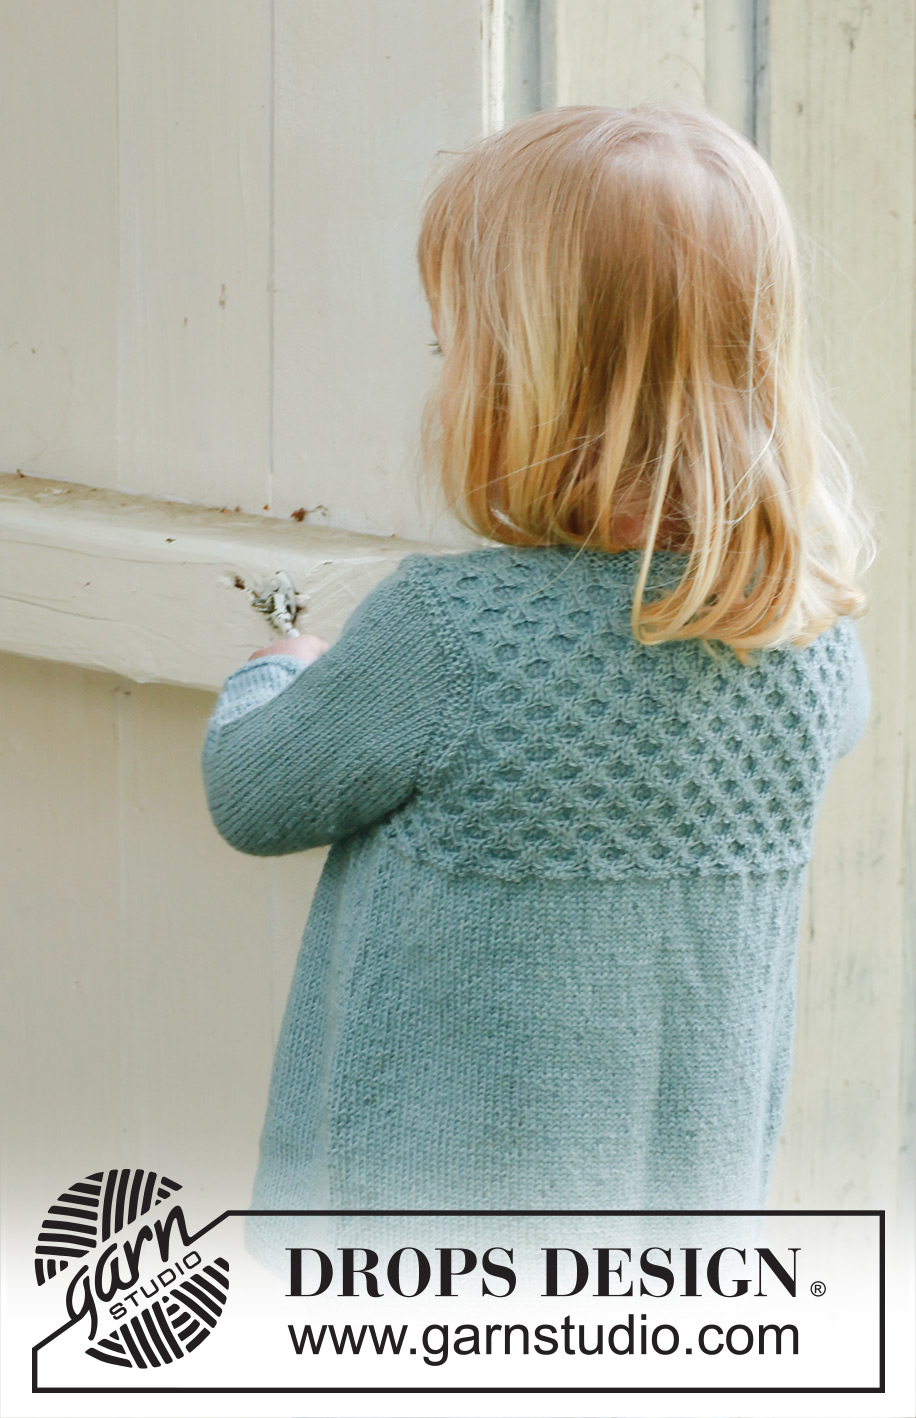
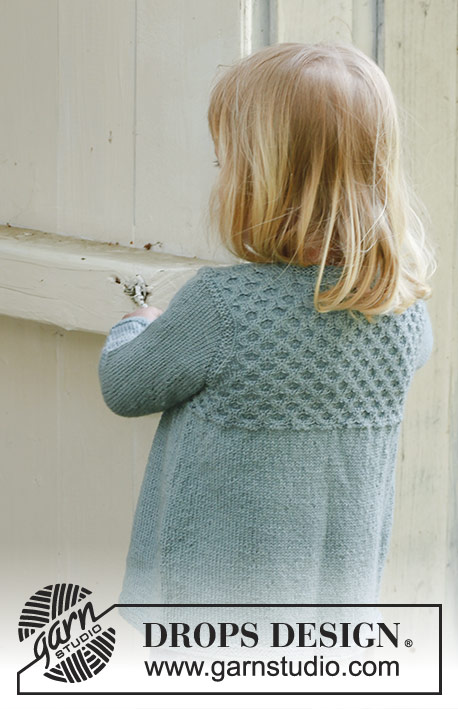
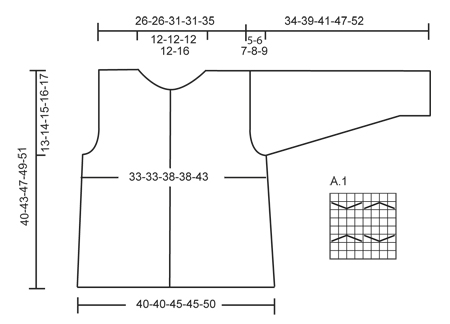
Knitted jacket with honeycomb pattern in DROPS Alpaca. Size children 3 to 12 years.
DROPS Children 23-19 |
||||||||||
|
GARTER ST (back and forth on needle): K all rows. 1 ridge = 2 rows K. GARTER ST (in the round): 1 ridge = 2 rounds * K 1 round and P 1 round *, repeat from *-*. PATTERN: See diagram A-1. Diagram shows the pattern from RS. BUTTON HOLES: Cast off for button holes on right band. 1 button hole = cast off 3rd st from mid front. On next row cast on 1 new st over the cast off st. Cast off for button holes when piece measures: Size 3/4: 21, 27 and 33 cm Size 5/6: 24, 30 and 36 cm Size 7/8: 25, 30, 35 and 40 cm Size 9/10: 27, 32, 37 and 42 cm Size 11/12: 29, 34, 39 and 44 cm DECREASE TIP (applies to armholes): All dec are done from RS. Dec inside 3 sts in garter st. Work sts that do not fit A.1 in stocking st. Dec after 3 sts in garter st as follows: Slip 1 st as if to K, K 1, psso. Dec before 3 sts in garter st as follows: K 2 tog. --------------------------------------------------------- JACKET: Worked back and forth on circular needle. Cast on 202-202-226-226-250 sts on circular needle size 3 mm with Alpaca. P 1 row from WS. Then work 6 rows in garter st - see explanation above. REMEMBER THE KNITTING TENSION! Then work in stocking st but work the 5 outermost sts (= band) in each side in garter st until finished measurements. When piece measures 24-26-28-29-30 cm, work 2 rows in garter st AT THE SAME TIME on 1st row inc 34-34-42-42-50 sts evenly = 236-236-268-268-300 sts on needle. Work next row from RS as follows: 5 sts in garter st, K 1, A-1 over the next 224-224-256-256-288 sts, finish with K 1 and 5 sts in garter st. Remember to cast off for button holes - see explanation above. Insert 2 markers in the piece; 62-62-70-70-78 sts in from each side (back piece = 112-112-128-128-144 sts). When piece measures 27-29-32-33-34 cm, work 2 rows in garter st over 8 sts on each side of markers, work the other sts as before. On next row cast off 4 sts on each side of every marker and finish each part separately. BACK PIECE: = 104-104-120-120-136 sts. Work as follows from RS: 3 sts in garter st, K 1, work diagram A-1 over the next 96-96-112-112-128 sts, finish with K 1 and 3 sts in garter st. Dec for armholes in each side every other row as follows - read DECREASE TIP: 1 st 8 times = 88-88-104-104-120 sts. When piece measures 38-41-45-47-49 cm, cast off the middle 40-40-40-40-56 sts for neck = 24-24-32-32-32 sts remain on each shoulder. Finish each part separately. Cast off when piece measures 40-43-47-49-51 cm. RIGHT FRONT PIECE: = 58-58-66-66-74 sts. Work as follows from RS: 5 sts in garter st, K 1, A.1 over the next 48-48-56-56-64 sts, finish with K 1 and 3 sts in garter st. Dec for armhole in the side as on back piece. Remember to cast off for button holes. AT THE SAME TIME when piece measures 34-37-41-43-45 cm, insert 14-14-14-14-22 sts towards mid front on a stitch holder. Then cast off for neck every other row as follows: 2 sts 4 times, and 1 st 4 times – work the sts that do not fit A-1 in stocking st. After all cast offs, 24-24-32-32-32 sts remain on shoulder. Cast off when piece measures 40-43-47-49-51 cm. LEFT FRONT PIECE: Work as right front piece but reversed. SLEEVE: Worked in the round on double pointed needles. Cast on 44-48-48-52-52 sts on double pointed needles size 3 mm with Alpaca. Insert a marker at the beg of round. Work 6 rounds in garter st, then work in stocking st until finished measurements. When piece measures 5 cm, inc 1 st on each side of marker, repeat every 3½-4-3½-4½-4 cm a total of 7-7-8-8-9 times = 58-62-64-68-70 sts. When piece measures 29-33-34-39-43 cm, cast off 3 sts on each side of marker, now work piece back and forth. Then cast off for sleeve cap in each side at beg of every row as follows: 2 sts 3 times and 1 st 0-1-3-5-6 times, then cast off 2 sts in each side until piece measures 33-38-40-46-51 cm, cast off 3 sts 1 time in each side. Cast off the remaining sts, piece measures approx. 34-39-41-47-52 cm. ASSEMBLY: Sew the shoulder seams. Sew in sleeves. Sew the buttons on to left front piece. NECK EDGE: Knit up 74 to 94 sts (incl sts on stitch holders) around the neck on circular needle size 3 mm. Work 6 rows in garter st. Cast off. |
||||||||||
Diagram explanations |
||||||||||
|
||||||||||
 |
||||||||||
Have you finished this pattern?Tag your pictures with #dropspattern #myhoneycardigan or submit them to the #dropsfan gallery. Do you need help with this pattern?You'll find 16 tutorial videos, a Comments/Questions area and more by visiting the pattern on garnstudio.com. © 1982-2026 DROPS Design A/S. We reserve all rights. This document, including all its sub-sections, has copyrights. Read more about what you can do with our patterns at the bottom of each pattern on our site. |
||||||||||


With over 40 years in knitting and crochet design, DROPS Design offers one of the most extensive collections of free patterns on the internet - translated to 17 languages. As of today we count 324 catalogues and 12290 patterns translated into English (UK/cm).
We work hard to bring you the best knitting and crochet have to offer, inspiration and advice as well as great quality yarns at incredible prices! Would you like to use our patterns for other than personal use? You can read what you are allowed to do in the Copyright text at the bottom of all our patterns. Happy crafting!
Post a comment to pattern DROPS Children 23-19
We would love to hear what you have to say about this pattern!
If you want to leave a question, please make sure you select the correct category in the form below, to speed up the answering process. Required fields are marked *.