
Popular categories
Looking for a yarn?


Comments / Questions (39)
![]() Sabine wrote:
Sabine wrote:
Hallo, ich stricke gerade Micah, habe aber eine generelle Frage, die ich in Ihren Video-Tutorials nicht finde: Welche Randmasche passt am besten, damit bei einem gestrickten Teil, z.B. Topflappen, das umhäkelt werden soll, keine Löcher neben der Randmasche entstehen? Ich habe schon alles Mögliche ausprobiert, auch den Kettrand. Vielen Dank!
03.01.2022 - 19:39DROPS Design answered:
Liebe Sabine, die Randmaschen können entweder glatt rechts/glatt links oder kraus rechts gestrickt, je nach Gewohnheit. Viel Spaß beim stricken!
04.01.2022 - 07:12
![]() Alyssa Waitt wrote:
Alyssa Waitt wrote:
Hello! Just as a follow up to my last question to be sure - the sweater would fit over a baby's head (the 1/3 size) no problem without the buttons? Thanks!
03.05.2021 - 15:50DROPS Design answered:
Dear Alyssa, that depends on a number of things, including the size of the child's head, your gauge, etc, but according to Ravelry, a number of people have made this item, and had no problem with the neckline. Happy Knitting!
03.05.2021 - 16:41
![]() Alyssa Waitt wrote:
Alyssa Waitt wrote:
Hello! Which sizes need the button band, and which sizes don't? Thank you!
30.04.2021 - 20:08DROPS Design answered:
Dear Alyssa, the pattern is for two models for all different sizes. As such, you can make a jumper with a button band or without it, regardless of your size. Happy knitting!
30.04.2021 - 22:34
![]() Sabine Adam wrote:
Sabine Adam wrote:
Hallo, ich habe zwei Fragen: Was ist der Unterschied zwischen Raglanpasse mit und ohne Öffnung? Und wozu benötigt man Muster 2? Danke
06.02.2021 - 12:43DROPS Design answered:
Liebe Frau Adam, mit Öffnung gibt es Blendemaschen bei der Raglan - ohne Öffnung wird es wie auf dem Foto. Muster 2 braucht man hier nicht (danke für den Hinweis). Viel Spaß beim stricken!
10.02.2021 - 08:33
![]() Sarah wrote:
Sarah wrote:
Liebes Drops Team! Ich kann die Größen in cm nicht ganz nachvollziehen. Was an dem Pullover für 2 jährige beispielsweise ist 92cm lang/weit? Vielen Dank!
04.02.2021 - 17:38DROPS Design answered:
Liebe Sarah, 92 cm sind die gesamte Höhe von dem Kind mit 2 Jahre - die Maßen vom Pullover finden Sie in der Skizze - hier lesen Sie mehr über die Maßskizze. Viel Spaß beim stricken!
05.02.2021 - 07:59
![]() Sarah wrote:
Sarah wrote:
Hallo Liebes Drops Team! In der Anleitung steht beim Ärmel, dass nach dem Anschlag 3 cm glatt gestrickt werden sollen. Ich nehme an das ist ein Fehler und es sollen 3 cm Bündchen gestrickt werden? Vielen Dank
23.01.2021 - 18:18DROPS Design answered:
Liebe Sarah, o h ja genau, zuerst stricken Sie 1 Runde glatt rechts und dann 3 cm Bündchen - Anleitung wird korrigiert, danke für den Hinweis. Viel Spaß beim stricken!
25.01.2021 - 08:51
![]() Daria wrote:
Daria wrote:
Czy jest może ten wzór na szydełko?
19.11.2020 - 23:58DROPS Design answered:
Witaj Dario! Jest pod numerem 21-41. Miłej pracy!
20.11.2020 - 08:19
![]() Conny Holm wrote:
Conny Holm wrote:
Lige et spørgsmål: Hvad med halskanten når jeg strikker blusen med knappekant?
28.12.2019 - 16:12DROPS Design answered:
Hej Conny, da strikkes halsen frem og tilbage fra raglanåbningen (der skal ikke være knaphul i halskanten) God fornøjelse!
31.01.2020 - 11:23
![]() Conny Holm wrote:
Conny Holm wrote:
Har vist fundet ud af det: de 4 første m på ærmet strikkes ret? Måske ville det være en ide, hvis I viste et billede af knaplukningen - så havde jeg måske ikke siddet og bøvlet med det - eller en mere forklarende tekst.
27.12.2019 - 13:01
![]() Conny Holm wrote:
Conny Holm wrote:
Hvordan strikker jeg raglan med indtagninger og knappekant - forstår ikke opskriften: Jeg skal fortsætte med at strikke frem og tilbage fra højre "raglansøm og slå 4 m op til kant. Indtagningstips fra retsiden: Strik 4 km i retstrik, 2 r sm - strik til der er 3 m tilbage før næste mærketråd .... strik til der er 6 m tilbage tag 1 m løs af, 1 r, løft den løse over, 4 km i ret??? Der er kun taget 4 m ud i alt?hvordan kan jeg så strikke 2x4 km på samme pind?
26.12.2019 - 21:15DROPS Design answered:
Hej Conny, fint at du selv har fundet ud af det :)
31.01.2020 - 11:33
|
|||||||||||||
Micah#micahsweater |
|||||||||||||
 |
 |
||||||||||||
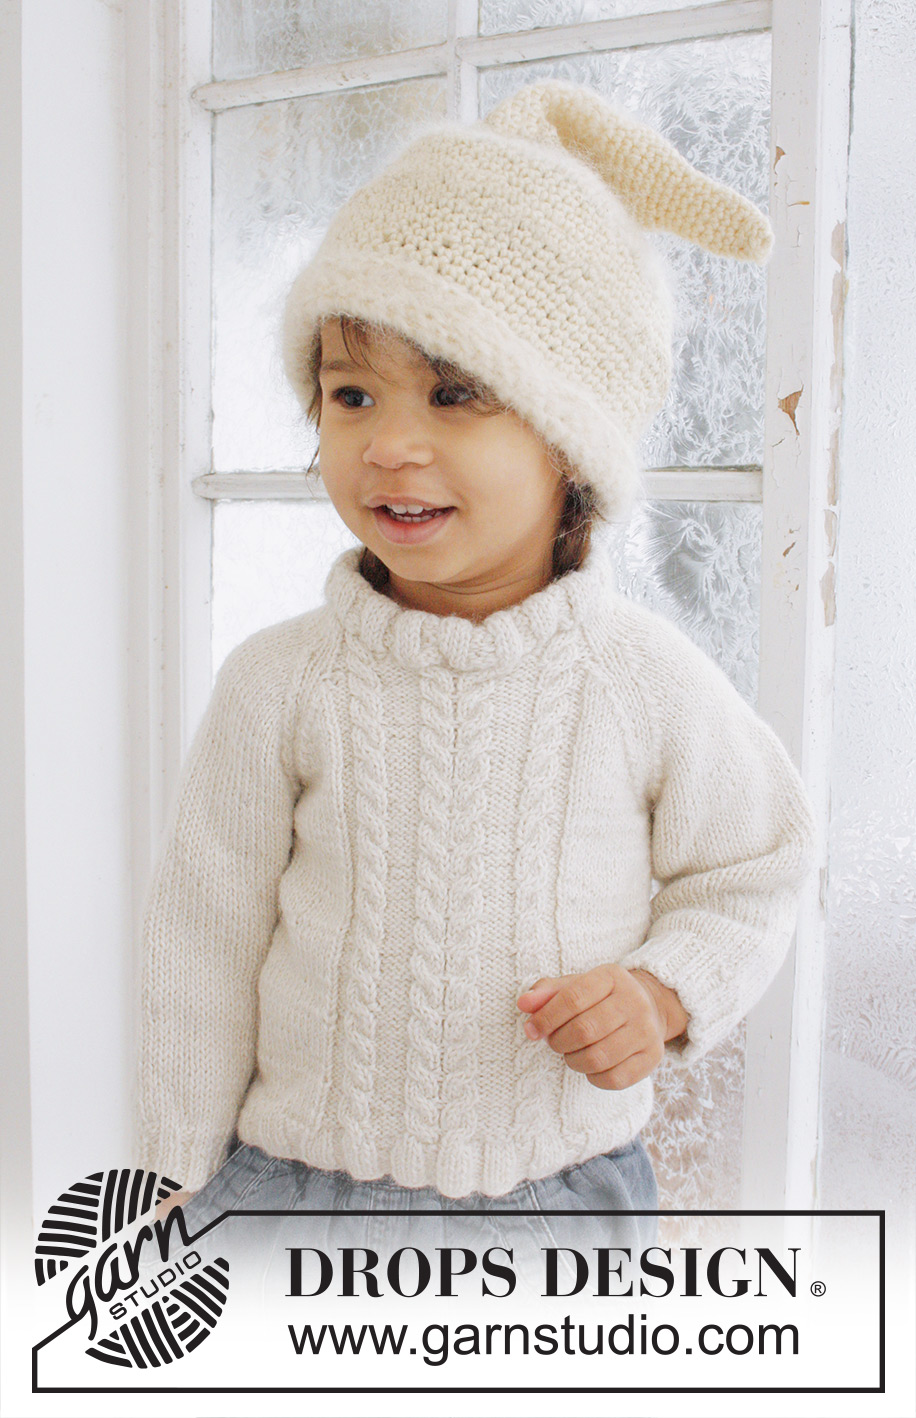
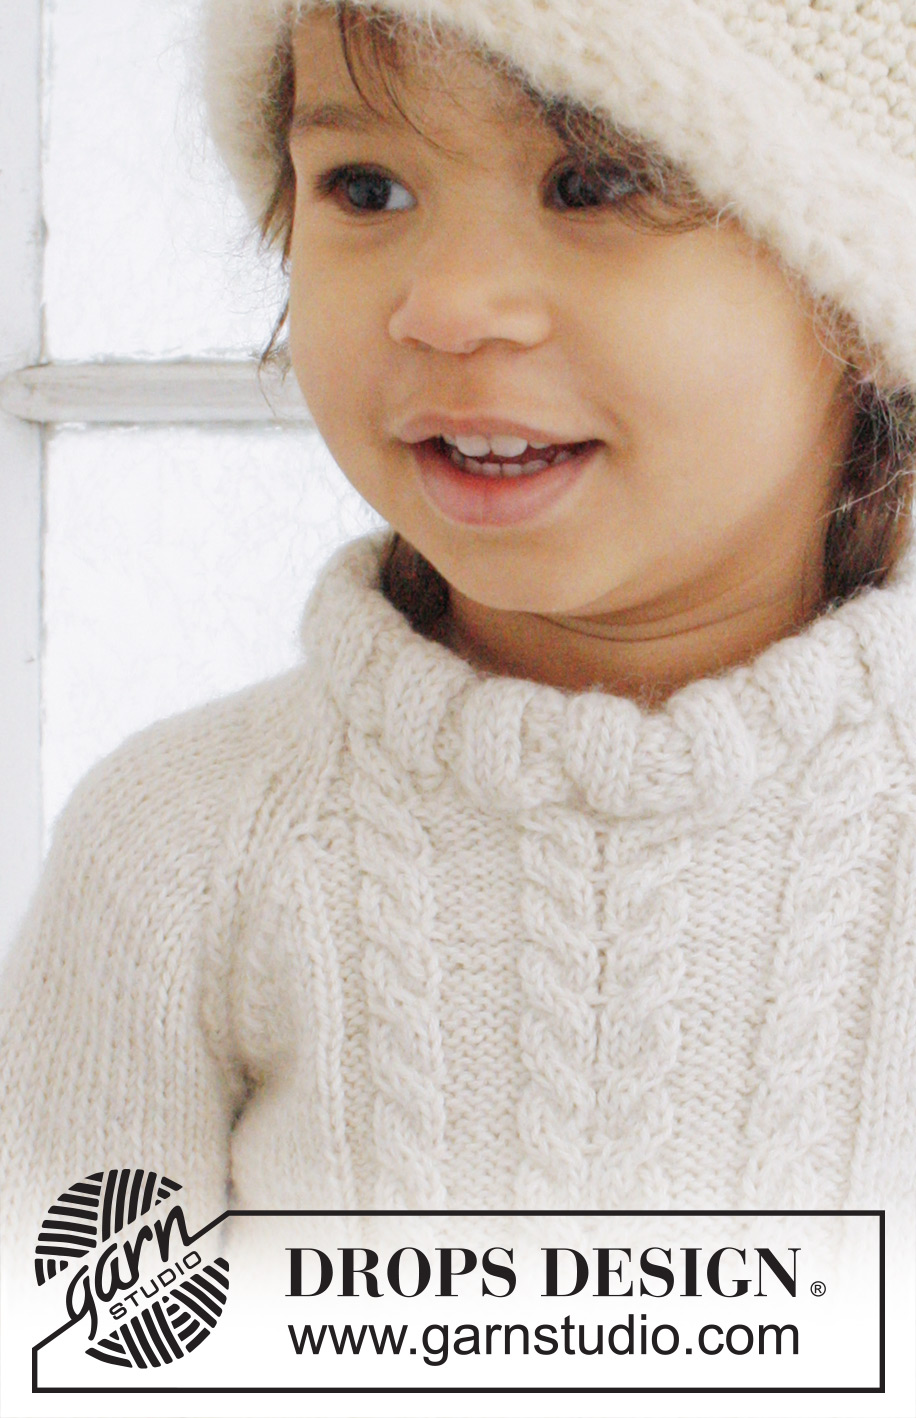
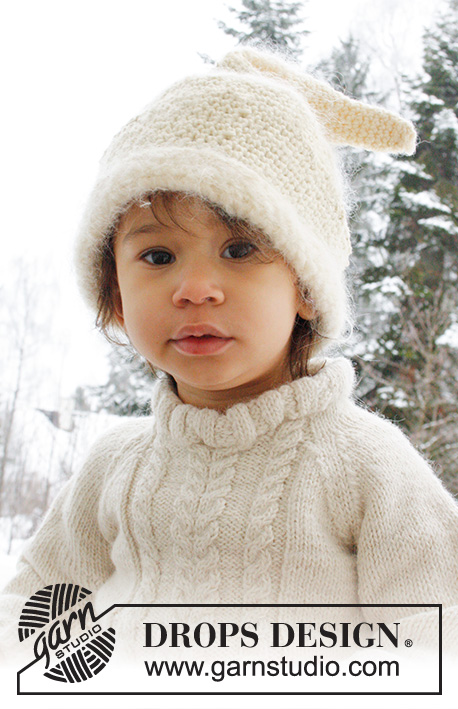
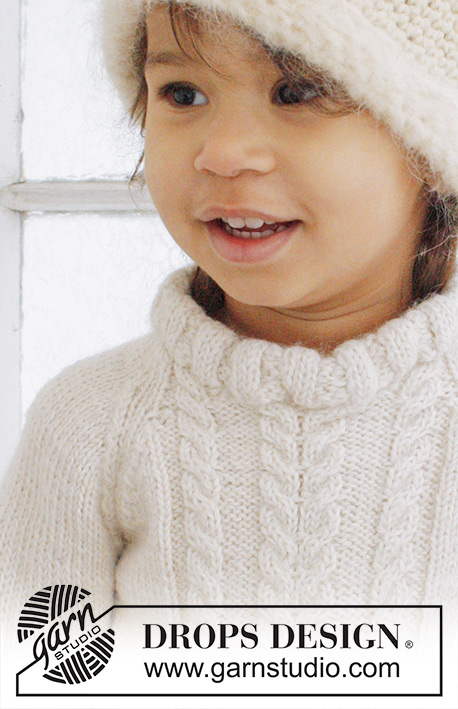
Knitted jumper with cables and raglan in 2 threads DROPS Alpaca for baby and children
DROPS Baby 21-40 |
|||||||||||||
|
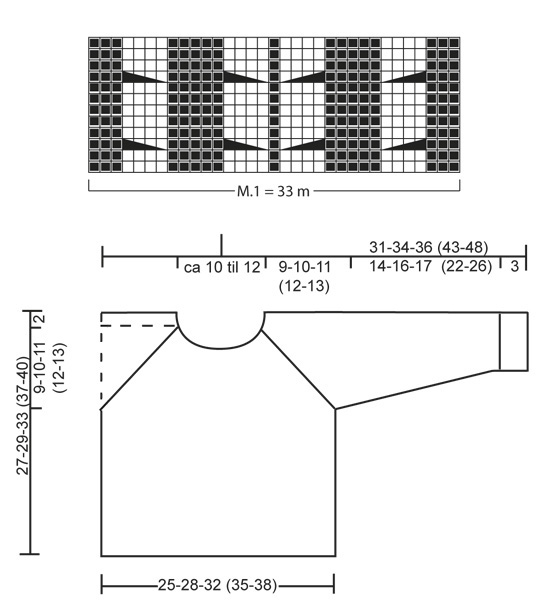
RIB: * K 3, P 3 *, repeat from *-*. PATTERN: See diagrams M.1 - diagrams show pattern from RS and are repeated until finished measurements. DECREASE TIP FOR RAGLAN WITHOUT BUTTON BAND: K 2 tog. * Work until 3 sts remain before next marker, slip 1 st as if to K, K 1, psso, K 2, K 2 tog *, repeat from *-* at the next 2 markers, work until 4 sts remain on needle, slip 1 st as if to K, K 1, psso, K 2. DECREASE TIP FOR RAGLAN WITH BUTTON BAND: DEC AS FOLLOWS FROM RS: Work 4 band sts in garter st, K 2 tog. * Work until 3 sts remain before next marker, slip 1 st as if to K, K 1, psso, K 2, K 2 tog *, repeat from *-* at the next 2 markers, work until 6 sts remain on needle, slip 1 st as if to K, K 1, psso, work 4 band sts in garter st. DEC AS FOLLOWS FROM WS: Work 4 band sts in garter st, P 2 tog, * Work until 3 sts remain before next marker, P 2 twisted tog (i.e. work in back loop of st instead of front), P 2, P 2 tog *, repeat from *-* at the next 2 markers, work until 6 sts remain on needle, P 2 twisted tog, work 4 band sts in garter st. NOTE: Make sure that the sts lay in the correct direction from RS. BUTTON HOLES: Cast off for button holes on the raglan band which is on the sleeve part – assess if this is needed in the larger sizes. Dec as follows: K 1, K 2 tog, 1 YO, K 1. Cast off for button holes when band measures: Size 1/3 months: 2, 5 and 8 cm Size 6/9 months: 3, 6 and 9 cm Size 12/18 months: 3, 7 and 10 cm Size 2 years: 3, 7 and 11 cm Size 3/4 years: 4, 8 and 12 cm -------------------------------------------------------- JUMPER: Worked in the round on circular needle. BODY: Cast on 102-114-126 (138-150) sts on circular needle size 3.5 mm with 2 threads Alpaca. Work 1 round in stocking st, then continue with RIB for 3 cm - see explanation above. Switch to circular needle size 4 mm and work 1 round in stocking st. Work next round as follows: 11-14-17 (20-23) sts in stocking st, insert a marker in the first of these sts (= the side), diagram M.1 (= 33 sts), work 11-14-17 (20-23) sts in stocking st, insert a marker in the last of these sts (= the side), work 47-53-59 (65-71) sts in stocking st. Continue to work like this until piece measures 16-17-20 (23-25) cm. Now cast off 5 sts in each side for armholes (= st with marker + 2 sts on each side of this st) = 49-55-61 (67-73) sts on front piece and 43-49-55 (61-67) sts on back piece. Put piece aside and knit the sleeves. SLEEVE: Cast on 30-30-36 (36-36) sts on double pointed needles size 3.5 mm with 2 threads Alpaca. Work 1 round in stocking st, continue with rib for 3 cm. Switch to double pointed needles size 4 mm, continue in stocking st. At the same time when piece measures 6 cm, inc 2 sts mid under sleeve, repeat every 3-2-3 (2.5-2.5) cm a total of 4-6-5 (7-9) times = 38-42-46 (50-54) sts. When piece measures 17-19-20 (25-29) cm, cast off 5 sts mid under sleeve = 33-37-41 (45-49) sts. Put piece aside and knit another sleeve. YOKE: Slip sleeves on to same circular needle as body where armholes were cast off = 158-178-198 (218-238) sts. Insert a marker in every transition between body and sleeves. Then continue the piece with or without button holes – see explanation below. YOKE WITH BUTTONS: Then the piece is worked back and forth from right "raglan seam" at the front. Cast on 4 extra sts on the front piece part (= button band) = 162-182-202 (222-242) sts. Read all of the following section before continuing! Continue in stocking st and with stripes as well as 4 sts in GARTER ST at beg and end of row (for button band). At the same time dec for raglan – see DECREASE TIP – dec on every other row: 11-11-12 (12-13) times and then on every row: 1-3-4 (6-7) times. NOTE: Also cast off for BUTTON HOLES - see explanation above. At the same time when piece measures 23-25-29 (32-35) cm, slip the middle 13-13-13 (15-15) sts in the front on a stitch holder for neck and work each side separate. Continue to cast off towards the neck on every other row: 2 sts 1 time and 1 st 2-2-2 (3-3) times. After all dec for raglan and cast offs for neck, a total of 45-49-53 (53-57) sts remain on needle. YOKE WITHOUT BUTTONS: Then work in the round. Continue in stocking st and with stripes. At the same time dec for raglan – see DECREASE TIP – dec on every other row: 11-11-12 (12-13) times and then on every row: 1-3-4 (6-7) times. At the same time when piece measures 23-25-29 (32-35) cm, slip the middle 13-13-13 (15-15) sts in the front on a stitch holder for neck and continue back and forth on needle. Continue to cast off towards the neck in beg of every row each side: 2 sts 1 time and 1 st 2-2-2 (3-3) times. After all dec for raglan and cast offs for neck, 41-45-49 (49-53) sts remain on needle. NECK: Knit up approx. 23 to 27 sts at the front of neck (incl sts on stitch holder) = 68 to 84 sts. Slip all sts on circular needle size 3,5 mm – work 1 round in stocking st while at the same time dec/inc sts evenly to 64-76 sts. Work rib K 2/P 2 for 8 cm, loosely cast off – fold the edge double towards WS and fasten with stitches. ASSEMBLY: Sew the openings under the sleeves tog. If button band has been worked: Place button bands on top of each other with the button holes part at the top and fasten in the bottom edge from WS. Sew on buttons. |
|||||||||||||
Diagram explanations |
|||||||||||||
|
|||||||||||||
 |
|||||||||||||
Have you finished this pattern?Tag your pictures with #dropspattern #micahsweater or submit them to the #dropsfan gallery. Do you need help with this pattern?You'll find 22 tutorial videos, a Comments/Questions area and more by visiting the pattern on garnstudio.com. © 1982-2026 DROPS Design A/S. We reserve all rights. This document, including all its sub-sections, has copyrights. Read more about what you can do with our patterns at the bottom of each pattern on our site. |
|||||||||||||


With over 40 years in knitting and crochet design, DROPS Design offers one of the most extensive collections of free patterns on the internet - translated to 17 languages. As of today we count 324 catalogues and 12239 patterns translated into English (UK/cm).
We work hard to bring you the best knitting and crochet have to offer, inspiration and advice as well as great quality yarns at incredible prices! Would you like to use our patterns for other than personal use? You can read what you are allowed to do in the Copyright text at the bottom of all our patterns. Happy crafting!
Post a comment to pattern DROPS Baby 21-40
We would love to hear what you have to say about this pattern!
If you want to leave a question, please make sure you select the correct category in the form below, to speed up the answering process. Required fields are marked *.