
Popular categories
Looking for a yarn?


Comments / Questions (219)
![]() WU Bernadette wrote:
WU Bernadette wrote:
Bonjour je ne comprends pas les explications à partir de 19cm de hauteur totale il faut faire 4 rangs de point mousse au dessus des 20mailles centrale soit 10 mailles de chaque cote de chaque marqueur je ne vois pas comment faire pouvez-vous me guider pas à pas en me disant quoi faire sur ce rang. Merci
06.03.2015 - 00:32DROPS Design answered:
Bonjour Mme Wu, à 19 cm (taille 12/18 mois), on va former la bordure sous les bras en tricotant 4 rangs point mousse sur les 20 m des côtés (soit 10 m avant + 10 m après chacun des marqueurs). Tricotez ces 4 rangs comme avant sur les autres mailles. Au rang suivant, on rabat les 10 m au milieu de ces 20 m (= il reste 5 m point mousse de bordure d'emmanchure pour chaque devant et de chaque côté pour le dos). Bon tricot!
06.03.2015 - 09:17
![]() Noemie wrote:
Noemie wrote:
Bonjour. En 6/9 mois je ne comprends pas les diminutions à 17cm de haut. Avant la séparation en 3,il y a 13 diminutions tous les 2 rangs. Une fois les 3 parties séparées, pour le dos les diminutions de 6 x 1 m tous les 2 rangs nous fait diminuer 12 m(de 52 à 40 mailles), ce qui fait 6 x 2m sur chaque rang diminué. Pour les 2 autres parties, on continue les diminutions comme avant mais on doit se retrouver à 11 m. Comment répartir les diminutions ?Merci d’avance
20.02.2015 - 00:15DROPS Design answered:
Bonjour Noémie, les diminutions de l'encolure commencent après les 2 rangs point mousse sur les 5 m de chaque côté (rangs raccourcis), on diminue 13 fois 1 m tous les 2 rangs au total, mais en même temps, (à 17 cm également), vous tricotez 4 rangs point mousse sur les 20 m de chaque côté pour les emmanchures, rabattez les mailles des emmanchures et continuez chaque partie séparément en continuant les diminutions de l'encolure. Bon tricot!
20.02.2015 - 09:09
![]() Stina wrote:
Stina wrote:
Die Abnahmen im Perlmuster sind mir nicht ganz klar. Es ist erklärt was zu tun ist wenn die ersten/letzten Maschen vor den Blenden zwei rechte oder zwei linke Maschen sind. Wie nehme ich denn in der Reihe danach ab wenn eine rechts und die andere links ist? Danke für Eure Hilfe!
17.02.2015 - 01:58DROPS Design answered:
Liebe Stina, leider ist bei der Übersetzung ein Fehler passiert. Die Anleitung wurde nun korrigiert, jetzt sagt die Erklärung, wie Sie die M abnehmen müssen.
23.02.2015 - 10:04Susan wrote:
How many stitches do I need for the fronts I find pattern confusing and what do I do for armholes loving the waistcoat
03.02.2015 - 18:06Susan wrote:
How many stitches do I need for the fronts I find pattern confusing
03.02.2015 - 18:00DROPS Design answered:
Dear Susan, both front pieces and back piece are worked in one piece until dividing pieces for armhole, you then bind off 8-10 sts each side (after 4 rows in garter st over the 18-20 sts each side). Each piece is then worked separately. Happy knitting!
04.02.2015 - 09:06
![]() OVALINE wrote:
OVALINE wrote:
Bonjour, je ne comprends pas les explications pour placer la poche si on tricote 5 m mousse 21 m jersey et il reste 9 mailles sur les 35 du devant ??? Donc on je peux pas mettre 16 m en attente.. il doit y avoir une erreur ?? Merci de votre aide Cordialement
02.12.2014 - 15:03DROPS Design answered:
Bonjour Ovaline, on crée l'ouverture des poches ainsi: 5 m point mousse, 21 m jersey (on met en attente les 16 dernières m tricotées = il reste les 5 premières m jersey sur l'aiguille), au rang suivant, on monte 16 m au-dessus de ces 16 m en attente pour la poche. Bon tricot!
02.12.2014 - 16:52
![]() Addy wrote:
Addy wrote:
Ik ben 20 cm bij maat 92. Nu snap ik het niet meer. kom niet uit met de steken. ik heb er 160. Kan iemand duidelijk vertellen hoe ik verder moet breien. En moet ik nog voor voorpanden op hulpdraad zetten. En die steken bij de markeerders , is dat links ervan of rechts of moet deze midden in zitten.
27.11.2014 - 12:21DROPS Design answered:
Hoi Addy. Bij 20 cm moet je eerst 2 nld ribbelst over ALLEEN de eerste 5 st op de nld (dus de voorbies). Brei dan 1 nld over alle st tot aan de andere kant en brei hier ook 2 nld ribbelst over de eerste 5 st (je breit de nld uit, keert en breit de 2 nld ribbelst) Vervolgens ga je verder met de minderingen voor de V-hals. Als je hebt afgekant voor de armsgaten kan je de voorpanden op een hulpdraad of stekenhouder plaatsen en verder breien over het achterpand.
27.11.2014 - 13:34
![]() Monica Gjørv wrote:
Monica Gjørv wrote:
Det er vel ikke meningen at man skal felle 16 ganger til v-hals før man deler til for og bskstykke? Tolker oppskriften som at man feller et par runder, og deretter fortsetter med fellingene etter man har delt arbeidet. Stemmer det?
17.10.2014 - 22:23DROPS Design answered:
Hej Monica, Ja det stemmer, du feller et par gange til V-hals, deler arbejdet og fortsætter med at felle til V-hals ifølge opskriften. God fornøjelse!
23.10.2014 - 11:27
![]() Randi Hansen wrote:
Randi Hansen wrote:
Kjempefin vest. Lett mønster å forstå.
12.10.2014 - 13:52Stina wrote:
100 g = 282 yards
14.08.2014 - 08:04
|
|
Junior#juniorvest |
|
 |
 |
Knitted vest with V-neck and textured pattern for baby and children in DROPS BabyMerino or DROPS BabyAlpaca Silk
DROPS Baby 21-8 |
|
|
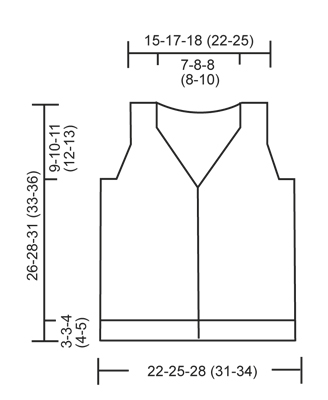
GARTER ST (back and forth on needle): K all rows. DOUBLE MOSS ST: Row 1: * K 2, P 2 *, repeat from *-*. Row 2: K over K and P over P. Row 3: P over K and K over P. Row 4: As row 2. Repeat row 1 to 4. BUTTON HOLES: Cast off for button holes on right band. 1 button hole = K tog 2nd and 3rd st from edge and make 1 YO. Cast off for button holes when piece measures: SIZE 1/3 MONTHS: 2, 6, 10 and 14 cm. SIZE 6/9 MONTHS: 2, 7, 11 and 16 cm. SIZE 12/18 MONTHS: 2, 7, 12 and 17 cm. SIZE 2 YEARS: 2, 8, 13 and 19 cm. SIZE 3/4 YEARS: 2, 8, 14 and 20 cm. DEC FOR V-NECK AND ARMHOLES IN DOUBLE MOSS ST: All dec are done from RS! DEC AS FOLLOWS BEFORE BAND/SLEEVE EDGE: When last st should be K: K 2 tog. When last st should be P: P 2 tog. DEC AS FOLLOWS AFTER BAND/SLEEVE EDGE: When first st should be K: Slip 1 st as if to K, K 1, psso. When first st should be P: P 2 twisted tog (i.e. work in back loop of st instead of front). -------------------------------------------------------- -------------------------------------------------------- BODY: Worked back and forth on circular needle from mid front. Cast on 148-168-184 (204-224) sts on circular needle size 2.5 mm with Baby Merino. Work first row as follows from RS: 5 sts in GARTER ST (= band) - see explanation above, * K 2, P 2 *, repeat from *-* until 7 sts remain, finish with K 2 and 5 sts in GARTER ST (= band). Continue rib like this with 5 sts in garter st in each side until piece measures 3-3-4 (4-5) cm - REMEMBER BUTTON HOLES on band - see explanation above. Switch to circular needle size 3 mm and work in stocking st but continue bands in garter st as before. AT THE SAME TIME on first row after rib, dec 32-36-40 (44-52) sts evenly (do not dec over bands) = 116-132-144 (160-172) sts. Insert a marker 31-35-39 (43-45) sts in from each side (= 54-62-66 (74-82) sts between markers on back piece). REMEMBER THE KNITTING TENSION! When piece measures 7-7½-8 (9-10) cm, work next row as follows from RS: 5 sts in garter st, 21-21-27 (27-31) sts in stocking st, slip the last 16-16-20 (20-24) sts that were worked on a stitch holder for pocket slit, work until 10-10-12 (12-12) sts remain on needle, slip the last 16-16-20 (20-24) sts that were worked on a stitch holder for pocket slit, work 5-5-7 (7-7) sts in stocking st and finish with 5 sts in garter st. On next row cast on 16-16-20 (20-24) new sts over each of the 2 stitch holders with sts = 116-132-144 (160-172) sts. Continue in stocking st and in garter st until piece measures 13-14-16 (16-18) cm. Now K 4 rows over all sts (= 2 ridges). Then work DOUBLE MOSS ST - see explanation above (continue bands in garter st as before). READ ALL OF THE FOLLOWING SECTION BEFORE CONTINUING! When piece measures 15-17-18 (20-21) cm, work 2 rows in garter st over the first 5 sts on needle (do not work the other sts on needle), then work 1 row over all sts before working 2 rows in garter st over the first 5 sts on needle in the other side of piece (this is done so that the V-neck looks nice). Then dec for V-neck - see explanation above: Dec 1 st every other row (i.e. every row from RS) a total of 12-13-16 (16-16) times. AT THE SAME TIME when piece measures 16-17-19 (20-22) cm, work 4 rows in garter st over the middle 18-20-20 (20-20) sts in each side (i.e. over 9-10-10 (10-10) sts on each side of both markers) – work the other sts as before. On next row, cast off the middle 8-10-10 (10-10) sts in each side for armhole and finish front and back piece separately. BACK PIECE: = 46-52-56 (64-72) sts. Work double moss st with 5 sts in garter st in each side (= sleeve edges). AT THE SAME TIME dec for armholes - see explanation above: Dec 1 st every other row (i.e. on every row from RS) a total of 5-6-6 (6-6) times = 36-40-44 (52-60) sts. Continue in double moss st and in garter st until piece measures 24-26-29 (31-34) cm. Now work in garter st over all sts until finished measurements. AT THE SAME TIME when piece measures 25-27-30 (32-35) cm, cast off the middle 16-18-20 (20-24) sts for neck = 10-11-12 (16-18) sts remain on each shoulder. Now finish each shoulder separately. Continue with garter st until piece measures 26-28-31 (33-36) cm, cast off. LEFT FRONT PIECE: Continue with double moss st and in garter st while AT THE SAME TIME dec for armhole in the side as on back piece and continue dec for V-neck as before. After last dec, 10-11-12 (16-18) sts remain on needle. Work garter st over all sts until piece measures 26-28-31 (33-36) cm and cast off. RIGHT FRONT PIECE: Work as left front piece but reversed. POCKET SLIT: Slip the 16-16-20 (20-24) sts from stitch holder on one front piece back on needle size 2.5 mm. Work rib K2/P2 with 1 st in garter st and K 2 in each side (seen from RS). When pocket slit measures 2½-2½-3 (3-3) cm, loosely cast off with K over K and P over P. Sew pocket slit to front piece with duplicate sts in each side. Sew pocket opening to bottom of pocket slit (where sts were put on a stitch holder) on the back of piece. Work another pocket slit the same way on the other front piece. ASSEMBLY: Sew the shoulder seams. Sew on buttons. |
|
 |
|
Have you finished this pattern?Tag your pictures with #dropspattern #juniorvest or submit them to the #dropsfan gallery. Do you need help with this pattern?You'll find 13 tutorial videos, a Comments/Questions area and more by visiting the pattern on garnstudio.com. © 1982-2026 DROPS Design A/S. We reserve all rights. This document, including all its sub-sections, has copyrights. Read more about what you can do with our patterns at the bottom of each pattern on our site. |
|


With over 40 years in knitting and crochet design, DROPS Design offers one of the most extensive collections of free patterns on the internet - translated to 17 languages. As of today we count 324 catalogues and 12290 patterns translated into English (UK/cm).
We work hard to bring you the best knitting and crochet have to offer, inspiration and advice as well as great quality yarns at incredible prices! Would you like to use our patterns for other than personal use? You can read what you are allowed to do in the Copyright text at the bottom of all our patterns. Happy crafting!
Post a comment to pattern DROPS Baby 21-8
We would love to hear what you have to say about this pattern!
If you want to leave a question, please make sure you select the correct category in the form below, to speed up the answering process. Required fields are marked *.