
Popular categories
Looking for a yarn?


Comments / Questions (119)
![]() Marianne wrote:
Marianne wrote:
Habe eine Strickjacke ‚Grey Gosling‘ fertiggestellt und würde gerne das Foto posten auf der dropsfan Galerie. Hier wird aber ein URL gefordert. Wie kann ich das einpflegen? Viele Grüße
25.06.2025 - 16:05
![]() Nury Zev wrote:
Nury Zev wrote:
No se entiende el.procedimiento. desde donde empieza, cuantos puntos hay que.montar para bebe de 3.meses
20.05.2025 - 15:44
![]() Cassandra Bremefors wrote:
Cassandra Bremefors wrote:
Jag sitter helt fast vid sista steget "FRAM- OCH BAKST". Jag förstår inte vart och från vilken sida jag ska sätta på maskorna från "VÄNSTER FRAMST" tillsammans med maskorna från "BAKST". Det här mönstret är väldig komplicerad och skriver inte ut all information. Jag tänkte att det endast skulle vara att göra likadant på vänster sida som jag gjort för högra sidan, men förstår inte alls hur jag ska göra.
07.02.2025 - 16:06DROPS Design answered:
Hej Cassandra, jo det stemmer, det skal blive helt ens i begge sider, med en åbning midt foran :)
12.02.2025 - 14:16
![]() Cassandra Bremefors wrote:
Cassandra Bremefors wrote:
Jag sitter helt fast vid sista steget "FRAM- OCH BAKST". Jag förstår inte vart och från vilken sida jag ska sätta på maskorna från "VÄNSTER FRAMST" tillsammans med maskorna från "BAKST". Det här mönstret är väldig komplicerad och skriver inte ut all information. Jag tänkte att det endast skulle vara att göra likadant på vänster sida som jag gjort för högra sidan, men förstår inte alls hur jag ska göra.
02.02.2025 - 20:16DROPS Design answered:
Hei Cassandra. Jo, du har allerede strikket Høyre Erme, Høyre Forstykke og litt over halvparten av bakstykket i en del, maskene til bakstykket settes på en tråd (=1.del) . Så legges denne delen til side. Så starter/legg opp masker til venstre forstykke (= 2. del) og strikker til den måler X cm og det er lagt opp X masker i venstre side. Nå setter du maskene som sitter på tråden (bakstykket på 1.del) på samme pinne som venstre forstykke (2.del) ) 1.del og 2. del er nå samlet og du strikker nå forstykket og bakstykket sammen og feller masker, og deretter avsluttes det med å strikke venstre erme. mvh DROPS Design
10.02.2025 - 14:16
![]() Lia wrote:
Lia wrote:
Chiedo scusa per la domanda forse sciocca: dove devo inserire le correzioni? "DAVANTI: Poi lavorare 4 ferri a maglia legaccio" : all'inizio della spiegazione sul Davanti? "MANICA DESTRA: ...Inserire un segnapunti nell'ultimo ferro e misurare da qui il dietro d'ora in poi" : a che punto della spiegazione? Grazie
16.10.2024 - 18:03DROPS Design answered:
Buonasera Lia, il modello online è già aggiornato. Buon lavoro!
28.10.2024 - 00:03
![]() Lia wrote:
Lia wrote:
Chiedo scusa per la domanda forse sciocca: dove devo inserire le correzioni? "DAVANTI: Poi lavorare 4 ferri a maglia legaccio" : all'inizio della spiegazione sul Davanti? "MANICA DESTRA: ...Inserire un segnapunti nell'ultimo ferro e misurare da qui il dietro d'ora in poi" : a che punto della spiegazione? Grazie
11.10.2024 - 19:20DROPS Design answered:
Buonasera Lia, il modello online è già aggiornato. Buon lavoro!
28.10.2024 - 00:04
![]() Constanza wrote:
Constanza wrote:
Buenas tardes, estoy comenzando el patrón 1/3 meses. A los 5 cm hay que aumentar a cada lado. Qué tipo de aumento hay que hacer? Se puede aumentar después del primer punto de la corrida y antes del último punto? Muchas gracias de antemano :)
22.09.2024 - 14:21DROPS Design answered:
Hola Constanza, se aumenta 1 punto al inicio y al final de la fila, es decir, en cada lado. Se puede aumentar haciendo 1 hebra o de otra forma si se prefiere, asegurándose de que no queden agujeros.
23.09.2024 - 01:26
![]() Elly wrote:
Elly wrote:
Bij het linker voorpand moet je 58 steken opzetten. Daarna 3x 1 steek meerderen. Er staat dan heb je 68 steken maar volgens mij maar 61 steken. Die ik iets verkeerd?
11.07.2024 - 09:03DROPS Design answered:
Dag Elly,
De 7 steken die je daarna opzetten zitten ook bij deze 68 steken, dus dan klopt het weer.
11.07.2024 - 21:09
![]() Latha wrote:
Latha wrote:
The back is a lot smaller than the front the back measures 22 cms and the front is 30 cms? How do I fix the problem?
11.06.2024 - 04:38DROPS Design answered:
Dear Latha, back piece should be large enough, note that the 7 to 11 cm worked on back piece only are just for neck on back piece, then you put sts aside, work left front piece then when front piece measures 6 to 8 cm, cast on the new sts for neck turn and work next row from WS then cut the yarn and work then all sts for left front piece + back piece on same needle to continue left shoudler/left side of piece to the left sleeve. Happy knitting!
11.06.2024 - 08:20
![]() Nara wrote:
Nara wrote:
Thank you it looks like a fun knit to do
09.06.2024 - 03:22
|
||||
Grey Gosling#greygoslingcardigan |
||||
 |
 |
|||
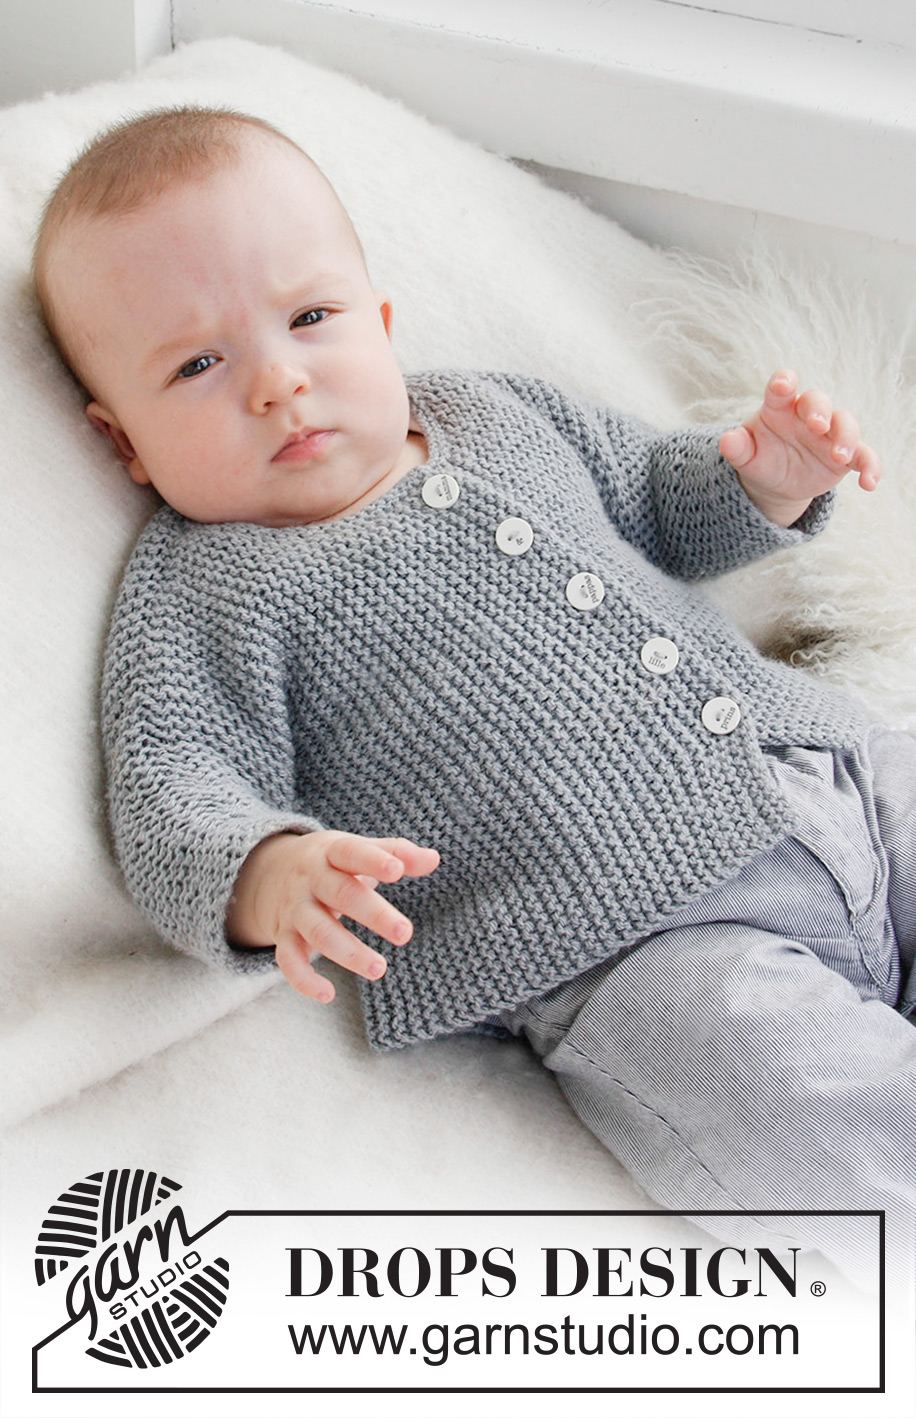
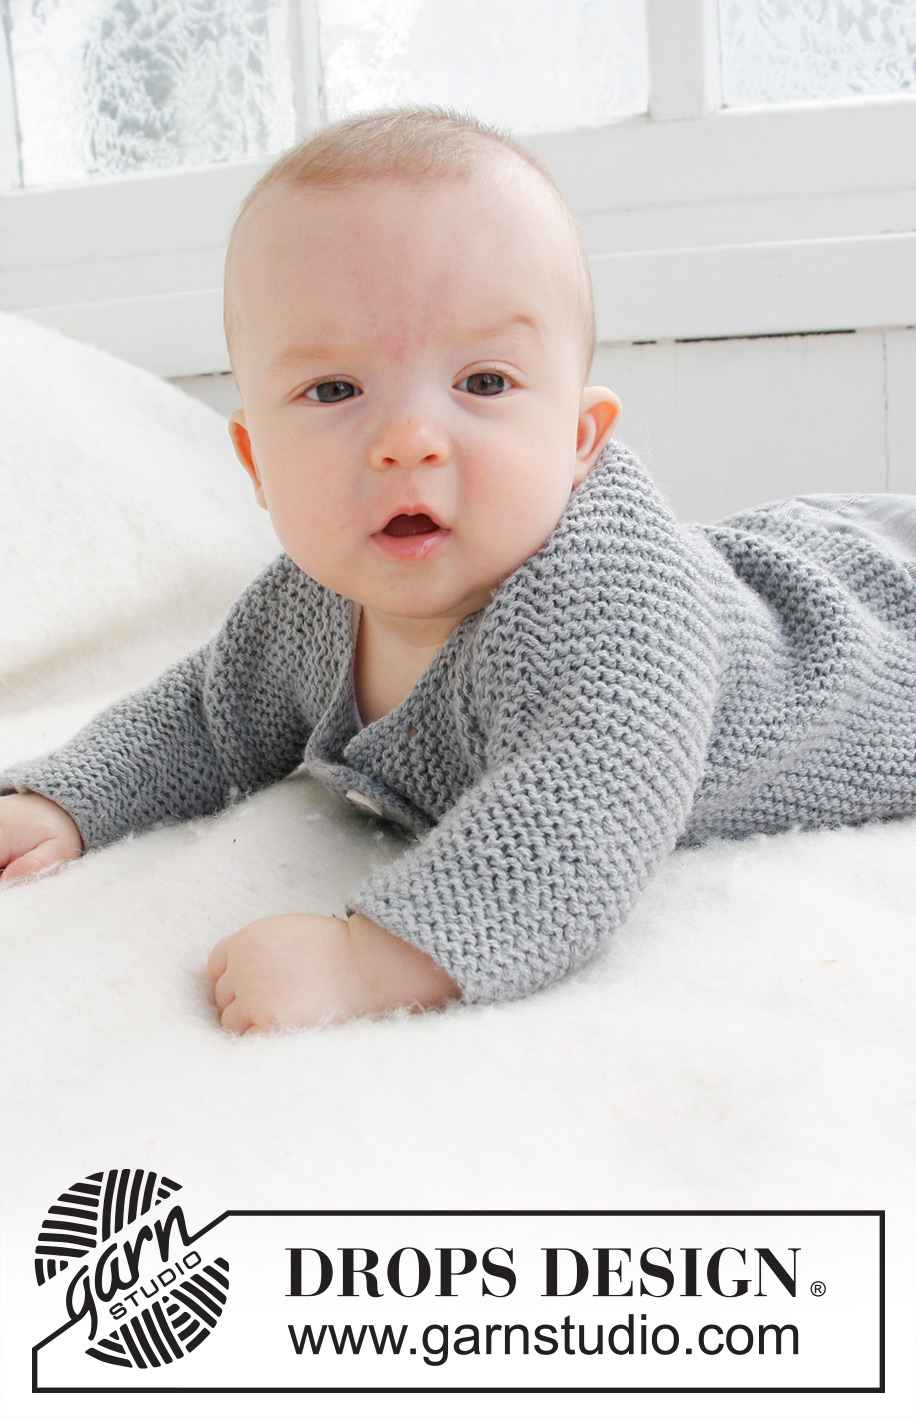
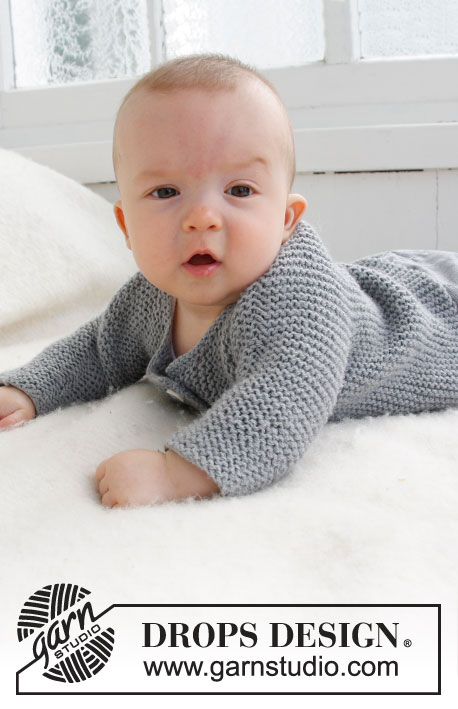
Knitted jacket worked sideways for baby and children in 2 threads DROPS Alpaca
DROPS Baby 21-39 |
||||
|
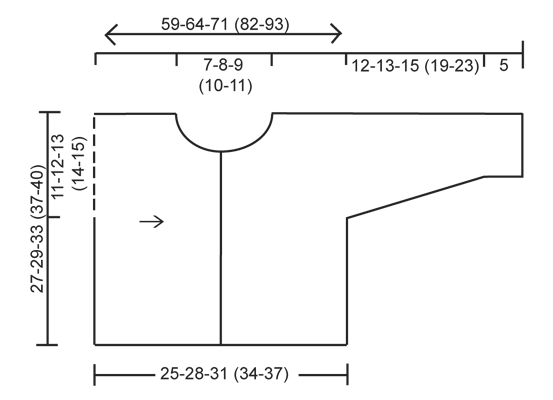
GARTER ST (back and forth on needle): K all rows. INCREASE TIP (applies to neck line): Inc by making 1 YO inside 2 edge sts in garter st. On next row K YO twisted (i.e. work in back loop of st instead of front to avoid holes). NOTE: Work the outermost st in neck line a little tight so that the edge looks nice BUTTON HOLES: 1 button hole = Cast off 1 st and make 1 YO on next row over the cast off st. ------------------------------------------------------- JACKET: Front and back piece is worked in one, sideways from arm to arm. RIGHT SLEEVE: Loosely cast on 26-28-28 (30-30) sts (= bottom of right sleeve) on needle size 5 mm with 2 threads Alpaca. Work in Garter St - see explanation above. When piece measures 5 cm, inc 1 st in each side, repeat inc every other cm a total of 6-6-8 (9-11) times = 38-40-44 (48-52) sts. When piece measures 17-18-20 (24-28) cm, loosely cast on 27-29-34 (39-42) new sts at beg and end of row for front and back piece = 92-98-112 (126-136) sts. Continue to work until piece measures 9-10-11 (12-13) cm from where the sts for front and back piece were cast on (piece measures 26-28-31 (36-41) cm from cast on edge at the bottom of sleeve). Work next row from RS as follows: K the first 46-49-56 (63-68) sts on needle (= front piece) and slip the remaining 46-49-56 (63-68) sts on a stitch holder (= back piece). Insert a marker in last row, now measure back piece from here. FRONT PIECE: = 46-49-56 (63-68) sts. Turn piece and cast off the first 6-6-6 (7-7) sts on row for neck. Then dec for neck line towards the neck every cm: 1 st 3 times in total = 37-40-47 (53-58) sts on needle. Work until width of front piece = 12.5-14-15.5 (17-18.5) cm. Now cast off for 5-5-5 (6-6) button holes evenly on next row – see explanation above, Note the hole at the top are cast off after 2 sts at neck edge. Then work 4 rows in garter stitch. Cast off. BACK PIECE: Slip the 46-49-56 (63-68) sts from stitch holder back on needle and K every row until piece measures 7-8-9 (10-11) cm from last marker. Put the piece aside and work left front piece. LEFT FRONT PIECE: Loosely cast on 37-40-47 (53-58) sts on needle size 5 mm with 2 threads Alpaca. K every row until piece measure 4-4.5-5 (5.5-6) cm. Now inc for neck line in the left side of piece on every cm 1 st a total of 3 times - see Inc.tips above. When piece measure 6-6.5-7 (7.5-8) cm cast on 6-6-6 (7-7) sts in left side = 46-49-56 (63-68) m. When all sts are inc for neck work pieces together - see BODY. BODY: Slip the 46-49-56 (63-68) sts from back piece on to same needle as left front piece = 92-98-112 (126-136) sts on needle. Insert a new marker in the piece - now measure piece from here! Work until piece measures 9-10-11 (12-13) cm. Loosely cast off at beg of the next 2 rows 27-29-34 (39-42) sts in each side = 38-40-44 (48-52) sts remain on needle for left sleeve – now measure piece from here. When piece measures 2-3-1 (3-3) cm, dec 1 st in each side, repeat every other cm a total of 6-6-8 (9-11) times = 26-28-28 (30-30) sts on needle. Loosely cast off when sleeve measures 17-18-20 (24-28) cm (piece measures approx. 59-64-71 (82-93) cm from arm to arm). NECK EDGE: From RS pick up approx 40 - 50 sts around neck with 2 strands on needles size 5 mm/US 8. K3 rows back and forth, then cast/bind off loosely. ASSEMBLY: Fold the piece double at the shoulders and sew sleeve and side seams in one in front loop of outermost st to avoid a chunky seam. Sew on buttons. |
||||
Diagram explanations |
||||
|
||||
|
||||
Have you finished this pattern?Tag your pictures with #dropspattern #greygoslingcardigan or submit them to the #dropsfan gallery. Do you need help with this pattern?You'll find 11 tutorial videos, a Comments/Questions area and more by visiting the pattern on garnstudio.com. © 1982-2025 DROPS Design A/S. We reserve all rights. This document, including all its sub-sections, has copyrights. Read more about what you can do with our patterns at the bottom of each pattern on our site. |
||||


With over 40 years in knitting and crochet design, DROPS Design offers one of the most extensive collections of free patterns on the internet - translated to 17 languages. As of today we count 314 catalogues and 11822 patterns translated into English (UK/cm).
We work hard to bring you the best knitting and crochet have to offer, inspiration and advice as well as great quality yarns at incredible prices! Would you like to use our patterns for other than personal use? You can read what you are allowed to do in the Copyright text at the bottom of all our patterns. Happy crafting!
Post a comment to pattern DROPS Baby 21-39
We would love to hear what you have to say about this pattern!
If you want to leave a question, please make sure you select the correct category in the form below, to speed up the answering process. Required fields are marked *.