
Popular categories
Looking for a yarn?


Comments / Questions (219)
![]() Ulla. wrote:
Ulla. wrote:
Hej Toppenmönster som jag stickat till barnbarnen. Nu vill de ha samma väst men då finns det ingen beskrivning till 5-6 år. Kan jag ta annat garn och stickor eller kan du tipsa mig om något mönster ni har som är snarlikt. Tack för alla era videos, de gör att jag klarar det mesta.
29.01.2017 - 11:33DROPS Design answered:
Hej Ulla. Hvad med at tage en anden vestopskrift som den her: S26-15 og saa tilpasse mönstret fra B21-8?
30.01.2017 - 16:02
![]() Camilla wrote:
Camilla wrote:
Jag stickar i stl 3-6mån och jag har stickat 14cm och gjort 4v med rätstickning. Då står det att jag ska läsa nästa kapitel innan jag fortsätter. Är det meningen att det nu är dags att dela upp den i fram och bakstycke redan? Förstår inte riktigt. Tacksam för hjälp
21.01.2017 - 14:16DROPS Design answered:
Hej Camilla. Nej ikke helt. Först skal du lige strikke forkortede v over de förste m paa forstykket og derefter begynder du at lukke af til v-halsen. Ved 17 cm deler du arbejdet op i fram og bakstycke.
26.01.2017 - 12:07Javcqueline wrote:
I am at a loss now, have looked through the questions here but cannot seem to sort out the bit about the armholes. When you say work 4 rows in garter stitch over the middle 20 stitches in each side ( ie over 10 ) stitches in each side. Do you mean knit the first 5 in garter stitch (the band) then another 10 then knit in double moss until the last 10 plus 5? sorry about this. lol
13.01.2017 - 17:58DROPS Design answered:
Dear Jacqueline, you have now to work 4 rows in garter st over the 20 sts under armhole, ie 10 sts before + 10 sts after each of the side markers, work the other sts as before. Happy knitting!
13.01.2017 - 18:13MOUTHAR wrote:
Bonjour En premier je veut vous remerciez pour cet agréable cite, j'ai essayer plusieurs modèle et ils sont très bien réussie. J'ai une petite note a propos des boutonnières je croit qu'on doit les ouvrir à l'avant gauche comme il apparait sur la photo et n'en pas à droite. Merci encore une fois
04.09.2016 - 00:40
![]() Ingalill wrote:
Ingalill wrote:
Hvilken av str. bør jeg følge når jeg skal strikke en vest i str. 62 (3-6mnd)? Vil vesten i str. 56-62 passe frem til han skal bruke str.68?
09.08.2016 - 22:08DROPS Design answered:
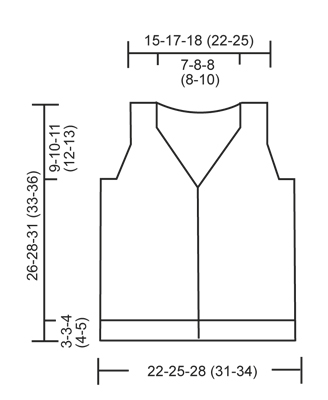
Hej Ingalil. Se maalene nederst paa skitsen og sammenlign disse med en vest/tröje som han har. Og fordi babyer vokser hurtigt ville jeg nok vaelge en str större hvis den er lidt lille i det.
24.08.2016 - 12:46
![]() Gitte wrote:
Gitte wrote:
Hej Findes denne søde vest også i herre str.
31.07.2016 - 19:33DROPS Design answered:
Hej Gitte. Nej, vi har desvaerre ikke denne i herre str.
01.08.2016 - 14:35
![]() Birgit Langebeck wrote:
Birgit Langebeck wrote:
Jeg strikker denne model i str. 6/9mdr. jeg kan ikke få det til at passe med masker til lommer 5m ret 21m glatstr 16m på en tråd det¨giver 42 m og jeg har kun 35. Næste fejl når jeg skal strikke hver side, ryg, forstykker, lukkes der 10masker i hver side til ærmegab, det skulle iflg opskriften give 52m, men jeg har så kun 42 m.har selv gjort så jeg strikker 5 kantm, i hver side og har lukket for 5m på hver side af mærketråden
26.06.2016 - 13:27DROPS Design answered:
Hej Birgit. Du strikker 21 m og saa saetter du de sidste 16 de 21 du lige har strikket paa en traad. Herefter strikker du til der er 10 m tilbage paa pinden og satter her igen 16 af de sidststrikkede m paa en traad. Du skal lukke 5 m af paa hver side af maerketraaden (10 m i hver side totalt).
27.06.2016 - 16:31
![]() Martine Labbe wrote:
Martine Labbe wrote:
Bonjour je tricote ce modèle et j'ai beau lire et relire je ne vois pas où faire mes diminutions pour encolure et emmanchures avant mes 5 mailles mousse pour bordure ?
26.04.2016 - 23:37DROPS Design answered:
Bonjour Mme Labbe, diminuez 1 m après les 5 m point mousse de l'emmanchure et avant les 5 m point mousse de la bordure devant (devant gauche) - voir également au début des explications "DIMINUTIONS POUR L'ENCOLURE V et LES EMMANCHURES au DOUBLE POINT DE RIZ". Bon tricot!
27.04.2016 - 08:47
![]() Nellie wrote:
Nellie wrote:
Hallo :-) Ich komme leider ab: “nach 15-17-18 (20-21) cm 1 Krausrippe über die ersten 5 M. der R. stricken (die restlichen M. werden nicht gestrickt) bis “Die Teile separat fertig stricken“ nicht weiter... ich bin etwas verzweifelt :-(
16.04.2016 - 23:26DROPS Design answered:
Liebe Nellie, über die 5 Krausmaschen der Blende wird auf beiden Seiten je eine verkürzte Reihe gestrickt (also nur über diese 5 M stricken), damit sich die Blende bei der Schräge durch das Krausmuster nicht zusammenzieht. Die weiter in der Anleitung beschriebenen 2 Krausrippen nach dem glatt rechts gestrickten Teil können Sie auf dem Foto erkennen.
18.04.2016 - 08:58
![]() Linette Pearl Mortensen wrote:
Linette Pearl Mortensen wrote:
Hvor er dette bare et godt mønster. Nu har jeg lavet 5stk. Til mit barnebarn. Selvfølgelig har jeg lavet dem i andre farver og sat et personligt præg. Men basis opskriften er denne og den er virkelig god.
13.04.2016 - 14:40
|
|
Junior#juniorvest |
|
 |
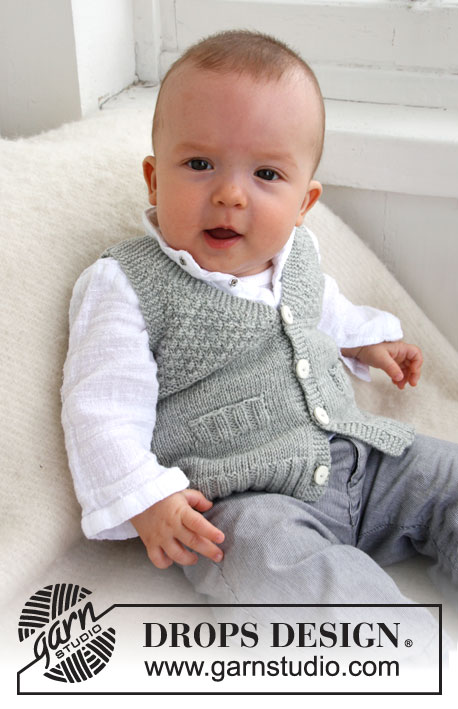 |
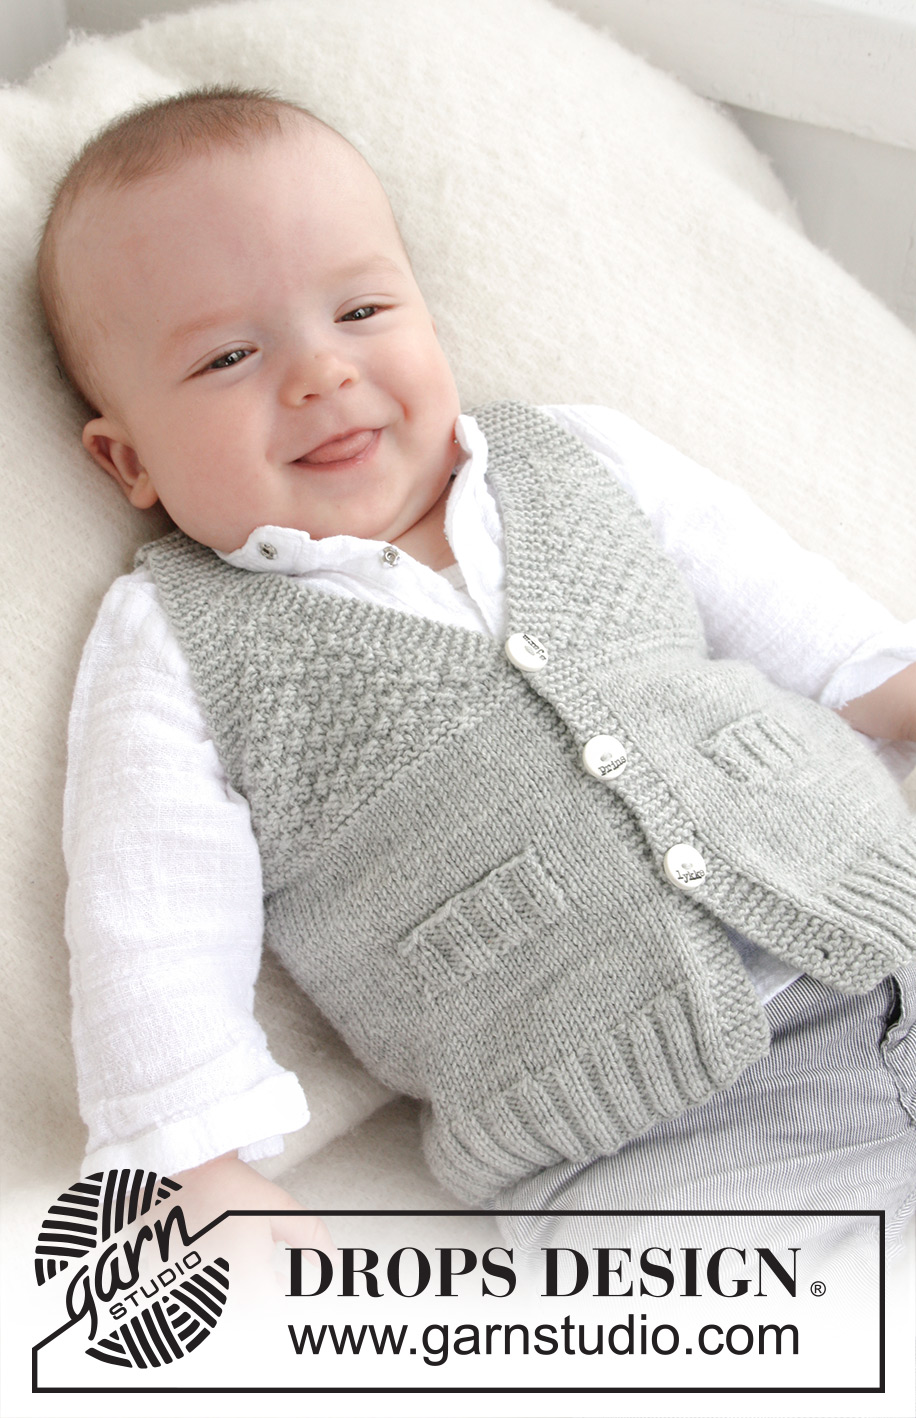
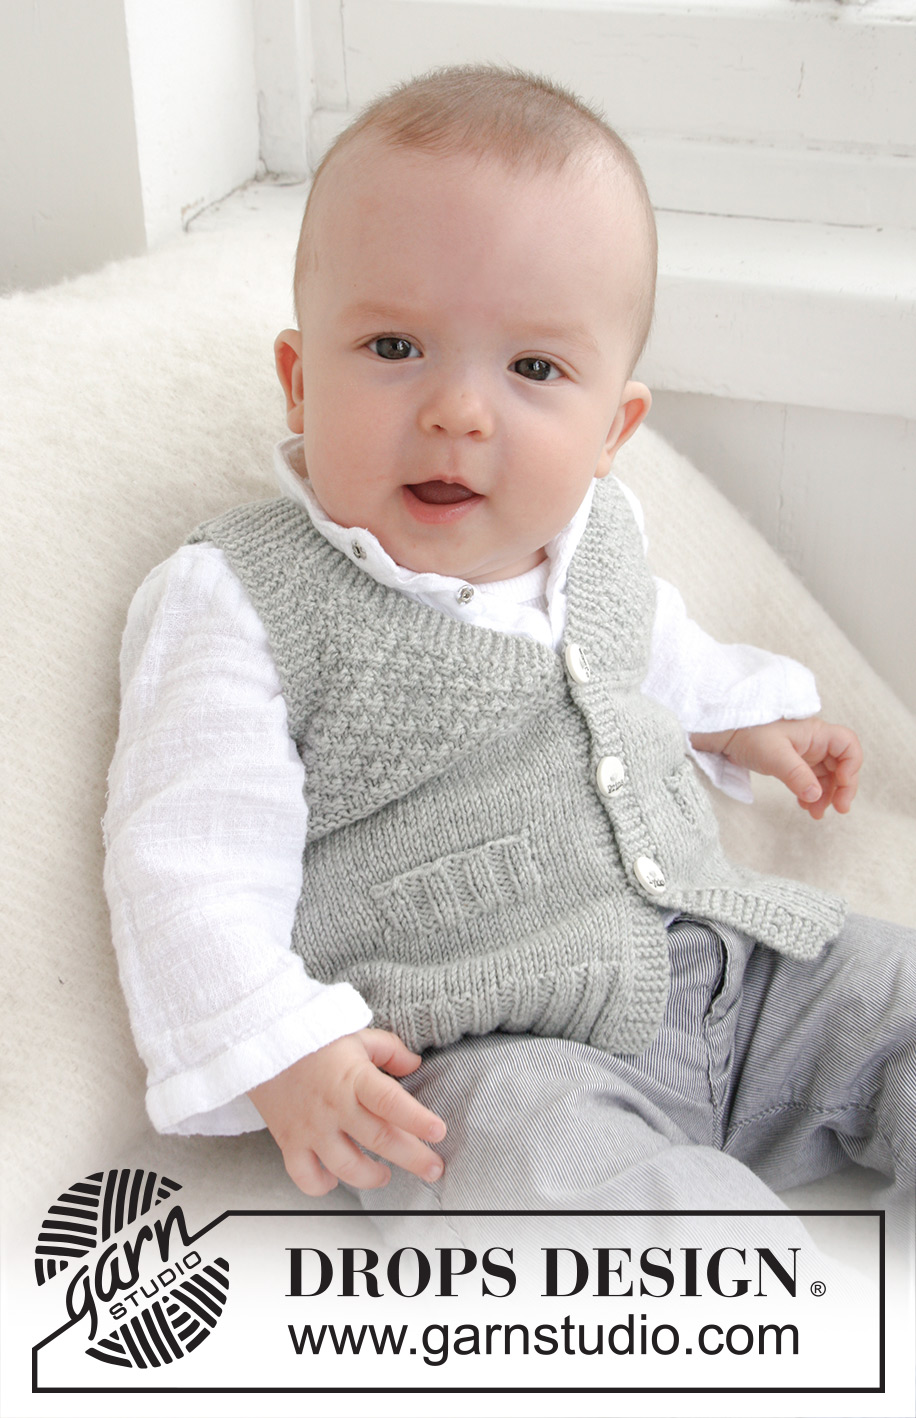
Knitted vest with V-neck and textured pattern for baby and children in DROPS BabyMerino or DROPS BabyAlpaca Silk
DROPS Baby 21-8 |
|
|
GARTER ST (back and forth on needle): K all rows. DOUBLE MOSS ST: Row 1: * K 2, P 2 *, repeat from *-*. Row 2: K over K and P over P. Row 3: P over K and K over P. Row 4: As row 2. Repeat row 1 to 4. BUTTON HOLES: Cast off for button holes on right band. 1 button hole = K tog 2nd and 3rd st from edge and make 1 YO. Cast off for button holes when piece measures: SIZE 1/3 MONTHS: 2, 6, 10 and 14 cm. SIZE 6/9 MONTHS: 2, 7, 11 and 16 cm. SIZE 12/18 MONTHS: 2, 7, 12 and 17 cm. SIZE 2 YEARS: 2, 8, 13 and 19 cm. SIZE 3/4 YEARS: 2, 8, 14 and 20 cm. DEC FOR V-NECK AND ARMHOLES IN DOUBLE MOSS ST: All dec are done from RS! DEC AS FOLLOWS BEFORE BAND/SLEEVE EDGE: When last st should be K: K 2 tog. When last st should be P: P 2 tog. DEC AS FOLLOWS AFTER BAND/SLEEVE EDGE: When first st should be K: Slip 1 st as if to K, K 1, psso. When first st should be P: P 2 twisted tog (i.e. work in back loop of st instead of front). -------------------------------------------------------- -------------------------------------------------------- BODY: Worked back and forth on circular needle from mid front. Cast on 148-168-184 (204-224) sts on circular needle size 2.5 mm with Baby Merino. Work first row as follows from RS: 5 sts in GARTER ST (= band) - see explanation above, * K 2, P 2 *, repeat from *-* until 7 sts remain, finish with K 2 and 5 sts in GARTER ST (= band). Continue rib like this with 5 sts in garter st in each side until piece measures 3-3-4 (4-5) cm - REMEMBER BUTTON HOLES on band - see explanation above. Switch to circular needle size 3 mm and work in stocking st but continue bands in garter st as before. AT THE SAME TIME on first row after rib, dec 32-36-40 (44-52) sts evenly (do not dec over bands) = 116-132-144 (160-172) sts. Insert a marker 31-35-39 (43-45) sts in from each side (= 54-62-66 (74-82) sts between markers on back piece). REMEMBER THE KNITTING TENSION! When piece measures 7-7½-8 (9-10) cm, work next row as follows from RS: 5 sts in garter st, 21-21-27 (27-31) sts in stocking st, slip the last 16-16-20 (20-24) sts that were worked on a stitch holder for pocket slit, work until 10-10-12 (12-12) sts remain on needle, slip the last 16-16-20 (20-24) sts that were worked on a stitch holder for pocket slit, work 5-5-7 (7-7) sts in stocking st and finish with 5 sts in garter st. On next row cast on 16-16-20 (20-24) new sts over each of the 2 stitch holders with sts = 116-132-144 (160-172) sts. Continue in stocking st and in garter st until piece measures 13-14-16 (16-18) cm. Now K 4 rows over all sts (= 2 ridges). Then work DOUBLE MOSS ST - see explanation above (continue bands in garter st as before). READ ALL OF THE FOLLOWING SECTION BEFORE CONTINUING! When piece measures 15-17-18 (20-21) cm, work 2 rows in garter st over the first 5 sts on needle (do not work the other sts on needle), then work 1 row over all sts before working 2 rows in garter st over the first 5 sts on needle in the other side of piece (this is done so that the V-neck looks nice). Then dec for V-neck - see explanation above: Dec 1 st every other row (i.e. every row from RS) a total of 12-13-16 (16-16) times. AT THE SAME TIME when piece measures 16-17-19 (20-22) cm, work 4 rows in garter st over the middle 18-20-20 (20-20) sts in each side (i.e. over 9-10-10 (10-10) sts on each side of both markers) – work the other sts as before. On next row, cast off the middle 8-10-10 (10-10) sts in each side for armhole and finish front and back piece separately. BACK PIECE: = 46-52-56 (64-72) sts. Work double moss st with 5 sts in garter st in each side (= sleeve edges). AT THE SAME TIME dec for armholes - see explanation above: Dec 1 st every other row (i.e. on every row from RS) a total of 5-6-6 (6-6) times = 36-40-44 (52-60) sts. Continue in double moss st and in garter st until piece measures 24-26-29 (31-34) cm. Now work in garter st over all sts until finished measurements. AT THE SAME TIME when piece measures 25-27-30 (32-35) cm, cast off the middle 16-18-20 (20-24) sts for neck = 10-11-12 (16-18) sts remain on each shoulder. Now finish each shoulder separately. Continue with garter st until piece measures 26-28-31 (33-36) cm, cast off. LEFT FRONT PIECE: Continue with double moss st and in garter st while AT THE SAME TIME dec for armhole in the side as on back piece and continue dec for V-neck as before. After last dec, 10-11-12 (16-18) sts remain on needle. Work garter st over all sts until piece measures 26-28-31 (33-36) cm and cast off. RIGHT FRONT PIECE: Work as left front piece but reversed. POCKET SLIT: Slip the 16-16-20 (20-24) sts from stitch holder on one front piece back on needle size 2.5 mm. Work rib K2/P2 with 1 st in garter st and K 2 in each side (seen from RS). When pocket slit measures 2½-2½-3 (3-3) cm, loosely cast off with K over K and P over P. Sew pocket slit to front piece with duplicate sts in each side. Sew pocket opening to bottom of pocket slit (where sts were put on a stitch holder) on the back of piece. Work another pocket slit the same way on the other front piece. ASSEMBLY: Sew the shoulder seams. Sew on buttons. |
|
 |
|
Have you finished this pattern?Tag your pictures with #dropspattern #juniorvest or submit them to the #dropsfan gallery. Do you need help with this pattern?You'll find 13 tutorial videos, a Comments/Questions area and more by visiting the pattern on garnstudio.com. © 1982-2026 DROPS Design A/S. We reserve all rights. This document, including all its sub-sections, has copyrights. Read more about what you can do with our patterns at the bottom of each pattern on our site. |
|


With over 40 years in knitting and crochet design, DROPS Design offers one of the most extensive collections of free patterns on the internet - translated to 17 languages. As of today we count 324 catalogues and 12290 patterns translated into English (UK/cm).
We work hard to bring you the best knitting and crochet have to offer, inspiration and advice as well as great quality yarns at incredible prices! Would you like to use our patterns for other than personal use? You can read what you are allowed to do in the Copyright text at the bottom of all our patterns. Happy crafting!
Post a comment to pattern DROPS Baby 21-8
We would love to hear what you have to say about this pattern!
If you want to leave a question, please make sure you select the correct category in the form below, to speed up the answering process. Required fields are marked *.