
Popular categories
Looking for a yarn?


Comments / Questions (10)
![]() Cathy wrote:
Cathy wrote:
Thank you for trying to answer my previous question, but I think something may have got lost in translation. I agree with Elin Backstrand (8.12.2022), some of the instructions belonging only to Peter have been accidentally included. Pernille does not have trouser legs.
09.12.2022 - 18:58
![]() Elin Bäckstrand wrote:
Elin Bäckstrand wrote:
Stycket "Byxben: Virka 22 lm och slut dem till en ring med 1 sm i första lm. varv 1: Virka 1 fm i varje lm. Avsluta med 1 sm i första fm. 2:a-4:e v: 3 lm, 1 st i varje fm. Avsluta med 1 sm i början på v. Klipp tråden på det ena benet och fäst den. På det andra benet ska tråden hänga och användas senare till ihopvirkning av benen." tillhör inte detta mönster. Byxan finns invirkad i ben för denna.
08.12.2022 - 07:53
![]() Elin Bäckstrand wrote:
Elin Bäckstrand wrote:
Hej! Har möjligen stycket om byxben smugit sig in från mönstret till Peter? Om man försöker få ihop allt till någon klänning blir det extremt konstigt som det är skrivet nu!
07.12.2022 - 08:23DROPS Design answered:
Hej Elin, Pernille har också ett litet byxben i natur :)
07.12.2022 - 15:39
![]() Cathy wrote:
Cathy wrote:
I am a little confused, because the instructions says to make trouser legs and gives instructions to make trouser legs in off-white. But the photo and the instructions for the skirt, incorporating the legs, does not show or refer to any trouser legs. The white in the photo, as far as I can tell, is the off-white from the top of the legs. Is this a mistake in the instructions? It all seems to work if I ignore all references to trouser legs, but am I missing something?
04.12.2022 - 08:09DROPS Design answered:
Dear Cathy, the colours for legs are under Colours for Pernille: - this means when working legs you have to work following the stripes under Legs. Happy crocheting!
06.12.2022 - 09:34
![]() Manjola wrote:
Manjola wrote:
.... giusto....mi era sfuggito questo particolare, grazie!!!
07.03.2022 - 23:06
![]() Manjola wrote:
Manjola wrote:
Buonasera Non è molto chiaro, il giro 22 della gamba è l'inizio del filo color panna? Grazie
07.03.2022 - 19:48DROPS Design answered:
Buonasera Manjola, per i colori deve fare riferimento a quanto indicato nel paragrafo "Colori per Pernille". Buon lavoro!
07.03.2022 - 21:45
![]() Annie Froma wrote:
Annie Froma wrote:
Hoe haak ik het broekje van Peter ?
22.12.2020 - 14:13DROPS Design answered:
Dag Annie,
Het patroon van het broekje van Peter is via deze link te vinden.
17.01.2021 - 14:22
![]() MONS wrote:
MONS wrote:
BOnjour je voudrai commander du coton pour faire doudou pour bebe au crochet mais je voudrais que ce coton soit doux au toucher lequel me conseillez vous car j'avais achete du PARIS mais je l'ai trouvé pas assez doux merci beaucoup (c'est doudou etoile que j aimerai faire
20.06.2019 - 08:12DROPS Design answered:
Bonjour Mme Mons, vous trouverez ici quelques informations sur les alternatives - pour toute aide au choix d'un fil, merci de bien vouloir contacter votre magasin DROPS, même par mail ou téléphone, il pourra ainsi vous conseiller en fonction de vos préférences personnelles. Bon crochet!
20.06.2019 - 09:02
![]() Cathy Peterson wrote:
Cathy Peterson wrote:
I think the directions for the skirt are incorrect. They start to chain 4 and then decrease to 33 by crocheting each 3rd and 4th stitch together. I believe the directions should read ch 44 and then the rest of the directions make sense.
27.05.2014 - 21:19DROPS Design answered:
Dear Mrs Peterson, you are correct, there is a typo there and you should start skirt with 44 ch. Pattern has been edited, thank you. Happy crocheting!
28.05.2014 - 09:19
![]() Anneli Vartiainen wrote:
Anneli Vartiainen wrote:
Puuttuuko ohjeen alkuosa?
09.07.2013 - 09:10DROPS Design answered:
Hej! Ohje on kyllä siinä kokonaisuudessaan.
01.08.2013 - 12:16
|
|
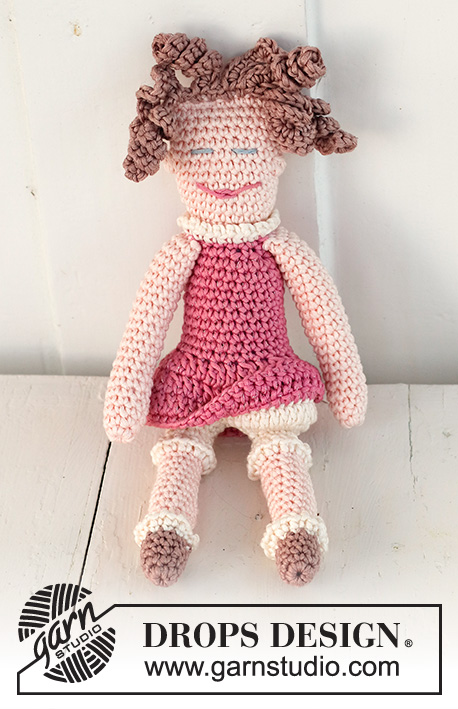
Pernille#dropspernille |
|
 |
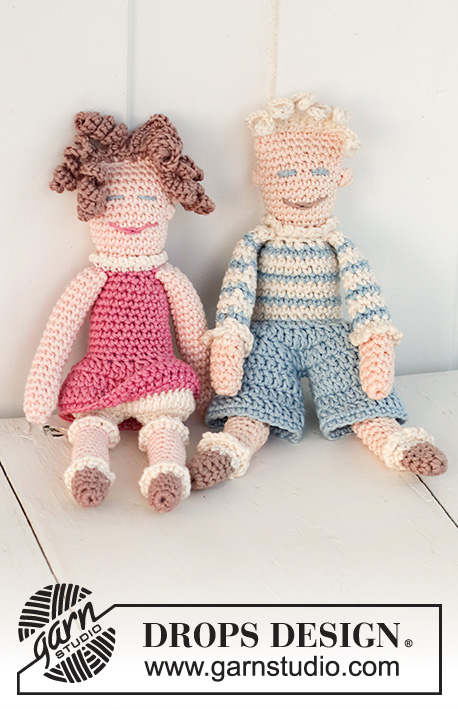 |
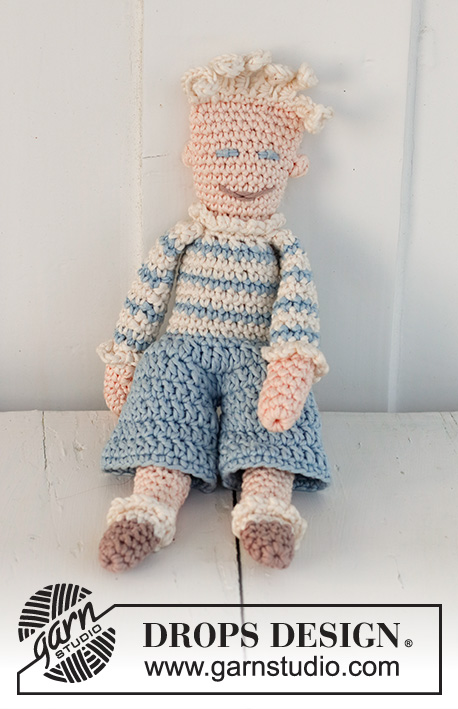
Crochet dolls “Peter” and “Pernille” in DROPS Muskat
DROPS Baby 13-37 |
|
|
Crochet gauge: 21 dc for the width = 10 cm. Crochet 2 tr tog. to 1 tr as follows: Crochet 1 tr but wait with the last pull through (= 2 threads on hook), now crochet the next tr, but when making the last pull through, pull through all sts on hook. Lace edge: When making the lace edge, do not crochet through the whole st but only the most outer part of the dc. Crochet as follows: *2 ch, 1 dc*, repeat from *-*. The round after the lace edge is crochet in the same round but this time crochet in the back part of the dc. Colours for Pernille: Legs: 5 rounds of nutmeg, 1 rounds of off-white, 1 off- white lace edge, 11 rounds of baby pink, 1 off-white lace edge and hereafter off- white until finished measurements. Arms: baby pink. Trouser legs: Off-white. Dress: 1 thread of desert rose and 1 thread of glitter. THE DOLL PERNILLE: See explanation of colours above. Crochet 2 legs, 2 arms and 2 trouser legs. Leg: Crochet 4 ch and make a loop with a sl st. 1st round: Crochet 6 dc around the loop, finish with a sl st in the first dc. 2nd round: 1 ch, *1 dc, 2 dc in the next st*. Repeat from *-* (= 9 dc). Finish with a sl st in the first ch. 3rd-21st round: 1 ch, 9 dc, finish with a sl st in the first ch (remember the lace edge according the above explanation). 22nd round: 1 ch, 4 dc, 2 dc in the next dc, 3 dc, 2 dc in the next dc (=11 dc). Finish with a sl st in the first dc. 23rd round: 1 ch, crochet 2 dc in each dc = 22 dc. Crochet 1 round of tr in off-white around one leg and then around the other leg. Cut and sew the thread. Fill with cotton. Arm: Crochet round 1-21 as for the leg, on the next round dec 1 dc as follows: skip a dc (= 8 dc on round). Cut the thread and sew. Fill with cotton. Trouser leg: Crochet 22 ch and make a loop with a sl st. 1st round: Crochet 1 dc in each ch, finish with a sl st in the first dc. 2nd-4th round: 3 ch, 1 tr in each dc. Finish with a sl st in the first ch. On one of the legs cut the thread and sew. On the other leg cut the thread but don’t sew it as it needs to be used to crochet the legs tog. Skirt: Crochet 44 ch and make a loop with a sl st. 1st round: Crochet 1 dc in each st, finish with a sl st in the first dc. 2nd round: 3 ch, 1 tr in each dc, finish with a sl st. 3rd round: Put both legs inside the skirt. Crochet 3 ch, hereafter 1 round of tr- pull the hook through both legs and skirt- at the same time dec. every 4th st as follows: crochet the 3rd and 4th st together – see above explanation = 33 tr. Finish round with a sl st. 4th round: 3 ch, crochet 1 round of tr - at the same dec, every 3rd st as follows: crochet the 3rd and 4th st together = 22 tr. Finish round with a sl st. Continue as described under the jumper. Jumper: Round starts mid back. 1st-10th round: 1 ch, 1 dc in each st, finish with a sl st in the first ch. 11th round: 1 ch, 1 dc, skip a dc, 1 dc in each of the next 6 dc, skip 1 dc, 1 dc in the next st, skip 1 dc, 1 dc in the next st, skip a dc, 1 dc in the following 6 dc, skip a dc, 1 dc in the next st, skip a dc and attach with a sl st in the beginning of round = 16 dc. 12th round: Now crochet the arms to the body as follows: 1 ch, 2 dc, put the arms double at the top of the jumper, crochet 4 dc through both the arms and the jumper. Then crochet 4 dc(=the front) and attach the other arm the same way, crochet 2 dc, and finish with a sl st in the first ch. 13th round: Crochet a lace edge in off-white. Head: Change to baby pink. 1st and 2nd round: 1 ch, 16 dc around, finish with a sl st in the first ch. 3rd round: 1 ch, *1 dc, 2 dc in the next dc*, repeat from *-* until end of round = 24 dc, finish with a sl st in the first ch. 4th-7th round: 1 ch, 1 dc in each st until end of round and finish with a sl st in the first ch. 8th round: 1 ch, 5 dc, in the next st crochet an ear as follows: 3 tr which are crochet tog. in the last pull through ( this means: wait with the last pull through in each tr until all 3 tr are crochet, yrh and pull through all sts). 11 dc, crochet another ear in the next dc, crochet dc until end of round, and finish with a sl st in the first ch. 9th -13th round: Crochet as round 4-7. Assembly: Fill the body and the head with cotton wool. Sew the opening between the legs, sew on eyes and mouth. Put the head flat, face up and crochet it tog. at the top with dc’s through both layers with baby pink. Long hair: 1 dc, *13 ch, crochet backwards over the ch’s as follows: Skip 1 ch, crochet 3 dc in each of the next 12 ch, crochet 1-2 dc backwards on the head (depending on how much hair the doll should have)*, repeat from *-* until end of row, cut the thread and sew. |
|
Have you finished this pattern?Tag your pictures with #dropspattern #dropspernille or submit them to the #dropsfan gallery. Do you need help with this pattern?You'll find 11 tutorial videos, a Comments/Questions area and more by visiting the pattern on garnstudio.com. © 1982-2026 DROPS Design A/S. We reserve all rights. This document, including all its sub-sections, has copyrights. Read more about what you can do with our patterns at the bottom of each pattern on our site. |
|


With over 40 years in knitting and crochet design, DROPS Design offers one of the most extensive collections of free patterns on the internet - translated to 17 languages. As of today we count 324 catalogues and 12290 patterns translated into English (UK/cm).
We work hard to bring you the best knitting and crochet have to offer, inspiration and advice as well as great quality yarns at incredible prices! Would you like to use our patterns for other than personal use? You can read what you are allowed to do in the Copyright text at the bottom of all our patterns. Happy crafting!
Post a comment to pattern DROPS Baby 13-37
We would love to hear what you have to say about this pattern!
If you want to leave a question, please make sure you select the correct category in the form below, to speed up the answering process. Required fields are marked *.