
Popular categories
Looking for a yarn?


Comments / Questions (4)
![]() Jannyhilhorst wrote:
Jannyhilhorst wrote:
Kan ik ze gratis krijgen Zo leuk vriendelijke groet. Janny hilhorst
21.09.2024 - 12:47
![]() Christel Jansson wrote:
Christel Jansson wrote:
Hur gör man huvud o kropp? Hittar inte något skrivit on det?
22.06.2015 - 19:37DROPS Design answered:
Hej. Om du läser texten i stycket där det står "Tröja:" så hittar du det. Lycka till!
24.06.2015 - 08:46
![]() J.de Ruijter wrote:
J.de Ruijter wrote:
Bij het haakpatroon van het truitje van Peter en Pernille staat niet bij hoeveel steken ik moet opzetten en wat voor steken. Ik wil hier graag antwoord op?
13.03.2014 - 03:25DROPS Design answered:
Hoi J. de Ruijter. Je haakt de truien in verlenging van de broek. Je had hier 22 stk en haak dan verder met de kleur voor de trui over deze stk en volgens de beschrijving voor de trui.
13.03.2014 - 17:07
![]() Françoise wrote:
Françoise wrote:
Je n'ai pas trouvé à quel moment il fallait intégrer les jambes de la poupée, mais je n'ai peut-être pas tout compris..........comme pour les diminutions du pantalon
12.02.2013 - 17:24DROPS Design answered:
Bonjour Françoise, la partie du pantalon a été corrigée pour expliquer l'assemblage des jambes et de celles du pantalon. Pour diminuer, crochetez 1 B mais ne faites pas le dernier jeté, crochetez la B suiv et au dernier jeté, écoulez toutes les boucles. Bon crochet !
13.02.2013 - 11:51
|
|
Peter#dropspeter |
|
 |
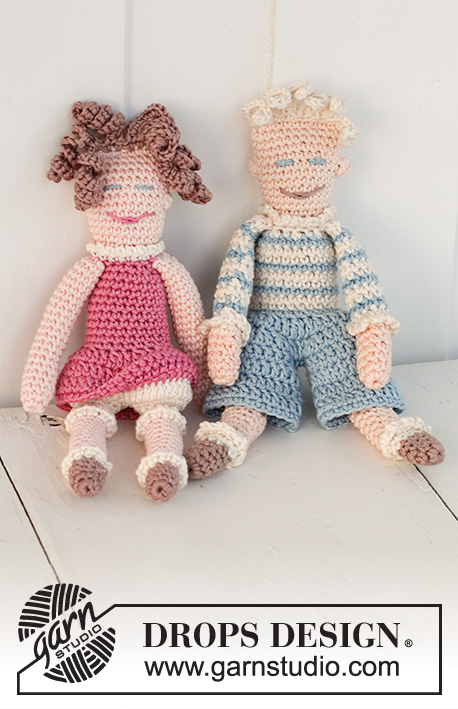 |
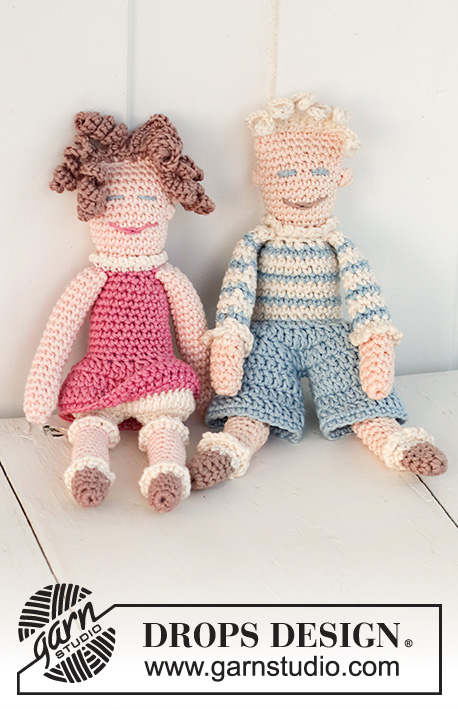
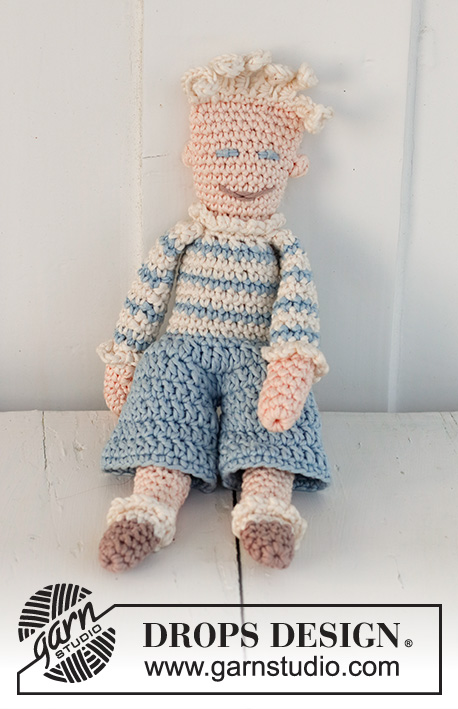
Crochet dolls “Peter” and “Pernille” in DROPS Muskat
DROPS Baby 13-33 |
|
|
Crochet gauge: 21 dc for the width = 10 cm. Crochet 2 tr tog. to 1 tr as follows: Crochet 1 tr but wait with the last pull through (= 2 threads on hook), now crochet the next tr, but when making the last pull through, pull through all sts on hook. Lace edge: When making the lace edge, do not crochet through the whole st but only the most outer part of the dc. Crochet as follows: *2 ch, 1 dc*, repeat from *-*. The round after the lace edge is crochet in the same round but this time crochet in the back part of the dc. Colours for Peter: Legs: 5 rounds of nutmeg, 2 rounds of off-white, 1 off-white lace edge, 15 rounds of baby pink. Arms: 7 rounds of baby pink, 1 round of off-white, 1 off- white lace edge, *2 rounds of off-white, 1 round of ice blue*, repeat from *-* until finished measurements. Trouser legs + trousers: Ice blue. Jumper: *1 round of ice blue, 2 rounds of off-white*, repeat from *-*. THE DOLL PETER: See explanation of colours above. Crochet 2 legs, 2 arms and 2 trouser legs. Leg: Crochet 4 ch and make a loop with a sl st. 1st round: Crochet 6 dc around the loop, finish with a sl st in the first dc. 2nd round: 1 ch, *1 dc, 2 dc in the next st*. Repeat from *-* (= 9 dc). Finish with a sl st in the first ch. 3rd-21st round: 1 ch, 9 dc, finish with a sl st in the first ch (remember the lace edge according the above explanation). 22nd round: 1 ch, 4 dc, 2 dc in the next dc, 3 dc, 2 dc in the next dc (=11 dc). Finish with a sl st in the first dc. 23rd round: 1 ch, crochet 2 dc in each dc = 22 dc. Cut and sew the thread. Fill with cotton. Arm: Crochet round 1-21 as for the leg, on the next round dec 1 dc as follows: skip a dc (= 8 dc on round). Cut the thread and sew. Fill with cotton. Trouser leg: Crochet 22 ch and make a loop with a sl st. 1st round: Crochet 1 dc in each ch, finish with a sl st in the first dc. 2nd-4th round: 3 ch, 1 tr in each dc. Finish with a sl st in the first ch. On one of the legs cut the thread and sew. On the other leg cut the thread but don’t sew it as it needs to be used to crochet the legs tog. Trousers: Put a leg in each trouser leg. Crochet 3 ch with the thread from one of the trouser legs. 1st round: Continue to crochet the legs so they become attach to the trousers as follows: Crochet through both the trousers and the leg. Crochet 1 round of tr around the first leg and then around the second leg. 2nd round: 3 ch, 1 round of tr at the same time dec. every 4th tr as follows: crochet the 3rd and the 4th tr tog. – see explanation above = 33 tr. Finish with a sl st at the beginning of round. 3rd round: 3 ch, 1 round of tr at the same time dec. every 3rd tr as follows: crochet the 2nd and the 3rd tr tog. – see explanation above = 22 tr. Finish with a sl st at the beginning of round. Jumper: Round starts mid back. 1st-10th round: 1 ch, 1 dc in each st, finish with a sl st in the first ch. 11th round: 1 ch, 1 dc, skip a dc, 1 dc in each of the next 6 dc, skip 1 dc, 1 dc in the next st, skip 1 dc, 1 dc in the next st, skip a dc, 1 dc in the following 6 dc, skip a dc, 1 dc in the next st, skip a dc and attach with a sl st in the beginning of round = 16 dc. 12th round: Now crochet the arms to the body as follows: 1 ch, 2 dc, put the arms double at the top of the jumper, crochet 4 dc through both the arms and the jumper. Then crochet 4 dc(=the front) and attach the other arm the same way, crochet 2 dc, and finish with a sl st in the first ch. 13th round: Crochet a lace edge in off-white. Head: Change to baby pink. 1st and 2nd round: 1 ch, 16 dc around, finish with a sl st in the first ch. 3rd round: 1 ch, *1 dc, 2 dc in the next dc*, repeat from *-* until end of round = 24 dc, finish with a sl st in the first ch. 4th-7th round: 1 ch, 1 dc in each st until end of round and finish with a sl st in the first ch. 8th round: 1 ch, 5 dc, in the next st crochet an ear as follows: 3 tr which are crochet tog. in the last pull through ( this means: wait with the last pull through in each tr until all 3 tr are crochet, yrh and pull through all sts). 11 dc, crochet another ear in the next dc, crochet dc until end of round, and finish with a sl st in the first ch. 9th -13th round: Crochet as round 4-7. Assembly: Fill the body and the head with cotton wool. Sew the opening between the legs, sew on eyes and mouth. Put the head flat, face up and crochet it tog. at the top with dc’s through both layers with baby pink. Short hair: 1 dc, *5 ch, crochet backwards over the ch’s as follows: Skip 1 ch, crochet 3 dc in each of the next 4 ch, crochet 1-2 dc backwards on the head (depending on how much hair the doll should have)*, repeat from *-* until end of row, cut the thread and sew. |
|
Have you finished this pattern?Tag your pictures with #dropspattern #dropspeter or submit them to the #dropsfan gallery. Do you need help with this pattern?You'll find 11 tutorial videos, a Comments/Questions area and more by visiting the pattern on garnstudio.com. © 1982-2025 DROPS Design A/S. We reserve all rights. This document, including all its sub-sections, has copyrights. Read more about what you can do with our patterns at the bottom of each pattern on our site. |
|


With over 40 years in knitting and crochet design, DROPS Design offers one of the most extensive collections of free patterns on the internet - translated to 17 languages. As of today we count 314 catalogues and 11822 patterns translated into English (UK/cm).
We work hard to bring you the best knitting and crochet have to offer, inspiration and advice as well as great quality yarns at incredible prices! Would you like to use our patterns for other than personal use? You can read what you are allowed to do in the Copyright text at the bottom of all our patterns. Happy crafting!
Post a comment to pattern DROPS Baby 13-33
We would love to hear what you have to say about this pattern!
If you want to leave a question, please make sure you select the correct category in the form below, to speed up the answering process. Required fields are marked *.