
Popular categories
Looking for a yarn?


Comments / Questions (63)
![]() Ella Iversen wrote:
Ella Iversen wrote:
Hvordan strikker man M4.
13.01.2019 - 18:07DROPS Design answered:
Hei Ella. M.4 strikkes slik: ta 1 m løst av p, 1 r, løft den løse m over (= 1 maske felt), ta 1 m løst av p, 1 r, løft den løse m over (= 1 maske felt), så strikker du 2 m rett sammen (=1 maske felt), 2 masker rett sammen (1 maske felt). Du har felt totalt 4 masker, og sitter igjen med 4 masker. God fornøyelse
16.01.2019 - 15:00
![]() Pamela wrote:
Pamela wrote:
Hola . Tengo agujas rectas, cuantos puntos tendría q poner para hacer espalda y dos delanteras? Para talle 9 meses y dos años? Muchas gracias
28.11.2018 - 12:37DROPS Design answered:
Hola Pamela. No hacemos patrones personalizados. Puedes utilizar los cálculos para agujas circulares siempre añadiendo 1 punto a cada lado de cada parte que trabajas por separado para las costuras.
30.12.2018 - 17:43
![]() Helle Andersen wrote:
Helle Andersen wrote:
Jeg forstår ikke hvordan man skal tage ind, jeg er kommet til bærestykket Jeg kan ikke se at maskeantallet passer, og skiftevis i h og v side? Hvad betyder det? På hver cm? Tager man en ret og vrangmaske sammen?
26.09.2018 - 22:02DROPS Design answered:
Hej, Når du tager ind skiftevis, tager du ind første gang i højre side af alla vrang-partier, næste gang (efter 1 cm) tager du ind i venstre side af alle vrang-partier. God fornøjelse!
28.09.2018 - 14:56
![]() Helle Andersen wrote:
Helle Andersen wrote:
Jeg kan ikke finde ud af hvordan jeg skal komme videre fra pind 5
18.09.2018 - 11:08DROPS Design answered:
Hej Helle, Næste p strikkes således (fra retsiden): 5 m RETSTRIK - se forkl over (= forkant), 2 vr, M.1(12m), * 6 vr, M.3 (=8m) =ialt 14m*, gentag disse 14 masker fra *-* over de næste 112 m (ialt 8 gange) (hvis du strikker den mindste), slut af med 6 m vr, M.1 (12m), 2 vr og 5 m RETSTRIK ( = forkant). Fortsæt således men næste pind strikkes fra vrangen. God fornøjelse!
19.09.2018 - 15:05
![]() Ann wrote:
Ann wrote:
Still unsure, row 5, is it p2, slip 3 on cable needle front of work, k3, k3 on cable, is this repeated again only 3 sts are back of work, then p6 m3, bit confused reanding diagram, if i should do all M1 or half of it, is row 6 just plain knitting also
29.05.2018 - 01:40DROPS Design answered:
Dear Ann, after the 4 knitted rows at the very beginning of the piece (= 2 ridges), work diagram M.1 as explained reading M.1 from the bottom corner on the right side to the left from RS and from the left towards the right from WS, so that Row 1 and 5 in M.1 = K 12, Row 3 = work cables as explained and from WS (= row 2,4,6) purl 12. Repeat then these 6 rows in height beginning next repeat from row 1 in M.1. Happy knitting!
29.05.2018 - 09:12
![]() Ann wrote:
Ann wrote:
Many thanks for your help. I look forward to knitting the little vest.
22.05.2018 - 22:09Michelle Keen wrote:
Is the yoke decreases in the purl panels or in cable panel? M2 chart seems to tell me that the cable panel decreases at least three times.....
22.05.2018 - 12:09DROPS Design answered:
Dear Mrs Keen, you decrease both in M.2 and in P-Sections - the decreases in the P-sections are done on every cm a total of 6-7-8 (9-9) times, at the same time, you work M.1 for 1-2-3-4 cm (see size) and then work M.2 instead of M.1. Happy knitting!
22.05.2018 - 12:49
![]() Ann wrote:
Ann wrote:
Just starting this lovely pattern. After row 4 do I purl 2, then follow diagram instructions M1, but not sure whether I should knit or purl M1 and M3 Stitches, I know i start and end each row with 5 garter stitches, but is it a stocking stitch pattern in general. Thank you.
20.05.2018 - 19:04DROPS Design answered:
Hi Ann, After row 4, you work as follows on row 5 (from the right side); 5 garter stitches, purl 2, then M.1 which you read from bottom left, so the first row is knit from the right side. Row 6 (row 2 in M.1) is purl from the wrong side to work stocking stitch. When you purl you start and finish with 5 garter stitches and knit 2 (rather than purl 2). Happy knitting!
22.05.2018 - 08:08Michelle Keen wrote:
So, after starting the yoke, do I replace all the M.1 pattern with the M.2 pattern after the 1 cm measurement?
20.05.2018 - 05:21DROPS Design answered:
Dear Mrs Keen, yes that's right, after 1 cm in M.1 replace all M.1 with M.2 (decrease for yoke are including in M.2). Happy knitting!
22.05.2018 - 10:09Michelle Keen wrote:
Just from the first particle after creating the sleeves
20.05.2018 - 03:45
|
||||||||||||||||||||||||||||||||||
Sweet Greta#sweetgretavest |
||||||||||||||||||||||||||||||||||
 |
 |
|||||||||||||||||||||||||||||||||
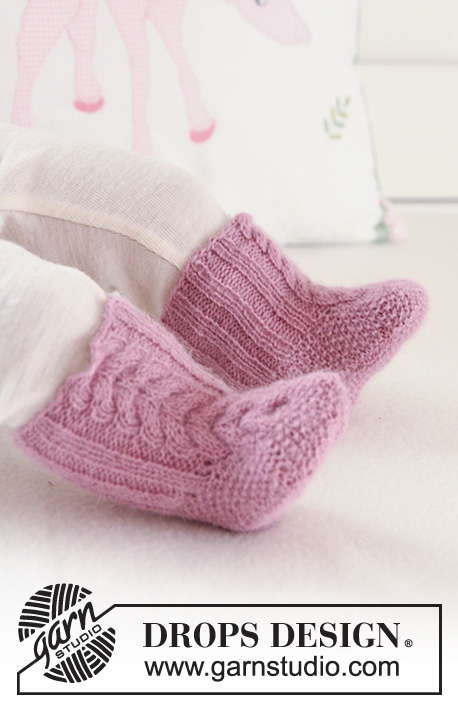
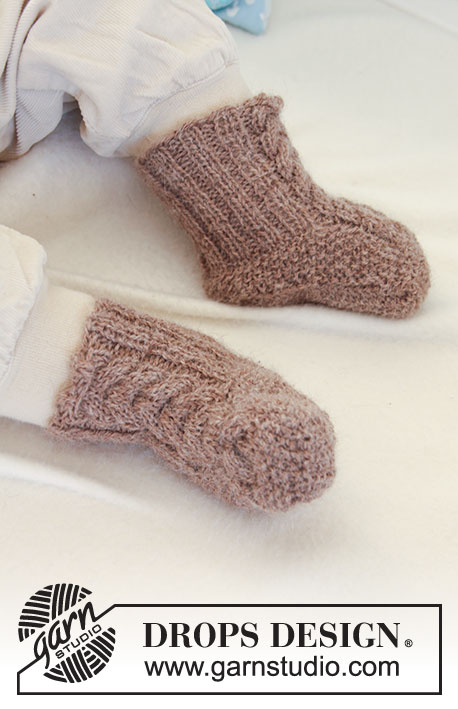
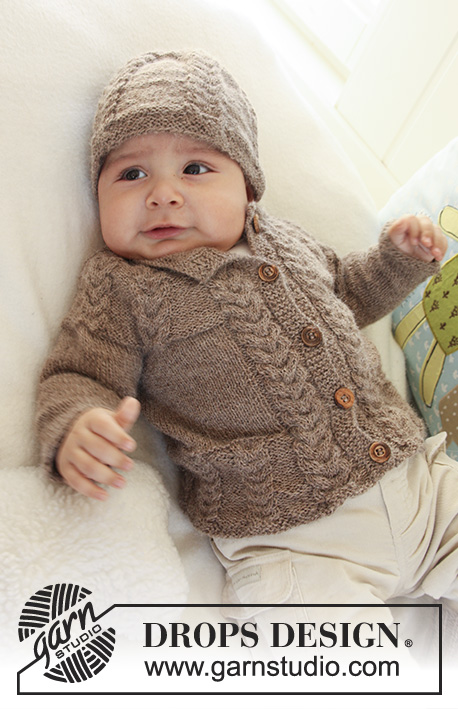
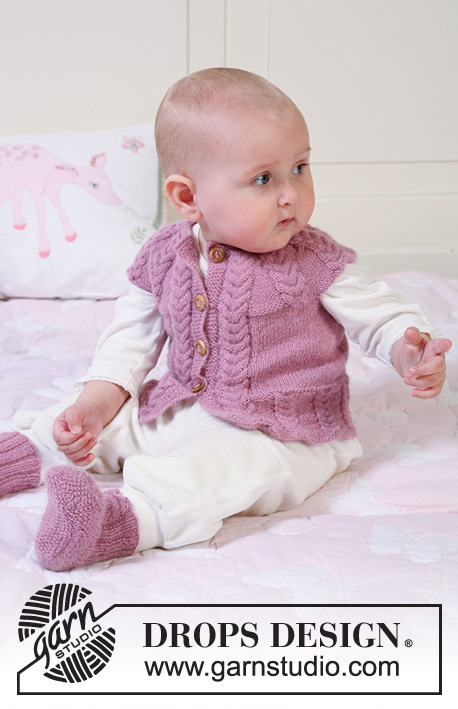
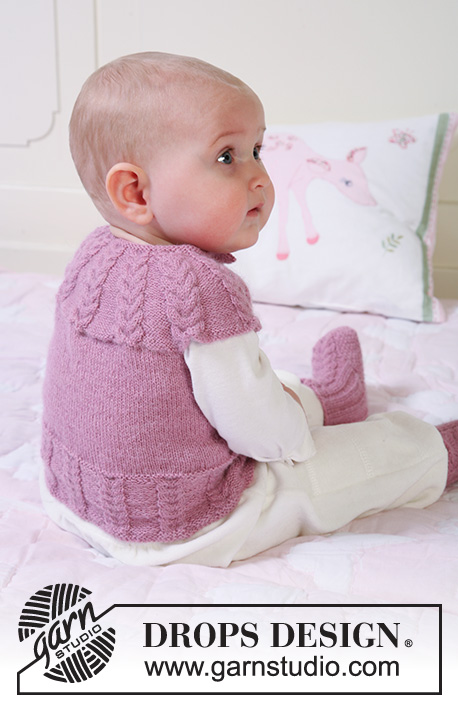
Set of knitted vest with raglan sleeves and cables plus booties for baby and children in DROPS Alpaca
DROPS Baby 19-18 |
||||||||||||||||||||||||||||||||||
|
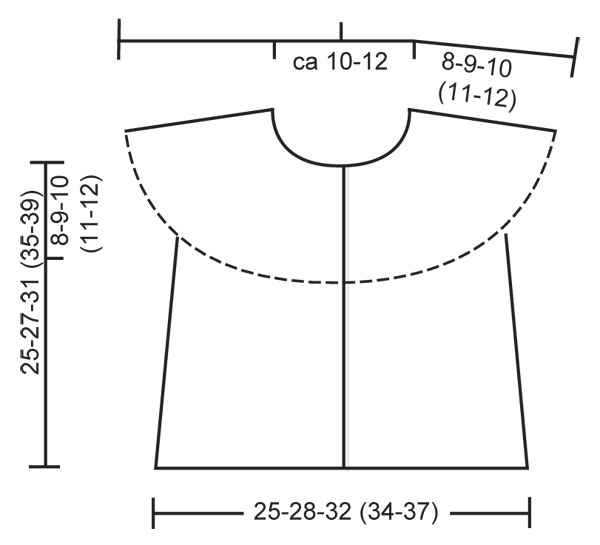
VEST: GARTER ST (back and forth on circular needle): K all rows. PATTERN: See diagram M.1 to M.4. Diagrams show the pattern from RS. BUTTONHOLES: Make buttonholes on right front band. 1 buttonhole = cast off 3rd and 4th front band st and cast on 2 new sts on next row. Make buttonholes when piece measures: SIZE 1/3 months: 9, 14, 19 and 24 cm SIZE 6/9 months: 8, 14, 20 and 26 cm SIZE 12/18 months: 8, 14, 19, 25 and 30 cm SIZE 2 years: 10, 16, 22, 28 and 34 cm SIZE 3/4 years: 10, 17, 24, 31 and 38 cm -------------------------------------------------------- -------------------------------------------------------- VEST: Worked back and forth on circular needle from mid front. Cast on 139-151-170 (183-192) sts on circular needle size 2.5 mm with Alpaca. K 4 rows, AT THE SAME TIME on 4th row inc 17-19-14 (15-20) sts evenly = 156-170-184 (198-212) sts. Work next row as follows (from RS): 5 GARTER STS - see above (= front band), P2, M.1, * P6, M.3 *, repeat from *-* on the next 112-126-140 (154-168) sts, finish with P6, M.1, P2 and 5 GARTER STS (= front band). Continue in pattern like this until piece measures 7-7-7 (8-8) cm. On next row from RS work 21 sts each side as before, K remaining sts, AT THE SAME TIME dec 9-13-8 (9-14) sts evenly on these sts = 147-157-176 (189-198) sts. On next row from WS work 21 sts each side as before, K remaining sts. NOTE! Remember BUTTONHOLES - see above. Continue as follows (from RS): 5 garter sts, P2, M.1, P2, stocking st on the next 105-115-134 (147-156) sts, P2, M.1, P2 and 5 garter sts. Continue in pattern like this until piece measures 16-17-20 (23-26) cm. Work next row as follows (from RS): 21 sts as before, 14-18-24 (26-29) stocking sts (= right front piece), garter st on the next 8 sts, 61-63-70 (79-82) stocking sts (= back piece), garter st on the next 8 sts, 14-18-24 (26-29) stocking sts and 21 sts as before (= left front piece). Continue like this until piece measures 17-18-21 (24-27) cm. On next row from RS cast off 8 sts each side (garter sts) for armhole. On next row from WS cast on 40-44-50 (54-60) new sts over the 8 cast off sts each side = 211-229-260 (281-302) sts. NOW MEASURE PIECE FROM HERE! On next row from RS work 21 sts each side as before, K remaining sts, AT THE SAME TIME inc 22-27-30 (33-36) sts evenly on these sts = 233-256-290 (314-338) sts. On next row from WS work 21 sts each side as before, K remaining sts. Now continue as follows (as seen from RS): 5 garter sts, P2, * M.1, P 11-11-12 (12-12) sts *, repeat from *-* a total of 9-10-11 (12-13) times and finish with M.1, P2 and 5 garter sts. AT THE SAME TIME dec from RS on the right and left side alternately of each P-section (dec by P2 tog, NOTE! do not dec in P2 each side) on every cm a total of 6-7-8 (9-9) times. AT THE SAME TIME when piece measures 1-1-2 (3-4) cm work M.2 over all sts in M.1 (work remaining sts as before). After 1 vertical repeat of M.2 continue with M.3. After all dec are complete there are 139-142-154 (154-165) sts on needle. Continue until piece measures approx 7-8-9 (10-11) cm, adjust to a full vertical repeat. Now work M.4 over M.3 (work remaining sts as before) = 99-98-106 (102-109) sts. After 1 vertical repeat of M.4 K 1 row from RS, AT THE SAME TIME dec 13-10-14 (6-9) sts evenly (do not dec on front bands) = 86-88-92 (96-100) sts. K 1 row from WS, K 1 row from RS, K 1 row from WS and cast off loosely. ASSEMBLY: Sew on buttons. ------------------------------------------------------ -------------------------------------------------------- BOOTIES: PATTERN: See diagram M.1. Diagram shows the pattern from RS. MOSS ST: Round 1: * K1, P1 *, repeat from *-*. Round 2: K over P and P over K. Repeat round 2. -------------------------------------------------------- BOOTIE: Piece worked in the round on double pointed needles, from top down. Cast on 50-50-54 (58-62) sts on double pointed needles size 2.5 mm with Alpaca. K 1 round on all sts and continue as follows: SIZE 1/3 months + 6/9 months + 2 years: K1, * P2/K2 *, repeat from *-* on the next 16-16-20 sts, P2, M.1 (= 12 sts), * P2/K2 *, repeat from *-* on the next 16-16-20 sts, P2, K1. SIZE 12/18 months + 3/4 years: P1, * K2/P2 *, repeat from *-* on the next 20-24 sts, M.1 (= 12 sts), * P2/K2 *, repeat from *-* on the next 20-24 sts, P1. Continue like this until piece measures 6-7-7 (8-8) cm. K 1 round on all sts, AT THE SAME TIME dec 4 sts evenly on round - do not dec on the 16 sts on upper foot (= M.1 + P2 each side) = 46-46-50 (54-58) sts. Keep the 16 sts on upper foot on needle and slip remaining 30-30-34 (38-42) sts on a stitch holder. Continue in M.1 with P2 each side back and forth on needle for 3-3.5-4 (5-6) cm. On next row from RS dec 4 sts on M.1 = 12 sts left on upper foot. Now pick up 6-8-8 (10-14) sts on the side of upper foot, slip sts from stitch holder back on needle and pick up 6-8-8 (10-14) sts on the other side of upper foot = 54-58-62 (70-82) sts. Continue in MOSS ST - see above - in the round on all sts for 1.5-2-2.5 (3-3.5) cm, and now P 1 round on all sts. Cast off all sts except the 12 sts on upper foot mid front. Work 9-10-11 (13-14) cm moss st back and forth on needle on these sts for sole. Cast off and sew sole to side pieces, sew edge to edge to avoid a chunky seam. |
||||||||||||||||||||||||||||||||||
Diagram explanations |
||||||||||||||||||||||||||||||||||
|
||||||||||||||||||||||||||||||||||
 |
||||||||||||||||||||||||||||||||||
 |
||||||||||||||||||||||||||||||||||
Have you finished this pattern?Tag your pictures with #dropspattern #sweetgretavest or submit them to the #dropsfan gallery. Do you need help with this pattern?You'll find 22 tutorial videos, a Comments/Questions area and more by visiting the pattern on garnstudio.com. © 1982-2026 DROPS Design A/S. We reserve all rights. This document, including all its sub-sections, has copyrights. Read more about what you can do with our patterns at the bottom of each pattern on our site. |
||||||||||||||||||||||||||||||||||


With over 40 years in knitting and crochet design, DROPS Design offers one of the most extensive collections of free patterns on the internet - translated to 17 languages. As of today we count 324 catalogues and 12290 patterns translated into English (UK/cm).
We work hard to bring you the best knitting and crochet have to offer, inspiration and advice as well as great quality yarns at incredible prices! Would you like to use our patterns for other than personal use? You can read what you are allowed to do in the Copyright text at the bottom of all our patterns. Happy crafting!
Post a comment to pattern DROPS Baby 19-18
We would love to hear what you have to say about this pattern!
If you want to leave a question, please make sure you select the correct category in the form below, to speed up the answering process. Required fields are marked *.