
Popular categories
Looking for a yarn?


Comments / Questions (51)
![]() Svenja wrote:
Svenja wrote:
Hallo, ich bin jetzt bei der Knopfblende am Rückenteil angekommen und würde nun gerne wissen, was 1 M. Krausrippe heißt und wie man diese strickt, in der Anleitung steht zwar - siehe oben- aber da steht es garnicht... Lg und Danke schonmal.
24.01.2015 - 14:10DROPS Design answered:
Antwort siehe unten! :-)
27.01.2015 - 23:45
![]() Svenja wrote:
Svenja wrote:
Hallo, ich bin jetzt bei der Knopfblende am Rückenteil angekommen und würde nun gerne wissen, was 1 M. Krausrippe heißt und wie man diese strickt, in der Anleitung steht zwar - siehe oben- aber da steht es garnicht... Lg und Danke schonmal.
24.01.2015 - 12:41DROPS Design answered:
Liebe Svenja, der Hinweis zur Krausrippe fehlte in der Tat und wurde nun ergänzt, Sie finden ihn über der eigentlichen Anleitung. Mit 1 M Krausrippe ist 1 M kraus re gemeint.
27.01.2015 - 23:44
![]() Svenja wrote:
Svenja wrote:
Hallo liebes DROPS Team, muss das Doppelte Perlmuster bei der kleinsten Größe 19 cm lang gestrickt werden oder nur 19 Reihen? Ich habe den Eindruck, dass die Weste ( wenn es denn wirklich 19 cm sein sollten ) zu lang wird.. Danke schonmal im Voraus!
17.01.2015 - 18:20DROPS Design answered:
Die 19 cm beziehen sich auf die Gesamtlänge, gemessen ab der Anschlagkante. "Nach" + cm-Angabe beziehen sich hier generell auf die Gesamtlänge, es sei denn, es wird ausdrücklich etwas anderes genannt. Weiterhin gutes Gelingen!
17.01.2015 - 18:33
![]() Christiane wrote:
Christiane wrote:
Ah danke, deshalb ist das so erklärt, jetzt hab ichs verstanden.
03.07.2014 - 09:14
![]() Christiane wrote:
Christiane wrote:
Was bedeutet beim muster rechts auf der vorderseite und links auf der rückseite. ich stricke ja rund. ist damit vorne beim pulli und hinten gemeint? danke für die hilfe.
01.07.2014 - 21:20DROPS Design answered:
Liebe Christiane, das soll bedeuten: "re in Hin-R" und "li in Rück-R", d.h. glatt re - in Rd also immer re. In M.1 stricken Sie also 2 Rd glatt li und 2 Rd glatt re im Wechsel. Sie stricken ja aber nicht nur in Rd, sondern am Vorder- und Rückenteil nach dem Abketten für die Armausschnitte auch in Hin- und Rück-R (Muster M.2).
02.07.2014 - 00:05Gloria wrote:
No entiendo dónde se levantan los puntos en la orilla de abotonamiento en la pieza de la espalda.
31.05.2014 - 00:00DROPS Design answered:
Hola Gloria! Para futuras preguntas marca la casilla "question" en lugar de comment. Los puntos se levantan a lo largo de la abertura de la espalda.
03.06.2014 - 09:33
![]() Yvonne wrote:
Yvonne wrote:
Hallo, ich ärgere mich gerade sehr arg, habe den Pullover fast fertig, habe es in die größe für 2 Jahre gemacht und sogar 4cm kürzer gemacht und jetzt geht mir die Wolle aus. Ich hatte 100gr. in Rot und muss jetzt schauen das ich vielleicht noch die gleiche partie bekomme, wg. farbunterschied. Da ich die Wolle bestimmt schon vor ein halbes bestellt habe, wird es bestimmt schwierig werden. Bitte die Mengeangabe korrigieren.
11.04.2014 - 20:28
![]() Martina wrote:
Martina wrote:
Ich versteh das mit der knopfblende auch nicht. WO genau kommt die hin? Aus welchem rand stricke ich die maschen raus?
10.02.2014 - 23:23DROPS Design answered:
Liebe Martina, die Knopfblende ist am Rücken (am Schlitz oben).
11.02.2014 - 16:30
![]() Ellen wrote:
Ellen wrote:
Det er umuligt at forstå, hvordan slidsen skal strikkes, til trods for jeres tidligere forklaringen. Den bageste halskant er rund. Hvor skal den slids være. Der burde være en tegning, når man nu ikke kan se det på fotografiet,
25.01.2014 - 11:02DROPS Design answered:
Hej Ellen. Du har lukket af til slidsen för du strikker halskanten. Slidsen er en lodret aabning i nakken saa vesten nemmere kan tages paa. Du strikker derefter de to skuldre paa rygstk hver for sig faerdig. Halsen paa ryggen er ikke "rund", du laver kun en runding paa forstk af vesten.
29.01.2014 - 10:53
![]() Connie wrote:
Connie wrote:
I skriver at der er en hel del rettelser på de små størrelser, hvor finder jeg dem henne??? De er ikke på siden med rettelser.
10.10.2013 - 14:29DROPS Design answered:
Skriv opskriften ud og strik efter opskriften på nettet så er den allerede rettet!
11.10.2013 - 09:11
|
|||||||
Petit Lord#petitlordslipover |
|||||||
|
|
|||||||
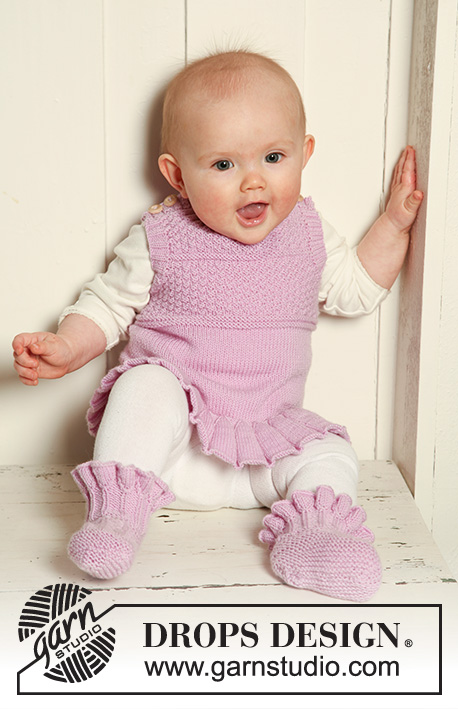
Knitted vest / slipover with textured pattern for baby and children in DROPS BabyMerino
DROPS Baby 19-20 |
|||||||
|
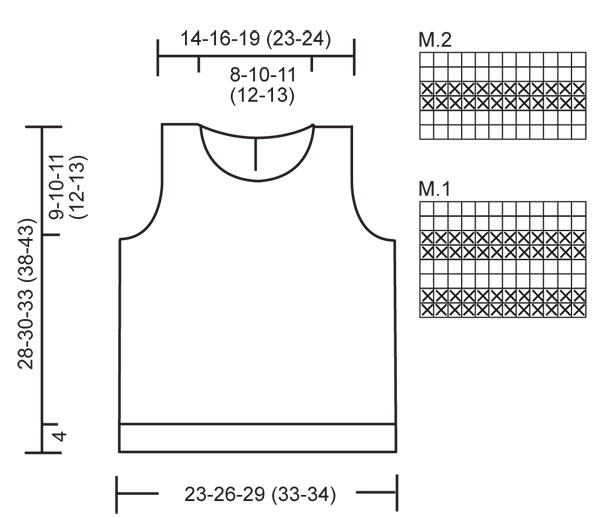
SLEEVELESS TOP: PATTERN: See diagram M.1 and M.2. Diagrams show the pattern from RS. DOUBLE MOSS ST: Row 1: * K2, P2 *, repeat from *-*. Row 2: K over K and P over P. Row 3: P over K and K over P. Row 4: Like row 2. Repeat row 1-4. GARTER ST (back and forth on needle): K all rows. -------------------------------------------------------- -------------------------------------------------------- SLEEVELESS TOP: Worked in the round on circular needle. Cast on 136-148-164 (188-196) sts on circular needle size 2.5 mm with Baby Merino. K 1 round and continue in rib K2/P2. When rib measures 4 cm dec 24-24-24 (32-32) sts evenly = 112-124-140 (156-164) sts. Insert a marker each side. Change to circular needle size 3 mm and continue in stocking st. REMEMBER THE KNITTING TENSION! When piece measures 13-14-15 (18-20) cm work M.1 on all sts. After 1 vertical repeat of M.1 continue in DOUBLE MOSS ST – see above - on all sts. When piece measures 19-20-22 (26-30) cm cast off 6 sts each side (i.e. 3 sts each side of marker) for armhole and complete front and back pieces separately. BACK PIECE: = 50-56-64 (72-76) sts. Continue back and forth on needle in double moss st. AT THE SAME TIME cast off for armhole each side on every other row: 2 sts 4 times and 1 st 1 time = 32-38-46 (54-58) sts. After dec for armhole are complete continue in M.2 on all sts. After 1 vertical repeat of M.2 continue in double moss st. AT THE SAME TIME 4 rows after M.2, cast off the middle 6-6-6 (6-6) sts for split and complete each shoulder separately. RIGHT SHOULDER: = 13-16-20 (24-26) sts. Continue back and forth on needle in double moss st until piece measures 26-28-31 (36-41) cm. Now cast off 6-8-9 (10-12) sts towards neck and cast off 1 st on neckline on next row = 6-7-10 (13-13) sts left on shoulder. Cast off when piece measures 28-30-33 (38-43) cm. LEFT SHOULDER: Like right shoulder but mirrored. FRONT PIECE: = 50-56-64 (72-76) sts. Continue back and forth on needle in double moss st. AT THE SAME TIME cast off for armhole each side as described for back piece = 32-38-46 (54-58) sts. After dec for armhole continue in M.2 on all sts. After 1 vertical repeat of M.2 continue in double moss st. When piece measures approx 24-25-28 (32-37) cm cast off the middle 10-14-16 (18-22) sts for neck and complete each shoulder separately. RIGHT SHOULDER: = 11-12-15 (18-18) sts. Continue back and forth on needle in double moss st, AT THE SAME TIME cast off to shape the neckline at the beg of every row from mid front: 2 sts 2 times and 1 st 1 time = 6-7-10 (13-13) sts left on shoulder. Cast off when piece measures 28-30-33 (38-43) cm. LEFT SHOULDER: Like right shoulder but mirrored. ASSEMBLY: Sew shoulder seams. BUTTON EDGE BACK PIECE: Pick up 12-16-16 (20-20) sts from RS on needle size 2.5 mm along right side of split on back piece. K 1 row from WS and work next row as follows from RS: 1 GARTER ST – see above - * K2/P2 *, repeat from *-* 2-3-3 (4-4) times and finish with K2 and 1 GARTER ST. Continue like this until edge measures approx 1 cm. Now make 1-1-1 (2-2) buttonholes as follows (from RS): SIZE 1/3 months: 1 garter st, K2, P2, cast off 2 sts, P2, K2 and 1 garter st. SIZE 6/9 + 12/18 months: 1 garter st, K2, P2, K2, cast off 2 sts, K2, P2, K2 and 1 garter st. SIZE 2 + 3/4 years: 1 garter st, K2, P2, cast off 2 sts, P2, K2, P2, cast off 2 sts, P2, K2 and 1 garter st. Cast on 2 new sts over cast off sts on return row. Cast off with K over k and P over P when edge measures approx 2 cm. Repeat along left side of split, but do not make buttonholes. NECKLINE: Pick up 88 to 128 sts (divisible by 4) from RS round neck (also pick up on button edges on back piece) on circular needle size 2.5 mm. K 1 row from WS and continue as follows from RS: 1 garter st, * K2/P2 *, repeat from *-* and finish with K2 and 1 garter st. When rib measures approx 1 cm make 1 buttonhole in line with the others on button edge on back piece. Cast off with K over K and P over P when rib measures approx 2-2-2 (3-3) cm. BORDER ROUND ARMHOLES: Beg mid under sleeve. Pick up 52 to 84 sts (divisible by 4) from RS round armhole on double pointed needles size 2.5 mm. P 1 round and continue in rib K2/P2 until border measures approx 2-2-2 (3-3) cm. Cast off with K over K and P over P. Repeat round the other armhole. ASSEMBLY: Sew on buttons on left side of split on back piece. Sew button edges to bottom of split. |
|||||||
Diagram explanations |
|||||||
|
|||||||
 |
|||||||
Have you finished this pattern?Tag your pictures with #dropspattern #petitlordslipover or submit them to the #dropsfan gallery. Do you need help with this pattern?You'll find 18 tutorial videos, a Comments/Questions area and more by visiting the pattern on garnstudio.com. © 1982-2026 DROPS Design A/S. We reserve all rights. This document, including all its sub-sections, has copyrights. Read more about what you can do with our patterns at the bottom of each pattern on our site. |
|||||||


With over 40 years in knitting and crochet design, DROPS Design offers one of the most extensive collections of free patterns on the internet - translated to 17 languages. As of today we count 324 catalogues and 12290 patterns translated into English (UK/cm).
We work hard to bring you the best knitting and crochet have to offer, inspiration and advice as well as great quality yarns at incredible prices! Would you like to use our patterns for other than personal use? You can read what you are allowed to do in the Copyright text at the bottom of all our patterns. Happy crafting!
Post a comment to pattern DROPS Baby 19-20
We would love to hear what you have to say about this pattern!
If you want to leave a question, please make sure you select the correct category in the form below, to speed up the answering process. Required fields are marked *.