
Popular categories
Looking for a yarn?


Comments / Questions (143)
![]() Pam Clemmer wrote:
Pam Clemmer wrote:
Hi there, Wondering if Winter Fantasy is offered in a pullover style, worked in the round, top down?
04.03.2018 - 15:50DROPS Design answered:
Dear Pam, sorry, but the cardigan is the only style this sweater is offerd. However, there are some projects made from it that are in pullover style, so you might try to convert it. Happy knitting!
04.03.2018 - 17:53
![]() Lene Ryberg Nikolajsen wrote:
Lene Ryberg Nikolajsen wrote:
Jeg strikker str M. 80 masker på pind 2,5 bliver en meget løs ærmerib. Mm strikkefasthed passer er antallet af 80 masker korrekt?
04.03.2018 - 08:17DROPS Design answered:
Hej, ja det stemmer men du skal helt ned på 26 masker på 10 cm i rib, for at få målet som står i opskriften. Du kan jo prøve med nr 2. God fornøjelse!
06.03.2018 - 17:04Guinevere wrote:
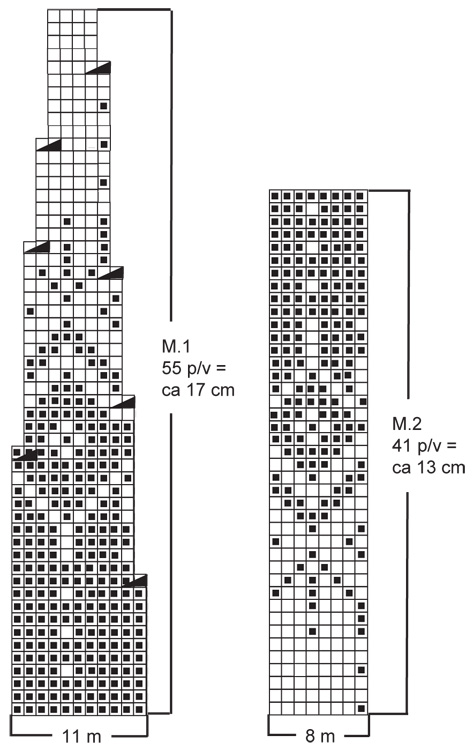
In M.1 chart which rows are right side and which wrong? Do I read right ones from right to left and wrong ones from left to right? I would also like to have the part Continue in M.1 with 1 edge st in garter st each side, work the last but 1 st on row like first st in M.1, but without the dec, a little more explained please.
09.02.2018 - 13:02DROPS Design answered:
Dear Guinevere, diagram are read starting from RS at the bottom corner on the right side towards the left and from WS from the left towards the right, ie from RS work: repeat M.1 and work the first st in M.1, from WS work the first st in M.1 and repeat M.1 (reading from the left towards the right) - when working the first st in M.1 always work K1 in the colour of the background colour/row, never end row with K2 tog as in other repetitions in M.1. Happy knitting!
09.02.2018 - 13:44
![]() Mette Kirstine Steensen wrote:
Mette Kirstine Steensen wrote:
Jeg kan ikke finde ud af hvilken farve jeg skal strikke når jeg skal strikke 2 er samme.
21.10.2017 - 14:15DROPS Design answered:
Hej, Du strikker de 2 masker sammen i den farve som er markeret i diagrammet. Første gange er det 2 sorte i højre side af diagrammet, næste gang er det 2 sorte i venstre side af diagrammet osv. God fornøjelse!
31.10.2017 - 13:26
![]() Diana wrote:
Diana wrote:
Lese ich das Muster immer von Rechts oder im Wechsel? Also rechte Maschen von Rechts und linke Maschen von links?
18.10.2017 - 09:36DROPS Design answered:
Liebe Diana, 1 Kästchen = 1 M x 1 Reihe, das Diagram lesen Sie von rechts nach links (Hinreihen) und links nach rechts (Rückreihe). Viel Spaß beim stricken!
18.10.2017 - 13:25
![]() Marit wrote:
Marit wrote:
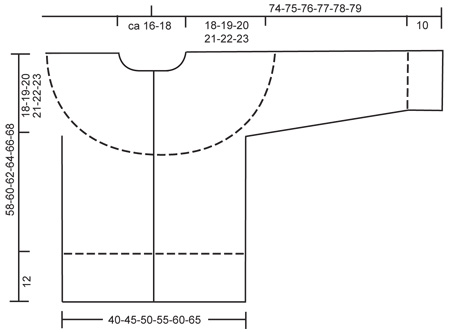
Finner ikke mål på jakken. Hvordan er overvidden i de ulike størrelsene? Aner ikke hvilken størrelse som vil passe meg.
02.09.2017 - 21:34DROPS Design answered:
Hei Marit. Målene til de ulike størrelsene finner du på målskissen som er helt nederst på oppskriften, under diagrammene. God Fornøyelse!
04.09.2017 - 11:38
![]() Lisbeth Merete Kolberg wrote:
Lisbeth Merete Kolberg wrote:
Jeg trenger litt hjelp med Winter Fantasy..... Gjelder første omgang med fellinger i mønsteret. Det er vist at første felling er de to første maskene på omgangen, men det skal ikke felles på slutten av omgangen. Da blir jo sidene forskjellige?
19.05.2017 - 14:30DROPS Design answered:
Hei Lisbeth. I dette mønstret felles det der det er vist i diagrammet. Det at det ikke blir likt i hver side, spiller ingen rolle her da fellingene skjer jevnt fordelt over hele mønstret. God Fornøyelse!
24.05.2017 - 12:38
![]() Cinzia Salvadori wrote:
Cinzia Salvadori wrote:
Sarebbe possibile fare questo modello cardigan, in tondo? Montando qualche maglia in più al centro davanti, e poi tagliare per applicare i bordi? Se si, vi pregherei di scrivermi quante maglie montare o come gestire il disegno allo sprone. Mille grazie
04.03.2017 - 14:35DROPS Design answered:
Buongiorno Cinzia, questo modello è stato disegnato per essere lavorato avanti e indietro. Noi purtroppo non possiamo riscrivere i modelli per le esigenze di tutte le clienti, ma può chiedere assistenza personale al suo rivenditore DROPS di fiducia. Buon lavoro!
05.03.2017 - 09:57
![]() Line wrote:
Line wrote:
Jeg forstår ikke, hvad I mener med dette i forhold til indtagning i bærestykket: "Videre strikkes der og tages ind efter M.1 (1.p = retsiden) med 1 kantm i retstrik i hver side, næst sidste m på p strikkes som første m i M.1 men der tages ikke ind i denne m.". Skal jeg kun tage en maske ind per pind? I så fald tænker jeg, cardiganen bliver rigtig lang, før jeg har taget 182 masker ind....
06.06.2016 - 21:53DROPS Design answered:
Hej Line. Nej, du strikker M.1 som gentages x antal gange paa din p. Hvis du ser paa M.1, saa kan du se at der tages ind et antal gange i höjden (f.eks. p 11 og 21). Dvs, du strikker 2 m sammen 1 gang per gentagelse i bredden. Du har M.1 altsaa x antal gange over p og til sidst 1 m til overs för kantm. Den strikker du som den förste m i M.1, men i DEN maske tages der ikke ind (strikkes sammen). Du har den maske her saa mönstret bliver ens paa begge sider af forstykket. Haaber du kan komme videre nu. God fornöjelse :)
07.06.2016 - 18:00
![]() Lillian wrote:
Lillian wrote:
Hei. Det står ingenting om hvilken pinnestr det skal være på stolpene. Skal det være 2,5 ettersom det er det på halskanten og oppleggskanten nede? Mvh Lillian
02.02.2016 - 20:41DROPS Design answered:
Hei Lilian. Ja, det skal ogsaa vaere p 2,5. Jeg skal give det videre saa vi kan faa det tilföjet.
04.02.2016 - 14:03
|
||||||||||
Winter Fantasy |
||||||||||
 |
 |
|||||||||
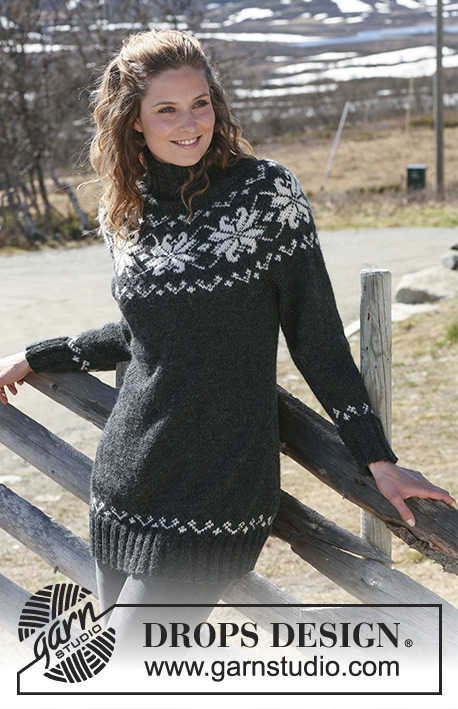
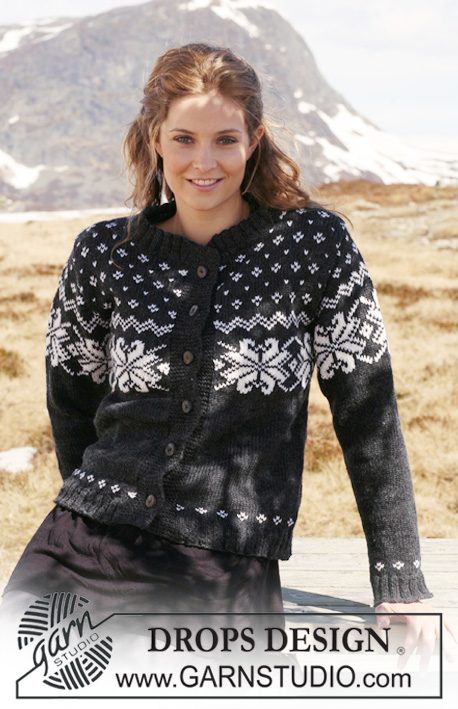
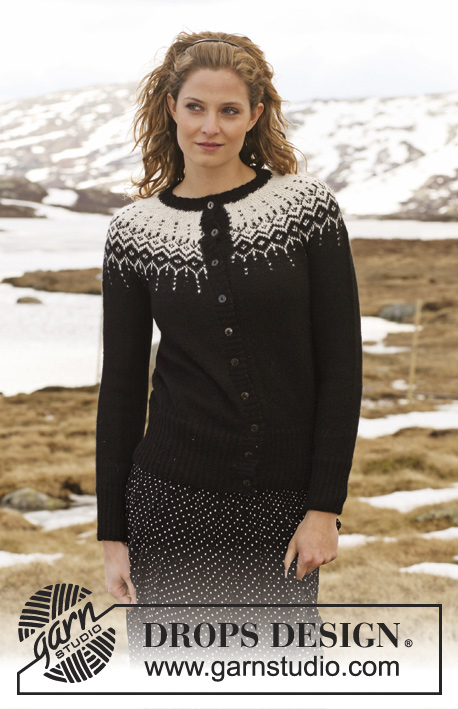
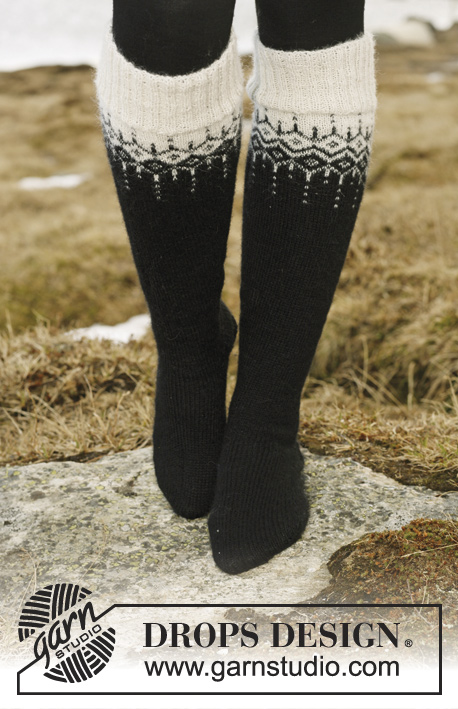
DROPS Jacket in ”Alpaca” and ”Glitter” with 2-colour pattern in round yoke. Size S to XXXL. Long socks in ”Fabel” with the same pattern.
DROPS 116-1 |
||||||||||
|
JACKET: PATTERN: See diagram M.1 – diagram is seen from RS and shows 1 pattern repeat. GARTER ST (back and forth on needle): K all rows. ---------------------------------------------------------- BODY PIECE: Worked back and forth on circular needle from mid front. Cast on 314-354-394-434-474-514 sts on circular needle size 2.5 mm with 1 thread black Alpaca + 1 thread Glitter. Work rib as follows (first row = RS): 1 edge st in GARTER ST – see above, * K2 / P3 *, repeat from *-* until 3 sts remain, K2, 1 edge st in GARTER ST. Continue like this until piece measures 2 cm, now dec all P3 to P2 (as seen from RS) = 252-284-316-348-380-412 sts. Continue in rib, K2 / P2, with 1 edge st in garter st each side. When piece measures 12 cm dec all P2 to P1 (as seen from RS) = 190-214-238-262-286-310 sts. Change to circular needle size 3 mm and continue in stocking st. REMEMBER THE KNITTING TENSION! When piece measures 40-41-42-43-44-45 cm work next row as follows from RS: 41-47-54-59-65-71 sts (= front piece), cast off 12 sts for armhole, 84-96-106-120-132-144 sts (= back piece), cast off 12 sts for armhole, 41-47-54-59-65-71 sts (= front piece) = 166-190-214-238-262-286 sts left on needle. Put piece aside and knit the sleeves. SLEEVE: Worked in the round on double pointed needles. Cast on 80-80-80-88-88-88 sts on double pointed needles size 2.5 mm with 1 thread black Alpaca + 1 thread Glitter. Work rib, K2 / P2. When piece measures 10 cm dec all P2 to P1 = 60-60-60-66-66-66 sts. Insert a marker at beg of round. Change to double pointed needles size 3 mm and continue in stocking st. When piece measures 11-11-11-14-14-14 cm inc 1 st each side of marker mid under sleeve, repeat the inc on every 4.5-3.5-2.5-2.5-2-2 cm a total of 8-11-14-13-15-17 times = 76-82-88-92-96-100 sts. When piece measures 48 cm cast off 12 sts mid under sleeve = 64-70-76-80-84-88 sts left on needle. Put piece aside and knit the other sleeve. YOKE: Slip sleeves on the same circular needle size 3 mm as body piece where cast off for armhole = 294-330-366-398-430-462 sts. Work 3-5-9-13-15-17 rows stocking st with black Alpaca + Glitter, AT THE SAME TIME on first row dec 5-8-11-10-9-8 sts evenly = 289-322-355-388-421-454 sts. Now continue in M.1 (first row = RS) with 1 edge st in garter st each side, work the last but 1 st on row like first st in M.1, but without the dec, to make the pattern identical on both front pieces. When all dec are complete there are 107-119-131-143-155-167 sts on needle and piece measures approx 58-60-62-64-66-68 cm. Work 1 row with off-white (from WS), AT THE SAME TIME dec 15-19-23-27-31-35 sts evenly = 92-100-108-116-124-132 sts. Now work shortened rows mid back with off-white as follows: Work 56-60-64-68-72-76 sts, turn, work 20 sts, turn, work 30 sts, turn, work 40 sts. Continue like this with 10 more sts before each turn until you have worked shortened rows on a total of 60-80-80-100-120 sts, turn and work return row and work 1 row on all sts. Slip sts on a stitch holder. LEFT FRONT BAND: Pick up approx 180 to 212 sts (divisible by 4) inside 1 edge st along left front piece with 1 thread black Alpaca + 1 thread Glitter on circular needle size 2.5 mm. Work rib as follows (first row = WS): 1 edge st in garter st, * P2 / K2 *, repeat from *-* and finish with P2 and 1 edge st in garter st. Continue with K over K and P over P until rib measures 3 cm, cast off loosely. RIGHT FRONT BAND: Like left front band, but after 1 cm make 9 buttonholes evenly distributed (make buttonholes in P-sections as seen from RS). 1 BUTTONHOLE = P2 tog and make 1 YO – place the bottom buttonhole in the 2nd P-section and the top one approx 6 cm from neckline (the last buttonhole is made on the neck). NECK: Worked with 1 thread black Alpaca + 1 thread Glitter on circular needle size 2.5 mm as follows: Pick up 8 sts on right front band (inside 1 edge st), work the 92-100-108-116-124-132 sts from stitch holder back on needle and pick up 8 sts on left front band = 108-116-124-132-140-148 sts. P 1 row from WS, AT THE SAME TIME inc 20 sts evenly = 128-136-144-152-160-168 sts. Continue in rib as follows (from RS): 1 edge st in garter st, * K2 / P2 *, repeat from *-* and finish with K2 and 1 edge st in garter st. Continue with K over K and P over P. When neck measures 1 cm make 1 buttonhole in line with the others on front band. When neck measures 3 cm cast off with K over K and P over P. ASSEMBLY: Sew on buttons. Sew openings under sleeves. ---------------------------------------------------------- SOCKS: PATTERN: See diagram M.2 – diagram shows 1 pattern repeat. We knitted the socks without Glitter. DECREASING TIP: Dec as follows before marker: K2 tog. Dec as follows after marker: K2 tog into back of loop. HEEL DECREASES: Row 1 (= RS): Work row until 8-9-9 sts remain, K2 tog into back of loop, turn piece. Row 2 (= WS): Work row until 8-9-9 sts remain, P2 tog, turn piece. Row 3 (= RS): Work row until 7-8-8 sts remain, K2 tog into back of loop, turn piece. Row 4 (= WS): Work row until 7-8-8 sts remain, P2 tog, turn piece. Continue dec like this with 1 less st before each dec until there are 14-14-16 sts on needle. ---------------------------------------------------------- SOCKS: Worked in the round on double pointed needles. Cast on 108-108-116 sts on double pointed needles size 2.5 mm with off-white. Work rib, K2 / P2 for 8 cm. K 1 round, AT THE SAME TIME dec 20 sts evenly = 88-88-96 sts. Continue in M.2. REMEMBER THE KNITTING TENSION! After M.2 piece measures approx 21 cm. Insert a marker at beg of round. Continue in black stocking st, AT THE SAME TIME dec 1 st each side of marker – SEE DECREASING TIP, and repeat the dec on every 4-5-5 round a total of 16-14-16 times = 56-60-64 sts. When piece measures 42-44-46 cm keep the first 28-30-32 sts on needle for heel and slip the remaining 28-30-32 sts on a stitch holder (= mid upper foot). Continue in stocking st back and forth on heel-sts for 5-5.5-6 cm - insert a marker. Now work HEEL DECREASES – see above. After heel dec pick up 13-14-16 sts each side of heel and slip the 28-30-32 sts from stitch holder back on needle = 68-72-80 sts. Insert a marker each side of the 28-30-32 sts on upper foot. Continue in stocking st in the round, AT THE SAME TIME dec each side as follows: K tog into back of loop the last 2 sts BEFORE first marker on upper foot, and K tog the first 2 sts AFTER the second marker on upper foot. Repeat the dec on every other round a total of 8-8-10 times = 52-56-60 sts. Continue until piece measures 18-19-22 cm from marker on heel (= approx 4-5-5 cm remain). Insert a marker each side with 26-28-30 sts on upper foot and 26-28-30 sts under foot. Continue in stocking st AT THE SAME TIME dec for toes each side of both markers as follows: Before marker: K2 tog. After marker: K2 tog into back of loop. Repeat the dec on every other round a total of 4-5-5 times and then on every round 7-7-8 times = 8 sts left on needle. Cut the thread, pull it through remaining sts, tighten and fasten. |
||||||||||
Diagram explanations |
||||||||||
|
||||||||||
 |
||||||||||
 |
||||||||||
Have you finished this pattern?Tag your pictures with #dropspattern or submit them to the #dropsfan gallery. Do you need help with this pattern?You'll find 30 tutorial videos, a Comments/Questions area and more by visiting the pattern on garnstudio.com. © 1982-2026 DROPS Design A/S. We reserve all rights. This document, including all its sub-sections, has copyrights. Read more about what you can do with our patterns at the bottom of each pattern on our site. |
||||||||||


With over 40 years in knitting and crochet design, DROPS Design offers one of the most extensive collections of free patterns on the internet - translated to 17 languages. As of today we count 325 catalogues and 12298 patterns translated into English (UK/cm).
We work hard to bring you the best knitting and crochet have to offer, inspiration and advice as well as great quality yarns at incredible prices! Would you like to use our patterns for other than personal use? You can read what you are allowed to do in the Copyright text at the bottom of all our patterns. Happy crafting!
Post a comment to pattern DROPS 116-1
We would love to hear what you have to say about this pattern!
If you want to leave a question, please make sure you select the correct category in the form below, to speed up the answering process. Required fields are marked *.