
Popular categories
Looking for a yarn?


Comments / Questions (143)
![]() Marie wrote:
Marie wrote:
Bizarre le motif est décalé sur la photo
27.03.2019 - 19:50
![]() Marie wrote:
Marie wrote:
Bizarre le motif est décalé sur la photo
27.03.2019 - 19:49
![]() Mme Gautier wrote:
Mme Gautier wrote:
Bonjour, je ne comprends pas du tout à partir d'où il faut commencer les rangs raccourcis. Faut-il compter les 56-60-64-68-72-76 m à compter du bord gauche ou du milieu dos? Faut-il recommencer 2 fois la manœuvre pour former l'encolure ? Merci pour votre réponse.
10.03.2019 - 21:57DROPS Design answered:
Bonjour Mme Gautier, vous commencez les rangs raccourcis de la réhausse en début de rang sur l'endroit (= devant droit): tricotez 56-76 m seulement, tournez et tricotez 20 m, tournez, tricotez 30 m et ainsi de suite jusqu'à ce que vous ayez tricoté 60-120 m, tournez, tricotez le rang jusqu'à la fin, puis 1 rang sur toutes les mailles. Cette vidéo montre comment tricoter une réhausse pour un pull, mais la technique sera la même ici, sauf que le début du tour sera ici sur l'endroit le début du rang (devant droit). Bon tricot!
11.03.2019 - 11:09
![]() Annica wrote:
Annica wrote:
Hej, kan jag sticka hela tröjan på rundsticka och klippa upp vid framkanten för att få en kofta?
09.03.2019 - 10:41DROPS Design answered:
Hej Annica, Ja se FAQ i mönstret: 17) Hur kan jag sticka en kofta runt istället för fram och tillbaka?
12.03.2019 - 14:03
![]() Lone Thodesen wrote:
Lone Thodesen wrote:
Jeg har strikket sokker med dette winter fantasy mønsteret .har jeg lov å selge mine lester ?ca 10 par i året.
14.02.2019 - 07:02DROPS Design answered:
Hei Lone. Så flott at du spør! Salg av plagg basert på DROPS oppsrkifter er tillatt så lenge de selges enkeltvis eller per bestilling. Annet kommersielt bruk er ikke tillatt. Altså så lenge det er på hobby-basis. Det skal tydelig fremgå at modellen er fra DROPS DESIGN. Betingelsen for tillatelse til bruk av tøymerke hvor DROPS DESIGN inngår, er at teksten skal være formulert slik: "Et DROPS DESIGN laget av .......". God fornøyelse
14.02.2019 - 07:49
![]() Cecile wrote:
Cecile wrote:
Ik ben nu bij naald 32 van de pas. De kantsteken heb ik steeds in zwart gebreid. Moet ik deze in zwart blijven breien in het gehele M1 patroon, of moet ik overgaan op wit? En zo ja, bij welke naald zou dat dan passend zijn?
07.01.2019 - 10:17DROPS Design answered:
Dag Cecile,
Je kant de kant steken steeds breien met de kleur die je op dat moment op de naald hebt. Aan het eind wordt de bies eraan gebreid en dan vallen de kantsteken weg, dus het maakt niet uit in welke kleur je die breit.
09.01.2019 - 11:23
![]() RoseMarie Lans wrote:
RoseMarie Lans wrote:
Kan jag byta ut Glitter mot tex Fabel i vitt eller något annat som inte är glitter eller bara välja bort den?
01.01.2019 - 13:31DROPS Design answered:
Hei RoseMarie. Glittertråden er såpass tynn at den ikke har noen innvirkning på strikkefastheten, så om du ikke ønsker glitter kan du enkelt kutte den ut. God fornøyelse
04.01.2019 - 09:30
![]() Cecile wrote:
Cecile wrote:
Bedankt voor het vorige antwoord. Ik snap hoe M1 te breien, maar begrijp niet dat ik na M1 nog een extra steek moet breien alvorens te eindigen met de kantsteek (waar ik ook mee begonnen was). Dan gaat het figuur bij iedere naald toch verspringen? Of moet ik op de terugnaald beginnen met 1 kantsteek, 1 steek uit M1 en dan M1 breien, om te eindigen met een kantsteek?
14.12.2018 - 22:26DROPS Design answered:
Dag Cecile,
Op de teruggaande naald begin je inderdaad met 1 kantsteek en 1 steek uit M.1, vervolgens brei je M.1, dus je zorgt ervoor dat het patroon niet verspringt. Deze extra steek wordt gemaakt om ervoor te zorgen dat het patroon mooi symmetrisch op het vest komt.
18.12.2018 - 11:05
![]() Cecile wrote:
Cecile wrote:
Ik ben aangekomen bij de pas waarbij ik 3naalden tricotsteek heb gebreid. Nu moet ik verder gaan met M 1 volgens de omschrijving van het patroon. M 1 begint met drie naalden zwart. Gaat het hier om drie nieuwe naalden of zijn dat de drie naalden die ik zojuist al heb gebreid? En dan nog even een vraagje over de eerste naald M1 bij de kleinste maat. Klopt het dat ik dan het volgende moet breien? kantsteek, 26 maal figuur, 2 losse steken steken. Alleen op deze manier kom ik nl. Aan 289 steken.
10.12.2018 - 21:26DROPS Design answered:
Dag Cecile,
Het gaat om 3 nieuwe naalden als je begint met M.1
Je breit 1 kantsteek, dan herhaal je 26 keer M.1, dan weer de eerste steek van M.1 (maar als je op een naald in M.1 bent waar een mindering zit (symbool die 2 steken samenbreien aangeeft), doe je bij deze laatste steek niet de mindering, maar een normale steek van M.1) en dan nog een kantsteek.
12.12.2018 - 17:56
![]() Maxine Rutherford wrote:
Maxine Rutherford wrote:
I was wondering if the cardigan can be convert into a jumper, if so how would I go about doing it I\'m as little unsure just what or which would be the best way. Thanks and regards Maxine
05.09.2018 - 06:12DROPS Design answered:
Dear Mrs Rutherford, you"ll find here a similar jumper that could inspire you. Happy knitting!
06.09.2018 - 08:44
|
||||||||||
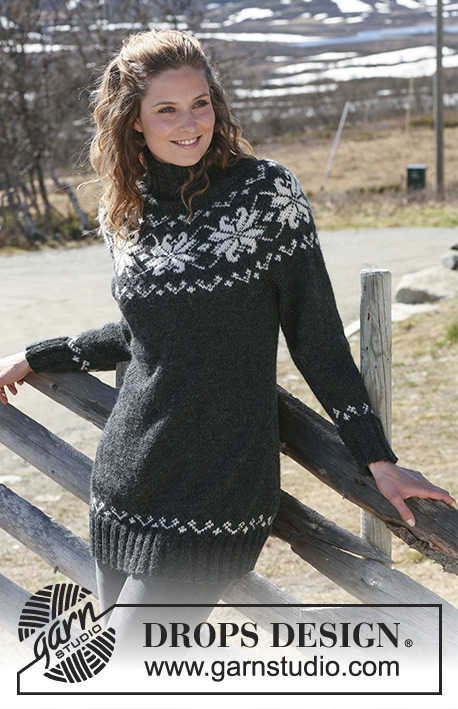
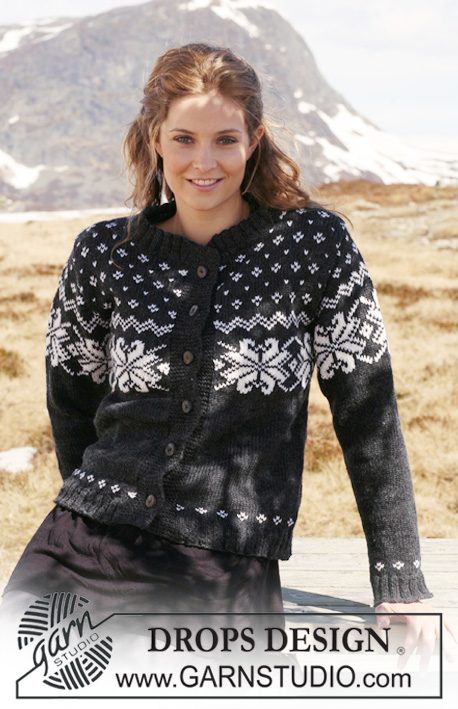
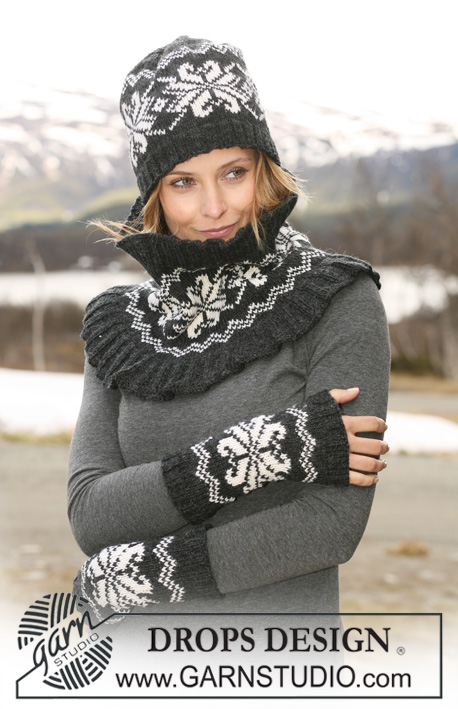
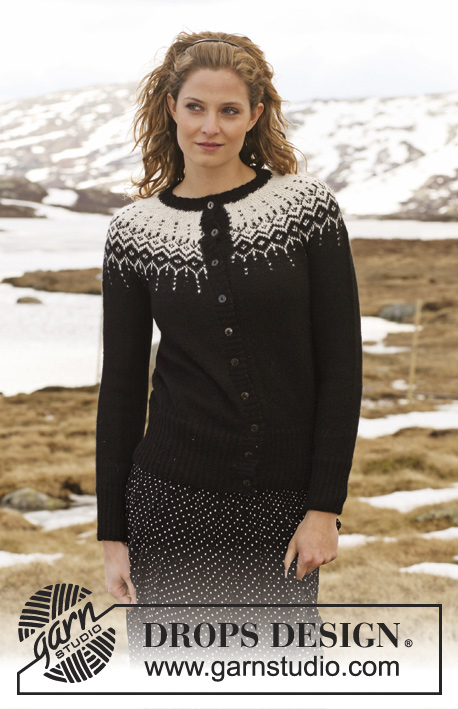
Winter Fantasy |
||||||||||
 |
 |
|||||||||
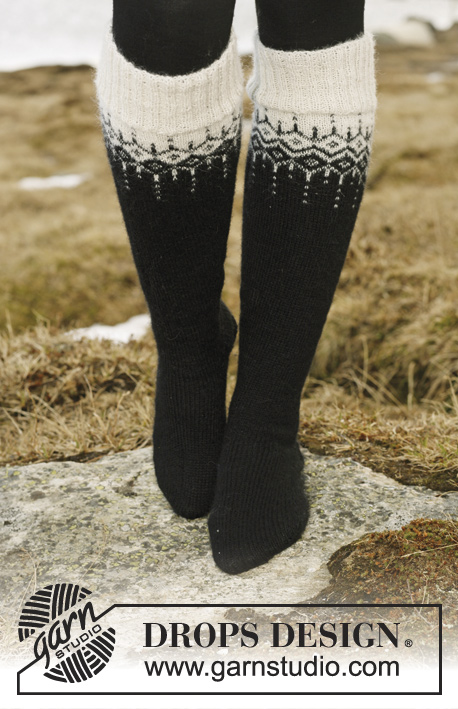
DROPS Jacket in ”Alpaca” and ”Glitter” with 2-colour pattern in round yoke. Size S to XXXL. Long socks in ”Fabel” with the same pattern.
DROPS 116-1 |
||||||||||
|
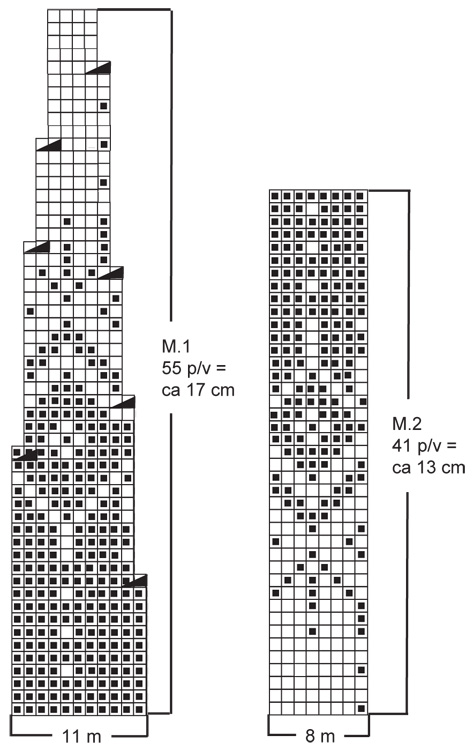
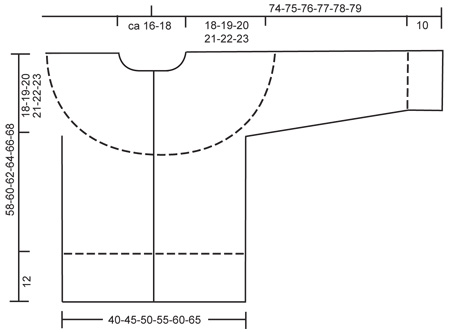
JACKET: PATTERN: See diagram M.1 – diagram is seen from RS and shows 1 pattern repeat. GARTER ST (back and forth on needle): K all rows. ---------------------------------------------------------- BODY PIECE: Worked back and forth on circular needle from mid front. Cast on 314-354-394-434-474-514 sts on circular needle size 2.5 mm with 1 thread black Alpaca + 1 thread Glitter. Work rib as follows (first row = RS): 1 edge st in GARTER ST – see above, * K2 / P3 *, repeat from *-* until 3 sts remain, K2, 1 edge st in GARTER ST. Continue like this until piece measures 2 cm, now dec all P3 to P2 (as seen from RS) = 252-284-316-348-380-412 sts. Continue in rib, K2 / P2, with 1 edge st in garter st each side. When piece measures 12 cm dec all P2 to P1 (as seen from RS) = 190-214-238-262-286-310 sts. Change to circular needle size 3 mm and continue in stocking st. REMEMBER THE KNITTING TENSION! When piece measures 40-41-42-43-44-45 cm work next row as follows from RS: 41-47-54-59-65-71 sts (= front piece), cast off 12 sts for armhole, 84-96-106-120-132-144 sts (= back piece), cast off 12 sts for armhole, 41-47-54-59-65-71 sts (= front piece) = 166-190-214-238-262-286 sts left on needle. Put piece aside and knit the sleeves. SLEEVE: Worked in the round on double pointed needles. Cast on 80-80-80-88-88-88 sts on double pointed needles size 2.5 mm with 1 thread black Alpaca + 1 thread Glitter. Work rib, K2 / P2. When piece measures 10 cm dec all P2 to P1 = 60-60-60-66-66-66 sts. Insert a marker at beg of round. Change to double pointed needles size 3 mm and continue in stocking st. When piece measures 11-11-11-14-14-14 cm inc 1 st each side of marker mid under sleeve, repeat the inc on every 4.5-3.5-2.5-2.5-2-2 cm a total of 8-11-14-13-15-17 times = 76-82-88-92-96-100 sts. When piece measures 48 cm cast off 12 sts mid under sleeve = 64-70-76-80-84-88 sts left on needle. Put piece aside and knit the other sleeve. YOKE: Slip sleeves on the same circular needle size 3 mm as body piece where cast off for armhole = 294-330-366-398-430-462 sts. Work 3-5-9-13-15-17 rows stocking st with black Alpaca + Glitter, AT THE SAME TIME on first row dec 5-8-11-10-9-8 sts evenly = 289-322-355-388-421-454 sts. Now continue in M.1 (first row = RS) with 1 edge st in garter st each side, work the last but 1 st on row like first st in M.1, but without the dec, to make the pattern identical on both front pieces. When all dec are complete there are 107-119-131-143-155-167 sts on needle and piece measures approx 58-60-62-64-66-68 cm. Work 1 row with off-white (from WS), AT THE SAME TIME dec 15-19-23-27-31-35 sts evenly = 92-100-108-116-124-132 sts. Now work shortened rows mid back with off-white as follows: Work 56-60-64-68-72-76 sts, turn, work 20 sts, turn, work 30 sts, turn, work 40 sts. Continue like this with 10 more sts before each turn until you have worked shortened rows on a total of 60-80-80-100-120 sts, turn and work return row and work 1 row on all sts. Slip sts on a stitch holder. LEFT FRONT BAND: Pick up approx 180 to 212 sts (divisible by 4) inside 1 edge st along left front piece with 1 thread black Alpaca + 1 thread Glitter on circular needle size 2.5 mm. Work rib as follows (first row = WS): 1 edge st in garter st, * P2 / K2 *, repeat from *-* and finish with P2 and 1 edge st in garter st. Continue with K over K and P over P until rib measures 3 cm, cast off loosely. RIGHT FRONT BAND: Like left front band, but after 1 cm make 9 buttonholes evenly distributed (make buttonholes in P-sections as seen from RS). 1 BUTTONHOLE = P2 tog and make 1 YO – place the bottom buttonhole in the 2nd P-section and the top one approx 6 cm from neckline (the last buttonhole is made on the neck). NECK: Worked with 1 thread black Alpaca + 1 thread Glitter on circular needle size 2.5 mm as follows: Pick up 8 sts on right front band (inside 1 edge st), work the 92-100-108-116-124-132 sts from stitch holder back on needle and pick up 8 sts on left front band = 108-116-124-132-140-148 sts. P 1 row from WS, AT THE SAME TIME inc 20 sts evenly = 128-136-144-152-160-168 sts. Continue in rib as follows (from RS): 1 edge st in garter st, * K2 / P2 *, repeat from *-* and finish with K2 and 1 edge st in garter st. Continue with K over K and P over P. When neck measures 1 cm make 1 buttonhole in line with the others on front band. When neck measures 3 cm cast off with K over K and P over P. ASSEMBLY: Sew on buttons. Sew openings under sleeves. ---------------------------------------------------------- SOCKS: PATTERN: See diagram M.2 – diagram shows 1 pattern repeat. We knitted the socks without Glitter. DECREASING TIP: Dec as follows before marker: K2 tog. Dec as follows after marker: K2 tog into back of loop. HEEL DECREASES: Row 1 (= RS): Work row until 8-9-9 sts remain, K2 tog into back of loop, turn piece. Row 2 (= WS): Work row until 8-9-9 sts remain, P2 tog, turn piece. Row 3 (= RS): Work row until 7-8-8 sts remain, K2 tog into back of loop, turn piece. Row 4 (= WS): Work row until 7-8-8 sts remain, P2 tog, turn piece. Continue dec like this with 1 less st before each dec until there are 14-14-16 sts on needle. ---------------------------------------------------------- SOCKS: Worked in the round on double pointed needles. Cast on 108-108-116 sts on double pointed needles size 2.5 mm with off-white. Work rib, K2 / P2 for 8 cm. K 1 round, AT THE SAME TIME dec 20 sts evenly = 88-88-96 sts. Continue in M.2. REMEMBER THE KNITTING TENSION! After M.2 piece measures approx 21 cm. Insert a marker at beg of round. Continue in black stocking st, AT THE SAME TIME dec 1 st each side of marker – SEE DECREASING TIP, and repeat the dec on every 4-5-5 round a total of 16-14-16 times = 56-60-64 sts. When piece measures 42-44-46 cm keep the first 28-30-32 sts on needle for heel and slip the remaining 28-30-32 sts on a stitch holder (= mid upper foot). Continue in stocking st back and forth on heel-sts for 5-5.5-6 cm - insert a marker. Now work HEEL DECREASES – see above. After heel dec pick up 13-14-16 sts each side of heel and slip the 28-30-32 sts from stitch holder back on needle = 68-72-80 sts. Insert a marker each side of the 28-30-32 sts on upper foot. Continue in stocking st in the round, AT THE SAME TIME dec each side as follows: K tog into back of loop the last 2 sts BEFORE first marker on upper foot, and K tog the first 2 sts AFTER the second marker on upper foot. Repeat the dec on every other round a total of 8-8-10 times = 52-56-60 sts. Continue until piece measures 18-19-22 cm from marker on heel (= approx 4-5-5 cm remain). Insert a marker each side with 26-28-30 sts on upper foot and 26-28-30 sts under foot. Continue in stocking st AT THE SAME TIME dec for toes each side of both markers as follows: Before marker: K2 tog. After marker: K2 tog into back of loop. Repeat the dec on every other round a total of 4-5-5 times and then on every round 7-7-8 times = 8 sts left on needle. Cut the thread, pull it through remaining sts, tighten and fasten. |
||||||||||
Diagram explanations |
||||||||||
|
||||||||||
 |
||||||||||
 |
||||||||||
Have you finished this pattern?Tag your pictures with #dropspattern or submit them to the #dropsfan gallery. Do you need help with this pattern?You'll find 30 tutorial videos, a Comments/Questions area and more by visiting the pattern on garnstudio.com. © 1982-2026 DROPS Design A/S. We reserve all rights. This document, including all its sub-sections, has copyrights. Read more about what you can do with our patterns at the bottom of each pattern on our site. |
||||||||||


With over 40 years in knitting and crochet design, DROPS Design offers one of the most extensive collections of free patterns on the internet - translated to 17 languages. As of today we count 325 catalogues and 12298 patterns translated into English (UK/cm).
We work hard to bring you the best knitting and crochet have to offer, inspiration and advice as well as great quality yarns at incredible prices! Would you like to use our patterns for other than personal use? You can read what you are allowed to do in the Copyright text at the bottom of all our patterns. Happy crafting!
Post a comment to pattern DROPS 116-1
We would love to hear what you have to say about this pattern!
If you want to leave a question, please make sure you select the correct category in the form below, to speed up the answering process. Required fields are marked *.