
Popular categories
Looking for a yarn?


Comments / Questions (143)
![]() Tina wrote:
Tina wrote:
Skall verkligen ärmen vara 48 cm oavsett storlek?
01.04.2021 - 22:02DROPS Design answered:
Hej Tina, ja det stemmer, du finder målene fra nakken og ud til ærmet i måleskitsen nederst i opskriften :)
07.04.2021 - 10:13
![]() Gitte Larsen wrote:
Gitte Larsen wrote:
Kan man lave mønstret forneden og på ærmerne?
14.03.2021 - 23:02DROPS Design answered:
Hej Gitte, Ja selvfølgelig :) vi kan dog ikke hjælpe dig med at regne opskriften om.
17.03.2021 - 15:17
![]() Anny wrote:
Anny wrote:
Bonsoir Je vais commencer à tricoter ce pull avec de l'alpaga au point de riz il va etre assez fin et mou comment faire pour un aspect épais sans doute avec deux fils de laine Merci pour votre réponse que j'attends pour le commencer
21.01.2021 - 00:46DROPS Design answered:
Bonjour Anny, ce gilet se tricote avec 1 seul fil Alpaca, sur la base de 24 mailles x 32 rangs = 10 x 10 cm - vous trouverez < a href="https://www.garnstudio.com/lesson.php?id=25&cid=8">ici plus d'infos sur l'échantillon et la tension en général. Bon tricot!
21.01.2021 - 08:09
![]() Carla wrote:
Carla wrote:
I cannot order DROPS Glitter black no. 9 on your site. Is there an alternative??
07.01.2021 - 18:43DROPS Design answered:
Dear Carla, black doesn't exist anymore in DROPS Glitter, you can choose either silver or gold. Happy knitting!
08.01.2021 - 07:23
![]() Maumau wrote:
Maumau wrote:
Hei! Neulotaanko neuletakin etureunat ja pääntie tosiaan kaksinkertaisella langalla? Vai tarkoitetaanko tässä kaksinkertaisella musta+glitterlanka?
24.11.2020 - 13:22DROPS Design answered:
Hei, etureunat ja pääntien reunus neulotaan mustalla Alpaca-langalla + Glitter-langalla.
12.03.2021 - 13:44
![]() Veronique wrote:
Veronique wrote:
Bonjour, Par quoi remplacer DROPS GLITTER coloris n°09, noir, qui n'existe plus. Merci
01.10.2020 - 13:08DROPS Design answered:
Bonjour Véronique, vous pouvez utiliser le coloris or ou argent au choix, ou ne pas l'utiliser si vous le souhaitez, la tension n'en sera pas affectée. Bon tricot!
01.10.2020 - 14:01
![]() Jane wrote:
Jane wrote:
Det står at det skal glattsrikkes 15 omganger før mønsteret begynner, men når mønsteret begynner skal det glatt stikkes enda 7omg før mønsteret, stemmer dette?
28.08.2020 - 16:49DROPS Design answered:
Hei Jane. Tar utgangspunkt at det gjelder jakken og størrelse XXL.Du har strikket ferdig bolen og ermene, og du skal starte på bærestykket, da skal det strikkes 17 pinner glattstrikk (rett fra retten og vrang fra vrangen), deretter strikkes det etter M.1 (3 pinner). Kan ikke se noe ang 7 pinner eller gjelder spørsmålet ditt strømene? mvh DROPS design
31.08.2020 - 14:58
![]() Donna Marentette wrote:
Donna Marentette wrote:
Sorry, I should have been more specific. The pattern calls for casting on a large number of stitches for the body piece, work in K2/P3 for 2cm, then reduce stitches and work K2/P2. I have never seen that type of decrease before. I'm more used to casting on and working K2/P2 for the entire length of the ribbing. Why the initial extra stitches?
15.07.2020 - 21:41DROPS Design answered:
Dear Mrs Marentette, this is the designer's choice, start with rib K2/P3 for 2 cm then continue in rib K2/P2. Happy knitting!
16.07.2020 - 09:57
![]() Donna Marentette wrote:
Donna Marentette wrote:
Please explain why so many more stitches are cast on for the bottom 3/4 inch of the garment ribbing than are needed for the body of the garment.
12.06.2020 - 04:04DROPS Design answered:
Dear Mrs Marentette, you use smaller needles and are working rib, rib tighten edge, that's the reason why you need more stitches with smaller needles when you work rib than with larger needle in stocking stitch. Happy knitting!
12.06.2020 - 08:06
![]() Inger Holzmann wrote:
Inger Holzmann wrote:
Jeg forstår ikke, at der står modellen strikkes ovenfra og ned?? Så vidt jeg kan læse mig frem til, begynder man for neden.
18.02.2020 - 12:18DROPS Design answered:
Hej Inger du har helt ret, den strikkes nedenfra og op. Tak for info :)
18.02.2020 - 14:30
|
||||||||||
Winter Fantasy |
||||||||||
 |
 |
|||||||||
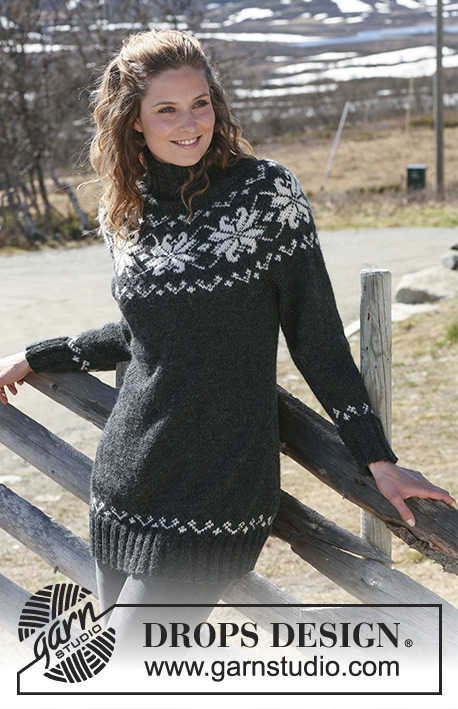
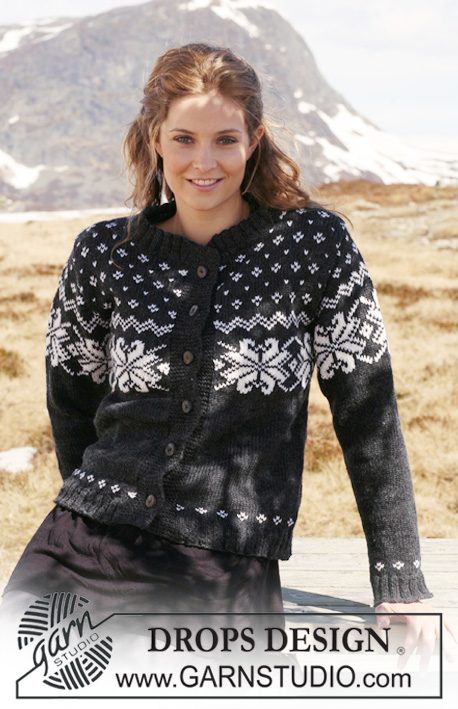
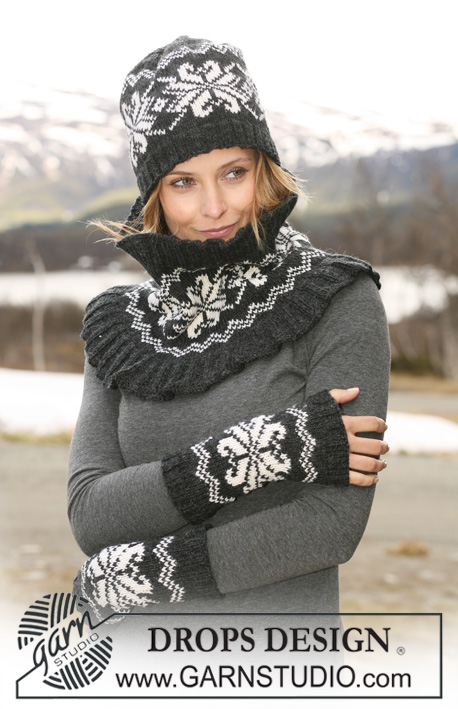
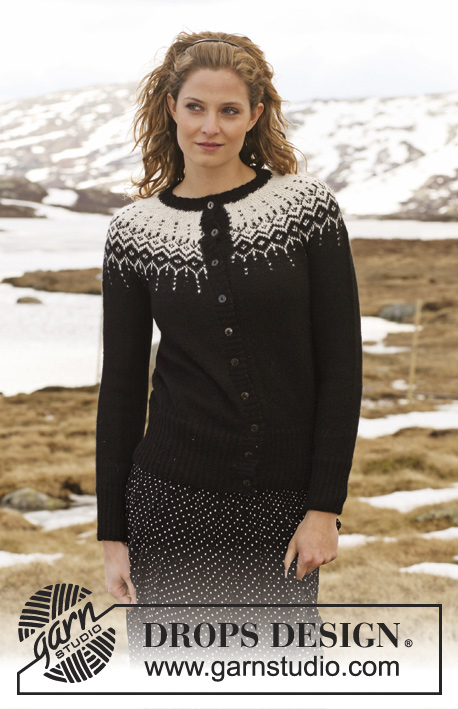
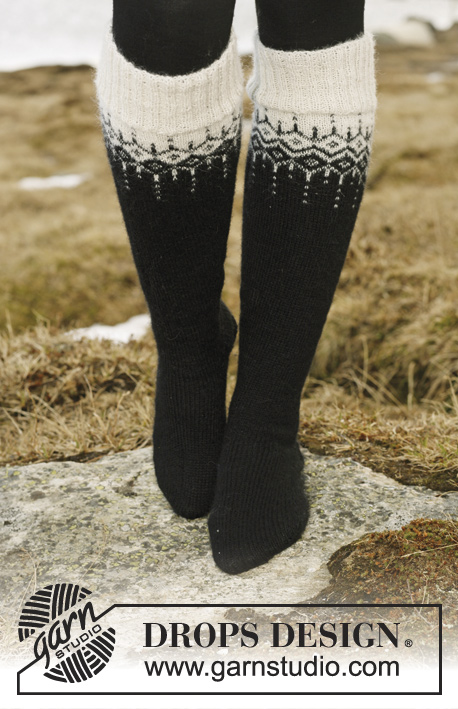
DROPS Jacket in ”Alpaca” and ”Glitter” with 2-colour pattern in round yoke. Size S to XXXL. Long socks in ”Fabel” with the same pattern.
DROPS 116-1 |
||||||||||
|
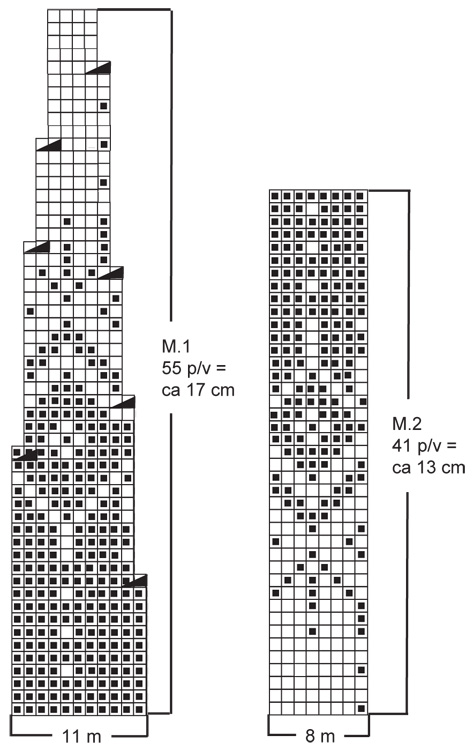
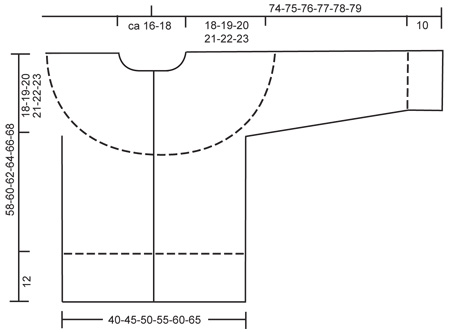
JACKET: PATTERN: See diagram M.1 – diagram is seen from RS and shows 1 pattern repeat. GARTER ST (back and forth on needle): K all rows. ---------------------------------------------------------- BODY PIECE: Worked back and forth on circular needle from mid front. Cast on 314-354-394-434-474-514 sts on circular needle size 2.5 mm with 1 thread black Alpaca + 1 thread Glitter. Work rib as follows (first row = RS): 1 edge st in GARTER ST – see above, * K2 / P3 *, repeat from *-* until 3 sts remain, K2, 1 edge st in GARTER ST. Continue like this until piece measures 2 cm, now dec all P3 to P2 (as seen from RS) = 252-284-316-348-380-412 sts. Continue in rib, K2 / P2, with 1 edge st in garter st each side. When piece measures 12 cm dec all P2 to P1 (as seen from RS) = 190-214-238-262-286-310 sts. Change to circular needle size 3 mm and continue in stocking st. REMEMBER THE KNITTING TENSION! When piece measures 40-41-42-43-44-45 cm work next row as follows from RS: 41-47-54-59-65-71 sts (= front piece), cast off 12 sts for armhole, 84-96-106-120-132-144 sts (= back piece), cast off 12 sts for armhole, 41-47-54-59-65-71 sts (= front piece) = 166-190-214-238-262-286 sts left on needle. Put piece aside and knit the sleeves. SLEEVE: Worked in the round on double pointed needles. Cast on 80-80-80-88-88-88 sts on double pointed needles size 2.5 mm with 1 thread black Alpaca + 1 thread Glitter. Work rib, K2 / P2. When piece measures 10 cm dec all P2 to P1 = 60-60-60-66-66-66 sts. Insert a marker at beg of round. Change to double pointed needles size 3 mm and continue in stocking st. When piece measures 11-11-11-14-14-14 cm inc 1 st each side of marker mid under sleeve, repeat the inc on every 4.5-3.5-2.5-2.5-2-2 cm a total of 8-11-14-13-15-17 times = 76-82-88-92-96-100 sts. When piece measures 48 cm cast off 12 sts mid under sleeve = 64-70-76-80-84-88 sts left on needle. Put piece aside and knit the other sleeve. YOKE: Slip sleeves on the same circular needle size 3 mm as body piece where cast off for armhole = 294-330-366-398-430-462 sts. Work 3-5-9-13-15-17 rows stocking st with black Alpaca + Glitter, AT THE SAME TIME on first row dec 5-8-11-10-9-8 sts evenly = 289-322-355-388-421-454 sts. Now continue in M.1 (first row = RS) with 1 edge st in garter st each side, work the last but 1 st on row like first st in M.1, but without the dec, to make the pattern identical on both front pieces. When all dec are complete there are 107-119-131-143-155-167 sts on needle and piece measures approx 58-60-62-64-66-68 cm. Work 1 row with off-white (from WS), AT THE SAME TIME dec 15-19-23-27-31-35 sts evenly = 92-100-108-116-124-132 sts. Now work shortened rows mid back with off-white as follows: Work 56-60-64-68-72-76 sts, turn, work 20 sts, turn, work 30 sts, turn, work 40 sts. Continue like this with 10 more sts before each turn until you have worked shortened rows on a total of 60-80-80-100-120 sts, turn and work return row and work 1 row on all sts. Slip sts on a stitch holder. LEFT FRONT BAND: Pick up approx 180 to 212 sts (divisible by 4) inside 1 edge st along left front piece with 1 thread black Alpaca + 1 thread Glitter on circular needle size 2.5 mm. Work rib as follows (first row = WS): 1 edge st in garter st, * P2 / K2 *, repeat from *-* and finish with P2 and 1 edge st in garter st. Continue with K over K and P over P until rib measures 3 cm, cast off loosely. RIGHT FRONT BAND: Like left front band, but after 1 cm make 9 buttonholes evenly distributed (make buttonholes in P-sections as seen from RS). 1 BUTTONHOLE = P2 tog and make 1 YO – place the bottom buttonhole in the 2nd P-section and the top one approx 6 cm from neckline (the last buttonhole is made on the neck). NECK: Worked with 1 thread black Alpaca + 1 thread Glitter on circular needle size 2.5 mm as follows: Pick up 8 sts on right front band (inside 1 edge st), work the 92-100-108-116-124-132 sts from stitch holder back on needle and pick up 8 sts on left front band = 108-116-124-132-140-148 sts. P 1 row from WS, AT THE SAME TIME inc 20 sts evenly = 128-136-144-152-160-168 sts. Continue in rib as follows (from RS): 1 edge st in garter st, * K2 / P2 *, repeat from *-* and finish with K2 and 1 edge st in garter st. Continue with K over K and P over P. When neck measures 1 cm make 1 buttonhole in line with the others on front band. When neck measures 3 cm cast off with K over K and P over P. ASSEMBLY: Sew on buttons. Sew openings under sleeves. ---------------------------------------------------------- SOCKS: PATTERN: See diagram M.2 – diagram shows 1 pattern repeat. We knitted the socks without Glitter. DECREASING TIP: Dec as follows before marker: K2 tog. Dec as follows after marker: K2 tog into back of loop. HEEL DECREASES: Row 1 (= RS): Work row until 8-9-9 sts remain, K2 tog into back of loop, turn piece. Row 2 (= WS): Work row until 8-9-9 sts remain, P2 tog, turn piece. Row 3 (= RS): Work row until 7-8-8 sts remain, K2 tog into back of loop, turn piece. Row 4 (= WS): Work row until 7-8-8 sts remain, P2 tog, turn piece. Continue dec like this with 1 less st before each dec until there are 14-14-16 sts on needle. ---------------------------------------------------------- SOCKS: Worked in the round on double pointed needles. Cast on 108-108-116 sts on double pointed needles size 2.5 mm with off-white. Work rib, K2 / P2 for 8 cm. K 1 round, AT THE SAME TIME dec 20 sts evenly = 88-88-96 sts. Continue in M.2. REMEMBER THE KNITTING TENSION! After M.2 piece measures approx 21 cm. Insert a marker at beg of round. Continue in black stocking st, AT THE SAME TIME dec 1 st each side of marker – SEE DECREASING TIP, and repeat the dec on every 4-5-5 round a total of 16-14-16 times = 56-60-64 sts. When piece measures 42-44-46 cm keep the first 28-30-32 sts on needle for heel and slip the remaining 28-30-32 sts on a stitch holder (= mid upper foot). Continue in stocking st back and forth on heel-sts for 5-5.5-6 cm - insert a marker. Now work HEEL DECREASES – see above. After heel dec pick up 13-14-16 sts each side of heel and slip the 28-30-32 sts from stitch holder back on needle = 68-72-80 sts. Insert a marker each side of the 28-30-32 sts on upper foot. Continue in stocking st in the round, AT THE SAME TIME dec each side as follows: K tog into back of loop the last 2 sts BEFORE first marker on upper foot, and K tog the first 2 sts AFTER the second marker on upper foot. Repeat the dec on every other round a total of 8-8-10 times = 52-56-60 sts. Continue until piece measures 18-19-22 cm from marker on heel (= approx 4-5-5 cm remain). Insert a marker each side with 26-28-30 sts on upper foot and 26-28-30 sts under foot. Continue in stocking st AT THE SAME TIME dec for toes each side of both markers as follows: Before marker: K2 tog. After marker: K2 tog into back of loop. Repeat the dec on every other round a total of 4-5-5 times and then on every round 7-7-8 times = 8 sts left on needle. Cut the thread, pull it through remaining sts, tighten and fasten. |
||||||||||
Diagram explanations |
||||||||||
|
||||||||||
 |
||||||||||
 |
||||||||||
Have you finished this pattern?Tag your pictures with #dropspattern or submit them to the #dropsfan gallery. Do you need help with this pattern?You'll find 30 tutorial videos, a Comments/Questions area and more by visiting the pattern on garnstudio.com. © 1982-2026 DROPS Design A/S. We reserve all rights. This document, including all its sub-sections, has copyrights. Read more about what you can do with our patterns at the bottom of each pattern on our site. |
||||||||||


With over 40 years in knitting and crochet design, DROPS Design offers one of the most extensive collections of free patterns on the internet - translated to 17 languages. As of today we count 325 catalogues and 12298 patterns translated into English (UK/cm).
We work hard to bring you the best knitting and crochet have to offer, inspiration and advice as well as great quality yarns at incredible prices! Would you like to use our patterns for other than personal use? You can read what you are allowed to do in the Copyright text at the bottom of all our patterns. Happy crafting!
Post a comment to pattern DROPS 116-1
We would love to hear what you have to say about this pattern!
If you want to leave a question, please make sure you select the correct category in the form below, to speed up the answering process. Required fields are marked *.