
Popular categories
Looking for a yarn?


Comments / Questions (42)
![]() Tineke wrote:
Tineke wrote:
Kunnen de patronen ook a.u.b worden beschreven voor breien op 2 pennen. Ik heb moeite met breien op een rondbreinaald
24.01.2026 - 19:36DROPS Design answered:
Dag Tineke,
Om een patroon aan te passen om op rechte naalden te breien hebben we een instructie gemaakt. Deze vind je hier. Helaas zijn niet alle patronen geschikt om met rechte naalden te breien, zoals patronen met een ronde pas.
25.01.2026 - 10:10
![]() Baussart wrote:
Baussart wrote:
Bonjour, dans ce modèle, pourquoi répartir des diminutions après les cotes lorsqu'on passe aux aiguilles circulaires ?? Et que veut dire 1m lis au point mousse de chaque côté ?? Merci d'avance Cordialement Dore
04.08.2025 - 15:46DROPS Design answered:
Bonjour Dore, il faut plus de mailles pour tricoter des côtes avec les aiguilles 3,5 que pour tricoter le jersey (et les torsades) avec les aiguilles 4,5, raison pour laquelle on va augmenter à la fin des côtes. 1 m lis au point mousse de chaque côté signifie que vous tricotez la 1ère et la dernière maille à l'endroit, tous les rangs, sur l'endroit aussi bien que sur l'envers. Bon tricot!
04.08.2025 - 16:26
![]() Karin wrote:
Karin wrote:
När jag börjar med intagningar på framstycket hur fortsätter jag då med flätorna? Förstår inte hur jag ska räkna då det blir 9 färre maskor. Alla 9 maskor ska tas in på M1 och M2. Så tacksam för svar
29.02.2024 - 18:40DROPS Design answered:
Hej Karin, du tager først de 9 masker ind, når du ikke skal fortsætte med flätorna, lige før du lukker af :)
05.03.2024 - 11:59
![]() Silvia wrote:
Silvia wrote:
Hallo, Ich habe nun einige Zentimeters des Musters gestrickt, die Zöpfe jeweils in der Hinrunde/ungeraden Zeilen, wie im Muster angegeben. Leider erscheint M1 wie geplant auf der Vorderseite (glatt rechts) aber M2 kommt eher auf der Rückseite zum Vorschein. Kann mir jemand sagen, woran das liegt und wie es richtig gehört? Danke.
09.11.2023 - 21:04DROPS Design answered:
Liebe Silvia, die 1. Reihe (sowie alle ungerade Reihen) in beiden Diagramme ist eine HinReihe, so werden die Zöpfe in M.2 (1., 3., 5. ...Reihe) sowie in M.1 (5. Reihe) immer bei einer Hin-Reihe gestrickt. Viel Spaß beim stricken!
10.11.2023 - 09:28
![]() Ruth Kankkonen wrote:
Ruth Kankkonen wrote:
Eikö takapuolen oikeaa hihaa tarvitse pidentää, kun siinähän menee osa päällekäin kun napitetaan?
16.10.2022 - 10:34
![]() Michaela wrote:
Michaela wrote:
Schade, dass Sie keine andere E-Mail-Adresse zur Verfügung stellen - dann müsste man das hier nicht öffentlich "ausfechten". Ich benötige keine Anleitung, wie man Maschen abnimmt! Für mich ist nicht nachvollziehbar, wie die Teile aufeinanderpassen sollen, wenn ich beim Vorderteil nach dem Bündchen 5 Maschen und beim Rückenteil 14 Maschen abketten soll. Aber ich gebe es jetzt auf und suche mir ein anderes Muster.
08.08.2022 - 12:56DROPS Design answered:
Liebe Michaela, damit die Bündchen nicht so eng werden, schlägt man mehr Maschen als man für das glatt rechts braucht, deshalb schlagen Sie 66-74 Maschen (1. + 2. Größe) und nach dem Bündchen 14 M abnimmt (nicht abkettet, dies wird korrigiert), so haben Sie 52-60 M = ca 26-30 cm (siehe Maßskizze). Wenn nach dem Rippenmuster-Rand abgenommen wird, kann man damit vermeiden, dass der Rand deutlich enger wird als das restliche Rumpfteil. Beim Vorderteil stricken Sie dann Zöpfte, und für Zöpfe brauchen Sie auch mehr Maschen als fürs glatt rechts, deshalb ist die Maschenanzahl beim Vorder- und Rückenteil unterschiedlich. Viel Spaß beim stricken!
08.08.2022 - 13:54
![]() Michaela wrote:
Michaela wrote:
Vielen Dank für Ihre Antwort. Allerdings passt sie nicht zu meiner Frage. Laut Anleitung soll die Abnahme der 14 Maschen gleich nach dem Bündchen in der ersten Reihe mit dem Nadelwechsel erfolgen - was mir nicht richtig erscheint: 4 cm Bündchen stricken = 1 re. / 1 li. Zu Rundstricknadel Nr. 4,5, wechseln und 1 R. re. auf rechts stricken – GLEICHZEITIG gleichmässig verteilt 14-14-18 (18-22) M. abk. = 52-60-64 (72-76). 1 R. re. von links stricken und danach glatt weiter stricken.
05.08.2022 - 12:43DROPS Design answered:
Liebe Michaela, oops ja sorry, ich hatte Ihre Frage misverstanden (war schon bei den Schultern...) - am Anfang vom Rückenteil nehmen Sie 14 Maschen regelmäßig verteilt ab - hier wird es erklärt, wie man so abnimmt. viel Spaß beim stricken!
05.08.2022 - 16:18
![]() Michaela wrote:
Michaela wrote:
Für das Rückenteil soll man gleich nach dem Bündchen 14 M abketten - nahezu das Dreifache zum Vorderteil. Wie soll das funktionieren, ohne dass der Pulli viel zu eng wird und die Teile aufeinander passen?
03.08.2022 - 18:15DROPS Design answered:
Liebe Michaela, bei der rechten Schulter/Ärmel Vorderteil haben Sie alle Maschen (Ärmel + Schulter mit Bündchen) gestrickt), bei der rechten Schulter/Ärmel Rückenteil werden zuerst die ersten 37 Maschen für die Ärmel abgekettet, dann über die 14 übrigen Maschen (Knopfleiste) stricken - die passen dann mit den 14 Maschen, die Sie kraus rechts bei der rechten Schulter Vorderteil gestrickt haben. Viel Spaß beim stricken!
04.08.2022 - 08:04
![]() Eugenia K wrote:
Eugenia K wrote:
Hello, dear Drops team. The pattern is lovely but I cannot understand how the increases for the sleeves are done. The pattern says cast on at the beg of each row on sides. Does that mean RS and WS or at the beg and end of each WS row? Also, there is no tutorial on increasing on purl row (WS). Thank you in advance for your quick reply.
07.08.2021 - 09:35DROPS Design answered:
Dear Eugenia K, you have to cast on the new stitches at the end of each row, both from RS and from WS to get both sleeves the same. Increase new stitches on each side as in this video, but increase the new stitches at the end of a row from RS and work them purl at the beg of next row and incraese at the beg of a row from WS and work them knit a the beg of next row (= stocking stitch). Happy knitting!
09.08.2021 - 08:50
![]() Fran wrote:
Fran wrote:
After the k1p1, The pattern says to reduce the number of stitches evenly and then when I go to do the cables, the number of stitches that I need to have far exceeds the stitches that I have left. For example I reduced to 69 stitches but the pattern calls for at least 74+ the pearl stitches between the cables please help
24.06.2021 - 01:51DROPS Design answered:
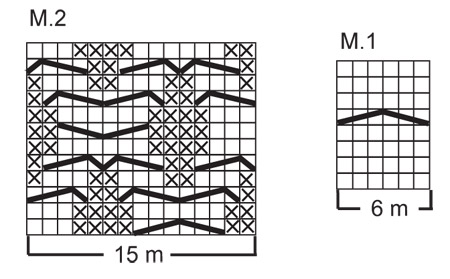
Dear Fan, in the 2nd size work as follows: 1 st in garter st, 16 sts in stocking st, P2, M.1(= 6 sts), P2, M.2 (= 15 sts), P2, M.1 (= 6 sts), P2, 16 sts in stocking st and 1 st in garter st = 1+16+2+6+2+15+2+6+2+16+1=69 sts. Happy knitting!
24.06.2021 - 08:37
|
|||||||||||||||||||
Sweet Snow#sweetsnowsweater |
|||||||||||||||||||
|
|
|||||||||||||||||||
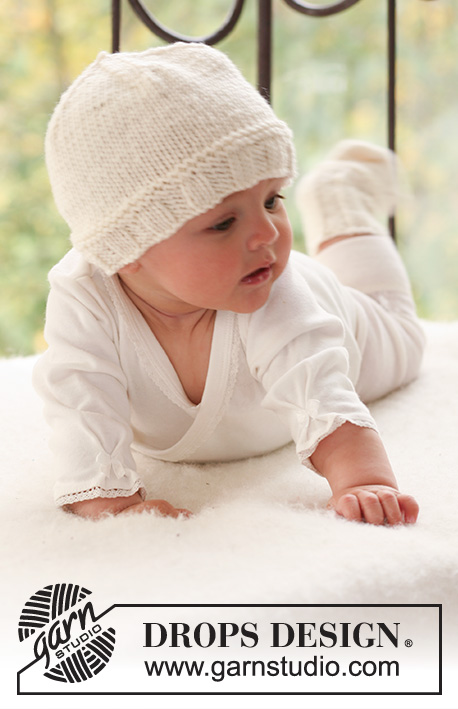
Set of knitted socks and jumper with cables and seamless sleeves, for baby and children in DROPS Merino Extra Fine
DROPS Baby 16-20 |
|||||||||||||||||||
|
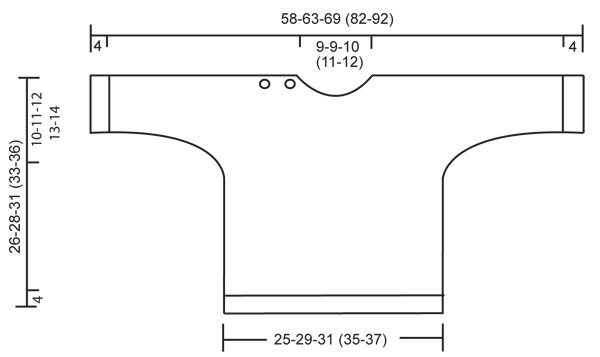
JUMPER: PATTERN: See diagram M.1 and M.2. The diagrams show the pattern from the RS. GARTER ST (back and forth on needle): K all rows. ---------------------------------------------------------- JUMPER: To fit in all sts, front and back pieces are worked back and forth on circular needle (rib worked on pointed needles). FRONT PIECE: Cast on 66-74-82 (90-98) sts (includes 1 edge st each side) on pointed needle size 3.5 mm with Merino Extra Fine. Work rib, K1/P1, with 1 edge st in garter st each side back and forth on needle for 4 cm. Change to circular needle size 4.5 mm, K 1 row from RS, AT THE SAME TIME dec 5-5-9 (9-13) sts evenly = 61-69-73 (81-85) sts. K 1 row from WS and continue as follows from RS: 1 garter st, 12-16-18 (22-24) stocking sts, P2, M.1, P2, M.2, P2, M.1, P2, 12-16-18 (22-24) stocking sts and 1 garter st. Continue back and forth on needle in pattern like this. REMEMBER THE KNITTING TENSION! When piece measures 16-17-19 (20-22) cm cast on new sts each side for sleeves. Cast on at the beg of every row from the sides: 4 sts 2-2-1 (1-1) times, 6 sts 1-1-1 (2-1) times, 8 sts 0-0-1 (1-2) times and 10-11-11 (14-20) sts 1 time = 109-119-131 (157-177) sts. Continue in pattern and stocking st as before with inc sts for sleeves in stocking st. When piece measures approx 22-24-26 (28-31) cm dec as follows on next row from RS: 5 sts evenly on M.2 and 2 sts evenly on each repeat of M.1 = 100-110-122 (148-168) sts. On next row slip the middle 10-10-12 (14-16) sts on a stitch holder for neck and complete each shoulder/sleeve separately. LEFT SHOULDER/SLEEVE: = 45-50-55 (67-76) sts. Continue in stocking st on M.1 with remaining sts as before. AT THE SAME TIME cast off to shape the neckline at the beg of every row from mid front: 2 sts 1 time and 1 st 2 times = 41-46-51 (63-72) sts left on shoulder/sleeve. Cast off when piece measures 26-28-31 (33-36) cm. RIGHT SHOULDER/SLEEVE: = 45-50-55 (67-76) sts. Continue and cast off for neckline as described for left shoulder. When piece measures 24-26-29 (31-34) cm continue in garter st on the 12-13-14 (15-16) sts towards mid front (work remaining sts as before). After 4 rows garter st make 2 buttonholes from RS as follows: K2 tog, 1 YO, K 5-6-7 (8-9), K2 tog, 1 YO, work remaining sts on row. Continue as before until piece measures 26-28-31 (33-36) cm. Cast off. BACK PIECE: Cast on 66-74-82 (90-98) sts (includes 1 edge st each side) on pointed needle size 3.5 mm with Merino Extra Fine. Work rib, K1/P1, with 1 edge st in garter st each side, back and forth on needle for 4 cm. Change to circular needle size 4.5 mm, K 1 row from RS, AT THE SAME TIME dec 14-14-18 (18-22) sts evenly = 52-60-64 (72-76) sts. K 1 row from WS and continue in stocking st with 1 garter st each side. When piece measures 16-17-19 (20-22) cm cast on new sts for sleeves each side as described for front piece = 100-110-122 (148-168) sts. Continue in stocking st on all sts. When piece measures 24-26-29 (31-34) cm cast off the middle 16-16-18 (20-22) sts for neck and complete each shoulder/sleeve separately. LEFT SHOULDER/SLEEVE: = 42-47-52 (64-73) sts. Continue in stocking st, AT THE SAME TIME dec 1 st on next row from neckline = 41-46-51 (63-72) sts left on shoulder/sleeve. Cast off when piece measures 26-28-31 (33-36) cm. RIGHT SHOULDER/SLEEVE: = 42-47-52 (64-73) sts. Continue as described for left shoulder = 41-46-51 (63-72) sts. When piece measures 26-28-31 (33-36) cm cast off the first 29-33-37 (48-56) sts from sleeve edge towards shoulder. Work 1.5 cm stocking st with 1 garter st each side on remaining 12-13-14 (15-16) sts (= buttonhole edge), K 1 row from WS on all sts and cast off from RS. ASSEMBLY: Sew upper arm seams, edge to edge to avoid a chunky seam – on right shoulder sew up to buttonhole edge. CUFFS: Pick up 38-42-46 (50-54) m sts on needle size 3.5 mm along sleeve edge. K 2 rows and continue in rib, K1/P1, with 1 garter st each side. Cast off when rib measures 4 cm. Repeat on the other sleeve. Sew side and under arm seams inside 1 edge st. NECKLINE: Pick up approx 52 to 68 sts from RS round neckline (incl sts on st holder at front) on needle size 3.5 mm and K 5 rows back and forth on needle, cast off. Sew on shoulder buttons. ---------------------------------------------------------- SOCKS: Foot length: 10-11-12 (14-16) cm. HEEL DECREASES: Row 1 (= RS): Work row until 5-5-5 (6-6) sts remain, slip next st as if to K, K1, psso, turn piece, Row 2 (= WS): Work row until 5-5-5 (6-6) sts remain, slip next st as if to P, P1, psso, turn piece, Row 3 ( = RS): Work row until 4-4-4 (5-5) sts remain, slip next st as if to K, K1, psso, turn piece, Row 4 (= WS): Work row until 4-4-4 (5-5) sts remain, slip next st as if to P, P1, psso, turn piece. Continue dec like this with 1 less st between each dec until there are 7-9-9 (9-9) sts on row. DECREASING TIP: Dec as follows before marker: K2 tog. Dec as follows after marker: slip 1 st as if to K, K1, psso. -------------------------------------------------------- Worked in the round on double pointed needles. Cast on 30-30-36 (36-36) sts on double pointed needles size 3 mm with Merino Extra Fine. Work 8-8-9 (9-10) cm rib, K3/P3, and then K 1 round, AT THE SAME TIME dec 2-0-4 (2-0) sts evenly = 28-30-32 (34-36) sts. P 1 round, K 1 round and P 1 round. Now keep the first 15-17-17 (19-19) sts on needle for heel and slip the remaining 13-13-15 (15-17) sts on a stitch holder = upper foot. Work 3-3.5-4 (4-4.5) cm stocking st on heel sts. Insert a marker in piece and now dec for heel – SEE ABOVE. After heel dec pick up 7-8-9 (9-10) sts on each side of heel and slip sts from stitch holder back on needles = 34-38-42 (42-46) sts. Continue in stocking st on all sts, AT THE SAME TIME dec 1 st on each side of the 13-13-15 (15-17) sts on upper foot as follows: K tog the 2 sts before the 13-13-15 (15-17) sts into back of loop and K tog the 2 sts after the 13-13-15 (15-17) sts. Repeat the dec on every other round a total of 4-6-6 (6-6) times = 26-26-30 (30-34) sts. Continue until piece measures approx 8-9-9.5 (11.5-12.5) cm from marker on heel (approx 2-2-2.5 (2.5-3.5) cm remain). Now insert a marker each side with 13-13-15 (15-17) sts on upper foot and 13-13-15 (15-17) sts under foot. Continue in stocking st, AT THE SAME TIME dec 1 st on each side of both markers – SEE DECREASING TIP - on every other round 2-2-3 (3-5) times and then on every round 3-3-3 (3-2) times = 6 sts left. Cut the thread, pull through remaining sts and fasten. Sock measures approx 10-11-12 (14-16) cm. |
|||||||||||||||||||
Diagram explanations |
|||||||||||||||||||
|
|||||||||||||||||||
 |
|||||||||||||||||||
 |
|||||||||||||||||||
Have you finished this pattern?Tag your pictures with #dropspattern #sweetsnowsweater or submit them to the #dropsfan gallery. Do you need help with this pattern?You'll find 19 tutorial videos, a Comments/Questions area and more by visiting the pattern on garnstudio.com. © 1982-2026 DROPS Design A/S. We reserve all rights. This document, including all its sub-sections, has copyrights. Read more about what you can do with our patterns at the bottom of each pattern on our site. |
|||||||||||||||||||


With over 40 years in knitting and crochet design, DROPS Design offers one of the most extensive collections of free patterns on the internet - translated to 17 languages. As of today we count 324 catalogues and 12290 patterns translated into English (UK/cm).
We work hard to bring you the best knitting and crochet have to offer, inspiration and advice as well as great quality yarns at incredible prices! Would you like to use our patterns for other than personal use? You can read what you are allowed to do in the Copyright text at the bottom of all our patterns. Happy crafting!
Post a comment to pattern DROPS Baby 16-20
We would love to hear what you have to say about this pattern!
If you want to leave a question, please make sure you select the correct category in the form below, to speed up the answering process. Required fields are marked *.