
Popular categories
Looking for a yarn?


Comments / Questions (33)
![]() Lois Schultz wrote:
Lois Schultz wrote:
When attaching the sleeve (which has a knitted \"facing\" in reverse stockinette) you work from the right side and take a stitch from the sleeve. What kind of stitch do you use? Following the wool direction (like Kitchener stitch) or simple up and down like sewing with thread? I wish there was a video of this process.
02.03.2022 - 20:44DROPS Design answered:
Dear Mrs Schultz, you can sew the sleeve onto armhole as on this video and then sew the extra rows from WS as for the collar in this video. Happy assembly!
03.03.2022 - 15:13
![]() Maiken Bols wrote:
Maiken Bols wrote:
Hvilken str. er hægterne?
15.12.2020 - 09:21
![]() Rhina wrote:
Rhina wrote:
Hej igen, Altså skal jeg starte ved pilen for den størrelse jeg strikker og så starte ved pilen igen når jeg er ved rygstykket? Hilsen Rhina
20.05.2020 - 19:00DROPS Design answered:
Hej Rhina, ja det stemmer :)
22.05.2020 - 15:09
![]() Rhina Misha Rusbjerg wrote:
Rhina Misha Rusbjerg wrote:
Hej Er ikke helt med på hvad der menes ned det ? M.1. Start ved pilen på diagrammet og strik m over forstk, start tilbage ved pilen og strik m over ryg. Kan I uddybe det? Hilsner Rhina
16.05.2020 - 07:37DROPS Design answered:
Hej Du ser längst ner på diagram M.1 och startar vid pilen för din storlek. Sticka härifrån på framstycket och när du stickat m på framstycket börjar du vid pilen på diagrammet igen och stickar rygstycket. Mvh DROPS Design
19.05.2020 - 11:38
![]() Brit Johannessen Hiis wrote:
Brit Johannessen Hiis wrote:
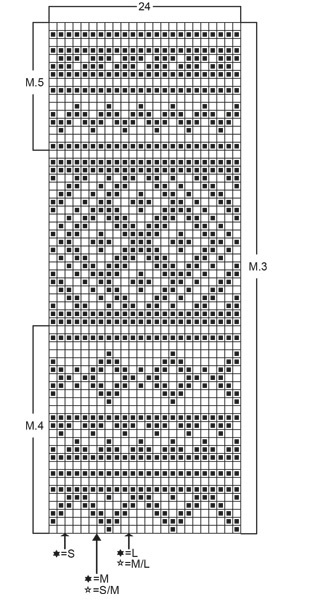
Hei. strikker denne. Etter M2 står det at jeg skal begynne på M4, Dette kan vell ikke medføre riktighet da det etter M2 er tunger som er starten og dette finner jeg igjen på M3. Tenker jeg riktig her? At jeg starter med M3 og fortsetter oppover med M4 ? Takk for svar. Brit Johannessen Hiis
10.02.2020 - 15:26DROPS Design answered:
Hei Brit. På bolen strikkes det M.1, M.2 og M.3, mens på ermene strikkes det M.1, M.2 og deretter M.4 og M.3. På bildet ser man at "krysset" ikke strikkes på ermene. God Fornøyelse!
10.02.2020 - 19:00
![]() Edith Gravel wrote:
Edith Gravel wrote:
Bonjour à toutes et joyeux temps de Fêtes. Ma question: est-ce possible de tricoter en rond avec des aiguilles circulaires de 40 cm même s'il y a du jacquard?
27.12.2019 - 23:22DROPS Design answered:
Bonjour Mme Gravel, sauf si je comprends mal votre question, vous pouvez tout à fait tricoter du jacquard en rond, quelque soit la taille de l'aiguille circulaire. Bon tricot!
02.01.2020 - 12:04Mary Ford wrote:
I have just ordered the wool for this pattern from one of your French Superstores, but please could you tell me where to get the Drops tin clasps, as I can't seem to find them anywhere. Many thanks.
20.01.2018 - 18:07DROPS Design answered:
Dear Mrs Ford, Drops claps are not available anymore, but you should find them in any haberdashery. Happy knitting!
22.01.2018 - 09:18
![]() Davina Scholefield wrote:
Davina Scholefield wrote:
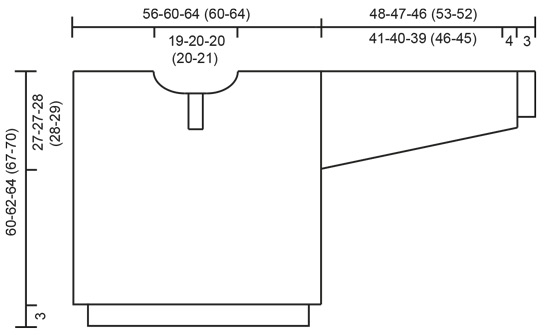
Please can you clarify for me whether the measurement to where you start steels is taken from the purl row or from the start of the work. Also, I am unsure where you do the increase for the steaks, is it 66 stitches from the start of the front so they are in the middle. Thank you in advance for your help. It's a lovely pattern. Davina
14.12.2017 - 10:17DROPS Design answered:
Dear Mrs Cholefield, the steek sts for armholes are cast on on each side when work measures 33-35-36 (39-41) cm, ie where you inserted the markers (124-132-140 (132-140) sts for the front and for the back piece). When piece measures 43-45-47 (50-53) cm, bind off the middle 12 sts on front piece for neck: substract 12 sts to the number of sts on front piece (ex 124 in 1st size) = 112 sts and divide it by 2 (2 sides for front piece) = 56 sts. You will work then 56 sts on front piece, cast off the next 12 sts and work the next 56 sts (+ steek sts for armholes). Happy knitting!
14.12.2017 - 10:49Amanda Williams wrote:
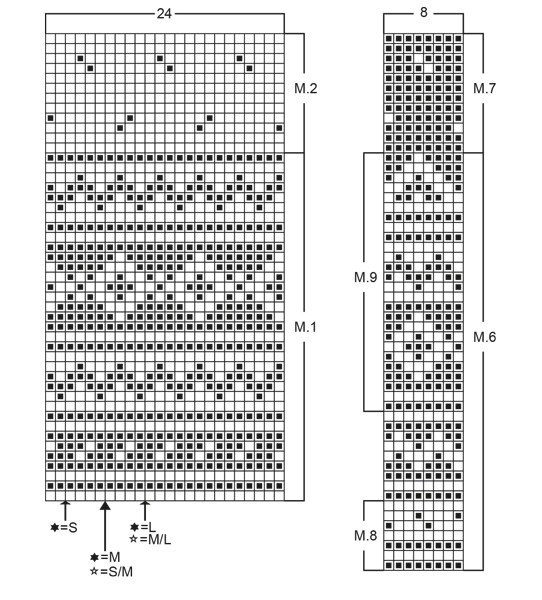
I'm knitting the hat and have had to look at an enlarged picture of the model as I can't see Pattern 8 or 9, just 2 diagrams which have most of the patterns but not in the right order. I can't see the last bit of the pattern nor can I therefore tell where to start the decrease. Any help? Thanks amanda
19.11.2017 - 22:12DROPS Design answered:
Dear Mrs Williams, you will find M.8 and M.9 under "SOCKS" at the right side of the measurement chart, M.8 = 7 rows ans M.9 = 26 rows). Start to decrease after 3.5-4.5 cm (see size) grey after M.9 inserting marker every 8th-6th st and K2 tog after each marker on every 6th round until 14-20 sts remain. Happy knitting!
20.11.2017 - 09:52
![]() Cecilia Annehed wrote:
Cecilia Annehed wrote:
Hej, varför går det inte att skriva ut diagrammet på mönster 52-19? Med vänlig hälsning Cecilia Annehed
21.12.2015 - 09:58DROPS Design answered:
Hej Cecilia, du klickar på "SKRIV UT: MÖNSTER"-KNAPPEN till höger under bilden. Lycka till!
22.12.2015 - 08:15
|
|||||||||||||
DROPS 52-19 |
|||||||||||||
 |
 |
||||||||||||
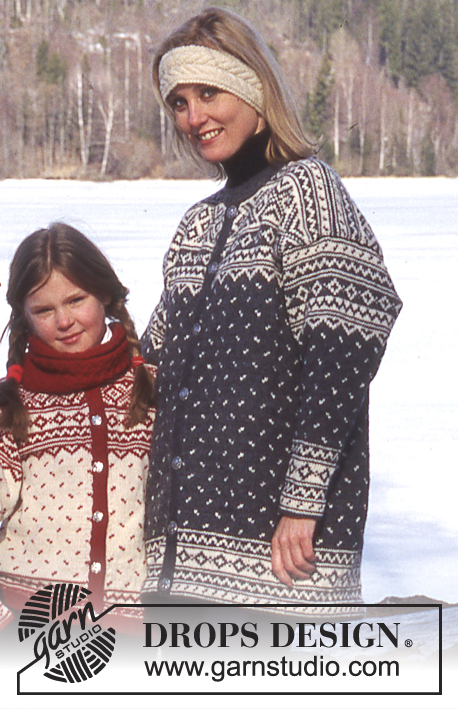
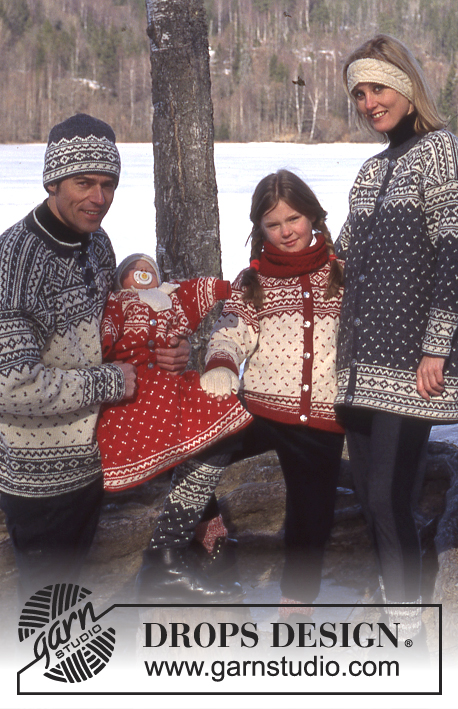
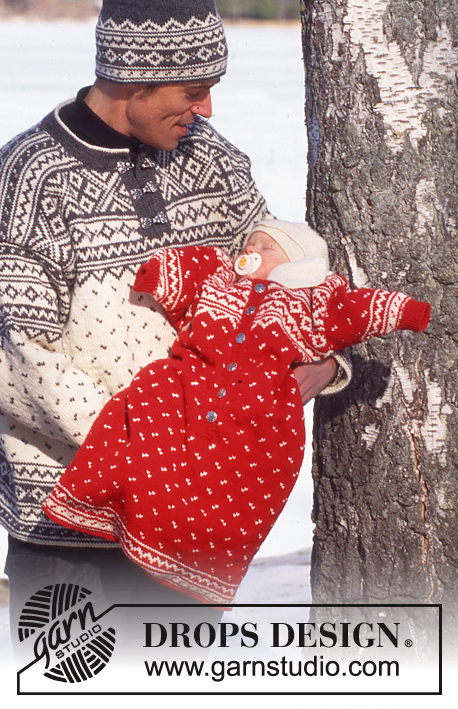
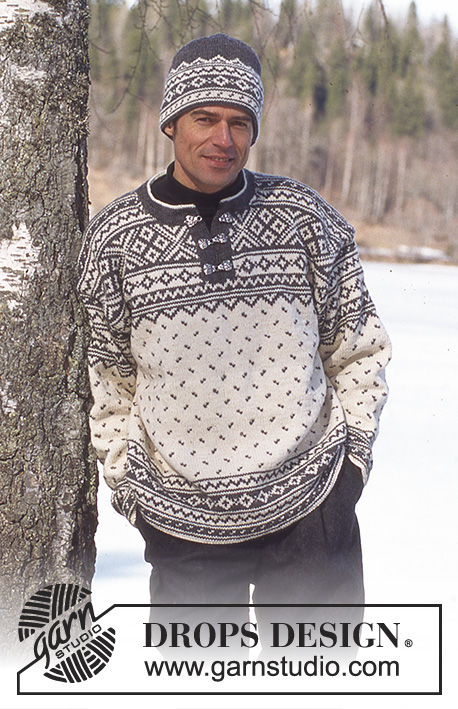
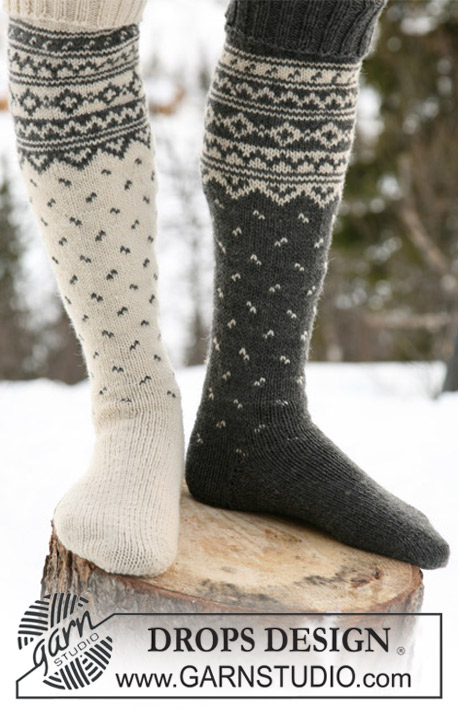
DROPS Sweater for men in Karisma Superwash
DROPS 52-19 |
|||||||||||||
|
Gauge: 22 sts and 30 rows on largest needles in pattern = 10 x 10 cm Pattern: See charts (1 chart = 1 repeat). The pattern is shown from the right side and is knit entirely in stockinette stitch. Arrows indicate the starting points for different sizes. Body: Numbers in ( ) = men's sizes. Knit the sweater in the round and cut steeks for armholes and neck split. Cast on 248-264-280 (264-280) sts with natural white on smaller circular needles; join and place a marker at the join. Knit 3 cm stockinette stitch, purl 1 row (for the folding edge - measure the work from here). Change to larger circular needles and knit Pattern 1 - start at the appropriate arrow on the chart and knit pattern over 124-132-140 (132-140) sts for the front, place a marker, start at the appropriate arrow again and knit pattern over 124-132-140 (132-140) sts for the back. After Pattern 1 knit Pattern 2 - start at the arrow as on Pattern 1. When the work measures 33-35-36 (39-41) cm , inc 5 sts on either side (these sts are for the steeks and are not knitted into the pattern). When the work measures 39-41-43 (46-49) cm - adjust for complete pattern - knit Pattern 3 (start at the appropriate arrow on the chart and knit across the front, start at the arrow again and knit across the back). When the work measures 43-45-47 (50-53) cm, bind off the center 12 sts in the front for split. On the next row cast on 5 new sts over the bound-off sts - these sts are for the steek and are not knitted into the pattern. When the work measures 55-57-59 (62-65) cm, bind off the center front 16-18-18 (18-20) sts + 5 steek sts for the neck and knit the rest back and forth on the needles. Bind off at each neck edge every other row: 3 sts 1 time, 2 sts 1 time, 1 st 2 times. At the same time, when the work measures 58-60-62 (65-68) cm, bind off the center back 38-40-40 (40-42) sts for the neck. Then bind off 2 sts at each back neck edge on the next row. Bind off after Pattern 3. The work measures approximately 60-62-64 (67-70) cm. Sleeves: Cast on 46-48-50 (50-52) sts on mid-size double pointed needles with natural white; join and place a marker at the join. Knit 3 cm stockinette stitch, purl 1 row (for the folding edge - measure the work from here). Change to largest double pointed needles and knit Pattern 1, centering the pattern on the sleeve. At the same time, when the work measures 7 cm inc 1 st each side of marker 37-36-37 (37-38) times: Women's S + M + L and Men's M/L: every 3rd row Men's S/M: alternately every 3rd and 4th row = 120-120-124 (124-128) sts. After Pattern 1 repeat Pattern 2 until the work measures 34-33-32 (39-38) cm - adjust for complete pattern. Then knit Pattern 4 once, then Pattern 5 once. The work measures approximately 48-47-46 (53-52) cm. Then knit 2 cm reverse stockinette stitch with natural white for a seam allowance over the cut edge on the body. Bind off. Assembly: Sew a marker thread in the center of the steek sts on either side and neck split. Sew two machine seams around the marker thread, 1st seam = 1/2 stitch from the marker thread, 2nd seam = 1/2 stitch from first seam. Cut steeks for armholes and split. Sew shoulder seams. Pick up approximately 20-30 sts along the left side of the split on smallest double pointed needles with gray and knit border as follows: 3 cm stockinette stitch, purl 1 row (for the folding edge), 3 cm stockinette stitch. Repeat along the right side of the split. Fold the edges over against the wrong side and sew. Pick up approximately 110-120 sts around the neck and over the placket on smallest double pointed needles with gray and knit border as follows: 3 cm stockinette stitch, change to natural white and knit 1 row stockinette stitch, purl 1 row (for the folding edge), 1 row stockinette stitch, change back to gray and knit 3 cm stockinette stitch. Fold the edge over against the wrong side and sew. Sew the sleeves to the body from the right side as follows: Sew alternately a stitch in the last row on the sleeve before the seam allowance and a stitch on the body after the machine seam. Turn the sweater inside out and sew the seam allowance from the sleeve over the cut edge on the body by hand. Sew on the hooks. SOCKS: Sizes: European shoe sizes 38-41 (41-44) women’s US shoe sizes 7 - 9-1/2 (9-1/2 - 11) men’s US shoe sizes 6 - 8-1/2 (8-1/2 - 10) total length: 58 (65) cm foot length: 23 (26) cm Materials: DROPS KARISMA SUPERWASH from Garnstudio Alternative 1: 250 (300) g col. 16, gray 50 (50) g col. 01, natural white Alternative 2: 250 (300) g col. 01, natural white 50 (50) g col. 16, gray DROPS 3 mm and 3.5 mm double pointed needles, or sizes needed to obtain correct gauge. Gauge: 22 sts and 30 rows on larger needles in stockinette stitch = 10 x 10 cm Pattern: See chart (1 chart = 1 repeat). The pattern is shown from the right side and is knit entirely in stockinette stitch. The chart is identical for all sizes. The chart includes Patterns 6, 7, 8 & 9 -- only Patterns 6 and 7 are used for the socks. Rib: * knit 2, purl 2 *, repeat from * - *. Socks: Color alternatives are in ( ). Cast on 72 (80) sts on smaller double pointed needles with gray (natural white); join and place a marker at the join (this is the center back). Knit 14 (16) cm rib. Change to larger double pointed needles and knit 2 rows stockinette stitch. Knit Pattern 6 once, then repeat Pattern 7. When the work measures 30 (32) cm begin shaping the leg. Dec 1 st on each side of the marker at the center back (before the marker: knit 1, slip 1, pass the slipped st over (psso); and after the marker: K 2 tog) every 5th (4th) row 12 (14) times = 48 (52) sts. When the work measures 50 (56) cm , put the center 24 (26) sts in front on a stitch holder and knit the rest with gray (natural white). Then knit 5 (6) cm stockinette stitch (for the heel) over the 24 (26) center sts in the back, and then turn the heel: 1st row (right side): Knit until 8 (9) sts remain on the needle, slip 1, knit 1, psso. Turn the work. 2nd row (wrong side): Purl until 8 (9) sts remain on the needle, slip 1, purl 1, psso. Turn the work. 3rd row (right side): Knit until 7 (8) sts remain on the needle, slip 1, knit 1, psso. Turn the work. 4th row (wrong side): Purl until 7 (8) sts remain on the needle, slip 1, purl 1, psso. Turn the work. 5th row (right side): Knit until 6 (7) sts remain on the needle, slip 1, knit 1, psso. Turn the work. 6th row (wrong side): Purl until 6 (7) sts remain on the needle, slip 1, purl 1, psso. Turn the work. 7th row (right side): Knit until 5 (6) sts remain on the needle, slip 1, knit 1, psso 1. Turn the work. 8th row (wrong side): Purl until 5 (6) sts remain on the needle, slip 1, purl 1, psso. Turn the work. Continue in this manner, working 1 less stitch before decreasing every other row, until 12 (14) sts remain. Then pick up 12 (13) sts on either side of the heel and distribute all sts evenly on 4 needles = 60 (66) sts. Put a marker on either side of the uppermost 24 (26) sts. Dec 1 st before the marker before the 24 (26) sts and 1 st after the marker after the 24 (26) sts every other row 6 times in all = 48 (54) sts. Make the decreases as follows: Before the marker: K 2 tog. After the marker: slip 1, knit 1 st, psso. Knit until the foot measures approximately 19 (21.5) cm. Put a marker on either side of the foot and bind off for the toe on either side of the marker as follows: K 2 tog before the marker and K 2 tog after the marker, repeat 3 times every other row = 36 (42) sts, then 7 (9) times on every row = 8 (6) sts. Pull together remaining sts and fasten well. HAT: Size: Women's (Men's) Circumference: 51 (55) cm Materials: DROPS KARISMA SUPERWASH from Garnstudio 100 (100) g col. 16, gray 50 (50) g col. 01, natural white DROPS 3 mm and 3.5 mm double pointed needles, or sizes needed to obtain correct gauge. Gauge: 22 sts and 30 rows on larger needles in stockinette stitch = 10 x 10 cm Pattern: See chart (1 chart = 1 repeat). The pattern is shown from the right side and is knit entirely in stockinette stitch. The chart is identical for all sizes. The chart includes Patterns 6, 7, 8 & 9 -- only Patterns 8 and 9 are used for the hat. Hat: Cast on 112 (120) sts on smaller double pointed needles with gray; join and place a marker at the join. Knit 33 rows stockinette stitch, purl 1 row (for the folding edge - measure the work from here). Change to larger double pointed needles and knit Pattern 8 and then Pattern 9. After Pattern 9 knit stockinette stitch in gray for 3.5 (4.5) cm , then attach a marker after every 8th (6th) st. On the next row, after each marker K 2 tog. Repeat this decrease every 6th row until 14 (20) sts remain. On the next row, * K 2 tog * across row. Then pull a double strand through the remaining sts and sew it in. Fold the edge over against the wrong side and sew. |
|||||||||||||
Diagram explanations |
|||||||||||||
|
|||||||||||||
 |
|||||||||||||
 |
|||||||||||||
 |
|||||||||||||
Have you finished this pattern?Tag your pictures with #dropspattern or submit them to the #dropsfan gallery. Do you need help with this pattern?You'll find 28 tutorial videos, a Comments/Questions area and more by visiting the pattern on garnstudio.com. © 1982-2026 DROPS Design A/S. We reserve all rights. This document, including all its sub-sections, has copyrights. Read more about what you can do with our patterns at the bottom of each pattern on our site. |
|||||||||||||


With over 40 years in knitting and crochet design, DROPS Design offers one of the most extensive collections of free patterns on the internet - translated to 17 languages. As of today we count 325 catalogues and 12298 patterns translated into English (UK/cm).
We work hard to bring you the best knitting and crochet have to offer, inspiration and advice as well as great quality yarns at incredible prices! Would you like to use our patterns for other than personal use? You can read what you are allowed to do in the Copyright text at the bottom of all our patterns. Happy crafting!
Post a comment to pattern DROPS 52-19
We would love to hear what you have to say about this pattern!
If you want to leave a question, please make sure you select the correct category in the form below, to speed up the answering process. Required fields are marked *.