
Popular categories
Looking for a yarn?


|
||||||||||
DROPS 52-21 |
||||||||||
 |
 |
|||||||||
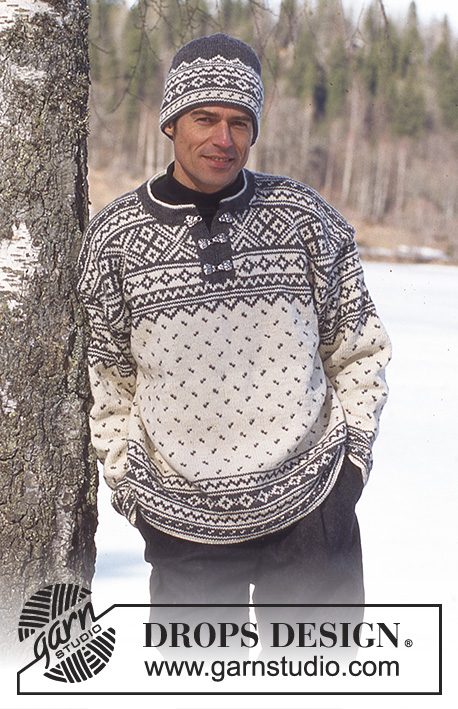
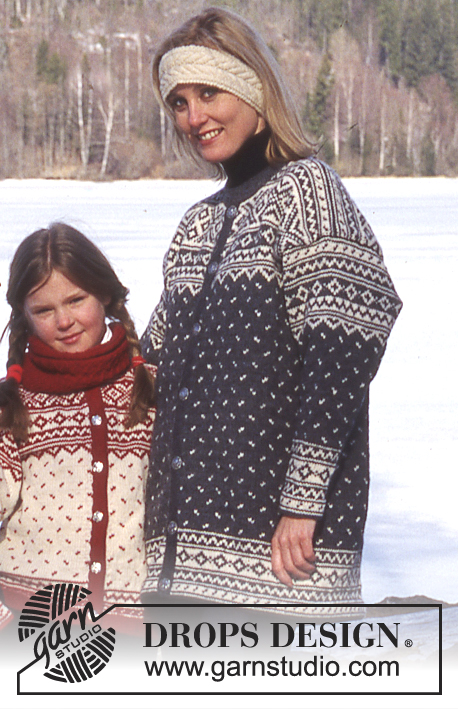
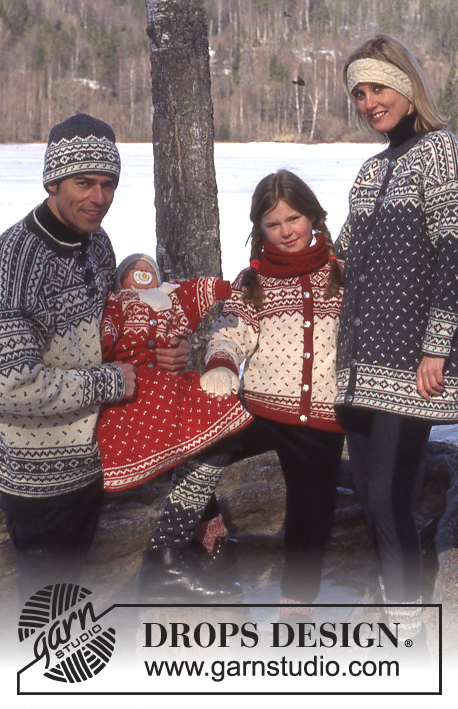
DROPS Child’s cardigan in Karisma Superwash
DROPS 52-21 |
||||||||||
|
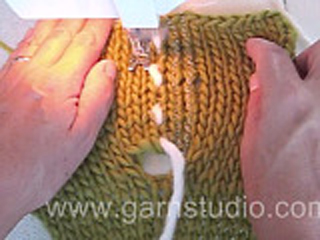
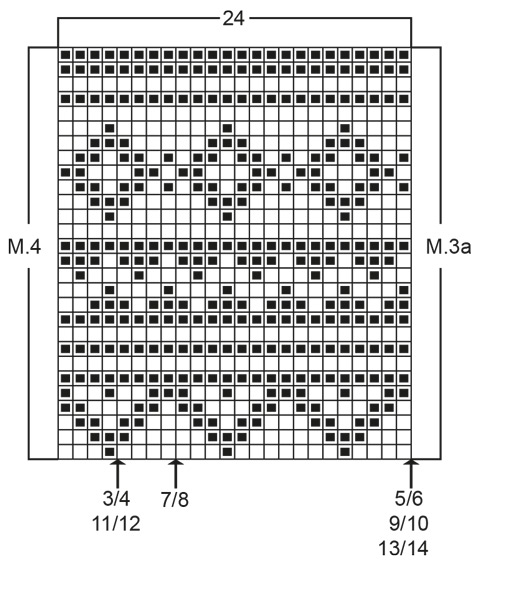
Gauge: 22 sts and 30 rows on 3.5 mm double pointed needles in stockinette stitch = 10 x 10 cm Pattern: See charts (1 chart = 1 repeat). The pattern is shown from the right side and is knit entirely in stockinette stitch. All charts have arrows indicating the starting points for different sizes. Border: Knit 3 cm stockinette stitch, purl 1 row (for the folding edge), 3 cm stockinette stitch. Body: Knit the cardigan in the round after the border and cut steeks for armholes and at the center front. Cast on 179-195-211 (219-227-243) sts (including 2 edge sts) on 3,5 circular needles with wine red and knit 2-2-3 (3-3-3) cm stockinette stitch back and forth on the needles, purl 1 row (for the folding edge - measure the work from here), 2-2-3 (3-3-3) cm stockinette stitch. Cast on 3 sts at the center front - these sts + edge sts (= 5 sts) are for the center front steek and are not knitted into the pattern. Join and start Pattern 1 at the appropriate arrow on the chart after the 5 steek sts at the center front. After Pattern 1 repeat Pattern 2 (start at the appropriate arrow on the chart after the 5 center front steek sts) until the work measures approximately 25-28-33 (35-37-40) cm - adjust for complete pattern (approximately 20 cm of the work remains). Then repeat Pattern 3 to finished dimensions (start at the appropriate arrow on the chart after the 5 steek sts at the center front). At the same time (for some sizes this will be while knitting Pattern 2, for others Pattern 3!), when the work measures 26-28-31 (32-33-36) cm, knit the next row as follows: 5 steek sts, 44-48-52 (54-56-60) sts for the front, inc 4 sts (for the armhole steek, not knitted into the pattern), 89-97-105 (109-113-121) sts for the back, inc 4 sts (armhole steek), 44-48-52 (54-56-60) sts for the front. When the work measures 41-44-48 (50-52-55) cm , bind off the center 18-18-20 (20-22-22) sts + 5 steek sts for the neck. Then bind off at each neck edge every other row: 3 sts 1 time, 2 sts 2 times, 1 st 1 time. At the same time, when the work measures 43-46-51 (53-55-58) cm , bind off the center back 31-31-33 (33-35-35) sts for the neck. Then bind off 2 sts at each back neck edge on the next row. Bind off after Pattern 3 is complete, the work measures approximately 45-48-53 (55-57-60) cm [17.75" - 18-7/8" - 20-7/8" (21-5/8" - 22.5" - 23-5/8")}. Sleeves: Cast on 40-42-46 (46-48-50) sts on 3,5 mm double pointed needles with wine red; join and place a marker at the join. Knit 2-2-3 (3-3-3) cm stockinette, purl 1 row (for the folding edge - measure the work from here), 2-2-3 (3-3-3) cm stockinette stitch, increasing 4-6-6 (6-8-6) sts evenly distributed on the last row = 44-48-52 (52-56-56) sts. Knit Pattern 1. After the border, inc 1 st each side of marker: 20-20-23 (25-25-25) times: Size 3/4 years: alternately every 2nd and 3rd row Sizes 5/6 + 7/8 + 9/10 years: every 3rd row Sizes 11/12 + 13/14 years: alternately every 3rd and 4th row = 84-88-98 (102-106-106) sts. After Pattern 1 repeat Pattern 2 until the work measures approximately 15-18-22 (25-29-31) cm - adjust for complete pattern. Then knit Pattern 4 to finished dimensions. When the work measures 21-24-28 (31-35-37) cm, put 2 sts each side of marker on a stitch holder. Continue to knit back and forth on needle and at the same time put sts on a stitch holder on either side for sleeve caps every other row: 6-7-7 (8-8-8) sts 4 times. The work now measures approximately 24-27-31 (34-38-40) cm. Put all sts back on the same needles again and knit in the round over all sts as follows: 2 cm reverse stockinette stitch with wine red for a seam allowance over the cut edge on the body, bind off. Assembly: Sew a marker thread in the center of the steek sts on either side and at center front. Sew two machine seams around the marker thread, 1st seam = 1/2 stitch from the marker thread, 2nd seam = 1/2 stitch from first seam. Cut steeks for armholes and at the center front. Sew shoulder seams. Pick up approximately 84-90-100 (104-108-114) sts along the left front on 3.5 mm circular needle with wine red and knit border (see instructions above), bind off. Fold the edges over the cutting edge and sew. Repeat along the right front, but after 1 cm make 5-6-6 (6-6-7) buttonholes evenly distributed on the row (1 buttonhole = bind off 2 sts and cast on 2 new sts over the bound-off sts on the next row). Remember to make corresponding buttonholes on the folding edge. Pick up approximately 88-110 sts around the neck on smaller circular needles with wine red and knit border as follows: 3 cm stockinette stitch, change to natural and knit 1 row stockinette stitch, purl 1 row (for the folding edge), change back to wine red and knit 3 cm stockinette stitch, bind off. Fold the edge over against the wrong side and sew. Sew the sleeves to the body from the right side as follows: Sew alternately a stitch in the last row on the sleeve before the seam allowance and a stitch on the body after the machine seam. Turn the sweater inside out and sew the seam allowance from the sleeve over the cut edge on the body by hand. Fold all edges over against the wrong side and sew. Sew on the buttons. Socks: See pattern under Model No. 22. |
||||||||||
Diagram explanations |
||||||||||
|
||||||||||

|
||||||||||

|
||||||||||
|
||||||||||

|
||||||||||
|
Have you made this or any other of our designs? Tag your pictures in social media with #dropsdesign so we can see them! Do you need help with this pattern?You'll find tutorial videos, a Comments/Questions area and more by visiting the pattern on garnstudio.com. © 1982-2024 DROPS Design A/S. We reserve all rights. This document, including all its sub-sections, has copyrights. Read more about what you can do with our patterns at the bottom of each pattern on our site. |
||||||||||


With over 40 years in knitting and crochet design, DROPS Design offers one of the most extensive collections of free patterns on the internet - translated to 17 languages. As of today we count 304 catalogues and 11422 patterns - 11422 of which are translated into English (UK/cm).
We work hard to bring you the best knitting and crochet have to offer, inspiration and advice as well as great quality yarns at incredible prices! Would you like to use our patterns for other than personal use? You can read what you are allowed to do in the Copyright text at the bottom of all our patterns. Happy crafting!
Comments / Questions (8)
Sorry for not explaining. I am asking about the cast off at 41cm when casting off for the neck, do you cast off 9 stitches , then the 5 stitch steek and then another 9 stitches. Then knit back and forth. Hope this helps.
16.08.2022 - 17:12DROPS Design answered:
Dear Mrs Campbell, thanks for your answer, yes correct, you will bind off for the neckline on mid front the 9 sts before the 5 steek sts + the 5 steek sts + the 9 sts after the steek sts and continue now back and forth casting of at the beginning of each row on each side: 3 sts 1 time, 2 sts 2 times and 1 st 1 time. Happy knitting!
16.08.2022 - 17:15Do you bind off 9 stitches each side of the steel and then do you knit back and forth - not in the round any more.
16.08.2022 - 13:18DROPS Design answered:
Dear Mrs Campbell, which 9 titches are you talking about? Can you tell us more, I'm not sure to see which part of the pattern this refers to. Thanks for your comprehension.
16.08.2022 - 17:05When knitting pattern 3 for the body, do you complete 28 rows of M3(1)and then go straight on to M3(2) - 33 rows - pattern 3 total 61 rows. Also what does it mean to repeat to finished dimensions? I’m knitting the smallest size. Also in the sleeves it says to do pattern 4 - is that the same as M3(1)? Many thanks Jane
10.08.2022 - 17:25DROPS Design answered:
Dear Mrs Campbell, correct, when working Pattern 3 you should first work M.3 (1) then M.3(2) - after you have worked these 61 rows, you should have reached the finished measurements and you cast off all stitches. Happy knitting!
11.08.2022 - 10:33Bonjour Pouvez-vous me dire les quantités de laine nécessaires pour réaliser ce modèle dans les différentes tailles s’il vous plaît ? Je ne les ai pas trouvées . Merci beaucoup
13.10.2021 - 17:08DROPS Design answered:
Bonjour Mme Detain, ils sont au debut, sous le titre du modele. Par exemple: pour la premiere taille 3/4 ans vous aurez besoin de 300 g (6 pelotes) couleur 01 naturel et 250 g (5 pelotes) couleur 48 rouge vin. La laine utilise est DROPS Karisma. Bon tricot!
14.10.2021 - 08:45Hei, en saa mallipiirroksia auki tietokoneella. mikä neuvoksi?
28.08.2019 - 17:56DROPS Design answered:
Hei, nyt piirrokset aukeavat taas!
28.08.2019 - 18:16Emma Sorensen wrote:
I opskriften står at man skal bruge p 3 og 3,5. Så vidt jeg kan se er hele opskriften med p 3,5. Skal ombukningskanten måske strikkes på p 3?
07.01.2016 - 00:50DROPS Design answered:
Hej. Det var fel i oppskriften, pinne 3 ska inte brukes. Detta är nu rättat, tack för info!
13.01.2016 - 13:50Hei. Hvilket størrelse er det på knappene i cm?
29.09.2015 - 23:58DROPS Design answered:
Hej, Knapperne er ca 15 mm. God fornøjelse!
01.10.2015 - 16:30Hej, jag är lite osäker på hur man läser diagrammen. Om jag ska sticka diagram M3 i storlek 3/4, då börjar jag inte i höger hörn som jag brukar, utan vid pilen för storlek 3/4. Sen går jag varvet runt så hela rapporten på 24 maskor stickas...? Är det rätt tänkt?
27.03.2014 - 19:23DROPS Design answered:
Hej Yanella. Ja, det er korrekt. Du starter ved pilen, strikker diagrammet ud, og herfra starter du i höjre hjörne som normalt (högr hörn) og strikker diagrammet helt ud osv. God fornöjelse med den.
28.03.2014 - 10:39