DROPS Children 49 · Lots of new kid designs!
Product image DROPS Daisy yarn
DROPS Daisy
100% Wool
from 3.50 £ /50g
Get the yarn to make this pattern from 35.00£.

The yarn cost is calculated from the pattern’s smallest size and the yarn’s cheapest product type. Looking for an even better price? You might find it on the DROPS Deals!

DROPS AW2425

Under the Oak Cardigan

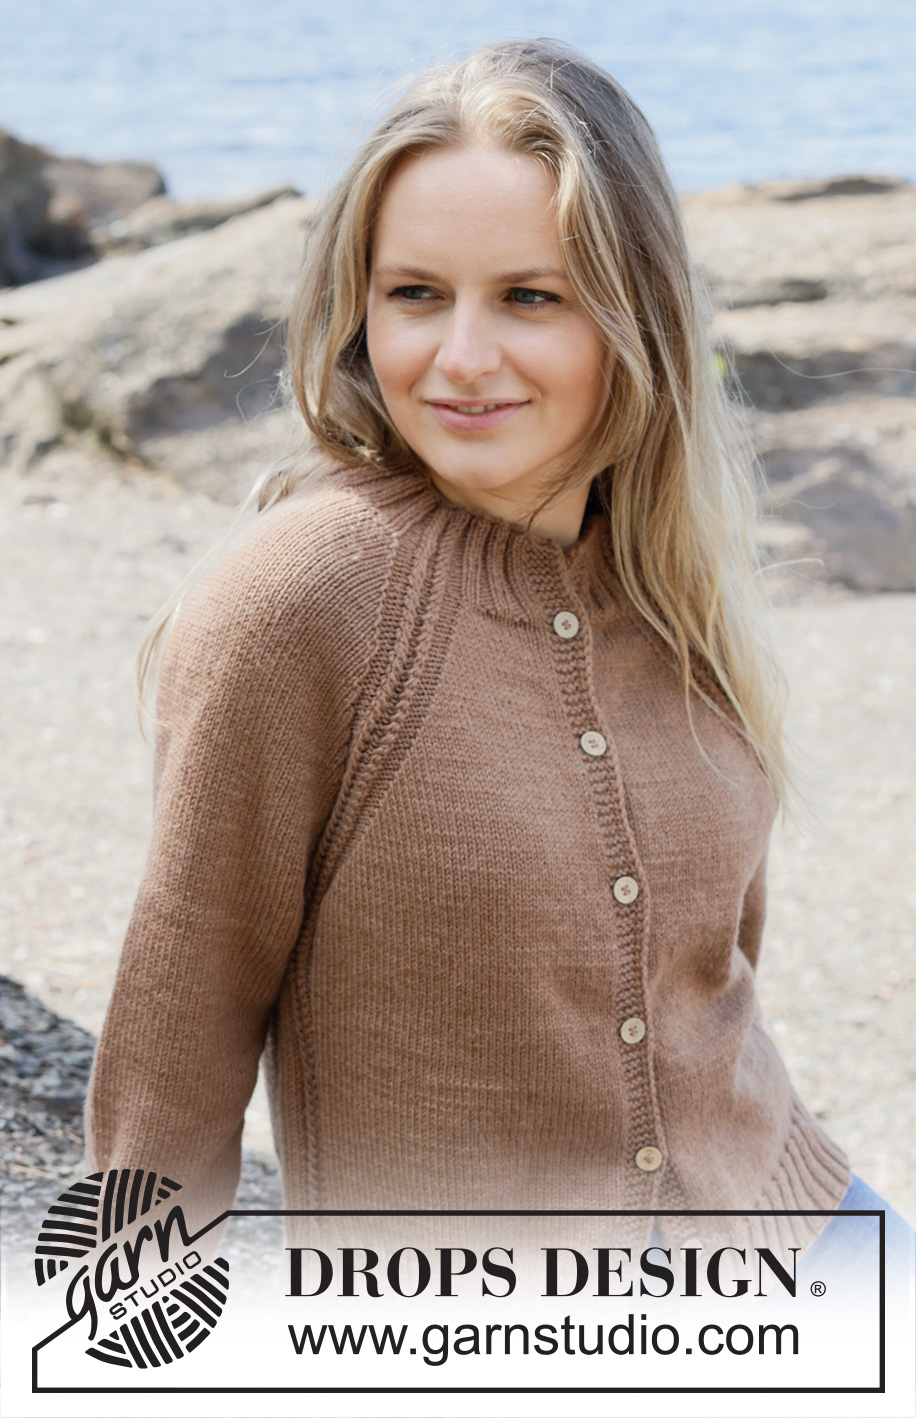
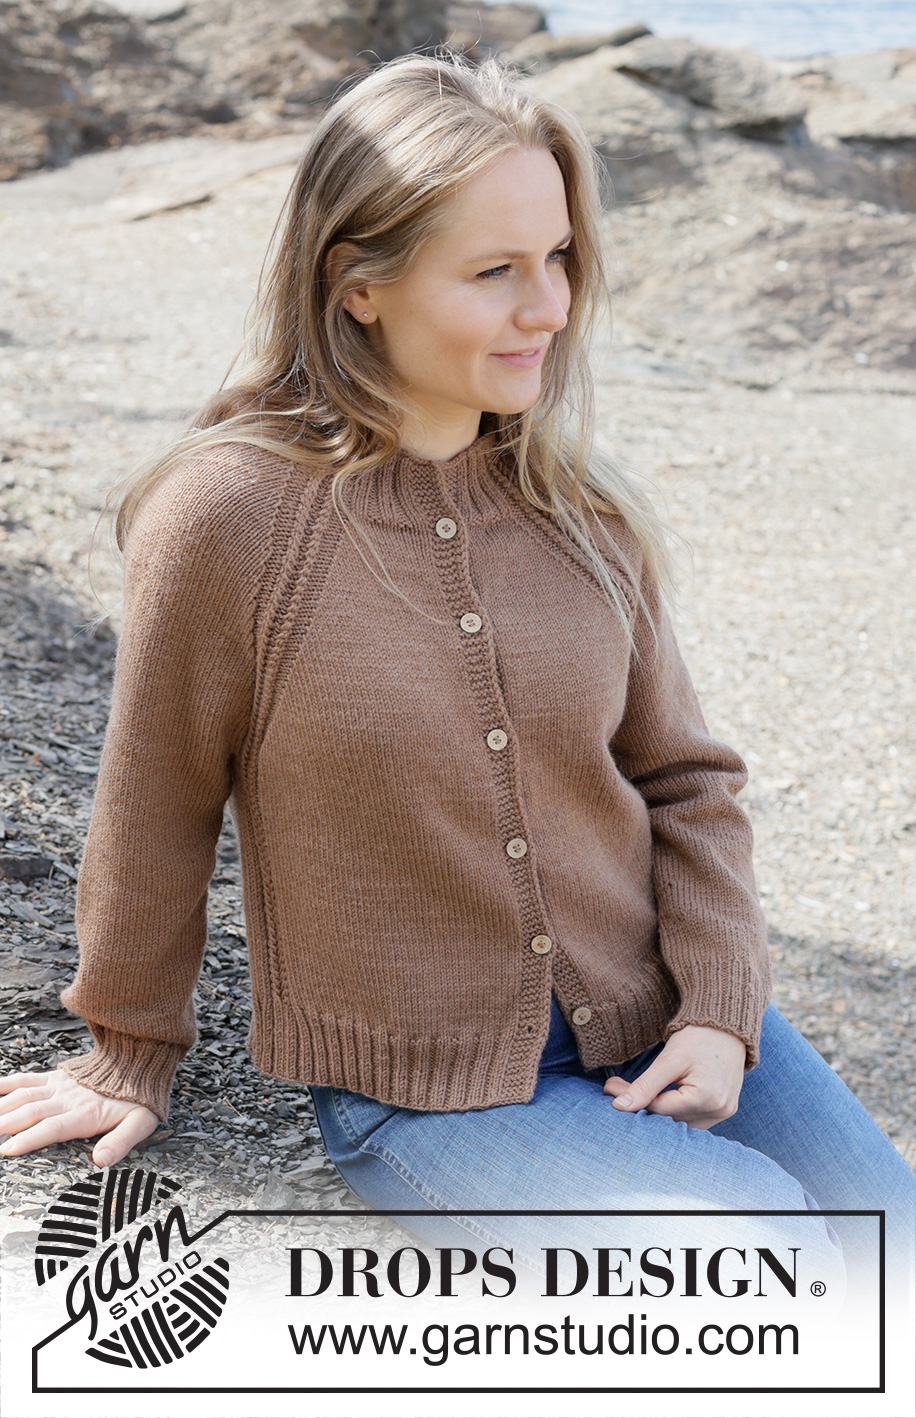
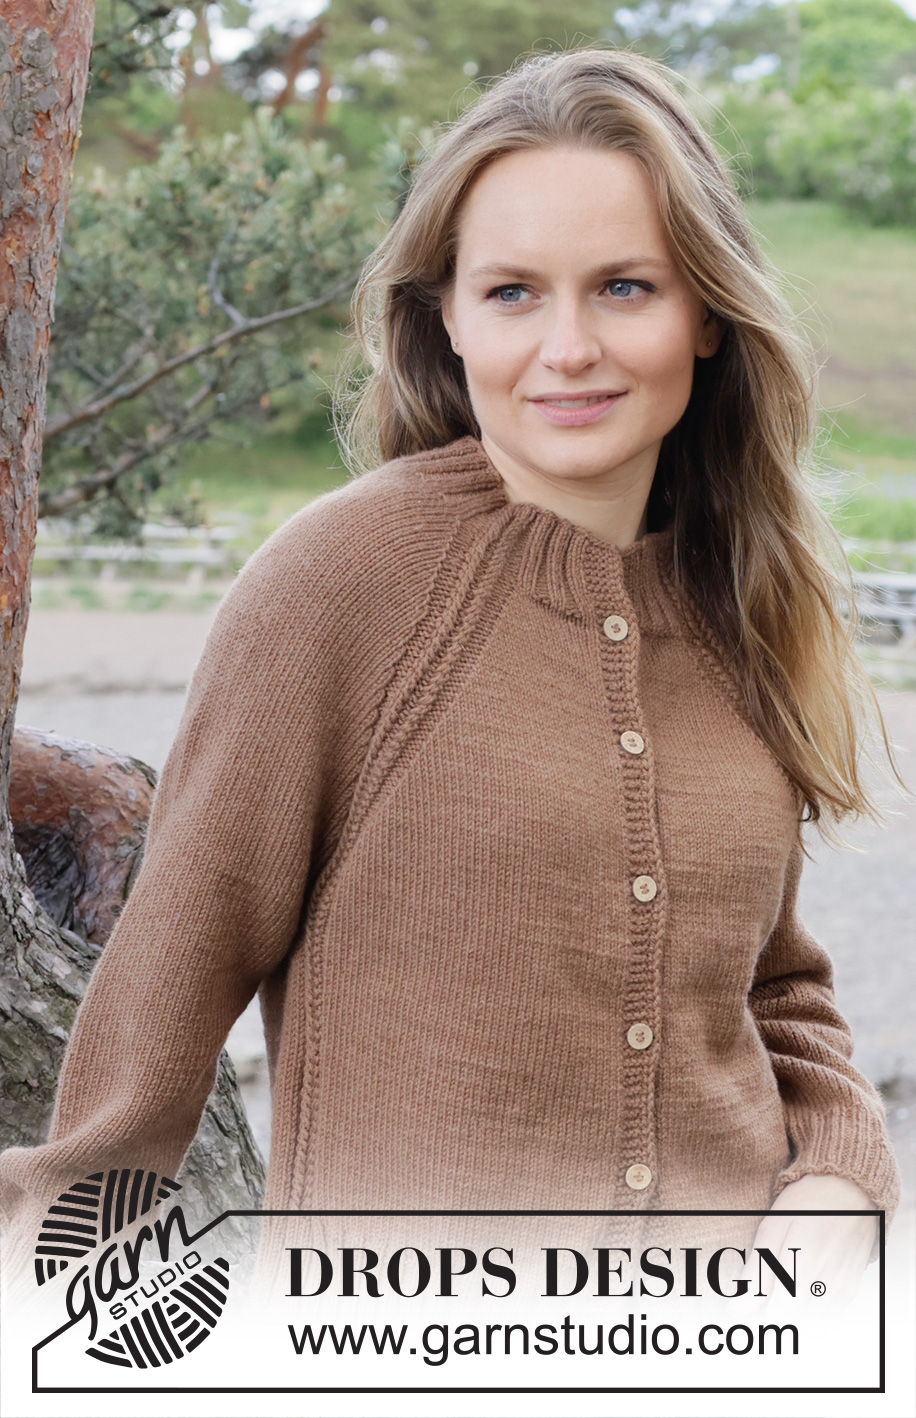
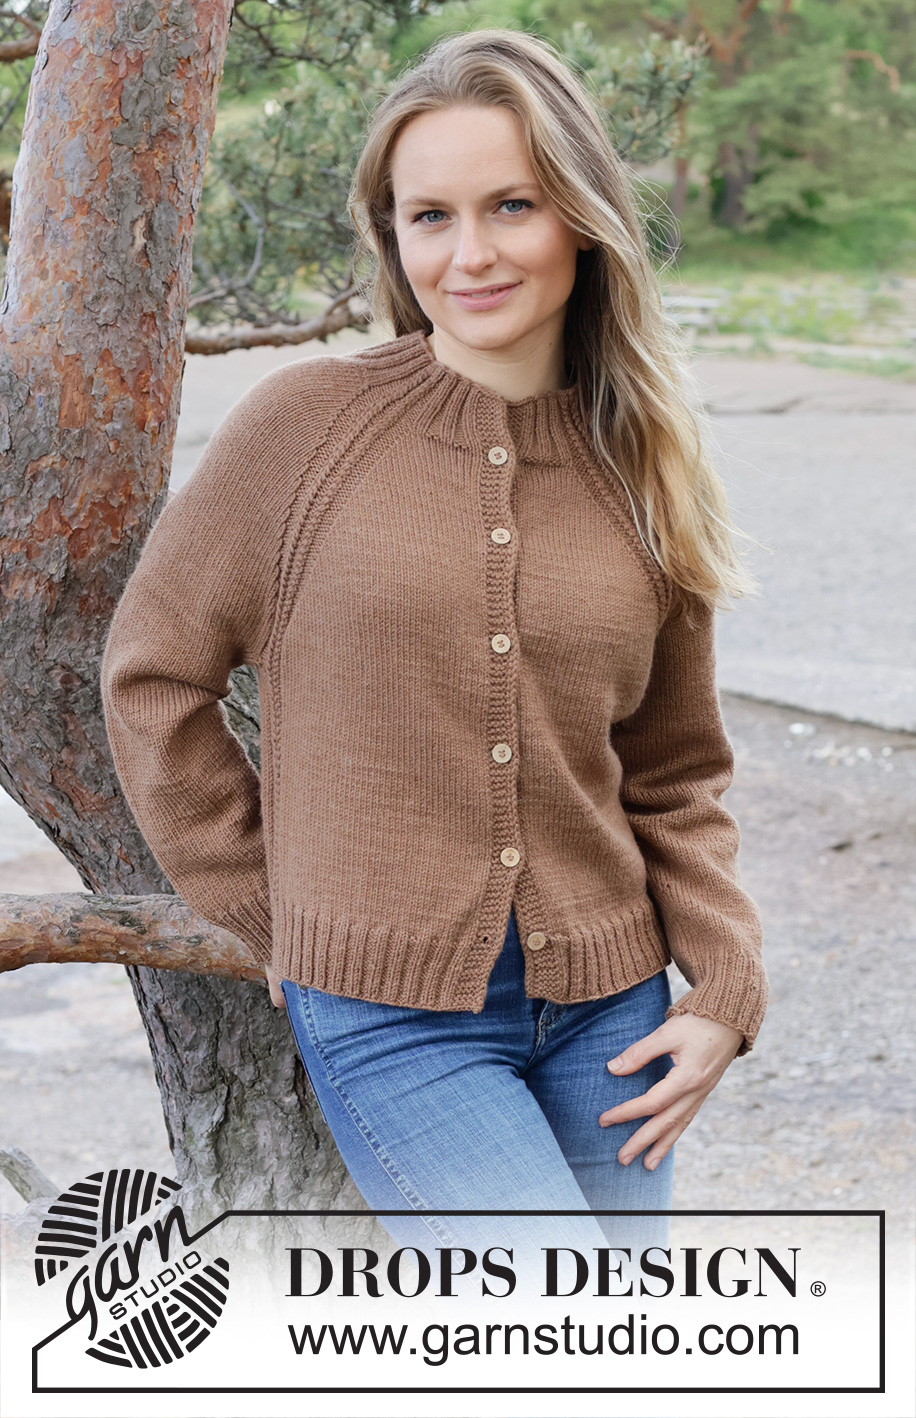
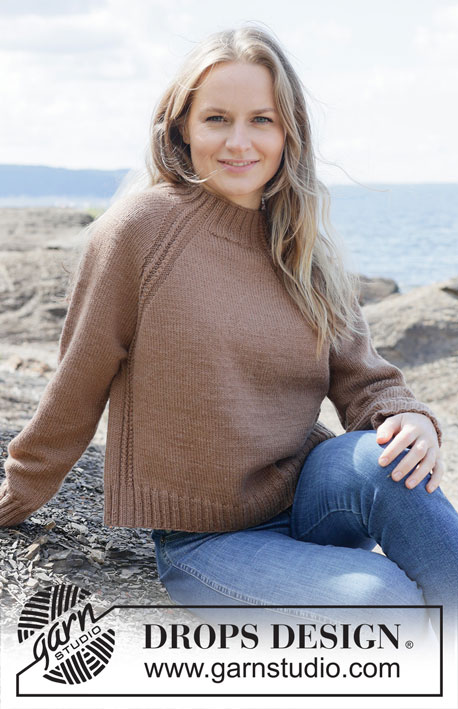
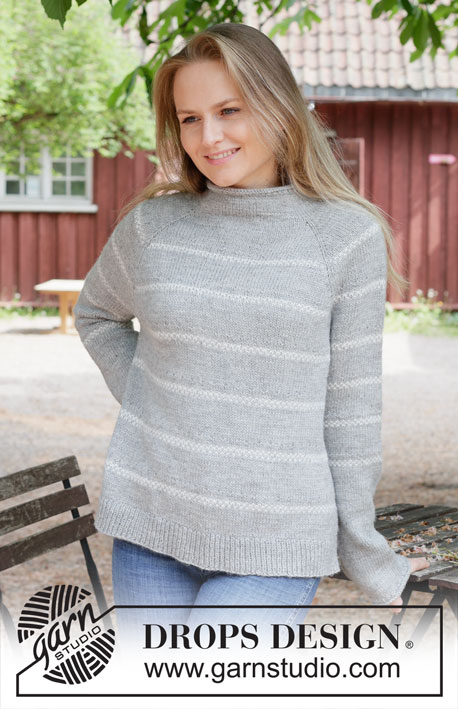
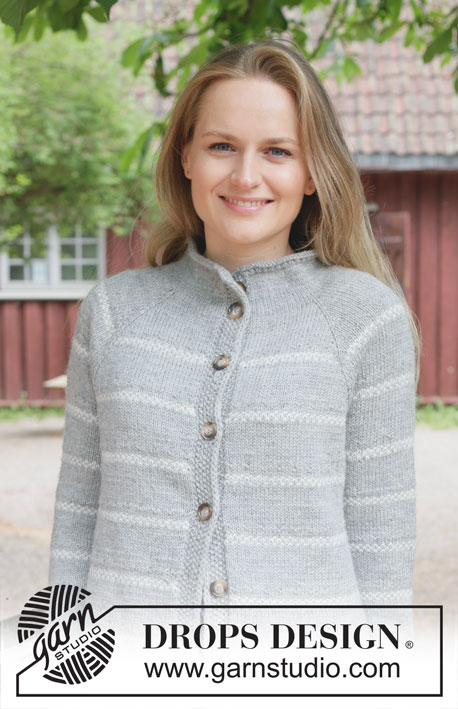
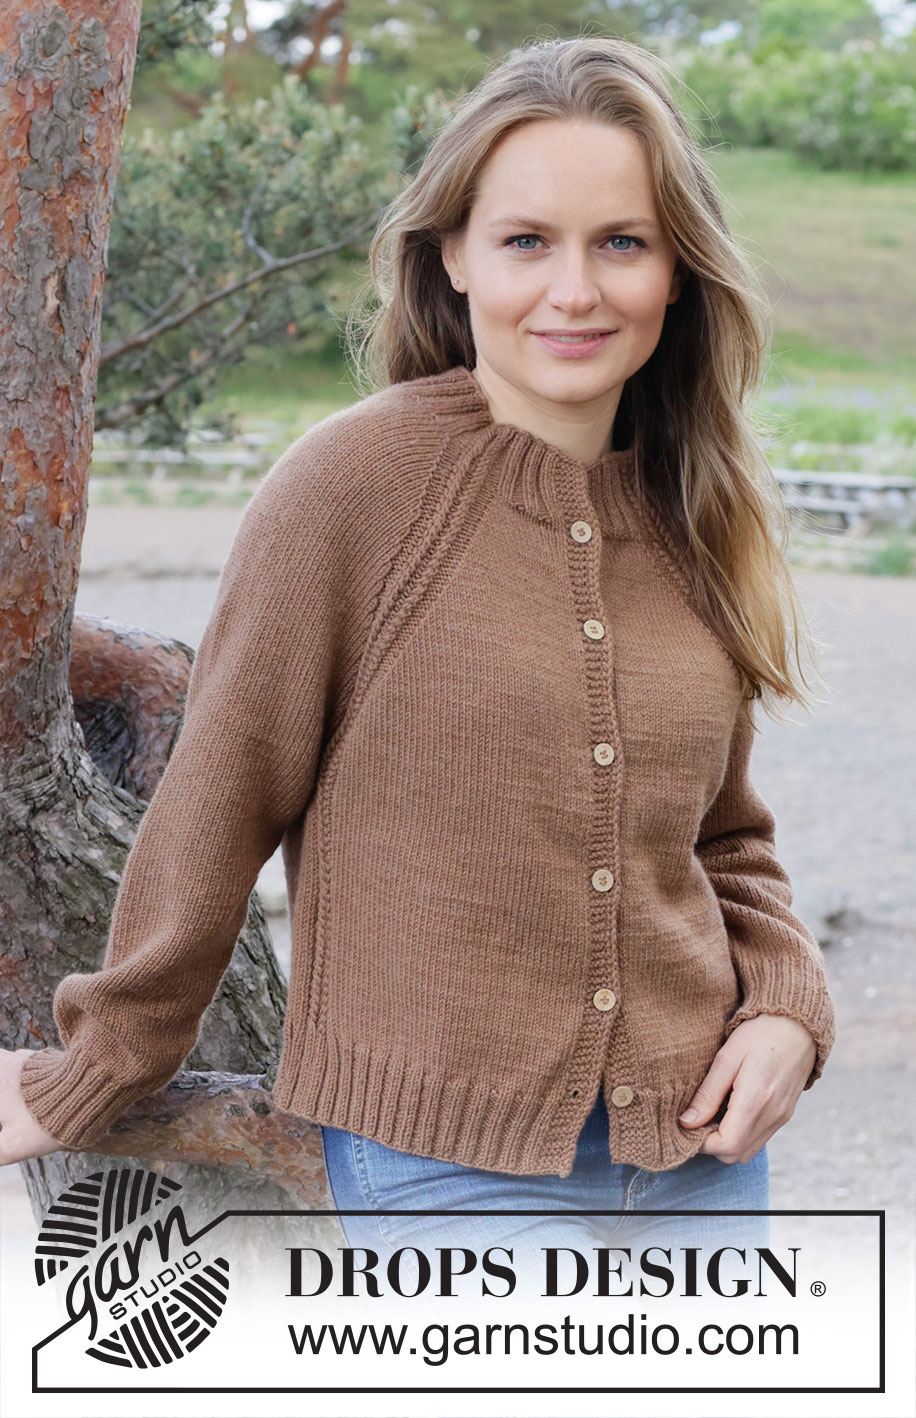
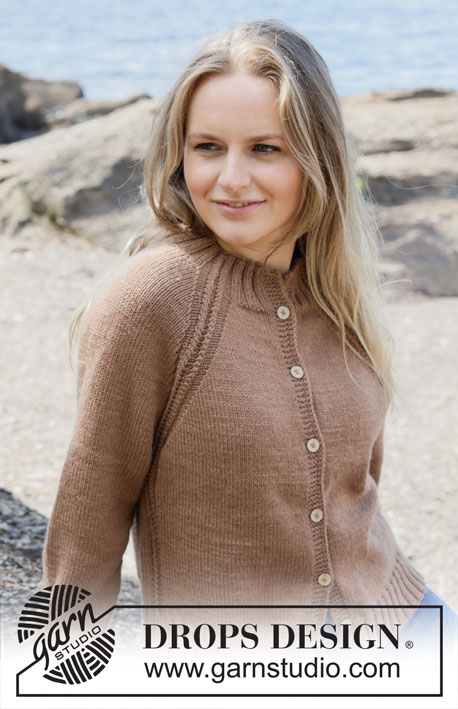
Knitted jacket in DROPS Daisy or DROPS Fiesta. Piece is knitted top down with raglan, cables and i-cord. Size: S - XXXL

Highlight Size:
DROPS 255-22

#undertheoakcardigan

DROPS Design: da-028
Yarn group B
----------------------------------------------------------

SIZE:
S - M - L - XL - XXL - XXXL

YARN:
DROPS DAISY from Garnstudio (belongs to yarn group B)
500-550-600-650-700-750 g colour 13, almond

Or use:
DROPS FIESTA from Garnstudio (belongs to yarn group B)
500-550-600-650-700-750 g colour 08, chestnut

NEEDLES:
DROPS CIRCULAR NEEDLE SIZE 4 mm: Length 40 and 80 cm.
DROPS CIRCULAR NEEDLE SIZE 3 mm: Length: 80 cm
DROPS DOUBLE POINTED NEEDLES SIZE 4 mm
DROPS DOUBLE POINTED NEEDLES SIZE 3 mm
The technique MAGIC LOOP can be used – you then only need circular needle of 80 cm in each size.

BUTTONS:
DROPS BUTTON NO 516: 6-6-7-7-7-7 pieces

KNITTING TENSION:
21 stitches in width and 28 rows vertically in stocking stitch on needle size 4 mm = 10 x 10 cm.
NOTE! Remember that needle size is only a suggestion. If you have too many stitches on 10 cm switch to larger needles. If you have too few stitches on 10 cm switch to smaller needles.

-------------------------------------------------------

Alternative Yarn – See how to change yarns here
Yarn Groups A to F – Use the same pattern and change the yarn here
Yarn usage using an alternative yarn – Use our yarn converter here

-------------------------------------------------------

You might also like...

Product image DROPS Daisy
DROPS Daisy
100% Wool
from 3.50 £ /50g
Get the yarn to make this pattern from 35.00£.

The yarn cost is calculated from the pattern’s smallest size and the yarn’s cheapest product type. Looking for an even better price? You might find it on the DROPS Deals!

Pattern instructions

NOTE: This pattern is written in British English. All measurements in charts are in cm. Convert from cm to inches here. There are different terms for crocheting in British and American English. If this pattern includes crochet, convert "crochet terms" here. See this pattern in American English here..
----------------------------------------------------------

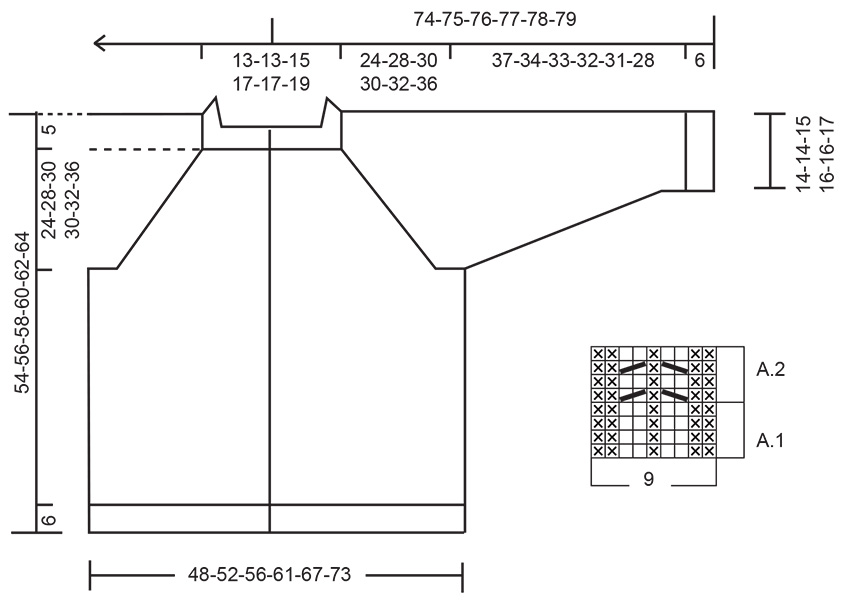
EXPLANATION FOR THE PATTERN:

----------------------------------------------------------

GARTER STITCH (when working back and forth):
Knit on all rows, i.e. knit from right side and knit from wrong side.
1 ridge vertically = knit 2 rows.

PATTERN:
See diagrams A.1 and A.2.
Diagrams show all rows in pattern seen from the right side.

RAGLAN:
Increase 1 stitch by making 1 yarn over, on next row work yarns over as explained below:
BEFORE A.2:
Purl yarn overs in back loop of stitches to avoid holes. Then work the new stitches in stocking stitch.
AFTER A.2:
Slip stitch off left needle and put it back on left needle but the opposite way (insert left needle in from behind when slipping it back on needle). Purl yarn overs in front loop of stitches to avoid holes. Then work the new stitches in stocking stitch.

DECREASE TIP:
Decrease 1 stitch on each side of marker thread as follows:
Work until 3 stitches remain before marker thread and knit 2 together, knit 2 (marker thread is in the middle of these 2 stitches), slip 1 stitch knitwise, knit 1, pass slipped stitch over stitch worked (= 2 stitches decreased).

BAND WITH I-CORD:
BEGINNING OF ROW:
Work band as follows: Slip 1 stitch purlwise with strand in front of piece, knit 1 and work 4 stitches in garter stitch.
END OF ROW:
Work band as follows: Work until 6 stitches remain on row, work 4 stitches in garter stitch, slip 1 stitch purlwise with strand in front of piece, knit 1.
Work the same way both from right side and wrong side.

BUTTONHOLES:
Decrease for buttonholes on right band (when garment is worn). Decrease from right side when 5 stitches remain on row as follows:
ROW 1 (= right side): Make 1 yarn over, knit 2 together, knit 1, slip 1 stitch purlwise with strand in front of piece, knit 1.
ROW 2 (= wrong side): Work band as before and knit yarn over to make a buttonhole.
Decrease for first buttonhole on first row from right side after neck edge has been worked. Then decrease the next 5-5-6-6-6-6 buttonholes, approx. 8-8½-7½-8-8-8½ cm apart. Place bottom buttonhole in the transition between stocking stitch and rib.

----------------------------------------------------------

START THE PIECE HERE:

----------------------------------------------------------

JACKET - SHORT OVERVIEW OF THE PIECE:
In this pattern needles of different length have been used, begin with fitting length for number of stitches and switch as needed.
Work neck edge and yoke back and forth on circular needle from mid front, work top down.
When yoke is done, divide piece for body and sleeves. Work body downwards back and forth on circular needle while putting the sleeves aside. Then work sleeves downwards in the round on needle.

NECK EDGE:
Cast on 130-130-134-146-146-150 stitches on circular needle size 3 mm with DROPS Daisy or DROPS Fiesta. Purl 1 row from wrong side. Then work as follows from right side: 6 stitches BAND WITH I-CORD – read explanation above, * knit 2, purl 2 *, work from *-* over the next 8-8-8-12-12-12 stitches, knit 2, A.1 (= left front piece), * knit 2, purl 2 *, work from *-* over the next 20 stitches, knit 2 (= sleeve), A.1, * knit 2, purl 2 *, work from *-* over the next 16-16-20-24-24-28 stitches, knit 2, A.1 (= back piece), * knit 2, purl 2 *, work from *-* over the next 20 stitches, knit 2 (= sleeve), A.1, * knit 2, purl 2 *, work from *-* over the next 8-8-8-12-12-12 stitches, knit 2, 6 stitches band with i-cord (= right front piece). When A.1 has been worked 1 time vertically, continue with A.2 over stitches in A.1. Continue like this until neck edge measures 7 cm. Insert a maker on the inside of band in one side of piece, measure piece from this marker.


YOKE:
Switch to circular needle size 4 mm. Continue with pattern A.2 and band stitches as before, and work stocking stitch over stitches on sleeve, front pieces and back piece - AT THE SAME TIME on first row begin increases for RAGLAN and decrease for BUTTONHOLES - read explanation above. INCREASE AS FOLLOWS:
ROW 1 (= right side): Increase by making a yarn over before and after every A.2 (= 8 stitches increased).
ROW 2 (= wrong side): Work pattern as before, work the new stitches in stocking stitch (remember to twist yarn overs as explained above).
Work 1st and 2nd row 7-6-10-15-11-10 times (= 14-12-20-30-22-20 rows have been worked) = 186-178-214-266-234-230 stitches on needle. Remember to follow the knitting tension!

Continue with stocking stitch, band and A.2 as before, and increase for raglan as follows:
ROW 1 (= right side): Increase by making a yarn over before and after every A.2 (= 8 stitches increased)
ROW 2 (= wrong side): Work pattern as before, work the new stitches in stocking stitch.
ROW 3 (= right side): Increase by making a yarn over before 1st repetition of A.2, after 2nd repetition of A.2, before 3rd repetition of A.2 and after 4th repetition of A.2 i.e. increase only on front pieces and back piece, do not increase on sleeves (= 4 stitches increased).
ROW 4 (= wrong side): Work pattern as before, work the new stitches in stocking stitch.
Work 1st to 4th row 13-16-14-13-17-20 times (= 52-64-56-52-68-80 rows have been worked, and you have increased 13-16-14-13-17-20 times on sleeves and 26-32-28-26-34-40 times on front pieces/back piece) = 342-370-326-422-438-470 stitches on needle.

All increases for raglan are done, you have increased a total of 33-38-38-41-45-50 times on front pieces/back piece and 20-22-24-28-28-30 times on sleeves. Work stocking stitch and A.2 and band as before, without increasing, until piece measures approx. 24-28-30-30-32-36 cm from marker mid front. Now divide yoke for body and sleeves.

DIVIDING FOR BODY AND SLEEVES:
AT THE SAME TIME as next row is worked divide yoke for body and sleeves as follows: Work 58-63-63-70-74-79 stitches as before (= front piece), slip the next 62-66-70-78-78-82 stitches on a thread for sleeve, cast on 6-6-10-10-14-14 new stitches on needle (= in the side mid under sleeve), work 102-112-116-126-134-148 stitches as before (= back piece), slip the next 62-66-70-78-78-82 stitches on a thread for sleeve, cast on 6-6-10-10-14-14 new stitches on needle (= in the side mid under sleeve), and work the last 58-63-63-70-74-79 stitches as before (= front piece). Finish body and sleeves separately.

BODY:
= 230-250-262-286-310-334 stitches. Work in stocking stitch, A.2 and band as before until piece measures 43-45-47-49-51-53 cm from marker mid front.
Work 1 row from wrong side while at the same time increasing stitches evenly as follows: Increase 6-5-7-4-6-9 stitches on each front piece (between band stitches and A.2) and increase 10-12-12-14-14-16 stitches on back piece (increase between A.2) = 252-272-288-308-336-368 stitches. Switch to circular needle size 3 mm. Work rib as follows – first row is worked from right side: 6 band stitches as before, * knit 2, purl 2 *, work from *-* until 2 stitches remain before A.2, knit 2, A.1 over stitches in A.2, * knit 2, purl 2 *, work from *-* over the next 4-4-8-8-12-12 stitches, knit 2, A.1 over stitches in A.2, knit 2, purl 2 *, work from *-* until 2 stitches remain before A.2, knit 2, A.1 over stitches in A.2, * knit 2, purl 2 *, work from *-* over the next 4-4-8-8-12-12 stitches, knit 2, A.1 over stitches in A.2, * knit 2, purl 2 *, work from *-* until 2 stitches remain before band stitches, knit 2, 6 band stitches as before. Work like this for 6 cm. Jacket measures 49-51-53-55-57-59 cm from marker mid front and approx. 54-56-58-60-62-64 cm from the top of shoulder.

SLEEVES:
Slip 62-66-70-78-78-82 sleeve stitches from one thread on to circular needle size 4 mm and pick in addition up 1 stitch in each of the 6-6-10-10-14-14 stitches cast on under sleeve = 68-72-80-88-92-96 stitches.
Insert 1 marker thread in the middle of the 6-6-10-10-14-14 new stitches under sleeve - round begins at the marker thread.
Work in stocking stitch in the round on needle - AT THE SAME TIME when sleeve measures 3 cm from division, decrease mid under sleeve – read DECREASE TIP and decrease as follows: Decrease 2 stitches every 6½-5-3½-2½-2-1½ cm 5-6-8-11-12-13 times in total = 58-60-64-66-68-70 stitches.
Work until sleeve measures 37-34-33-32-31-28 cm from division.
Switch to double pointed needles size 3 mm and work rib (= knit 2/purl 2) while AT THE SAME TIME increasing 6-8-4-6-4-6 stitches evenly on 1st round = 64-68-68-72-72-76 stitches.
When piece measures 6 cm cast off. Sleeve measures approx. 43-40-39-38-37-34 cm from division.

ASSEMBLY:
Sew buttons on to left front piece.

Diagram

knit from the right side, purl from the wrong side = knit from the right side, purl from the wrong side
purl from the right side, knit from the wrong side = purl from the right side, knit from the wrong side
slip 1 stitch on cable needle behind piece, knit 1, knit 1 from cable needle = slip 1 stitch on cable needle behind piece, knit 1, knit 1 from cable needle
slip 1 stitch on cable needle in front of piece, knit 1, knit 1 from cable needle = slip 1 stitch on cable needle in front of piece, knit 1, knit 1 from cable needle
Diagram for DROPS 255-22

Each of our patterns has specific tutorial videos to help you.

Do you have a question? See a list of frequently asked questions (FAQ)

Knitting tension is what determines the final measurements of your work, and is usually measured per 10 x 10 cm. It is provided like so: number of stitches in width x number of rows in height - eg: 19 stitches x 26 rows = 10 x 10 cm.

The knitting tension is very individual; some people knit/crochet loosely while others work tightly. You adjust the knitting tension with the needle size, which is why the suggested needle size is only meant as a guide! You need to adjust this (up or down) to ensure that YOUR knitting tension matches the knitting tension provided in the pattern. If you work with a different knitting tension than provided you will have a different yarn consumption, and your work will have different measurements than what the pattern suggests.

The knitting tension also determines which yarns can replace each other. As long as you achieve the same knitting tension you can replace one yarn with another.

See DROPS lesson: How to measure your tension/gauge

See DROPS video: How to make a gauge tension swatch

The required amount of yarn is provided in grams, eg: 450 g. To calculate how many balls you’ll need you first need to know how many grams are in 1 ball (25g, 50g or 100g). This information is available if you click on the individual yarn quality on our pages. Divide the amount required with the amount of each ball. For example, if each ball is 50g (the most common amount), the calculation will be as follows: 450 / 50 = 9 balls.

The important thing when changing from one yarn to another is that the knitting/crochet tension remains the same. This is so that the measurements of the finished piece will be the same as on the sketch provided. It is easier to achieve the same knitting tension using yarns from the same yarn group. It is also possible to work with multiple strands of a thinner yarn to achieve the knitting tension of a thicker one. Please try our yarn converter. We recommend you to always work a test swatch.

Please NOTE: when changing yarn the garment might have a different look and feel to the garment in the photo, due to individual properties and qualities of each yarn.

See DROPS lesson: Can I use a different yarn than the one mentioned in the pattern?

All our yarns are categorised into yarn groups (from A to F) according to thickness and knitting tension – group A contains the thinnest yarns and group F the thickest. This makes it easier for you to find alternative yarns to our patterns, should you wish to switch yarn. All yarns within the same group have a similar knitting tension and can easily replace each other. However, different yarn qualities have different structures and properties which will give the finished work a unique look and feel.

Click here for an overview of the yarns in each yarn group

At the top of all our patterns you’ll find a link to our yarn calculator, which is a helpful tool should you wish to use a different yarn than suggested. By filling in the yarn quality you wish to replace, the amount (in your size) and number of strands, the calculator will present good alternative yarns with the same knitting tension. Additionally it will tell you how much you’ll require in the new qualities and whether you’ll need to work with multiple strands. Most skeins are 50g (some are 25g or 100g).

If the pattern is worked with multiple colours, every colour will have to be calculated separately. Similarly, if the pattern is worked with several strands of different yarns (for example 1 strand Alpaca and 1 strand Kid-Silk) you will have to find alternatives for each, individually.

Click here to see our yarn calculator

Since different yarns have different qualities and textures we have chosen to keep the original yarn in our patterns. However, you can easily find options among our available qualities by using our yarn calculator, or simply pick a yarn from the same yarn group.

It is possible that some retailers still have discontinued yarns in stock, or that someone has a few skeins at home that they would like to find patterns for.

The yarn calculator will provide both alternative yarn as well as required amount in the new quality.

If you think it's hard to decide what size to make, it can be a good idea to measure a garment you own already and like the size of. Then you can pick the size by comparing those measures with the ones available in the pattern's size chart.

You'll find the size chart at the bottom of the pattern.

See DROPS lesson: How to read size chart

The needle size provided in the pattern serves only as a guide, the important thing is to follow the knitting tension. And since knitting tension is very individual, you will have to adjust the needle size to ensure that YOUR tension is the same as in the pattern – maybe you’ll have to adjust 1, or even 2 needle sizes, up or down to achieve the correct tension. For this, we recommend that you work test swatches.

Should you work with a different knitting tension than the one provided, the measurements of the finished garment might deviate from the measurement sketch.

See DROPS lesson: How to measure your tension/gauge

See DROPS video: How to make a tension/gauge swatch

Working a garment top-down provides more flexibility and room for personal adjustment. For example it is easier to try the garment on while working, as well as making adjustments to length of yoke and shoulder caps.

The instructions are carefully explaining every step, in the correct order. Diagrams are adjusted to the knitting direction and are worked as usual.

The diagram depicts all rows/rounds, and every stitch seen from the right side. It is read from bottom to top, from right to left. 1 square = 1 stitch.

When working back and forth, every other row is worked from the right side and every other row is worked from the wrong side. When working from the wrong side, the diagram will have to be worked reversed: from left to right, knit stitches are purled, purl stitches are knit etc.

When working in the round every round is worked from the right side and the diagram are worked from right to left on all rounds.

See DROPS lesson: How to read knitting diagrams

The diagram depicts all rows/rounds, and every stitch seen from the right side. It is worked from bottom to top, from right to left.

When working back and forth every other row is worked from the right side: from right to left and every other row is worked from the wrong side: from left to right.

When working in the round, every row in the diagram are worked from the right side, from right to left.

When working a circular diagram you start in the middle and work your way outwards, counter clockwise, row by row.

The rows usually start with a given number of chain stitches (equivalent to the height of the following stitch), this will either be depicted in the diagram or explained in the pattern.

See DROPS lesson: How to read crochet diagrams

Instructions for working several diagrams after each other on the same row/round, will often be written like so: “work A.1, A.2, A.3 a total of 0-0-2-3-4 times". This means you work A.1 once, then A.2 is worked once, and A.3 is repeated (in width) the number of times provided for your size – in this case like so: S = 0 times, M = 0 times, L=2 times, XL= 3 times and XXL = 4 times.

The diagrams are worked as usual: begin with the first row in A.1, then work the first row in A.2 etc.

See DROPS lesson: How to read knitting diagrams

See DROPS lesson: How to read crochet diagrams

The total width of the garment (from wrist-to-wrist) will be larger in the larger sizes, despite the actual sleeves being shorter. The larger sizes have longer sleeve caps and wider shoulders, so there will be a good fit in all sizes.

The measurement sketch/schematic drawing provides information regarding the full length of the garment. If it’s a jumper or a jacket the length is measured from the highest point on the shoulder closest to the neckline, and straight down to the bottom of the garment. It is NOT measured from the tip of shoulder. Similarly, the length of yoke is measured from the highest point on the shoulder and down to where yoke is split into body and sleeves.

On a jacket measures are never taken along bands, unless specifically stated. Always measure inside band stitches when measuring the length.

See DROPS lesson: How to read a schematic drawing

Diagrams are often repeated on the round or in height. 1 repeat is the diagram the way it appears in the pattern. If it says to work 5 repeats of A.1 in the round, then you work A.1 a total of 5 times after/next to each other in the round. If it says to work 2 repeats of A.1 vertically/in height you work the entire diagram once, then begin again at the start and work the entire diagram one more time.

Chain stitches are slightly narrower than other stitches and to avoid working the cast-on edge too tight, we simply chain more stitches to begin with. The stitch count will be adjusted on the following row to fit the pattern and measurement sketch.

The rib edge is more elastic and will contract slightly compared to, for example, stocking stitch. By increasing before the rib edge, you avoid a visible difference in width between the rib edge and the rest of the body.

It’s very easy to cast off too tightly, and by making yarn overs while casting off (and simultaneously casting these off) you avoid a too tight cast off edge.

See DROPS video: How to bind off with yarn overs (yo)

To achieve an even increase (or decrease) you can increase on, for example: every 3rd and 4th row alternately, like so: work 2 rows and increase on the 3rd row, work 3 rows and increase on the 4th. Repeat this until the increase is complete.

See DROPS lesson: Increase or decrease 1 st on every 3rd and 4th row alternately

Should you prefer to work in the round instead of back and forth, you may of course adjust the pattern. You’ll need to add steeks mid-front (usually 5 stitches), and follow the instructions. When you would normally turn and work from the wrong side, simply work across the steek and continue in the round. At the end you’ll cut the piece open, pick up stitches to work bands, and cover the cut edges.

See DROPS video: How to knit steeks and cut open

Should you prefer to work back and forth instead of in the round, you may of course adjust the pattern so you work the pieces separately and then assemble them at the end. Divide the stitches for the body in 2, add 1 edge stitch in each side (for sewing) and work the front and back pieces separately.

See DROPS lesson: Can I adapt a pattern for circular needles into straight needles?

Pattern repeats can vary slightly in the different sizes, in order to get the correct proportions. If you’re not working the exact same size as the garment in the photo, yours might deviate slightly. This has been carefully developed and adjusted so that the complete impression of the garment is the same in all sizes.

Make sure to follow instructions and diagrams for your size!

If you have found a pattern you like which is available in women’s size it’s not very difficult to convert it to men’s size. The biggest difference will be the length of sleeves and body. Start working on the women size that you think would fit across the chest. The additional length will be worked right before you cast off for the armhole/sleeve cap. If the pattern is worked top-down you can add the length right after the armhole or before the first decrease on sleeve.

Regarding additional yarn amount, this will depend on how much length you add, but it is better with a skein too many than too few.

All yarns will have excess fibres (from production) that might come off as lint or shedding. Brushed yarns (ie hairier yarns) have more of these loose, excess fibres, causing more shedding.

Shedding also depends on what is worn under or over the garment, and whether this pulls at the yarn fibres. It’s therefore not possible to guarantee that there will be no shedding

Below are some tips on how to get the best result when working with hairier yarns:

1. When the garment is finished (before you wash it) shake it vigorously so the looser hairs come off. NOTE: do NOT use a lint roller, brush or any method that pulls at the yarn.

2. Place the garment in a plastic bag and put it in your freezer - the temperature will cause the fibres to become less attached to each other, and excess fibres will come off easier.

3. Leave in the freezer for a few hours before taking it out and shaking it again.

4. Wash the garment according to the instructions on the yarn label.

Pilling is a natural process that happens to even the most exclusive of fibers. It's a natural sign of wear and tear that is hard to avoid, and that is most visible in high friction areas of your garment like a sweater's arms and cuffs.

You can make your garment look as new by removing the pilling, using a fabric comb or a pill/lint remover.

Still can't find the answer you need? Then scroll down and leave your question so one of our experts can try to help you. This will be done normally within 5 to 10 working days.
In the meantime, you can read the questions and answers that others have left to this pattern or join the DROPS Workshop on Facebook to get help from fellow knitters/crocheters!
Have you finished this pattern?
Tag your pictures with #dropspattern #undertheoakcardigan or submit them to the #dropsfan gallery.

Post a comment to pattern DROPS 255-22

We would love to hear what you have to say about this pattern!

If you want to leave a question, please make sure you select the correct category in the form below, to speed up the answering process. Required fields are marked *.

Comments / Questions (7)

country flag GISELE AUBUT wrote:

Bonjour, Ma question porte aussi sur A.1 et A.2 Si je comprends bien, A.1 est seulement utilisé dans le col en alternance avec A.2 puis A.2 est utilisé pour les raglans par la suite? Merci.

28.03.2025 - 04:49

DROPS Design answered:

Bonjour Mme Aubut, pas exactement, vous tricotez A.1 sur le col, puis, quand les 4 rangs de A.1 sont terminés, vous tricotez A.2 au lieu de A.1 - le diagramme A.1 n'es tricoté qu'une seule fois, au tout début du col. Mais ensuite, oui, vous répétez A.2 tout du long. Bon tricot!

28.03.2025 - 08:19

country flag Engel wrote:

Bij maat xl lijkt het aantal steken op de voorpanden voor de boord niet te kloppen. Tussen voorbies en A2 staan, na de meerderingen, 59 steken op de naald. Met een boordsteek van 2 re;2 av hou je 3 steken over niet 2.

16.03.2025 - 19:51

country flag Laura Slotboom wrote:

Het patroon klopt niet in maat L. Na de pas heb je 214 steken op de pen dan 14 x meerderen voor de mouw = 14 x4 = 56 en 28 x voor voorpanden en rug 28 × 4 = 112 dus totaal 214 + 56 + 112 = 382 en geen 326. Of doe ik iets fout?

08.03.2025 - 16:23

country flag Leena Wahlberg wrote:

Hej, Halskant: i mönstret står att 6+8+2 räta maskor i början medan varvet slutas med 8+2 räta+6maskor. Ska det inte vara 2 räta +8+6 maskor i slutet på första varvet? Annars kanterna inte lika eller tänker jag fel?

04.02.2025 - 19:53

DROPS Design answered:

Hej Leena. Halskanten börjar med 6 framkantsmaskor med i-cord, sedan 2 rm, 2 am, 2 rm, 2 am, 2 rm, A.1 och varvet slutar med A.1, 2 rm, 2 am, 2 rm, 2 am, 2 rm och till sist 6 framkantsmaskor med i-cord, så kanterna kommer bli lika. Mvh DROPS Design

05.02.2025 - 14:11

country flag Edith wrote:

Bonjour, Après le deuxième rang (endroit) du col, comment faut il tricoter le troisième rang ? Tout à l'envers ? Mais alors les côtes 2 - 2 ne se forment pas. Faut il tricoter les mailles comme elles se présentent ? Faut il déjà commencer avec A2 ??? Merci de préciser.

11.11.2024 - 15:57

DROPS Design answered:

Bonjour Edith, sur l'envers, tricotez les mailles comme elles se présentent: les mailles point mousse au point mousse (avec la bordure I-cord), les mailles envers à l'envers, les mailles endroit à l'endroit et lisez les rangs envers de gauche à droite (soit 2 m end, 2 m env, 1 m end, 2 m env, 2 m end) pour A.1 (A.2 se tricote ensuite pareil plus tard = les torsades ne se font que sur l'endroit). Bon tricot!

11.11.2024 - 16:18

country flag Annette Holmstrøm wrote:

Der er uoverensstemmelser i beskrivelsen fra start - str L slå 134 m op del op… 6 m til i-ccord (her mangler beskrivelse at 2 ret m) , der efter 8 m, 2 r, 20 m, 2 r, 20 m, 2r, 20m, 2r, 20m, 2 r, 8m, 2 r, 6 m i-cord … Det giver 100 m … så er der langt op til 134 masker der skal slås op….. Hvad er løsningen….

02.10.2024 - 22:48

DROPS Design answered:

Hei Annette. Nei, mangler ikke 2 rett m i begynnelsen. Ser ut som du har glemt å telle maskene i A.1 (=9 masker x 4 = 36 masker). Det strikkes slik: 6 stolpemasker + 8 m + 2 m + A.1 (9 m) + 20 m + 2 m + A.1 (9 m) + 20 m + 2 m + A.1 (9 m) + 20 m + 2 m + A.1 (9 m) + 8 m + 2 m + 6 stolpemasker = 134 masker. mvh DROPS Design

15.10.2024 - 10:20

country flag Helle wrote:

Skovtræ

10.08.2024 - 13:07