
Popular categories
Looking for a yarn?


Comments / Questions (32)
![]() AH wrote:
AH wrote:
Macht bitte verkürzte Reihen am Halsausschnitt in allen euren Anleitungen, damit es besser sitzt.
28.02.2025 - 14:08
![]() Sabine wrote:
Sabine wrote:
Hallo, ich habe nun A1, A2 und A3 wie in der Anleitung beschrieben fertig, allerdings kann ich jetzt sehen, dass A2 ohne A4 (soll nicht verwendet werden) NICHT funktioniert. Da stimmt doch in der Anleitung etwas nicht. Wie ist es richtig?
27.01.2025 - 13:02DROPS Design answered:
Liebe Sabine, meinen Sie für die Jacke? bei der Jacke beginnt das Muster mit A.2, dann wird man A.3 wiederholen und endlich mit A.4 enden - welche Grösse stricken Sie? (Gerne können Sie die Frage auch direkt bei der Jacke stellen). Viel Spaß beim Stricken!
27.01.2025 - 17:41
![]() Tracey wrote:
Tracey wrote:
The graph doesn’t load on the US version of this pattern.
10.09.2024 - 18:55
![]() Conni wrote:
Conni wrote:
Hej, mangler der ikke noget i diagrammet, de 2 nederste symboler med de skrå streger er ikke i diagrammet,på forhånd tak
30.08.2024 - 12:46DROPS Design answered:
Hei Conni. Ser ut som disse symbolene tilhører jakken som er lik denne toppen (skal ikke være med i diagrammene til toppen). Dette skal vi få fjernet asap. Takk for at du gjorde oss oppmerksom på dette. mvh DROPS Design
02.09.2024 - 10:25
![]() Annemarie wrote:
Annemarie wrote:
Ich verstehe nicht, wieso bei vielen Drops Mustern neuerdings vor den Bündchen extra Maschen aufgenommen werden. Bündchen leiern aus. Haben sie dann zu viele Maschen, stehen sie ab. Das sieht nicht gut aus.
10.07.2024 - 02:22DROPS Design answered:
Liebe Annemarie, die Maschen werden zugenommen, damit die Bündchen den unteren Bereich des Ärmels / des Rumpfteils nicht zu stark zusammenziehen, durch die Zunahmen fallen die Ärmel/das Rumpfteil gerader und es wird unten nicht enger. Die Bündchen selber sollten aber nicht ausleiern, da sie mit einer dünneren Nadel gestrickt werden.
16.07.2024 - 17:12
![]() Kitty wrote:
Kitty wrote:
Merci pour les explications, je n'avais pas bien lu le diagramme !
21.05.2024 - 18:16
![]() CHRISTINE FORST wrote:
CHRISTINE FORST wrote:
Merci pour votre réponse. Bonne journée
21.05.2024 - 18:14
![]() Lise Hermann wrote:
Lise Hermann wrote:
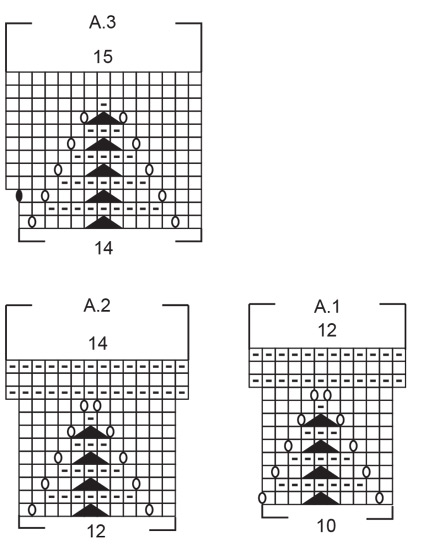
Hej Jeg er gået helt i stå ved diagram A1 str L, der skår at man skal strikke det i alt 20 omgange, hvordan skal det gøres? Jeg kan ikke få det til at ligne modellen. Diagrammet har færre omgange, hvis der skal gentages omgange, hvor starter man så? Med venlig hilsen Lise
21.05.2024 - 11:08DROPS Design answered:
Hej Lise, i str L har du 200 m, du strikker A.1 (=10 masker) 20 gange rund på rundpinden :)
21.05.2024 - 15:46
![]() Kitty wrote:
Kitty wrote:
J'ai également un problème avec la grille A1 au 2ème tour. Au 1er tour, il y a 2 jetés (ce qui fait 2 mailles en plus), et seulement 2 mailles tricotées ensembles, et au 2ème tour, je me retrouve avec 11mailles Merci de votre aide
20.05.2024 - 14:54DROPS Design answered:
Bonjour Kitty, le triangle noir correspond à une double diminution, autrement dit, on va glisser 1 maille comme pour la tricoter à l'endroit, tricoter 2 mailles ensemble à l'endroit, passer la maille glissée par-dessus les mailles tricotées ensemble = il reste 1 seule maille + les 2 jetés, on conserve bien le même nombre de mailles soit 10 mailles. Au 9ème rang, on fait seulement 2 jetés au milieu de A.1 = on augmente alors 2 mailles dans chaque A.1. Bon tricot!
21.05.2024 - 13:29
![]() CHRISTINE FORST wrote:
CHRISTINE FORST wrote:
Bonjour, Comment commencer les diagrammes ? Par le bas ou par le haut ? Pour A1, on commence par les12 mailles envers ou les 10 mailles ? Merci de votre aide
20.05.2024 - 08:43DROPS Design answered:
Bonjour Mme Forst, les diagrammes se lisent de bas en haut, et lorsque l'on tricote en rond, on lit tous les rangs (tours) de droite à gauche - retrouvez plus d'infos sur les diagrammes ici. Bon tricot!
21.05.2024 - 13:11
|
||||||||||||||||
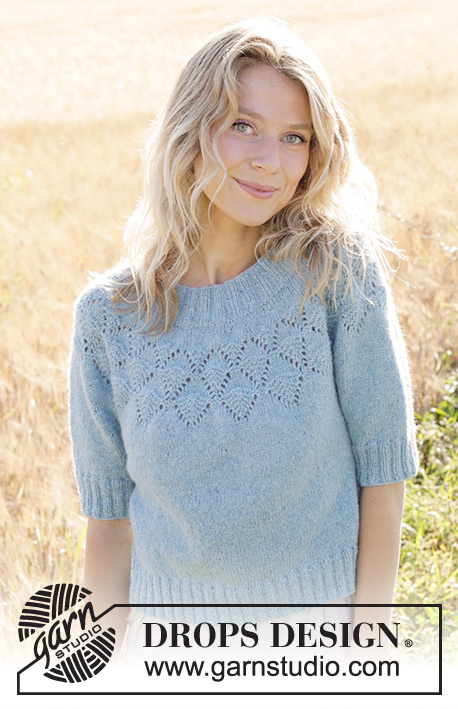
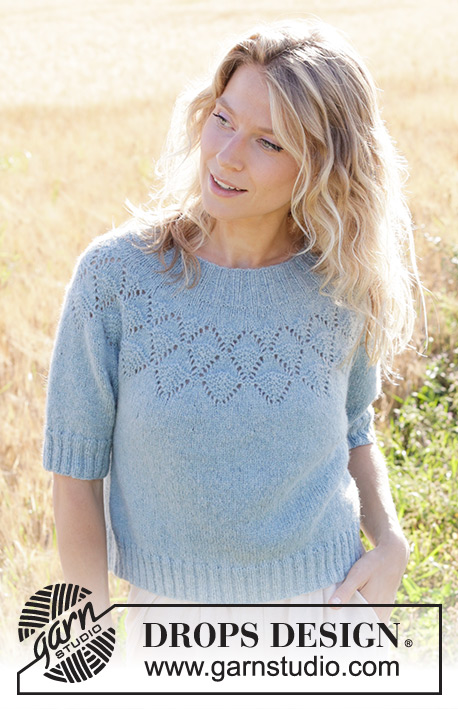
Blueberry Leaf#blueberryleafsweater |
||||||||||||||||
 |
 |
|||||||||||||||
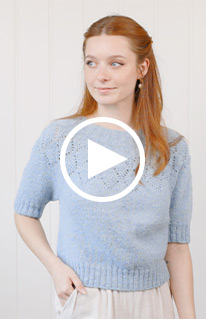
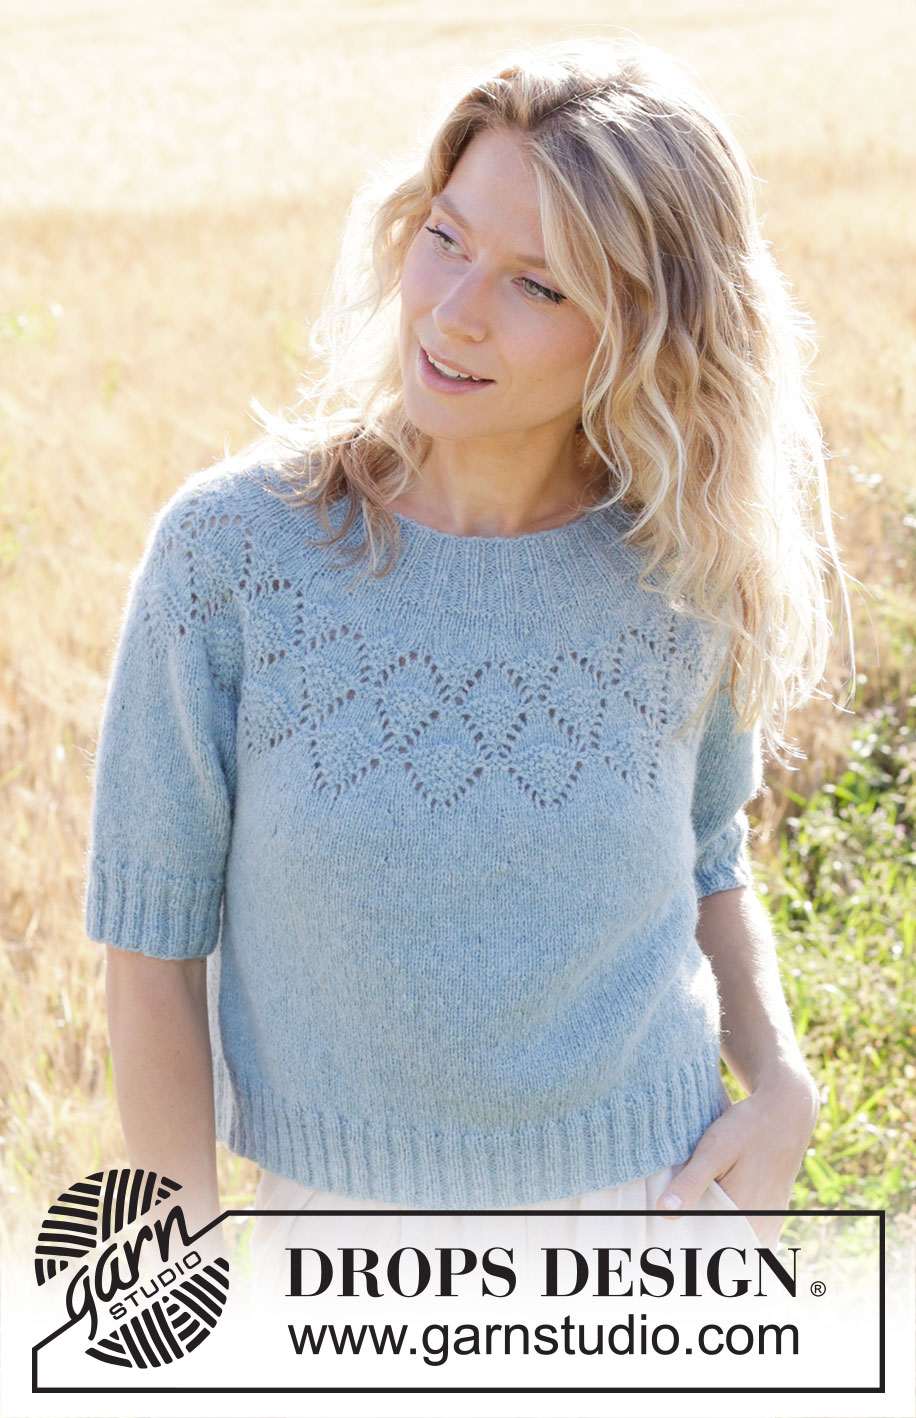
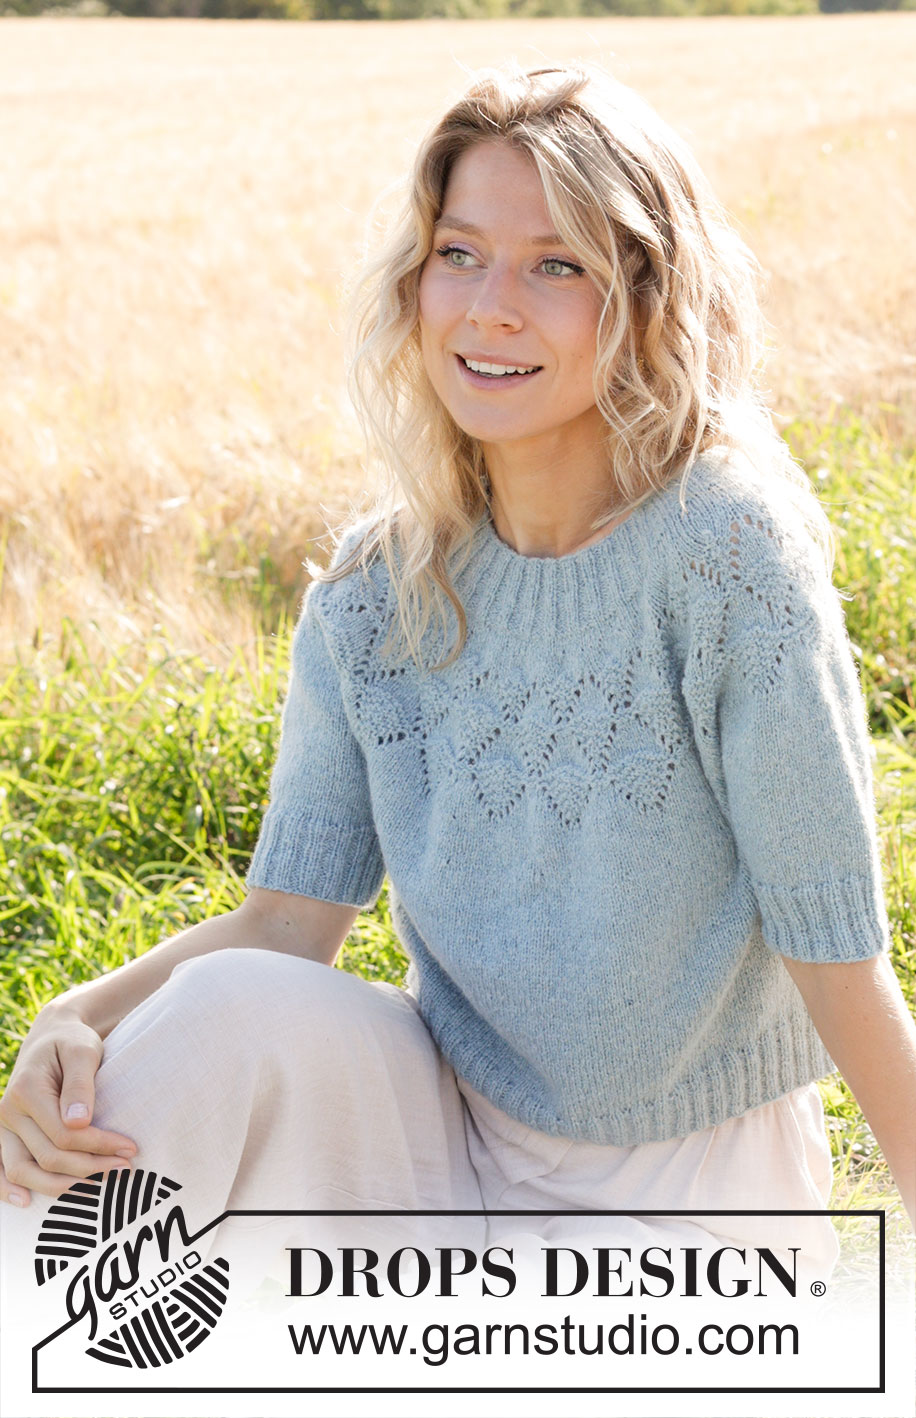
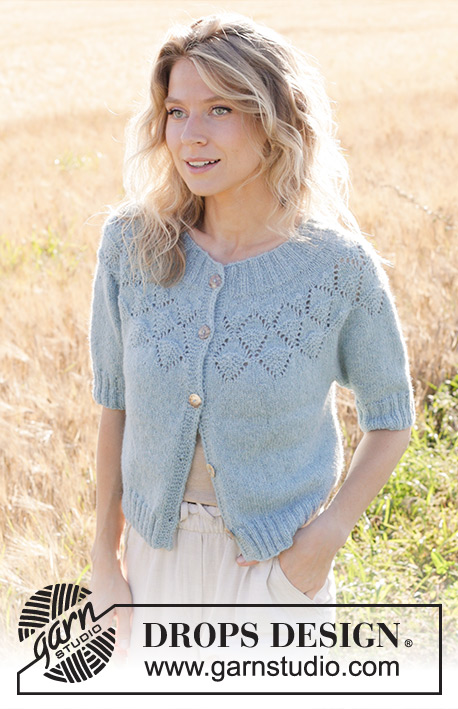
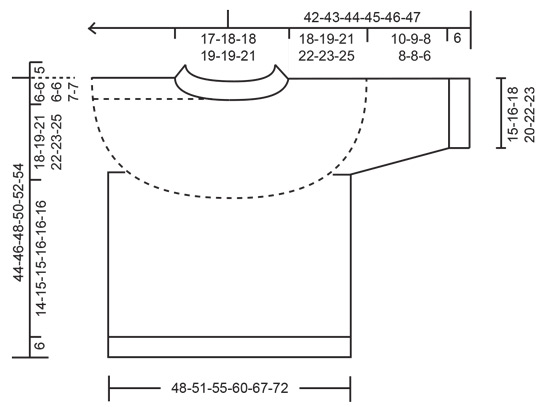
Knitted jumper in DROPS Sky or DROPS Merino Extra Fine. Piece is knitted top down with round yoke, lace pattern and short sleeves. Size: S - XXXL
DROPS 249-9 |
||||||||||||||||
|
---------------------------------------------------------- EXPLANATION FOR THE PATTERN: ---------------------------------------------------------- INCREASE TIP (applies to round yoke): To calculate how to increase evenly, use the total number of stitches on row (e.g. 150 stitches) and divide stitches by number of increases to be done (e.g. 30) = 5. In this example increase after approx. every 5th stitch by making 1 yarn over. On next round knit yarns over twisted to avoid holes. PATTERN: See diagrams A.1 to A.3. DECREASE TIP (applies to sleeves): Decrease 1 stitch on each side of marker thread as follows: Work until 3 stitches remain before marker thread, knit 2 together, knit 2 (marker thread is between these 2 stitches), slip 1 stitch knitwise, knit 1, pass slipped stitch over stitch worked. ---------------------------------------------------------- START THE PIECE HERE: ---------------------------------------------------------- JUMPER - SHORT OVERVIEW OF THE PIECE: In this pattern long and short needles have been used, begin with fitting length and switch as needed. Work neck edge and yoke in the round on circular needle from mid back, work top down. When yoke is done, divide stitches for body and sleeves. Work body down wards in the round on circular needle while putting the sleeves aside. Then work sleeves downwards in the round on needle. NECK EDGE: Cast on 120-124-128-132-140-148 stitches on circular needle size 3 mm with DROPS Sky or DROPS Merino Extra Fine. Work in the round in rib (knit 2/purl 2). When piece measures 2 cm, increase all purl sections with 2 purl stitches to 3 purl stitches - increase with 1 yarn over between 2 purl stitches, purl yarn over twisted on next round = 150-155-160-165-175-185 stitches. Continue with rib (knit 2/purl 3) until neck edge measures 5 cm in total. Insert a marker in the middle of round - now measure yoke from here. YOKE: Switch to circular needle size 4 mm. Work in stocking stitch in the round while at the same time increasing 30-35-40-45-45-55 stitches evenly on the first round – read INCREASE TIP = 180-190-200-210-220-240 stitches. Work until piece measures 3 cm from marker. Insert 1 marker thread at beginning of round, use it when working pattern. REMEMBER THE KNITTING TENSION! Now work PATTERN - read explanation above, i.e. work A.1 18-19-20-21-22-24 times in total in the round on yoke. When A.1 has been worked vertically, there are 216-228-240-252-264-288 stitches on needle. Now displace the round, cut the yarn and move the first 6 stitches on round on to right needle knitwise, move the marker thread here - now the round begins here. Work A.2 18-19-20-21-22-24 times in total in the round on yoke. When A.2 has been worked vertically, there are 252-266-280-294-308-336 stitches on needle. Now displace the round, cut the yarn and move the first 7 stitches on round on to right needle knitwise, move the marker thread here - now the round begins here. Work A.3 18-19-20-21-22-24 times in total in the round on yoke. When A.3 has been worked vertically, there are 270-285-300-315-330-360 stitches on needle. Piece measures approx. 12 cm from marker. Work in the round in stocking stitch, at the same time on first round increase 13-17-22-32-39-36 stitches evenly – remember INCREASE TIP = 283-302-322-347-369-396. Work until piece measures 15-15-16-17-17-18 cm from marker, on next round increase 13-18-22-33-39-36 stitches evenly = 296-320-344-380-408-432 stitches. Work in stocking stitch until piece measures 18-19-21-22-23-25 cm from marker. On next round divide yoke for body and sleeves as follows: Work the first 32-36-39-44-50-55 stitches as before (belongs to back piece), slip the next 58-62-68-76-78-80 stitches on a thread for sleeve, cast on 10-10-12-12-14-16 new stitches on needle (in the side under sleeve), work 90-98-104-114-126-136 stitches in stocking stitch (front piece), slip the next 58-62-68-76-78-80 stitches on a thread for sleeve, cast on 10-10-12-12-14-16 new stitches on needle (in the side under sleeve), and work the last 58-62-65-70-76-81 stitches as before (the rest of back piece). Finish body and sleeves separately. Now measure piece from here! BODY: = 200-216-232-252-280-304 stitches. Work in round in stocking stitch until piece measures 14-15-15-16-16-16 cm from division. On next round increase 40-40-44-52-56-60 stitches evenly = 240-256-276-304-336-364 stitches. Switch to circular needle size 3 mm. Now work rib in the round (purl 2/knit 2) until rib measures 6 cm. Cast off. Jumper measures approx. 44-46-48-50-52-54 cm from shoulder. SLEEVES: Slip the 58-62-68-76-78-80 stitches from thread in one side of piece on double pointed needles/a circular needle size 4 mm and pick in addition up 1 stitch in each of the 10-10-12-12-14-16 new stitches cast on under sleeve = 68-72-80-88-92-96 stitches. Insert 1 marker thread in the middle of the 10-10-12-12-14-16 new stitches under sleeve- Use marker thread later when decreasing under sleeve. Begin round at marker thread. Work in stocking stitch in the round, while AT THE SAME TIME when sleeve measures 3 cm from division, decrease 2 stitches mid under sleeve in size S, M, L and XL (do not decrease in XXL and XXXL) - read DECREASE TIP. SIZE S, M, L and XL: Decrease like this every 2-1-1-1½ cm 2-2-2-2 times in total = 64-68-76-84 stitches. ALL SIZES: = 64-68-76-84-92-96 stitches. Work until sleeve measures 10-9-8-8-8-6 cm from division. 6 cm remain until finished measurements. Try the jumper and work to desired length before rib. Knit 1 round while increasing 8-12-12-16-16-20 stitches evenly on round= 72-80-88-100-108-116 stitches. Switch to double pointed needles size 3 mm and work rib in the round (knit 2/purl 2) for 6 cm. Cast off. Sleeve measures approx. 16-15-14-14-14-12 cm from division. |
||||||||||||||||
Diagram explanations |
||||||||||||||||
|
||||||||||||||||
 |
||||||||||||||||
 |
||||||||||||||||
Have you finished this pattern?Tag your pictures with #dropspattern #blueberryleafsweater or submit them to the #dropsfan gallery. Do you need help with this pattern?You'll find 30 tutorial videos, a Comments/Questions area and more by visiting the pattern on garnstudio.com. © 1982-2026 DROPS Design A/S. We reserve all rights. This document, including all its sub-sections, has copyrights. Read more about what you can do with our patterns at the bottom of each pattern on our site. |
||||||||||||||||


With over 40 years in knitting and crochet design, DROPS Design offers one of the most extensive collections of free patterns on the internet - translated to 17 languages. As of today we count 324 catalogues and 12290 patterns translated into English (UK/cm).
We work hard to bring you the best knitting and crochet have to offer, inspiration and advice as well as great quality yarns at incredible prices! Would you like to use our patterns for other than personal use? You can read what you are allowed to do in the Copyright text at the bottom of all our patterns. Happy crafting!
Post a comment to pattern DROPS 249-9
We would love to hear what you have to say about this pattern!
If you want to leave a question, please make sure you select the correct category in the form below, to speed up the answering process. Required fields are marked *.