
Popular categories
Looking for a yarn?


Comments / Questions (59)
![]() Monika Klein wrote:
Monika Klein wrote:
Mit Begeisterung habe ich schon einige ihrer Modelle gestrickt. Wunderschöne Muster, die Größe passt auch stets gut. Erklärungen auch toll! ABER: warum werden die Modelle immer nur von vorn gezeigt? Bitte auch mit Rücken- und Seitenansicht. Hat man einen besseren gesamten Eindruck. Auch Saum/Bund unten bitte mehr sichtbar. Liebe Grüße
02.07.2025 - 12:06
![]() Corrie Bal wrote:
Corrie Bal wrote:
Inmiddels is het gelukt!! Leuk patroon!
27.06.2025 - 13:13
![]() Corrie Bal wrote:
Corrie Bal wrote:
Ik brei maat m, t/m de pas klopt alles. Nu moet ik aan het lijf beginnen met telpatroon A5. Ik begin met 15 nieuwe steken onder de mouw. Maar ik kom nooit goed uit met de ruitpatroon op voor/ achterkant. Hoe moet ik dat doen?
20.06.2025 - 21:06
![]() Anne-Marie wrote:
Anne-Marie wrote:
Merci pour ces précisions. Toutefois je trouve ça peu esthétique. Si je remplace par des rangs raccourcis tout en maintenant l'i-cord, je raccourcis à l'opposé de l'i-cord ?
10.06.2025 - 12:29DROPS Design answered:
Bonjour Anne-Marie, vous n'êtes pas obligée de suivre les explications pas à pas, vous êtes libre d'y ajouter votre touche personnelle et vos propres modifications. Bon tricot!
10.06.2025 - 12:41
![]() Anne-Marie wrote:
Anne-Marie wrote:
Je ne comprends pas bien pour les bordures ? Elles ne mesurent pas la même largeur tout du long ? 11 mailles au début et 6 à la fin ? Pourtant quand je regarde la photo je ne perçois pas cela. Aurais-je mal compris quelque chose ?
10.06.2025 - 10:02DROPS Design answered:
Bonjour Anne-Marie, tout à fait, la partie la plus large sera ensuite au niveau encolure dos et la partie plus fine côté encolure V par la suite - dans ce modèle, on tricote d'abord la bordure des devants puis on monte les mailles entre elles pour l'encolure dos - cette vidéo montre ce type de construction (similaire dans la façon de faire, mais avec des rangs raccourcis que l'on n'a pas ici - et sur le même nombre de mailles, mais elle devrait quand même vous aider à visualiser la technique). Bon tricot!
10.06.2025 - 11:07
![]() Emmanuelle wrote:
Emmanuelle wrote:
Bonjour, À partir de quel moment commence-t’on à tricoter en rond? Emmanuelle
27.05.2025 - 03:28DROPS Design answered:
Bonjour Emmanuelle, on commence à tricoter en rond quand A.1 est terminé, cf 2ème paragraphe EMPIECEMENT. Bon tricot!
27.05.2025 - 09:20
![]() Anja wrote:
Anja wrote:
Ik brei xl en heb een vraag: Na A1 gebreid te hebben en daarna A2, A3,A4 1x in hoogte te hebben gebreid zou ik volgens patroon 72 steken moeten hebben voor de mouw, maar ik heb 66. De aantallen voor het voor/achterpand (105) komen wel overeen. Als ik de nld. optel, 11 × elke 2e nld en 12 × elke 4e nld kom ik op 21 + 48 nld = 69 nld. Als je A1 in hoogte + A2,A3,A4 in hoogte optel = 60 nld Dat is te weinig voor de meerderingen. Of doe ik iets verkeerds?
08.05.2025 - 17:35DROPS Design answered:
Dag Anja,
Het aantal steken zou wel moeten kloppen op dat punt, dus je zou 72 voor elke mouw moeten hebben en 105 steken voor het voorpand en voor het achterpand. Klopt het totaal aantal steken wel? Dus heb je in totaal 354 steken op de naald? In dat geval zou je de steken wel kunnen verdelen. Anders zijn er toch ergens meerderingen vergeten, maar misschien is de wijdte van de mouw in jouw geval ook zonder deze meerderingen oké.
01.06.2025 - 20:26
![]() Véronique wrote:
Véronique wrote:
Bonjour, Est-il possible de réaliser le modèle Sand Diamond avec le fil de coton Safran ? Comment convertir ? En vous remerciant beaucoup
26.02.2025 - 12:02DROPS Design answered:
Bonjour Véronique, vous n'auriez pas le même échantillon, il vous faudra alors entièrement recalculer les explications sur la base du vôtre. Utilisez le convertisseur pour voir les cotons possibles en alternative ou bien consultez les modèles réalisables en Safran, seule ou avec une autre laine. Bon tricot!
26.02.2025 - 18:04
![]() Runa wrote:
Runa wrote:
Det kunne være dejligt med et foto af den fine bluse bagfra, uden modellens hår ;-) , så man kan se hvordan det færdige arbejde ser ud på nakke og ryg.
11.02.2025 - 15:07DROPS Design answered:
Hej Runa, det har vi desværre ikke, men mønsteret starter efter kanten, i halsudskæringen bagpå :)
12.02.2025 - 11:34
![]() Paquita wrote:
Paquita wrote:
Bonjour, Je ne sais pas quelle taille choisir. Existe t'il une grille pour avoir le tour de poitrine correspondant aux tailles proposées ? Je cherche également l'aisance positive ? Merci pour tout.
25.01.2025 - 00:06DROPS Design answered:
Bonjour Paquita, pour trouver la taille idéale (et l'aisance qui vous convient), mesurez un vêtement similaire que vous avez et dont vous aimez la forme, et comparez ces mesures à celles du schéma. Retrouvez plus d'infos ici. Bon tricot!
27.01.2025 - 08:58
|
|||||||||||||||||||
Sand Diamond#sanddiamondsweater |
|||||||||||||||||||
 |
 |
||||||||||||||||||
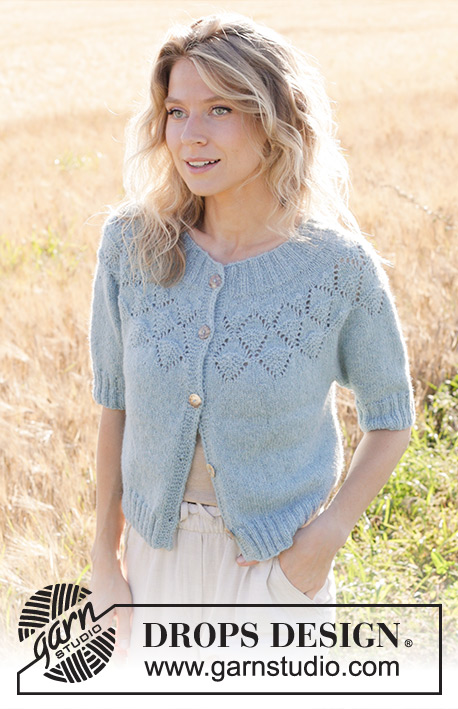
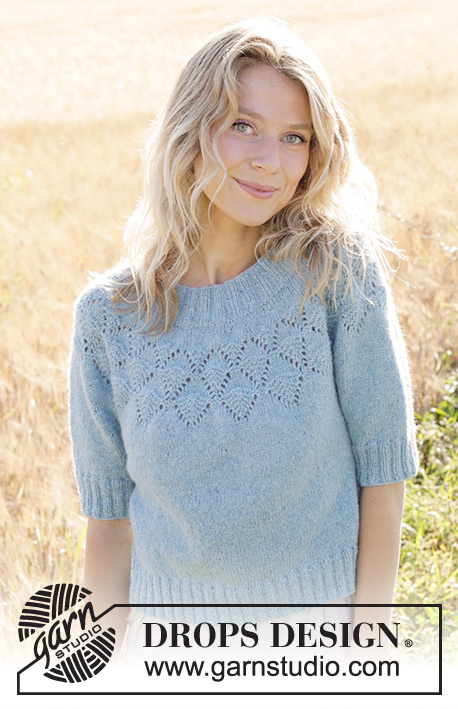
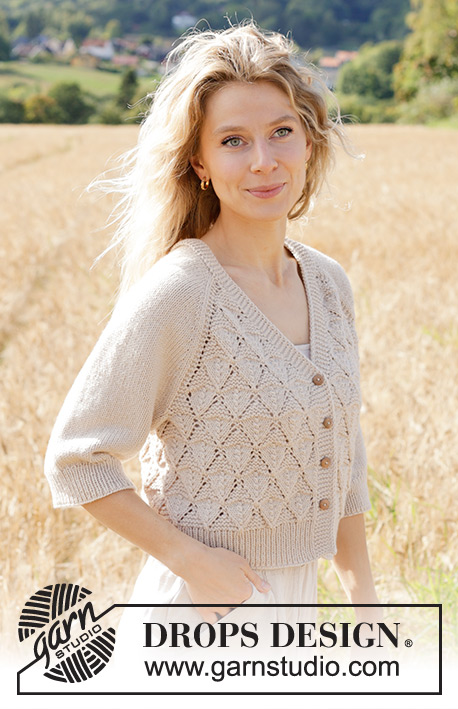
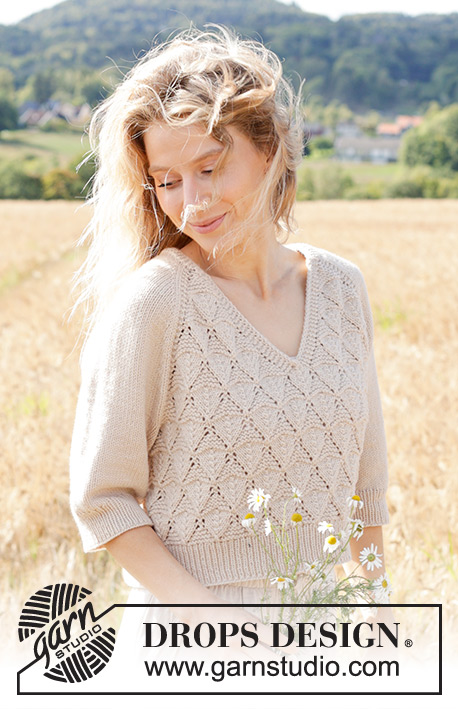
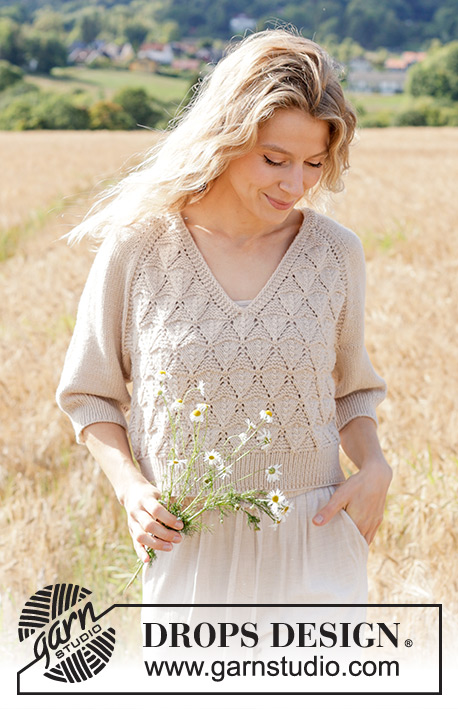
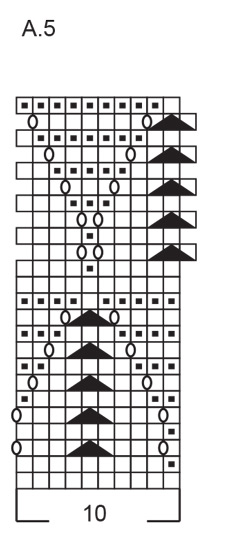
Knitted jumper in DROPS Daisy or DROPS Merino Extra Fine. The piece is worked top down with raglan, V-neck, lace pattern and ¾-length sleeves. Sizes S - XXXL.
DROPS 248-6 |
|||||||||||||||||||
|
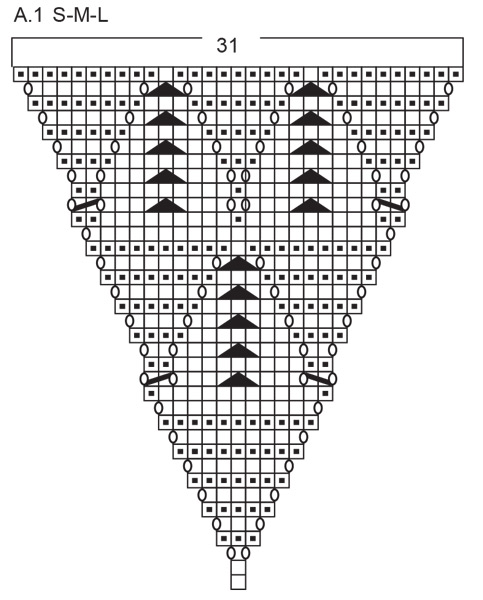
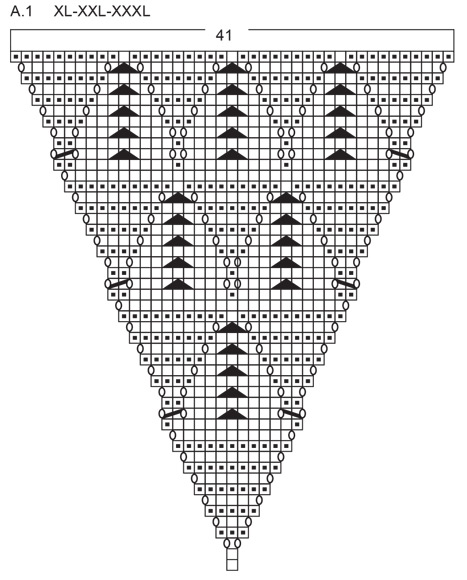
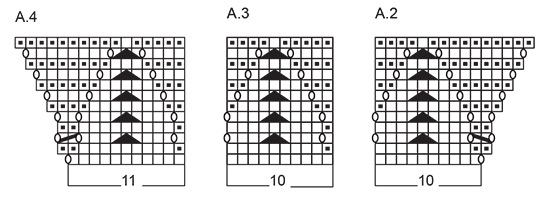
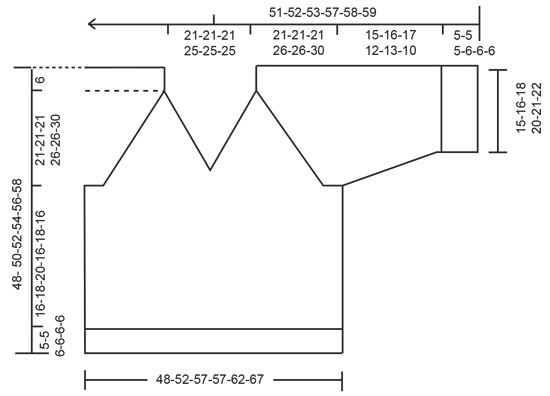
------------------------------------------------------- EXPLANATIONS FOR THE PATTERN: ------------------------------------------------------- GARTER STITCH (worked back and forth): Knit all rows, from both the right and wrong side. 1 ridge in height = knit 2 rows. GARTER STITCH (worked in the round): 1 ridge vertically = 2 rounds, i.e. knit 1 round and purl 1 round. PATTERN: See diagrams A.1 to A.5. The diagrams show all rows in the pattern seen from the right side. See diagram for your size in A.1. RIGHT BAND WITH I-CORD: RIGHT SIDE: Work 9 garter stitches, slip 1 stitch purl-wise with strand in front, knit 1. WRONG SIDE: Slip 1 stitch purl-wise with strand in front, knit 1, 9 garter stitches. LEFT BAND WITH I-CORD: RIGHT SIDE: Slip 1 stitch purl-wise with strand in front, knit 1, 9 garter stitches. WRONG SIDE: Work 9 garter stitches, slip 1 stitch purl-wise with strand in front, knit 1. RAGLAN: Increase 1 stitch by making 1 yarn over, which is worked twisted on the next round/row. The new stitches are then worked in stocking stitch. DECREASE TIP (for sleeves): Decrease 1 stitch on each side of the marker-stitch as follows: Work until there are 2 stitches left before the marker-stitch, knit 2 together, knit 1 (= marker-stitch), slip 1 stitch knit-wise, knit 1 and pass the slipped stitch over the knitted stitch. ------------------------------------------------------- START THE PIECE HERE: ------------------------------------------------------- JUMPER - SHORT OVERVIEW OF THE PIECE: The pattern uses both long and short needles; start with the length which fits the number of stitches and change when necessary. The piece is started back and forth, top down. When the V-neck is finished, continue working in the round with circular needle. Start by working 2 loose bands, then cast on stitches for the neckline between the bands and work the yoke back and forth. When the yoke is finished, divide for the body and sleeves. Continue the body in the round, while the sleeves wait. The sleeves are then worked in the round. The bands are sewn together mid-back, then sewn to the neckline. RIGHT BAND (when the garment is worn): Cast on 11 stitches with circular needle size 4 mm. Work RIGHT BAND WITH I-CORD – read description above, back and forth for 4 cm. Now knit together the first 2 stitches from the right side. Decrease like this every 3 cm a total of 5 times = 6 band stitches. Continue working until the band measures 21-21-21-23-23-23 cm, finishing after a row from the wrong side. Cut the strand and lay the piece to one side. LEFT BAND (when the garment is worn): Cast on 11 stitches with circular needle size 4 mm. Work LEFT BAND WITH I-CORD – read description above, back and forth for 4 cm. Now knit together the last 2 stitches from the right side. Decrease like this every 3 cm a total of 5 times = 6 band stitches. Continue working until the band measures 21-21-21-23-23-23 cm, finish after a row from the right side. Do not cut the strand. Cast on 99-99-99-113-113-113 stitches at the end of the row, then work the 6 stitches from the right band = 111-111-111-125-125-125 stitches. Work 1 row from the wrong side, purling the 99-99-99-113-113-113 cast on stitches and working the 6 band-stitches on each side as before. INFORMATION BEFORE CONTINUING: Lace pattern is now worked on the front piece, first according to diagram A.1, then A.2, A.3 and A.4. Lace pattern is worked on the back piece according to diagrams A.2, A.3 and A.4. The increases for the V-neck and raglan are drawn into the diagrams. When A.2, A.3 and A.4 have been worked 1 time in height, work 1 more repeat of A.3 between A.2 and A.4. The sleeves are worked in stocking stitch and increased as described under RAGLAN – read description above. The increases are inside 2 stocking stitches on each side of the sleeves and are worked every 2nd row 4-3-2-11-7-6 times, then every 4th row/round 10-13-13-12-14-17 times = 14-16-15-23-21-23 increases on each side of each sleeve. YOKE: REMEMBER THE KNITTING TENSION! Work the first row as follows from the right side: 6 band stitches as before, A.1, work 2 GARTER STITCHES – read description above (= left front piece), knit 2, increase 1 stitch for RAGLAN - read description above, 20-20-20-22-22-22 stocking stitches, increase 1 stitch for raglan, knit 2 (= left sleeve), 2 garter stitches, A,2, A.3 over the next 20-20-20-30-30-30 stitches, A.4, 2 garter stitches (= back piece), knit 2, increase 1 stitch for raglan, 20-20-20-22-22-22 stocking stitches, increase 1 stitch for raglan, knit 2 (= right sleeve), 2 garter stitches, A.1, 6 band stitches as before (= right front piece). There are 9 stitches on each front piece, 26-26-26-28-28-28 stitches on each sleeve (including the yarn overs and 2 stocking stitches on each side) and 45-45-45-55-55-55 stitches on the back piece. Continue this pattern and increase for raglan as described above. When A.1 has been worked 1 time in height, there are 39-39-39-49-49-49 stitches on each front piece and 75-75-75-95-95-95 stitches on the back piece. Cut the strand. Continue in the round over all stitches. Move the necessary stitches onto the right needle, without working them, until the beginning of the round is in the transition between the back piece and the right sleeve (between 2 garter stitches and 2 knitted stitches). Continue as follows: Knit and increase as before over the stitches on the right sleeve, work 2 garter stitches, 1 yarn over, work the first 33-33-33-43-43-43 stitches from the right front piece, place the next 4 stitches on an extra needle in front of the piece (= all stitches from the right front piece are now either worked or on the extra needle), knit the next 4 stitches together 2 and 2 (= first 4 stitches on the left front piece), knit together the first 2 stitches from the extra needle and knit the other 2 stitches (3 decreased stitches mid-front), work the next 33-33-33-43-43-43 stitches from the left front piece, make 1 yarn over, 2 garter stitches, work and increase as before over the left sleeve, 2 garter stitches, work A.2, A.3 over the next 50-50-50-70-70-70 stitches, A.4, work 2 garter stitches. The first round in A.2, A.3 and A.4 has been worked on the front and back pieces. Start on round 2 in diagrams A.2, A.3 and A.4 and work in the round over all stitches as follows: Knit and increase as before over the stitches on the right sleeve, work 2 GARTER STITCHES – read explanation above, A.2, A.3 over the next 50-50-50-70-70-70 stitches, A.4, 2 garter stitches, knit and increase as before over the stitches on the left sleeve, work 2 garter stitches, A.2, A.3 over the next 50-50-50-70-70-70 stitches, A.4, 2 garter stitches. Continue this pattern and increases until you have worked 1-2-2-1-1-2 repeats of A.2, A.3 and A.4 over A.1. There are now 85-95-95-105-105-115 stitches on the front/back pieces and 52-56-54-72-68-72 stitches on each sleeve, a total of 274-302-298-354-346-374 stitches. The yoke measures approx. 23-27-27-32-32-36 cm from the shoulder. Sizes M-L-XL-XXL and XXXL are finished; go to DIVIDE FOR BODY AND SLEEVES. SIZE S: Work 1 repeat in height without increasing as follows: Knit the right sleeve, work 2 garter stitches, A.3 over the next 70 stitches, work the first stitch in A.3, 2 garter stitches, knit over the left sleeve, 2 garter stitches, A.3 over the next 70 stitches, work the first stitch in A.3, 2 garter stitches. The yoke measures approx. 27 cm from the shoulder. DIVIDE FOR BODY AND SLEEVES – ALL SIZES: Place the first 52-56-54-72-68-72 stitches on a thread for the sleeve, cast on 15-15-25-15-25-25 stitches under the sleeve, knit 85-95-95-105-105-115 (front piece), place the next 52-56-54-72-68-72 stitches on a thread for the sleeve, cast on 15-15-25-15-25-25 stitches under the sleeve, knit the last 85-95-95-105-105-115 stitches (back piece). BODY: 200-220-240-240-260-280 stitches. Start with round 14-2-2-2-2-2 in A.5, and continue the pattern in the round until the body measures 16-18-20-16-18-16 cm, finishing after a whole or half repeat of A.5 in height. Change to circular needle size 3 mm. Work rib (knit 1, purl 1), AT THE SAME TIME increase 42-42-48-48-48-58 stitches evenly on round 1 = 242-262-288-288-308-338 stitches. When the rib measures 5-5-5-6-6-6 cm, cast off. The jumper measures approx. 48-50-52-54-56-58 cm from the shoulder. SLEEVES: Place the 52-56-54-72-68-72 stitches from the thread on one side of the piece on circular needle size 4 mm and knit up 1 stitch in each of the 15-15-25-15-25-25 stitches cast on under the sleeve = 67-71-79-87-93-97 stitches. Insert 1 marker in the middle stitch of the 15-15-25-15-25-25 stitches under the sleeve – start the round just before this marker-stitch. Work stocking stitch in the round. When the sleeve measures 3 cm from the division, decrease under the sleeve – read DECREASE TIP, repeat this decrease when the sleeve measures 8-8-9-6-6-6 cm = 63-67-75-83-89-93 stitches. Work until the sleeve measures 15-16-17-12-13-10 cm from the division. Change to double pointed needles size 3 mm. Work rib (knit 1, purl 1), AT THE SAME TIME increase 13-13-15-17-19-19 stitches evenly on round 1 = 76-80-90-100-108-112 stitches. Cast off when the rib measures 5-5-5-6-6-6 cm. ASSEMBLY: Sew the bands together mid-back, then sew the bands to the neckline. |
|||||||||||||||||||
Diagram explanations |
|||||||||||||||||||
|
|||||||||||||||||||
|
|||||||||||||||||||
|
|||||||||||||||||||
|
|||||||||||||||||||
|
|||||||||||||||||||
|
|||||||||||||||||||
Have you finished this pattern?Tag your pictures with #dropspattern #sanddiamondsweater or submit them to the #dropsfan gallery. Do you need help with this pattern?You'll find 31 tutorial videos, a Comments/Questions area and more by visiting the pattern on garnstudio.com. © 1982-2025 DROPS Design A/S. We reserve all rights. This document, including all its sub-sections, has copyrights. Read more about what you can do with our patterns at the bottom of each pattern on our site. |
|||||||||||||||||||


With over 40 years in knitting and crochet design, DROPS Design offers one of the most extensive collections of free patterns on the internet - translated to 17 languages. As of today we count 314 catalogues and 11821 patterns translated into English (UK/cm).
We work hard to bring you the best knitting and crochet have to offer, inspiration and advice as well as great quality yarns at incredible prices! Would you like to use our patterns for other than personal use? You can read what you are allowed to do in the Copyright text at the bottom of all our patterns. Happy crafting!
Post a comment to pattern DROPS 248-6
We would love to hear what you have to say about this pattern!
If you want to leave a question, please make sure you select the correct category in the form below, to speed up the answering process. Required fields are marked *.