
Popular categories
Looking for a yarn?


Comments / Questions (32)
![]() Anne Grethe Jensen wrote:
Anne Grethe Jensen wrote:
Det er en dejligt bluse at strikke har lavet 4 med kort ærme 1 med langt
23.04.2026 - 08:34
![]() Kulic Snjezana wrote:
Kulic Snjezana wrote:
Vielen lieben Dank.
14.04.2026 - 10:37
![]() Kulic Snjezana wrote:
Kulic Snjezana wrote:
Bei der Größe XL soll man 21 Runden A1 stricken. Das Diagramm hat 12 Runden. Wie stricke ich weiter?
14.04.2026 - 10:35
![]() Kulic Snjezana wrote:
Kulic Snjezana wrote:
Bei der Größe XL soll man 21 Runden A1 stricken. Das Diagramm hat 12 Runden. Wie stricke ich weiter?
13.04.2026 - 21:08DROPS Design answered:
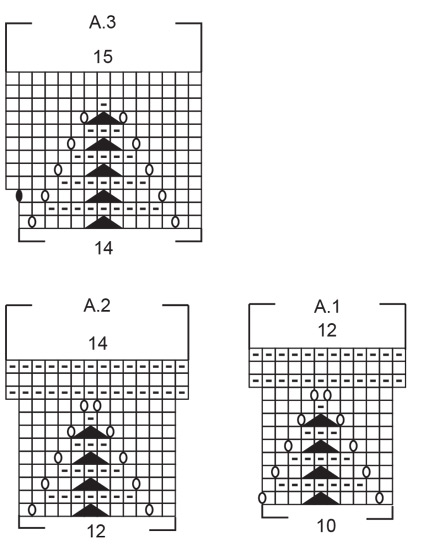
Liebe Frau Snjezana, A.1 wird nur einmal in der Höhe (= 12 Runden) gestrickt, in XL stricken Sie aber die 10 Maschen A.1 insgesamt 21 Mal in der Runde (10 Maschen x 21 = 210 Maschen). Gleichzeitig nehmen Sie 2 Maschen in jedem A.1 zu so sind es 12 Maschen x 21 = 252 Maschen wenn das Diagram fertig ist bzw nach den 12 Runden. Dann wird man den Rudbeginn versetzen und A.2 auch 21 Mal in der Runde stricken. Viel Spaß beim Stricken!
14.04.2026 - 08:49
![]() Kulic Snjezana wrote:
Kulic Snjezana wrote:
Muss ich bei größe XL die Runde 1 bis 9 zwei mal stricken und dann die letzten 3 Runden?
13.04.2026 - 09:27DROPS Design answered:
Liebe Frau Snjezana, wie meinen Sie das? Ich verstehe leider Ihre Frage nicht, können Sie uns mehr dazu sagen? Danke im voraus für Ihr Verständnis.
13.04.2026 - 10:50
![]() Jeanette wrote:
Jeanette wrote:
Hvordan skal det forstås at mønsterdiagrammerne starter med fx 10 masker (A1) og slutter med 12 masker? Skal der tages ud (- og hvordan?) i hvert mellemrum mellem mønstrene? Så kommer der til at hære 2 udtagninger i træk?
02.04.2026 - 08:07DROPS Design answered:
Hej Jeanette, jo når du følger diagrammerne, så får du automatisk flere masker, både ifølge A.1, A.2 og A.3. Husk at du starter nederst til højre i diagrammerne og strikker opad :)
09.04.2026 - 12:05
![]() Halina wrote:
Halina wrote:
Nie rozumiem w jaki sposób mam zacząć robić schemat A1. Mam 180 oczek i muszę przerobić schemat 18 razy. Skoro raport wynosi 14 oczek na początku to 14x18 równa się 252 oczka.
02.02.2026 - 08:25DROPS Design answered:
Witaj Halino, schemat A.3 (na górze) ma 14 oczek. Schemat A.1 (poniżej, po prawej stronie) ma 10 oczek. Czyli przy 180 oczkach powtórzysz ten schemat A.1 18 razy w okrążeniu. Pozdrawiamy!
02.02.2026 - 08:37
![]() Cécilia wrote:
Cécilia wrote:
Bonjour, lorsqu'on a fait la séparation, il est indiqué de tricoter 15 cm . Au tour suivant augmenter de 40 mailles. Faut il d'abord tricoter les 15 cm et augmenter ou faire un rang et augmenter de 40 mailles? Merci d'avance pour votre réponse. Amicalement
31.10.2025 - 20:27DROPS Design answered:
Bonjour Cécilia, vous tricotez d'abord les 15 cm et ensuite vous augmentez au tour suivant, ces augmentations se font juste avant de tricoter les côtes. Bon tricot!
03.11.2025 - 07:26
![]() Francine Lalonde wrote:
Francine Lalonde wrote:
Bonjour, je n’arrive toujours pas à réaliser le point de fantaisie. Vous n’auriez pas un tutoriel peut-être? Cela fait 3 fois que je recommence et j’ai vérifié vos vidéos et leçons . Je ne connais pas le nom du point. Un grand merci!
30.03.2025 - 04:00DROPS Design answered:
Bonjour Mme Lalonde, nous n'avons effectivement pas de vidéo pour ce point fantaisie. Lisez bien les diagramme de bas en haut et de droite à gauche - mettez éventuellement 1 marqueur entre chaque diagramme pour mieux repérer le nombre de mailles après chaque tour. , ex. tour 1 de A.1: *1 m end, 1 jeté, 3 m end, glissez 1 m, 2 m ens à l'end, passez la m glissée par-dessus la m tricotée, 3 m end, 1 jeté*, répétez de *-* tout le tour. 2ème tour:*2 m end, 7 m env, 2 m end*, répétez de *-* tout le tour. En espérant que ceci puisse vous aider. Bon tricot!
31.03.2025 - 08:55
![]() Francine Lalonde wrote:
Francine Lalonde wrote:
Bonjour, J’adore vos modèles. Au début de l’empiècement, après avoir augmenté les 45 mailles , faut-il tricoter en jersey? Merci.
24.03.2025 - 06:00DROPS Design answered:
Bonjour Mme Lalonde et merci :) Lorsque vous avez tricoté 2 tour en augmentant 45 mailles à intervalles réguliers, tricotez en jersey jusqu'à ce que l'empiècement mesure 3 cm à partir du marqueur que vous avez mis à la fin du col et tricotez ensuite le diagramme A.1 . Bon tricot!
24.03.2025 - 09:47
|
||||||||||||||||
Blueberry Leaf#blueberryleafsweater |
||||||||||||||||
 |
 |
|||||||||||||||
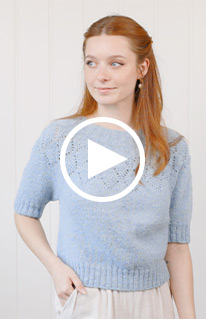
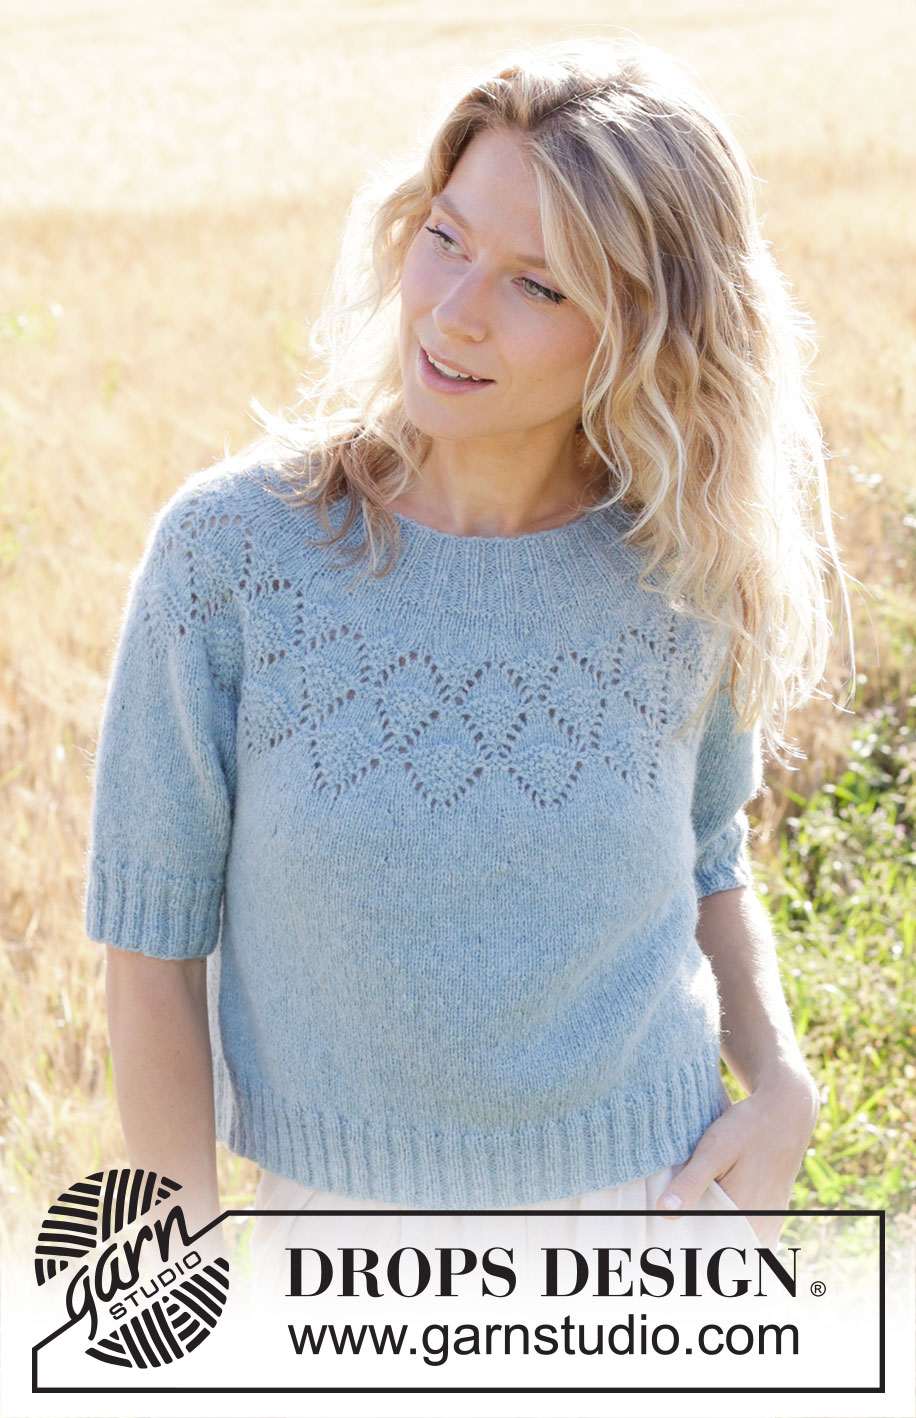
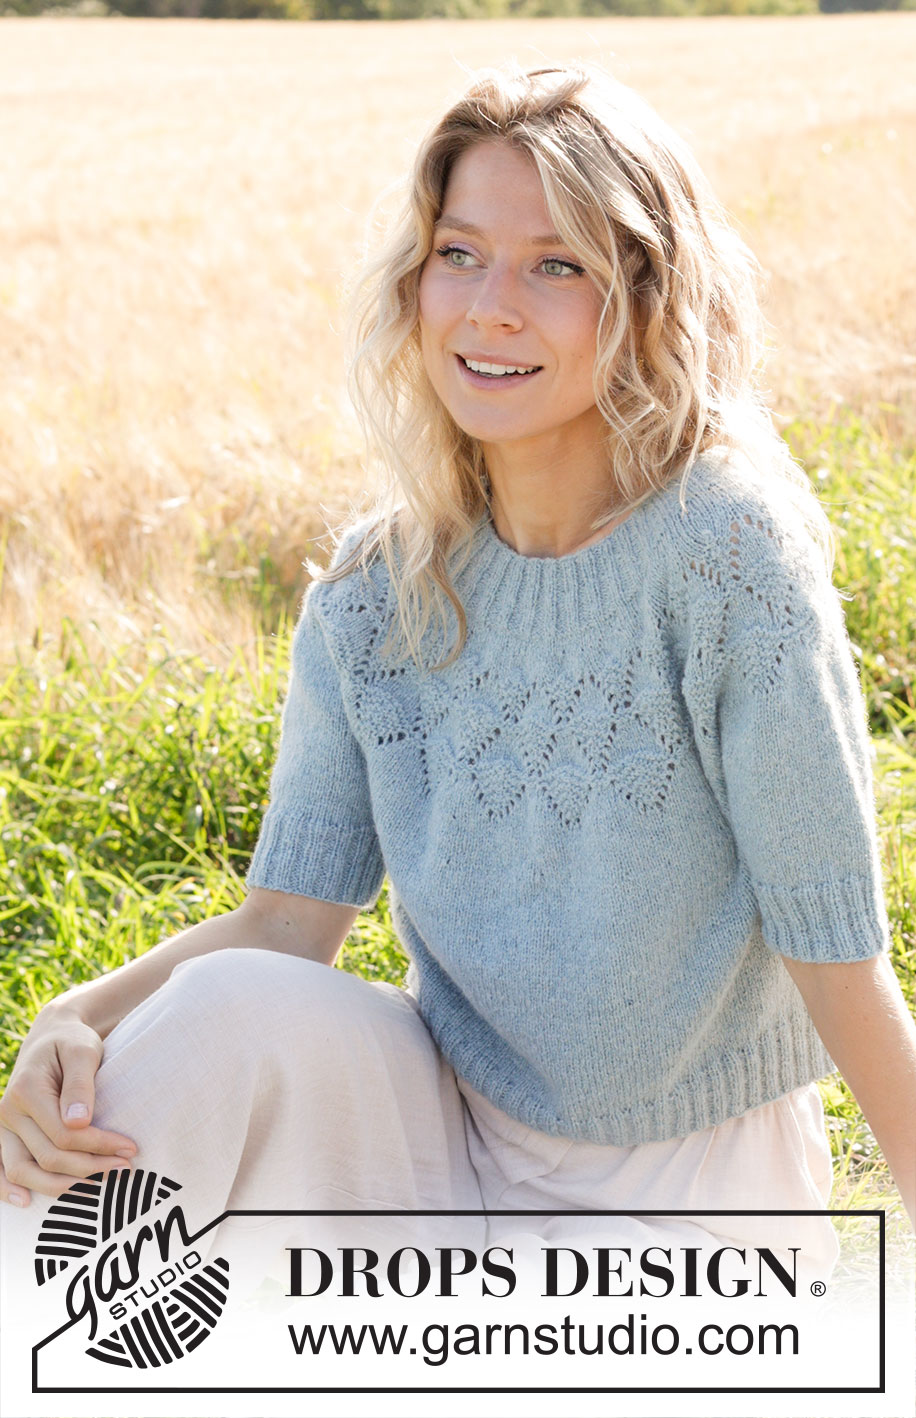
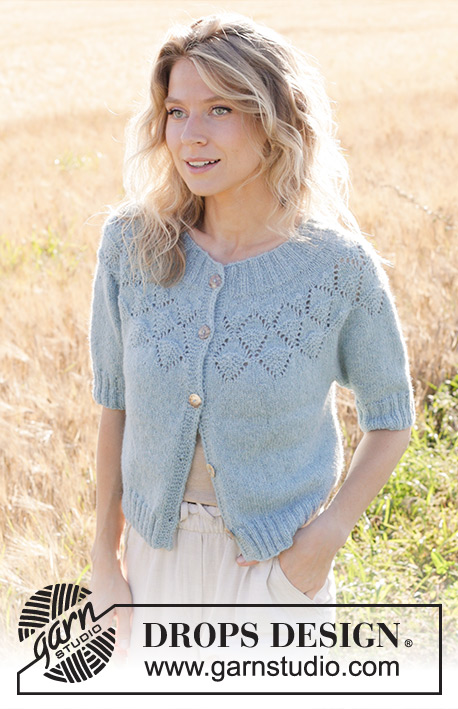
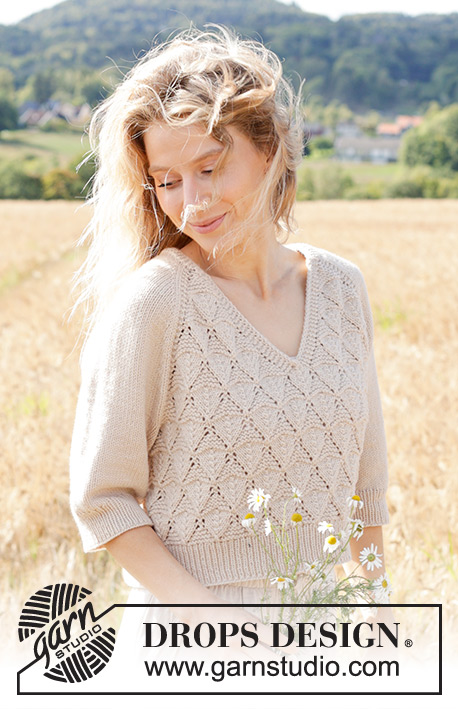
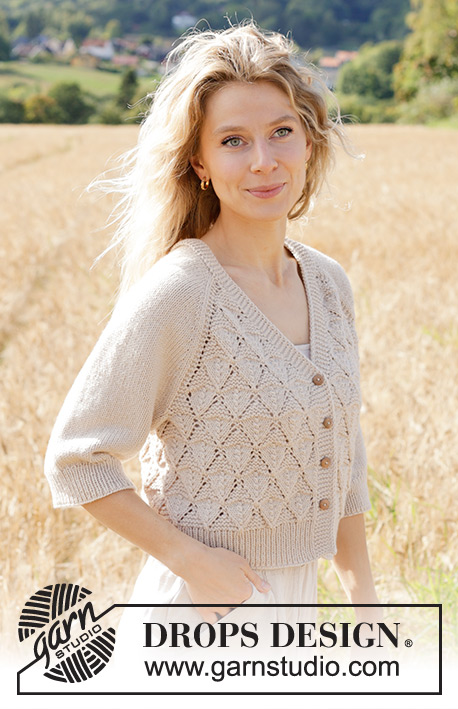
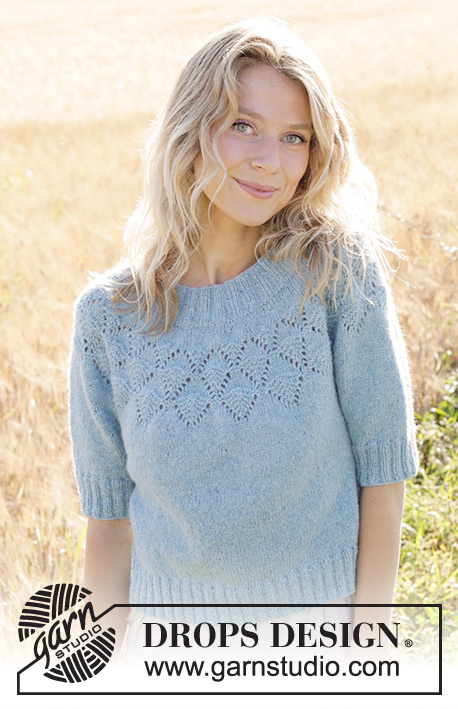
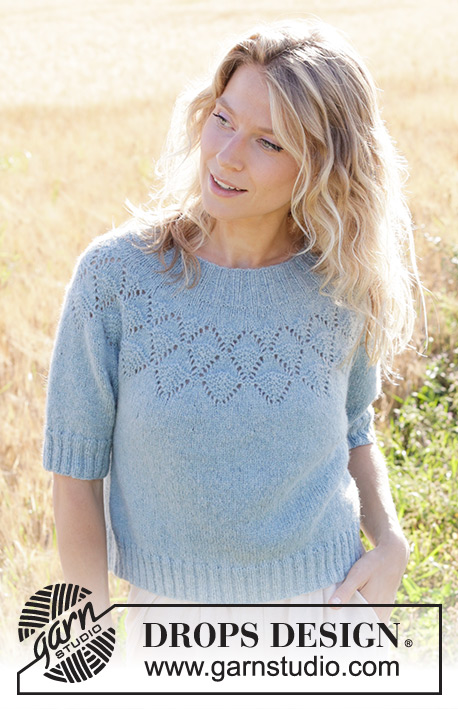
Knitted jumper in DROPS Sky or DROPS Merino Extra Fine. Piece is knitted top down with round yoke, lace pattern and short sleeves. Size: S - XXXL
DROPS 249-9 |
||||||||||||||||
|
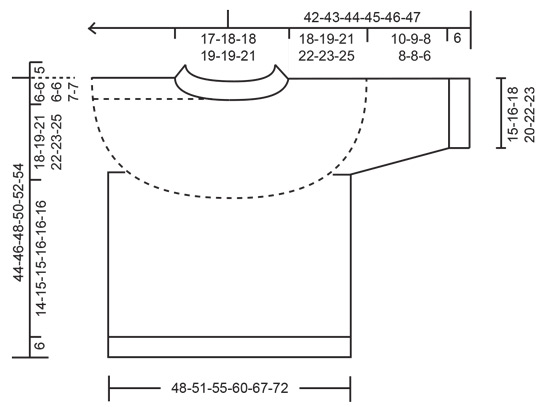
---------------------------------------------------------- EXPLANATION FOR THE PATTERN: ---------------------------------------------------------- INCREASE TIP (applies to round yoke): To calculate how to increase evenly, use the total number of stitches on row (e.g. 150 stitches) and divide stitches by number of increases to be done (e.g. 30) = 5. In this example increase after approx. every 5th stitch by making 1 yarn over. On next round knit yarns over twisted to avoid holes. PATTERN: See diagrams A.1 to A.3. DECREASE TIP (applies to sleeves): Decrease 1 stitch on each side of marker thread as follows: Work until 3 stitches remain before marker thread, knit 2 together, knit 2 (marker thread is between these 2 stitches), slip 1 stitch knitwise, knit 1, pass slipped stitch over stitch worked. ---------------------------------------------------------- START THE PIECE HERE: ---------------------------------------------------------- JUMPER - SHORT OVERVIEW OF THE PIECE: In this pattern long and short needles have been used, begin with fitting length and switch as needed. Work neck edge and yoke in the round on circular needle from mid back, work top down. When yoke is done, divide stitches for body and sleeves. Work body down wards in the round on circular needle while putting the sleeves aside. Then work sleeves downwards in the round on needle. NECK EDGE: Cast on 120-124-128-132-140-148 stitches on circular needle size 3 mm with DROPS Sky or DROPS Merino Extra Fine. Work in the round in rib (knit 2/purl 2). When piece measures 2 cm, increase all purl sections with 2 purl stitches to 3 purl stitches - increase with 1 yarn over between 2 purl stitches, purl yarn over twisted on next round = 150-155-160-165-175-185 stitches. Continue with rib (knit 2/purl 3) until neck edge measures 5 cm in total. Insert a marker in the middle of round - now measure yoke from here. YOKE: Switch to circular needle size 4 mm. Work in stocking stitch in the round while at the same time increasing 30-35-40-45-45-55 stitches evenly on the first round – read INCREASE TIP = 180-190-200-210-220-240 stitches. Work until piece measures 3 cm from marker. Insert 1 marker thread at beginning of round, use it when working pattern. REMEMBER THE KNITTING TENSION! Now work PATTERN - read explanation above, i.e. work A.1 18-19-20-21-22-24 times in total in the round on yoke. When A.1 has been worked vertically, there are 216-228-240-252-264-288 stitches on needle. Now displace the round, cut the yarn and move the first 6 stitches on round on to right needle knitwise, move the marker thread here - now the round begins here. Work A.2 18-19-20-21-22-24 times in total in the round on yoke. When A.2 has been worked vertically, there are 252-266-280-294-308-336 stitches on needle. Now displace the round, cut the yarn and move the first 7 stitches on round on to right needle knitwise, move the marker thread here - now the round begins here. Work A.3 18-19-20-21-22-24 times in total in the round on yoke. When A.3 has been worked vertically, there are 270-285-300-315-330-360 stitches on needle. Piece measures approx. 12 cm from marker. Work in the round in stocking stitch, at the same time on first round increase 13-17-22-32-39-36 stitches evenly – remember INCREASE TIP = 283-302-322-347-369-396. Work until piece measures 15-15-16-17-17-18 cm from marker, on next round increase 13-18-22-33-39-36 stitches evenly = 296-320-344-380-408-432 stitches. Work in stocking stitch until piece measures 18-19-21-22-23-25 cm from marker. On next round divide yoke for body and sleeves as follows: Work the first 32-36-39-44-50-55 stitches as before (belongs to back piece), slip the next 58-62-68-76-78-80 stitches on a thread for sleeve, cast on 10-10-12-12-14-16 new stitches on needle (in the side under sleeve), work 90-98-104-114-126-136 stitches in stocking stitch (front piece), slip the next 58-62-68-76-78-80 stitches on a thread for sleeve, cast on 10-10-12-12-14-16 new stitches on needle (in the side under sleeve), and work the last 58-62-65-70-76-81 stitches as before (the rest of back piece). Finish body and sleeves separately. Now measure piece from here! BODY: = 200-216-232-252-280-304 stitches. Work in round in stocking stitch until piece measures 14-15-15-16-16-16 cm from division. On next round increase 40-40-44-52-56-60 stitches evenly = 240-256-276-304-336-364 stitches. Switch to circular needle size 3 mm. Now work rib in the round (purl 2/knit 2) until rib measures 6 cm. Cast off. Jumper measures approx. 44-46-48-50-52-54 cm from shoulder. SLEEVES: Slip the 58-62-68-76-78-80 stitches from thread in one side of piece on double pointed needles/a circular needle size 4 mm and pick in addition up 1 stitch in each of the 10-10-12-12-14-16 new stitches cast on under sleeve = 68-72-80-88-92-96 stitches. Insert 1 marker thread in the middle of the 10-10-12-12-14-16 new stitches under sleeve- Use marker thread later when decreasing under sleeve. Begin round at marker thread. Work in stocking stitch in the round, while AT THE SAME TIME when sleeve measures 3 cm from division, decrease 2 stitches mid under sleeve in size S, M, L and XL (do not decrease in XXL and XXXL) - read DECREASE TIP. SIZE S, M, L and XL: Decrease like this every 2-1-1-1½ cm 2-2-2-2 times in total = 64-68-76-84 stitches. ALL SIZES: = 64-68-76-84-92-96 stitches. Work until sleeve measures 10-9-8-8-8-6 cm from division. 6 cm remain until finished measurements. Try the jumper and work to desired length before rib. Knit 1 round while increasing 8-12-12-16-16-20 stitches evenly on round= 72-80-88-100-108-116 stitches. Switch to double pointed needles size 3 mm and work rib in the round (knit 2/purl 2) for 6 cm. Cast off. Sleeve measures approx. 16-15-14-14-14-12 cm from division. |
||||||||||||||||
Diagram explanations |
||||||||||||||||
|
||||||||||||||||
 |
||||||||||||||||
 |
||||||||||||||||
Have you finished this pattern?Tag your pictures with #dropspattern #blueberryleafsweater or submit them to the #dropsfan gallery. Do you need help with this pattern?You'll find 30 tutorial videos, a Comments/Questions area and more by visiting the pattern on garnstudio.com. © 1982-2026 DROPS Design A/S. We reserve all rights. This document, including all its sub-sections, has copyrights. Read more about what you can do with our patterns at the bottom of each pattern on our site. |
||||||||||||||||


With over 40 years in knitting and crochet design, DROPS Design offers one of the most extensive collections of free patterns on the internet - translated to 17 languages. As of today we count 324 catalogues and 12290 patterns translated into English (UK/cm).
We work hard to bring you the best knitting and crochet have to offer, inspiration and advice as well as great quality yarns at incredible prices! Would you like to use our patterns for other than personal use? You can read what you are allowed to do in the Copyright text at the bottom of all our patterns. Happy crafting!
Post a comment to pattern DROPS 249-9
We would love to hear what you have to say about this pattern!
If you want to leave a question, please make sure you select the correct category in the form below, to speed up the answering process. Required fields are marked *.