
Popular categories
Looking for a yarn?


Comments / Questions (160)
![]() Teissandier wrote:
Teissandier wrote:
Bonjour, le modele dit de tricoter le col double en jersey alors que sur la photo il est en côtes et semble non double. Y a t il une erreur ? Merci
08.10.2025 - 18:30DROPS Design answered:
Bonjour Mme Teissandier, le col du modèle photographié a bien été tricoté en double, mais vous pouvez ne le tricoter qu'en simple si vous le préférez. Bon tricot!
09.10.2025 - 08:35
![]() Kirsten Pedersen wrote:
Kirsten Pedersen wrote:
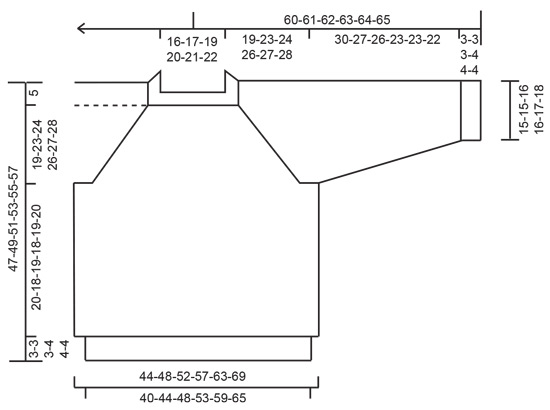
Længden på ryg- og forstykke (side 4/6) er angivet forkert. Strik rundt til arbejdet måler 20-18-19-18-19-20 cm fra delingen. Vil I venligst angive de korrekte mål (deet er str. S-M-L-XL-XXL-XXXL) og det kan jo ikke passe som det er angivet nu. På forhånd tak for svar. mvh Kirsten
02.10.2025 - 10:34DROPS Design answered:
Hei Kirsten. Fint om kan opplyse hva du mener er feil. Om du mener det er fordi den minst str. er lengre enn de andre str. etter delingen, så er det ingen feil. Du må se på hele lengden på plagget (bærestykket i den minste str er kortere enn de andre str, men har lengre mål etter delingen, men sammenlagt er det kortere). mvh DROPS Design
13.10.2025 - 14:46
![]() Tine wrote:
Tine wrote:
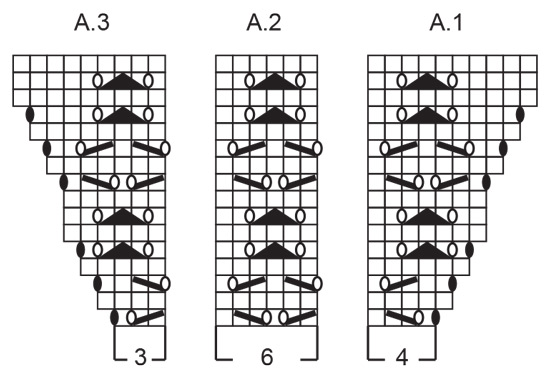
I knitted the sleeves several times and didn't get why my pattern wasn't working out. It took me a while to understand that I didn't need to knit A1 and A3 anymore once the increases were done. It would be great to save others from that by adding a simple line to only knit A2 after increases are finished. Looking at comments, I'm not the only one struggling with this. Thanks!
30.09.2025 - 07:24
![]() Wiebke wrote:
Wiebke wrote:
Hallo, mit welcher Nadelstärke macht man die Maschenprobe? LG Wiebke
29.09.2025 - 15:47DROPS Design answered:
Hallo Wiebke, die Maschenprobe wird mit Nadelstärke Nr. 4,5 gestrickt. Liebe Grüße!
21.10.2025 - 19:23
![]() Leny Van Haag wrote:
Leny Van Haag wrote:
In het patroon staat :brei A1, A2 over 12 steken, maar ik tel er maar 10 , dan A3 , 3 steken, Dan heb ik er nog 6 over voor de markeer draad Wat lees ik fout?
27.09.2025 - 11:04DROPS Design answered:
Dag Leny,
Je breit eerst A.1, dan brei je A.2 over 12 steken, dus dat betekent dat je 2 keer A.2 in de breedte breit, omdat A.2 6 steken breed is. tot slot brei je 1 keer A.3 in de breedte.
27.09.2025 - 19:55
![]() Lise wrote:
Lise wrote:
Bonjour, Peut on utiliser la laine brushed alpaca ? Ou juste l'apaca svp ? Merci
18.09.2025 - 09:57DROPS Design answered:
Bonjour Lise, vous pouvez tout à fait tricoter en Brushed Alpaca Silk , autrement dit avec juste 1 seul fil, au lieu de tricoter avec 2 fils (Alpaca + Kid-Silk). Retrouvez ici comment calculer la quantité correspondante. Bon tricot!
18.09.2025 - 18:36
![]() Roos wrote:
Roos wrote:
De uitleg over de raglan-meerderingen vertelt niet hoe vaak er gemeerderd moet worden op voor-en achterpanden. Het telpatroon geeft alleen de meerderingen op de mouwen aan. Meerder ik op de voor en achterpanden elke 2e naald?
12.09.2025 - 12:25DROPS Design answered:
Dag Roos,
De meerderingen voor de mouwen zijn in de telpatronen aangegeven. Op de voor- en achterpanden, meerder je 22-24-26-29-33-36 keer. Dit staat ook beschreven in te tekst.
12.09.2025 - 21:34
![]() Carolina wrote:
Carolina wrote:
So I am knitting Size XL. I decreased from 118 to 106 and I am currently dividing the arms from the front and back piece, when I follow the instructions and separate 16+ 19+32+19+16 = 102, not 106, what do I do with the other 4 stitches?
12.09.2025 - 11:32DROPS Design answered:
Hi Karolina, count 16 stitches (= half back piece), insert 1 marker in the next stitch (1 st), count 19 stitches (= sleeve), insert 1 marker in the next stitch, count 32 stitches (= front piece), insert 1 marker in the next stitch, count 19 stitches (= sleeve), insert 1 marker in the next stitch, there are 16 stitches left after the last marker (= half back piece). 16+1+19+1+32+1+19+1+16=106 sts. Happy knitting!
12.09.2025 - 11:54
![]() Elisabeth Rudiløkken wrote:
Elisabeth Rudiløkken wrote:
Hei. Skal strikke remembering spring genseren, men i oppskriften står ikke cm rundt bolen, kun s-m-l osv.hva er cm på str s og m mon tro? Mvh Elisabeth
02.09.2025 - 11:49DROPS Design answered:
Hej Elisabeth. Längst ned på opskriften finns en målskisse, där ser du plaggets mål i cm i alla storlekar. Mvh DROPS Design
02.09.2025 - 12:21
![]() Catherine wrote:
Catherine wrote:
Bonjour. Le diagramme A3 A2 A1 ne montre que 16 rangs, dont seulement 6 rangs d'augmentations, alors qu'il doit y en avoir 20 pour les manches. Pouvez vous m'expliquer comment poursuivre au delà des 16 rangs ? Merci
01.09.2025 - 23:58DROPS Design answered:
Bonjour Catherine, lorsque vous avez terminé les diagrammes A.1 - A.3 en hauteur, reprenez au 1er rang: tricotez A.1 au-dessus des 4 premières mailles du A.1 précédent, tricotez A.2 sur les 6 dernières mailles du A.1 précédent, tricotez A.2 comme avant, puis encore 1 fois A.2 au-dessus des 6 premières mailles du A.3 précédent et A.3 au-dessus des 3 dernières mailles de A.3 = vous tricotez maintenant 2 fois A.2 en plus entre A.1 et A.3. Bon tricot!
02.09.2025 - 17:18
|
|||||||||||||||||||
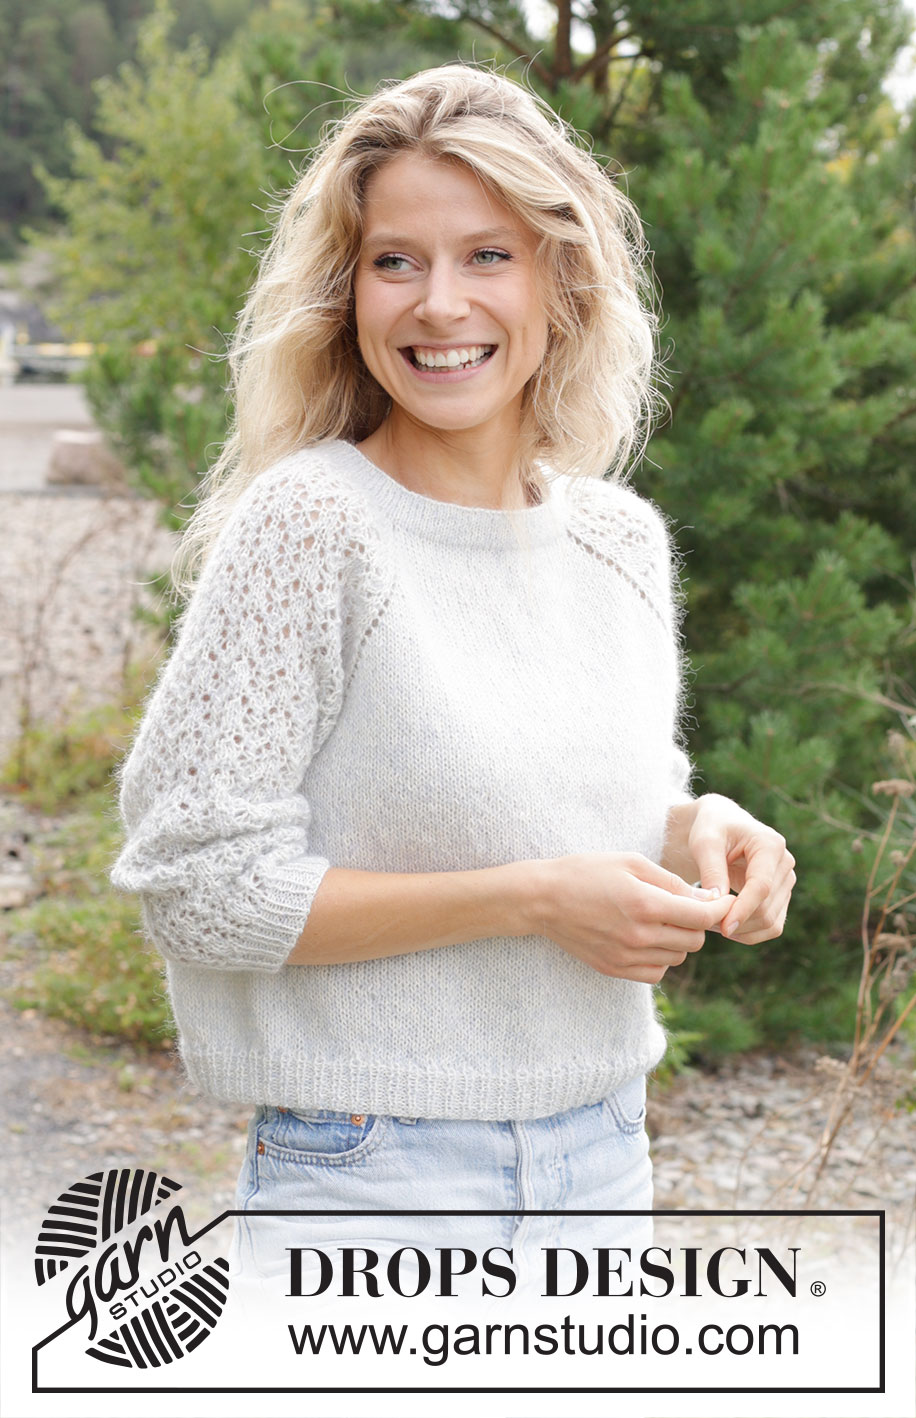
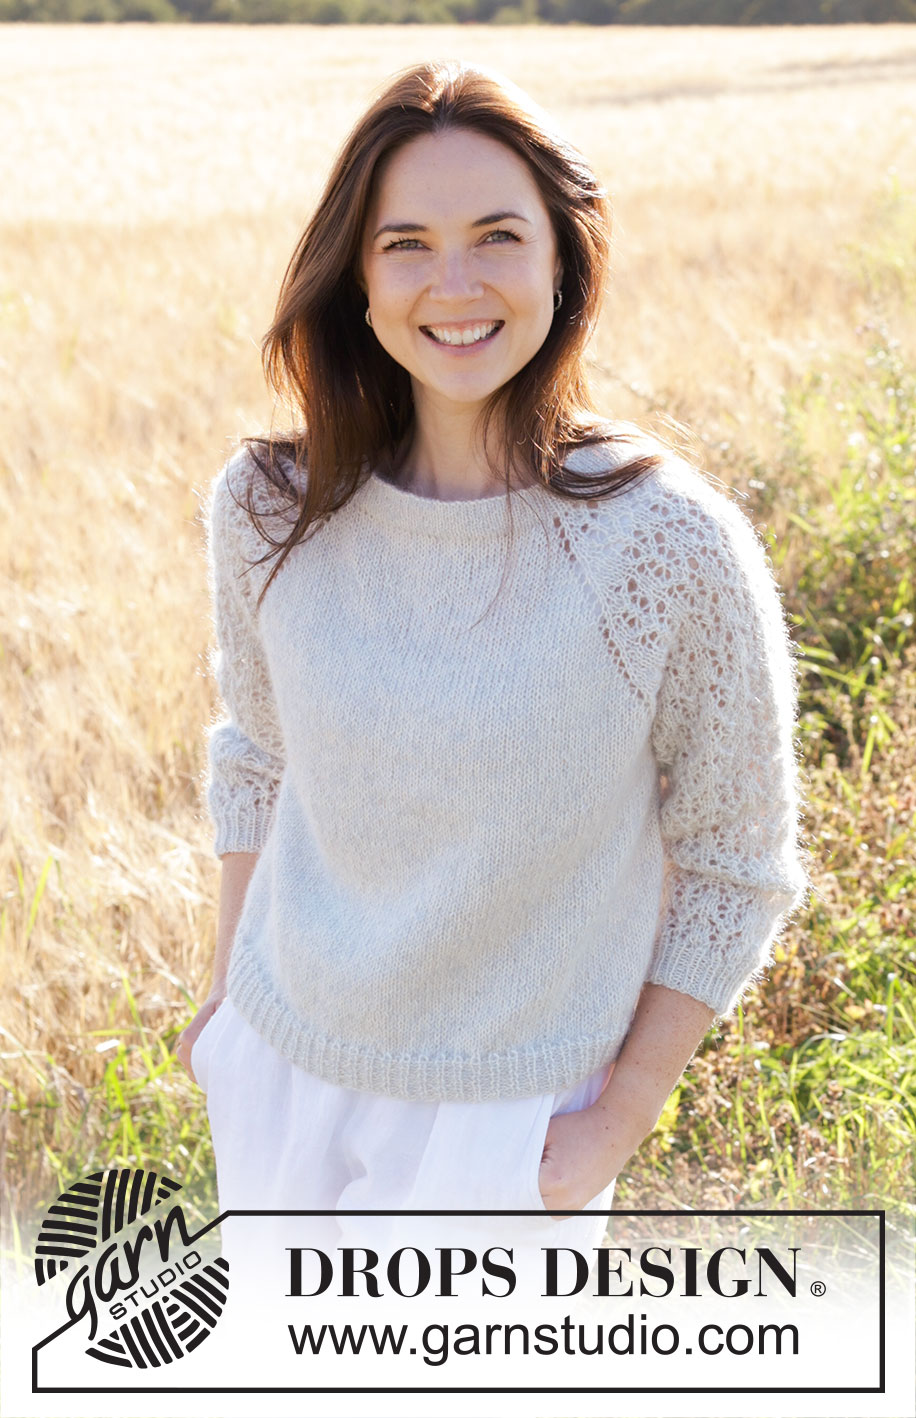
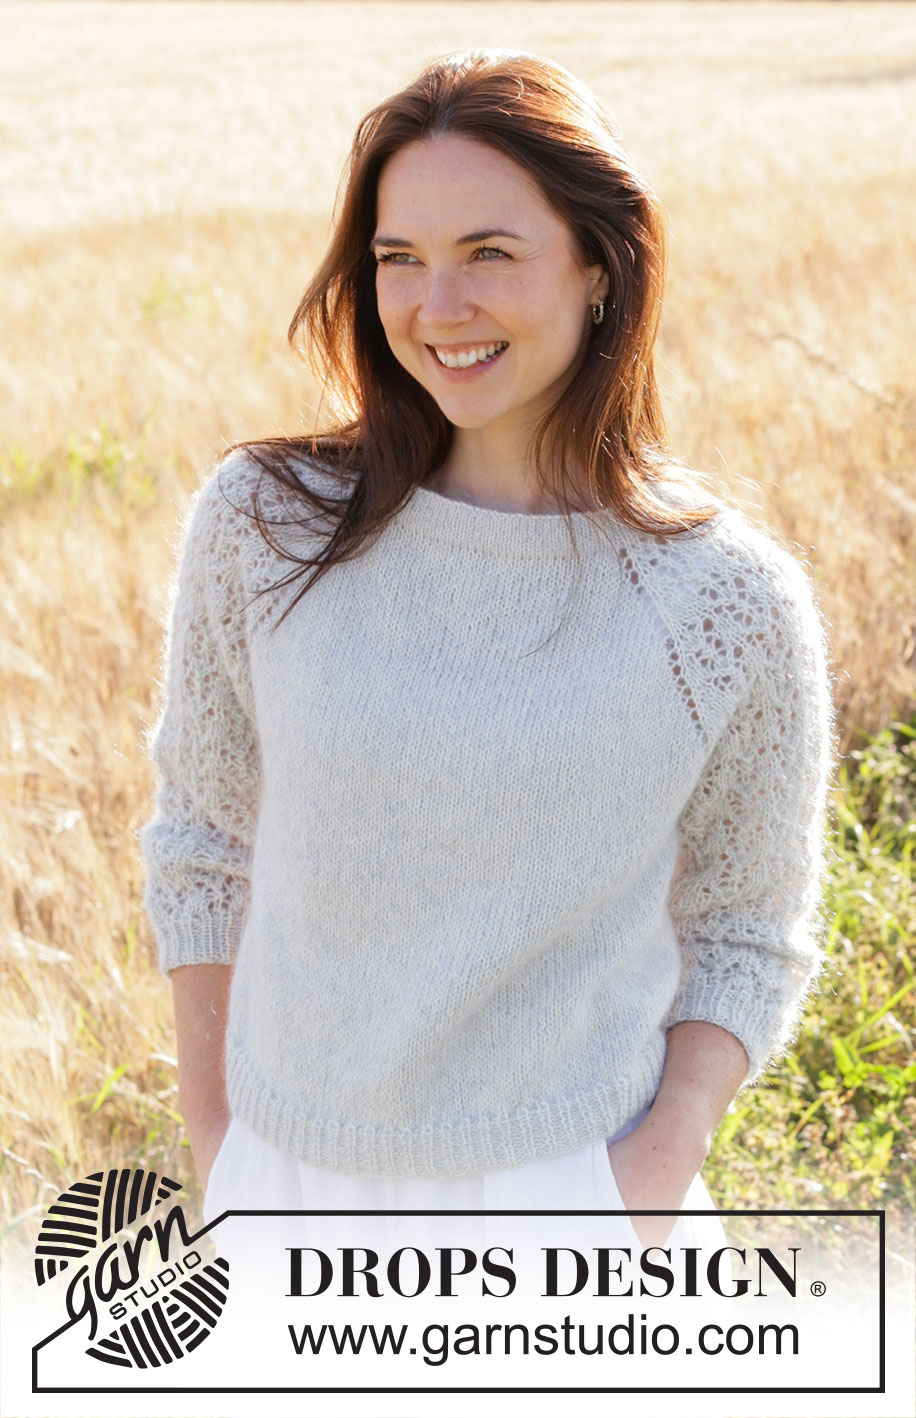
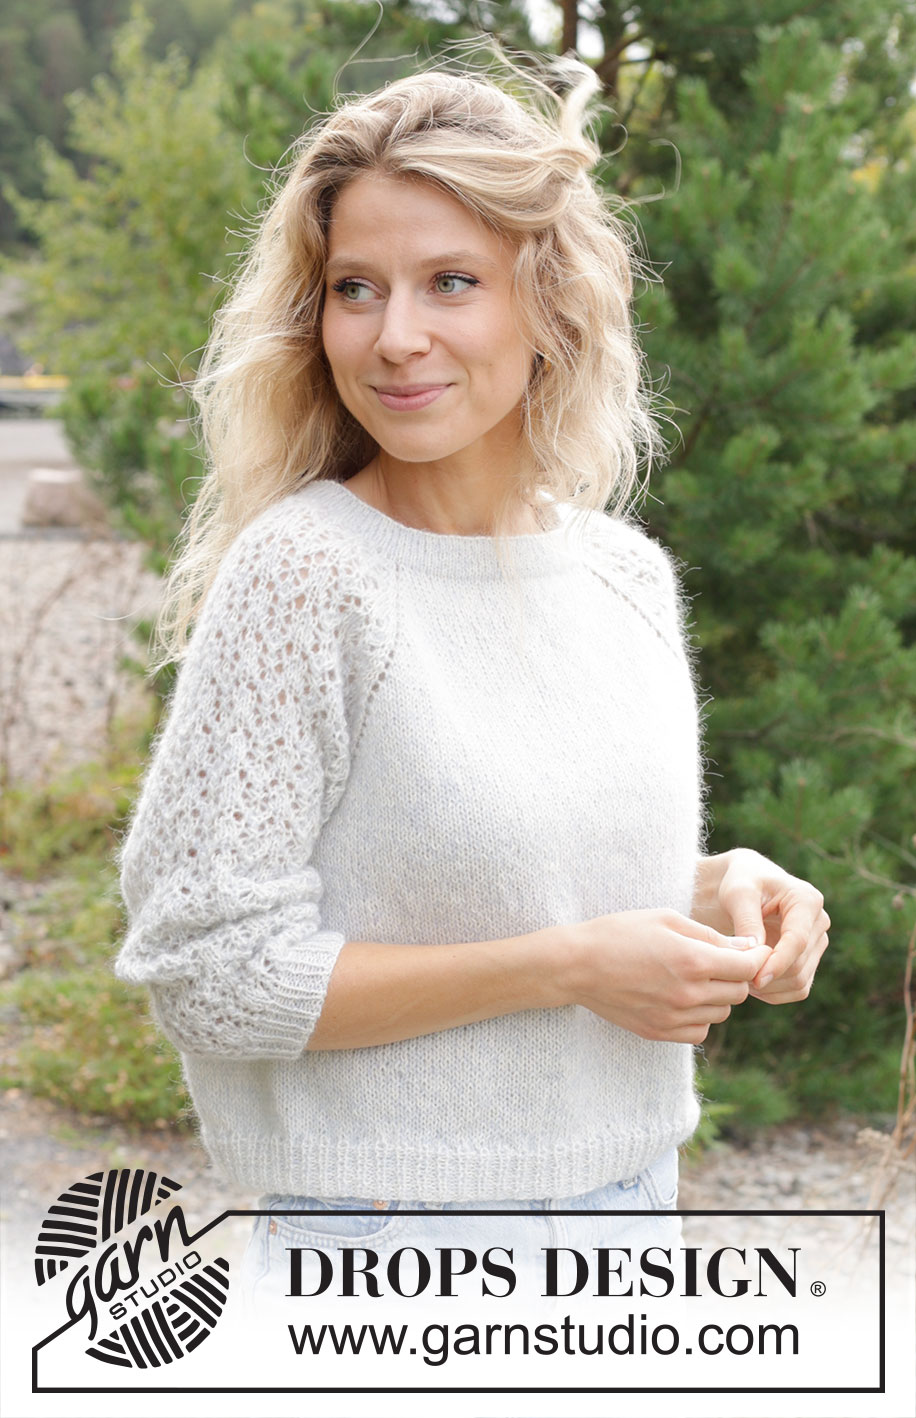
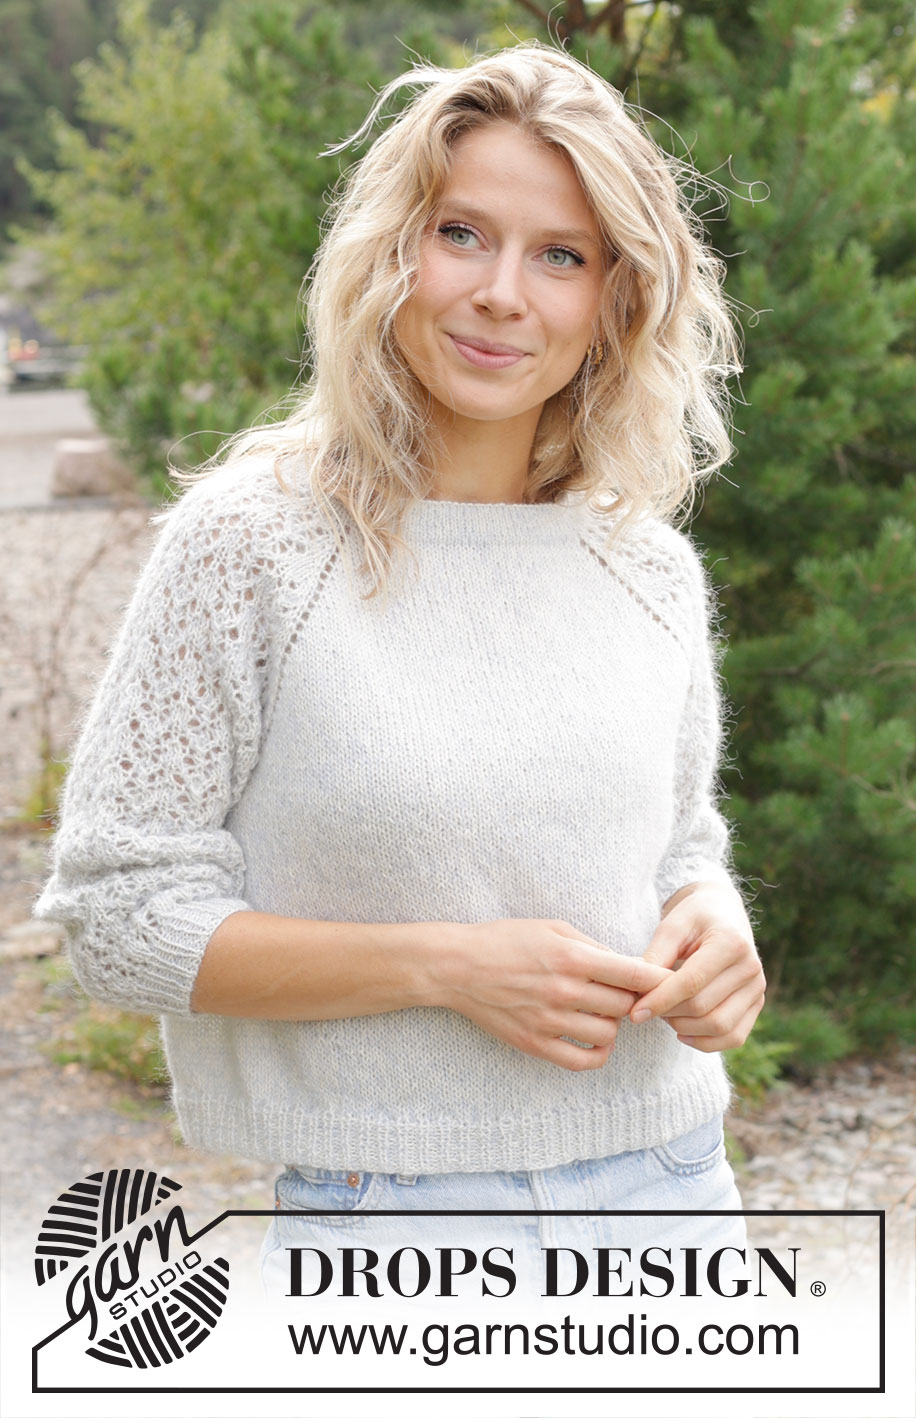
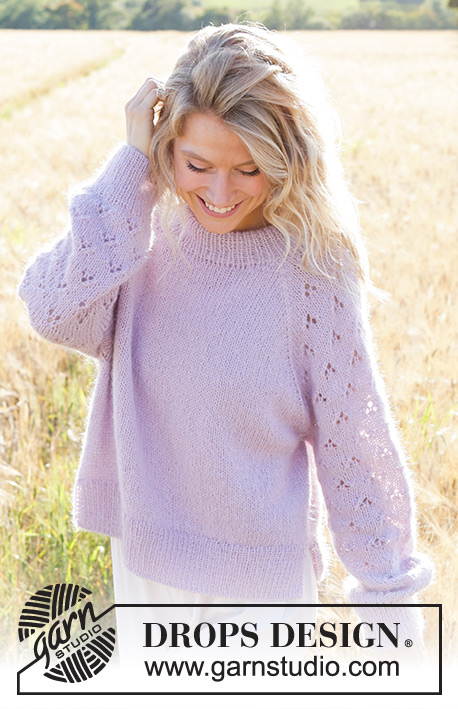
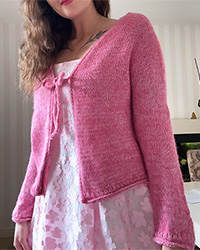
Remembering Spring#rememberingspringsweater |
|||||||||||||||||||
 |
 |
||||||||||||||||||
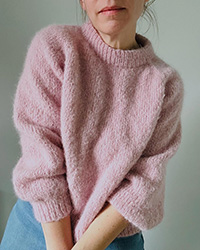
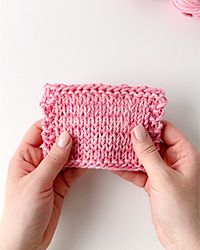
Knitted jumper in DROPS Alpaca and DROPS Kid-Silk. The piece is worked top down with double neck, raglan, lace pattern and ¾-length sleeves. Sizes S - XXXL.
DROPS 250-1 |
|||||||||||||||||||
|
------------------------------------------------------- EXPLANATIONS FOR THE PATTERN: ------------------------------------------------------- PATTERN: See diagrams A.1 to A.3. RAGLAN: Increase 1 stitch by making 1 yarn over before/after each marker-stitch. On the next round knit the yarn overs on the front and back pieces – leaving holes. The yarn overs on the sleeves are knitted twisted – no holes. Work the new stitches in stocking stitch on the front and back pieces and into the pattern on the sleeves. DECREASE TIP (for sleeves): Decrease 1 stitch on each side of the marker-thread as follows: Work until there are 3 stitches left before the marker-thread, knit 2 together, knit 2 (marker-thread sits between these 2 stitches), slip 1 stitch knit-wise, knit 1 and pass the slipped stitch over the knitted stitch (2 stitches decreased). ------------------------------------------------------- START THE PIECE HERE: ------------------------------------------------------- JUMPER – SHORT OVERVIEW OF THE PIECE: The pattern uses both long and short needles; start with the length which fits the number of stitches and change when necessary. The double neck and yoke are worked in the round with circular needle, top down. When the yoke is finished, it is divided for body and sleeves and the body is continued in the round, while the sleeves wait. The sleeves are worked in the round, top down. The neck is folded to the inside and sewn down. If there is a «0» in your chosen size, skip the information and go straight to the next instruction. DOUBLE NECK: Cast on 104-108-114-118-122-126 stitches with circular needle size 4.5 mm, 1 strand DROPS Alpaca and 1 strand DROPS Kid-Silk (= 2 strands). Change to circular needle size 3.5 mm (casting on with a larger needle size gives and elastic cast-on edge). Work stocking stitch in the round for 2½ to 3 cm. Purl 1 round, the neck is later folded along this round. Continue with stocking stitch until the neck measures 6 cm. It will be approx. 3 cm when folded double. Insert 1 marker at the beginning of the round (= mid-back), the yoke is measured from here. YOKE: Change to circular needle size 4.5 mm. Knit 1 round and decrease 10-10-12-12-12-12 stitches evenly spaced = 94-98-102-106-110-114 stitches. Insert 4 markers without working the stitches (these are used when increasing for raglan) as follows: Count 13-14-15-16-17-18 stitches (= half back piece), insert 1 marker in the next stitch, count 19 stitches (= sleeve), insert 1 marker in the next stitch, count 26-28-30-32-34-36 stitches (= front piece), insert 1 marker in the next stitch, count 19 stitches (= sleeve), insert 1 marker in the next stitch, there are 13-14-15-16-17-18 stitches left after the last marker (= half back piece). On the next round, work PATTERN and increase for RAGLAN – read description above, as follows: Knit 13-14-15-16-17-18 (= half back piece), increase 1 stitch for raglan, knit 1 (first marker sits in this stitch), work A.1, A.2 over the next 12 stitches, work A.3, knit 1 (second marker sits in this stitch) (= sleeve), increase 1 stitch for raglan, knit 26-28-30-32-34-36, increase 1 stitch for raglan (= front piece), knit 1 (third marker sits in this stitch), work A.1, A.2 over the next 12 stitches, work A.3, knit 1 (fourth marker sits in this stitch) (= sleeve),increase 1 stitch for raglan, knit 13-14-15-16-17-18 (= half back piece). REMEMBER THE KNITTING TENSION! Continue this pattern but note that the increases are different on the front/back pieces and the sleeves – read INCREASES FOR SLEEVES and INCREASES FOR FRONT/BACK PIECES before continuing! INCREASES FOR SLEEVES: On the sleeves you increase 17-20-21-23-24-25 times on each side (including the first increase described above). The sleeve increases are drawn into diagrams A.1 and A.3. Each time A.1, A.2 and A.3 are finished in height, there is room for 2 more repeats of A.2 between A.1 and A.3. The stitches which do not fit into the pattern on each side of the sleeve are worked in stocking stitch. INCREASES FOR FRONT/BACK PIECES: On the front and back pieces, you increase 22-24-26-29-33-36 times (including the first increase described above), as follows: Increase on each round 0-0-0-0-4-6 times, then every 2nd round 22-24-26-29-29-30 times. AFTER THE LAST INCREASE: When all the increases are finished there are 250-274-290-314-338-358 stitches (70-76-82-90-100-108 stitches on the front/back pieces and 55-61-63-67-69-71 stitches on each sleeve (including the marker-stitches on each side of the sleeves). Continue with pattern and stocking stitch but without further increases. The stitches which do not fit into the pattern on each side of the sleeve are worked in stocking stitch. Work until the yoke measures 19-23-24-26-27-28 cm from the marker. DIVIDE FOR BODY AND SLEEVES: Now divide for the body and sleeves as follows: Knit 35-38-41-45-50-54 (= half back piece), place the next 55-61-63-67-69-71 stitches on a thread for the sleeve, cast on 10-10-12-12-14-16 stitches (in side under sleeve), knit 70-76-82-90-100-108 (= front piece), place the next 55-61-63-67-69-71 stitches on a thread for the sleeve, cast on 10-10-12-12-14-16 stitches (in side under sleeve), knit the last 35-38-41-45-50-54 stitches (= half back piece). The body and sleeves are finished separately. The piece is now measured from here! BODY: = 160-172-188-204-228-248 stitches. Continue with stocking stitch in the round until the body measures 20-18-19-18-19-20 cm from the division. On the next round begin working rib, AT THE SAME TIME on the first round increase 0-4-4-8-8-12 stitches evenly spaced = 160-176-192-212-236-260 stitches, as follows: Change to circular needle size 3.5 mm, work rib (knit 1, purl 1 – remember the increases). When the rib measures 3-3-3-4-4-4 cm, cast off a little loosely with rib. The jumper measures approx. 47-49-51-53-55-57 cm from the shoulder. SLEEVES: Place the 55-61-63-67-69-71 stitches from the thread on the one side of the piece on circular needle size 4.5 mm and knit up 1 stitch in each of the 10-10-12-12-14-16 stitches cast on under the sleeve = 65-71-75-79-83-87 stitches. Insert a marker-thread in the middle of the 10-10-12-12-14-16 stitches under the sleeve. Start at the marker-thread and continue the pattern in the round. The stitches which do not fit into the pattern under the sleeve are worked in stocking stitch. AT THE SAME TIME when the sleeve measures 3-3-3-4-4-4 cm from the division, decrease 2 stitches under the sleeve – read DECREASE TIP. Decrease like this every 4-2½-2-1½-1½-1 cm a total of 6-8-9-10-11-12 times = 53-55-57-59-61-63 stitches. Continue working until the sleeve measures 30-27-26-23-23-22 cm from the division. Change to double pointed needles size 3.5 mm and work rib (knit 1, purl 1). AT THE SAME TIME on the first round increase 1-1-3-3-5-7 stitches evenly spaced = 54-56-60-62-66-70 stitches. When the rib measures 3-3-3-4-4-4 cm, cast off a little loosely with rib. The sleeve measures approx. 33-30-29-27-27-26 cm from the division. ASSEMBLY: Fold the neck double to the inside and sew down. To avoid the neck being tight and rolling outwards, it is important that the seam is elastic. |
|||||||||||||||||||
Diagram explanations |
|||||||||||||||||||
|
|||||||||||||||||||
 |
|||||||||||||||||||
 |
|||||||||||||||||||
Have you finished this pattern?Tag your pictures with #dropspattern #rememberingspringsweater or submit them to the #dropsfan gallery. Do you need help with this pattern?You'll find 29 tutorial videos, a Comments/Questions area and more by visiting the pattern on garnstudio.com. © 1982-2026 DROPS Design A/S. We reserve all rights. This document, including all its sub-sections, has copyrights. Read more about what you can do with our patterns at the bottom of each pattern on our site. |
|||||||||||||||||||


With over 40 years in knitting and crochet design, DROPS Design offers one of the most extensive collections of free patterns on the internet - translated to 17 languages. As of today we count 324 catalogues and 12232 patterns translated into English (UK/cm).
We work hard to bring you the best knitting and crochet have to offer, inspiration and advice as well as great quality yarns at incredible prices! Would you like to use our patterns for other than personal use? You can read what you are allowed to do in the Copyright text at the bottom of all our patterns. Happy crafting!
Post a comment to pattern DROPS 250-1
We would love to hear what you have to say about this pattern!
If you want to leave a question, please make sure you select the correct category in the form below, to speed up the answering process. Required fields are marked *.