
Popular categories
Looking for a yarn?


Comments / Questions (7)
![]() Regine wrote:
Regine wrote:
Ein wunderschönes Muster und die Anleitung dazu ist sehr leicht zu verstehen!
23.11.2024 - 22:35
![]() Sharon Harber wrote:
Sharon Harber wrote:
“Change to circular needle size 3 mm. Knit 1 row from the wrong side and increase 14-14-14-14-16-16-18 stitches evenly spaced (do not increase over the bands) = 163-171-183-191-201-209-219 stitches. Work as follows from the wrong side: “ Which of these rows is worked from the wrong side? The increase row or the first row of rib?
07.06.2024 - 23:35DROPS Design answered:
Hi Sharon, increases should be from the right side. Then you start knitting ribbing from the wrong side. We will make a correction there. Happy knitting!
08.06.2024 - 07:19
![]() Lilian wrote:
Lilian wrote:
Vielen Dank! Noch eine Frage: Die Maassangaben beim Halsausschnitt: ist da der Durchmesser gemeint (12cm) oder wenn die Jacke flach aufliegt (sozusagen der Halbmond)? Herzlichen Dank, Lilian
15.03.2024 - 09:43DROPS Design answered:
Liebe Lilian, alle angaben sind gemessen, wenn die Jacke flach liegt - siehe auch diese Lektion. Viel Spaß beim Stricken!
15.03.2024 - 15:40
![]() Lilian wrote:
Lilian wrote:
Hallo, Beim Muster steht: 6 Blendenmaschen, A1 17x, die erste Masche von A1. Das verstehe ich nicht. Ist damit jeweils die erste Masche der entsprechenden Reihe von A1 gemeint? Oder die allererste Masche (rechts unten auf dem Diagramm) von A1? Herzlichen Dank!
07.03.2024 - 15:34DROPS Design answered:
Liebe Lilian, so soll man stricken: 6 Blenden-Maschen krausrechts, dann wereden die 8 Maschen A.1 (2. Größe) insgesamt 17 Mal gestrickt (= über die nächsten 136 Maschen), dann stricken Sie die nächste Masche wie die 1. Masche in A.1, dann 6 Blenden-Maschen krausrechts = 6+136+1+6=149 Maschen. Viel Spaß beim Stricken!
07.03.2024 - 15:49
![]() Hanne wrote:
Hanne wrote:
Mønsterdiagrammet er forsvundet i opskriften.
29.02.2024 - 21:28DROPS Design answered:
Hej Hanne, du finder diagrammerne nederst i opskriften :)
01.03.2024 - 11:37
![]() Alexis wrote:
Alexis wrote:
With the top yoke area do I increase every row or just the purl side?
18.02.2024 - 22:38DROPS Design answered:
Dear Alexis, at the beginning, increase in the first purl row from the wrong side. Then work or skip the ELEVATION. Work in stocking stitch WITHOUT increasing until 2 rows are left before the yoke measures 3-3-4-4-5-5-6 cm from the marker. Here, knit 1 row from the right side and increase 26-28-32-36-40-44-48 stitches evenly spaced. Then work A.1 as described and increase in the arrows. Happy knitting!
18.02.2024 - 23:38
![]() Adelheid Marx wrote:
Adelheid Marx wrote:
Wolle in Farbe 85, hellbeige ist bei ihnen ausverkauft. Kann ich diese vorbestellen?
20.10.2023 - 20:17DROPS Design answered:
Liebe Frau Marx, am besten wenden Sie sich direkt an Ihrem DROPS Händler, dort kann man Ihnen (auch per Telefon oder per E-Mail) besser helfen. Viel Spaß beim stricken!
23.10.2023 - 09:25
|
|||||||||||||||||||
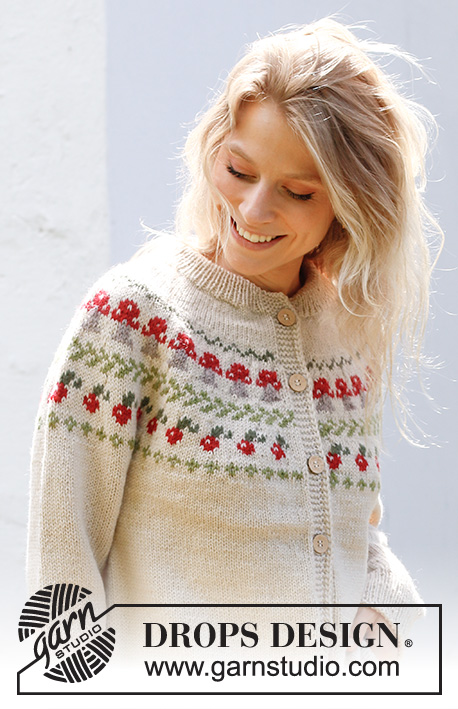
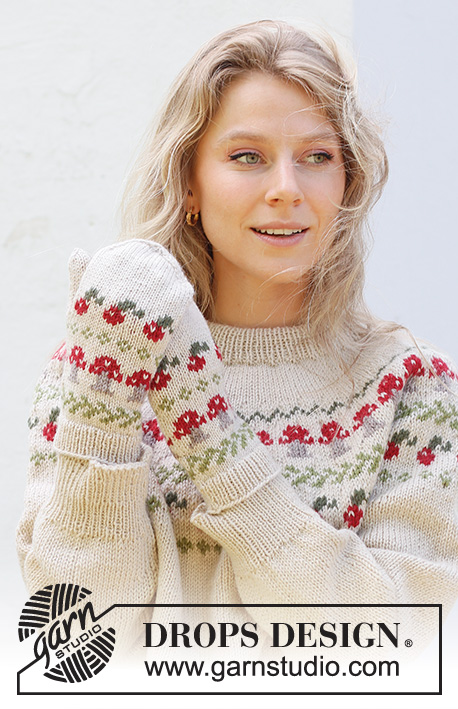
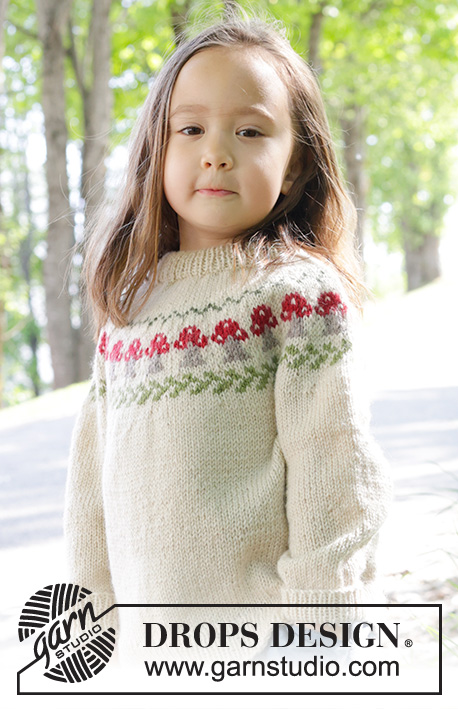
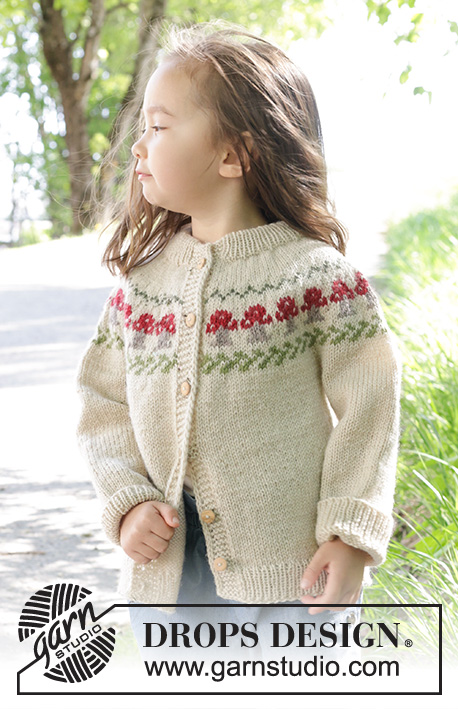
Mushroom Season Cardigan#mushroomseasoncardigan |
|||||||||||||||||||
 |
 |
||||||||||||||||||
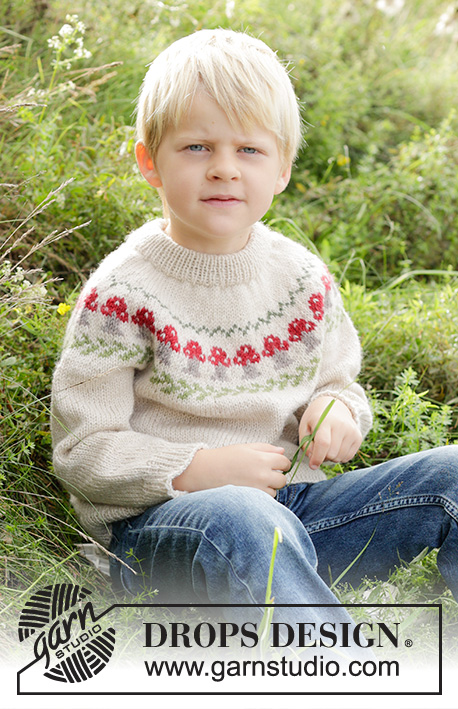
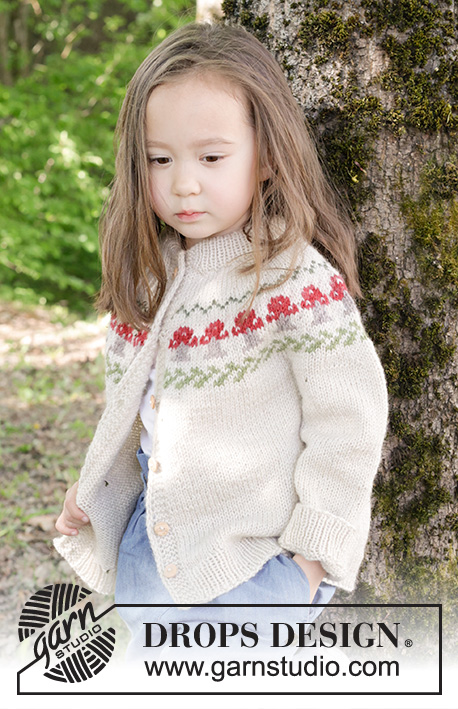
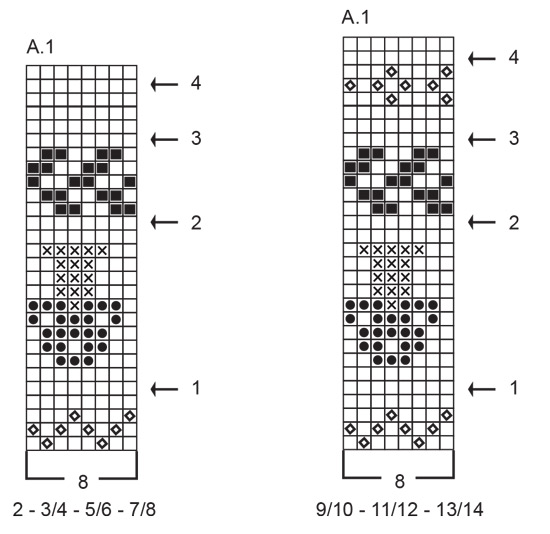
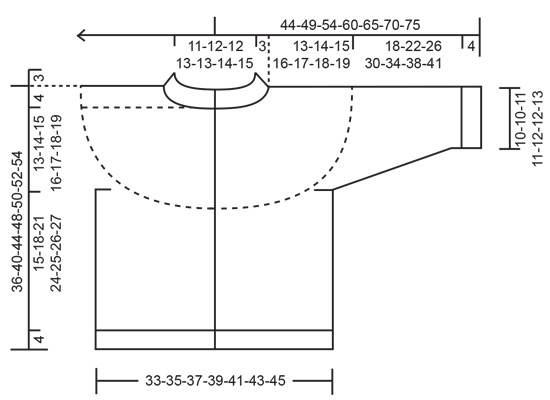
Knitted jacket for children in DROPS Karisma. The piece is worked top down with double neck, round yoke and multi-coloured mushroom pattern. Sizes 2 – 14 years.
DROPS Children 47-15 |
|||||||||||||||||||
|
------------------------------------------------------- EXPLANATIONS FOR THE PATTERN: ------------------------------------------------------- GARTER STITCH (worked back and forth): Knit all rows. 1 ridge = knit 2 rows. BANDS: BEGINNING OF ROW: Slip 1 stitch purl-wise with the strand in front, knit 1 and work 4 garter stitches. END OF ROW: Work until there are 6 stitches left on the row, work 4 garter stitches, slip 1 stitch purl-wise with the strand in front, knit 1. ELEVATION (back of neck): To make the back of the neck slightly higher when working a round yoke, you can work an elevation as described here. Skip this section if you do not want an elevation. Insert 1 marker in the middle stitch on the row. Start from the right side and knit 9-10-11-12-13-14-15 stitches past the marker-stitch, turn, tighten strand and purl 19-21-23-25-27-29-31 stitches back. Turn, tighten strand and knit 28-31-34-37-40-43-46 stitches, turn, tighten strand and purl 37-41-45-49-53-57-61 stitches back. Turn, tighten strand and knit 46-51-56-61-66-71-76 stitches, turn, tighten strand and purl 55-61-67-73-79-85-91 stitches back. Turn, tighten the strand and knit to end of row. Turn and purl 1 row (with front band stitches as before). Then work yoke as described in the text. PATTERN: See diagram A.1. Choose diagram for your size. The whole pattern is worked in stocking stitch. KNITTING TIP: To avoid the knitting tension losing its elasticity when working pattern, it is important that the strands at the back are not tight. Use a size larger needle when working pattern if the piece becomes tight. INCREASE TIP (evenly spaced): Increase 1 stitch by making 1 yarn over which is worked twisted on the next row/round to avoid a hole. Work the new stitches in stocking stitch. BUTTONHOLES: Work buttonholes on the right band (when the garment is worn). Work from the right side when there are 4 stitches left on the row as follows: Make 1 yarn over, knit 2 together, slip 1 stitch as if to purl with the strand in front, knit 1. On the next row (wrong side), knit the yarn over to leave a hole. The first buttonhole is worked on the first row after the neck is finished. The other 5-5-5-5-6-6-6 buttonholes are then worked with approx. 5½-6½-7-8-7-7½-7½ cm between each one. DECREASE TIP (for sleeves): Decrease 1 stitch on either side of the marker-thread as follows: Work until there are 3 stitches left before the marker-thread, knit 2 together, knit 2 (marker-thread sits between these 2 stitches), slip 1 stitch knit-wise, knit 1 and pass the slipped stitch over the knitted stitch (2 stitches decreased). ------------------------------------------------------- START THE PIECE HERE: ------------------------------------------------------- JACKET – SHORT OVERVIEW OF THE PIECE. The neck and yoke are worked back and forth with circular needle, from mid front and top down. The yoke is divided for body and sleeves and the body continued back and forth with circular needle. The sleeves are worked in the round with double pointed needles. DOUBLE NECK: Cast on 81-85-87-89-91-95-97 stitches with colour light beige DROPS Karisma, using short circular needles size 3 and 4 mm held together. Remove the needle size 4 mm (this gives you an elastic cast-on edge). Work as follows from the right side: 1 GARTER STITCH – read description above, * knit 1, purl 1 *, work from *-* until there are 2 stitches left, knit 1 and 1 garter stitch. Continue this rib back and forth for 3 cm. Now cast on 5 stitches at the end of the next 2 rows = 91-95-97-99-101-105-107 stitches. Continue the rib with 6 BAND stitches on each side – read description above. When the neck measures 6 cm and the next row is from the right side, fold the neck double to the inside and work as follows: 6 band stitches as before, work rib AT THE SAME TIME as you work every 2nd stitch together with its corresponding stitch on the cast-on edge, finish with 6 band stitches. You now have a double neck. YOKE: Change to circular needle size 4 mm. Purl 1 row from the wrong side increasing 24-26-28-30-32-32-34 stitches evenly spaced – read INCREASE TIP (bands worked as before. Do not increase over the bands) = 115-121-125-129-133-137-141 stitches. Insert 1 marker after the band at the beginning of the row. The yoke is measured from here. You can now work an ELEVATION at the back – read description above. Skip this if you do not want an elevation. Work stocking stitch back and forth with 6 band stitches as before on each side. REMEMBER THE KNITTING TENSION and BUTTONHOLES on the right band – read description above. When there are 2 rows left before the yoke measures 3-3-4-4-5-5-6 cm from the marker, knit 1 row from the right side and increase 26-28-32-36-40-44-48 stitches evenly spaced (do not increase over the bands) = 141-149-157-165-173-181-189 stitches. Work back from the wrong side. Now work pattern and increase as described below – read KNITTING TIP and PATTERN in explanations above. The bands are always worked with colour light beige. Work 6 band stitches as before, work A.1 16-17-18-19-20-21-22 times in width, work the first stitch in A.1 so the pattern is symmetrical, 6 band stitches as before. Continue this pattern. On each row with an arrow in A.1, AT THE SAME TIME increase from the right side as described below (do not increase over the bands): ARROW-1: Increase 32-32-32-40-40-40-48 stitches evenly spaced = 173-181-189-205-213-221-237 stitches. ARROW-2: Increase 24-24-32-32-40-40-40 stitches evenly spaced = 197-205-221-237-253-261-277 stitches. ARROW-3: Increase 16-16-16-16-16-16-16 stitches evenly spaced = 213-221-237-253-269-277-293 stitches. ARROW-4: Increase 4-8-8-4-0-4-0 stitches evenly spaced = 217-229-245-257-269-281-293 stitches. When A.1 is finished, continue with stocking stitch and colour light beige and 6 band stitches as before on each side. DIVIDE FOR BODY AND SLEEVES: Work until the yoke measures 13-14-15-16-17-18-19 cm from the marker. Work 36-38-41-43-45-47-49 stitches as before (front piece), place the next 42-44-46-48-50-52-54 stitches on 1 thread for the sleeve, cast on 8 stitches (in side under sleeve), work 61-65-71-75-79-83-87 stitches (back piece), place the next 42-44-46-48-50-52-54 stitches on 1 thread for the sleeve, cast on 8 stitches (in side under sleeve), work the last 36-38-41-43-45-47-49 stitches as before (front piece). The body and sleeves are finished separately. The piece is now measured from here! BODY: = 149-157-169-177-185-193-201 stitches. Work stocking stitch back and forth with colour light beige and 6 band stitches on each side, for a further 15-18-21-24-25-26-27 cm. Change to circular needle size 3 mm. Knit 1 row from the right side and increase 14-14-14-14-16-16-18 stitches evenly spaced (do not increase over the bands) = 163-171-183-191-201-209-219 stitches. Work as follows from the wrong side: 6 band stitches as before, * purl 1, knit 1 *, work from *-* until there are 7 stitches left, purl 1, 6 band stitches as before. Continue this rib for 4 cm. Cast off a little loosely. The jacket measures approx. 36-40-44-48-50-52-54 cm from the shoulder. SLEEVES: Place the 42-44-46-48-50-52-54 stitches from the thread on the one side of the piece on short circular needle/double pointed needles size 4 mm and knit up 1 stitch in each of the 8 stitches cast on under the sleeve with colour light beige = 50-52-54-56-58-60-62 stitches. Insert a marker-thread in the middle of the new stitches under the sleeve and allow it to follow your work onwards. Start at the marker-thread and work stocking stitch in the round. When the sleeve measures 2-3-4-4-4-4-4 cm, decrease 1 stitch on each side of the marker-thread – read DECREASE TIP. Decrease like this every 4-4½-6-7-8-8½-9 cm a total of 4 times = 42-44-46-48-50-52-54 stitches. Work until the sleeve measures 18-22-26-30-34-38-41 cm from the division (or to desired length, there is approx. 4 cm left). Change to double pointed needles size 3 mm. Knit 1 round and increase 4-4-4-4-6-6-6 stitches evenly spaced = 46-48-50-52-56-58-60 stitches. Work rib (knit 1, purl 1) for 4 cm. Cast off a little loosely. The sleeve measures approx. 22-26-30-34-38-42-45 cm from the division. Work the other sleeve in the same way. ASSEMBLY: Sew the openings on the neck mid-front with small stitches. Sew the buttons onto the left band. |
|||||||||||||||||||
Diagram explanations |
|||||||||||||||||||
|
|||||||||||||||||||
 |
|||||||||||||||||||
 |
|||||||||||||||||||
Have you finished this pattern?Tag your pictures with #dropspattern #mushroomseasoncardigan or submit them to the #dropsfan gallery. Do you need help with this pattern?You'll find 35 tutorial videos, a Comments/Questions area and more by visiting the pattern on garnstudio.com. © 1982-2026 DROPS Design A/S. We reserve all rights. This document, including all its sub-sections, has copyrights. Read more about what you can do with our patterns at the bottom of each pattern on our site. |
|||||||||||||||||||


With over 40 years in knitting and crochet design, DROPS Design offers one of the most extensive collections of free patterns on the internet - translated to 17 languages. As of today we count 325 catalogues and 12298 patterns translated into English (UK/cm).
We work hard to bring you the best knitting and crochet have to offer, inspiration and advice as well as great quality yarns at incredible prices! Would you like to use our patterns for other than personal use? You can read what you are allowed to do in the Copyright text at the bottom of all our patterns. Happy crafting!
Post a comment to pattern DROPS Children 47-15
We would love to hear what you have to say about this pattern!
If you want to leave a question, please make sure you select the correct category in the form below, to speed up the answering process. Required fields are marked *.