
Popular categories
Looking for a yarn?


Comments / Questions (80)
![]() Julia wrote:
Julia wrote:
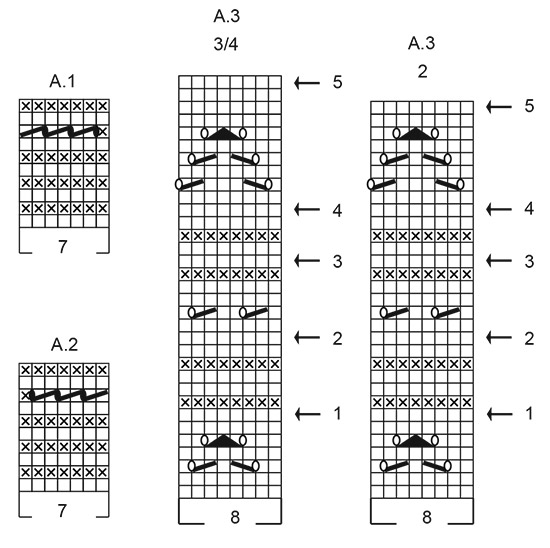
Is there a video that shows me when I’m working on the neck and I cast on seven stitches for the bands? Do I knit those right away or let them sit until I do A.1?
06.04.2026 - 21:37DROPS Design answered:
Hi Julia, Once the 7 band stitches have been cast on, they are worked according to charts A.1 and A.2 straight away. Work the charts bottom up and from right to left from the right side and left to right from the wrong side. Regards, Drops Team.
07.04.2026 - 06:44
![]() Zineb wrote:
Zineb wrote:
Bonjour, faut il commencer la patte de boutonnage en même temps que les cotes ou faire 3 cm de côtes et seulement après faire les 7 augmentations de chaque côté? Merci
04.04.2026 - 07:51DROPS Design answered:
Bonjour Mme Zineb, on tricote d'abord les côtes sur les mailles montées puis on va monter 7 mailles de chaque côté pour la bordure des devants, ainsi, quand le col est doublé, on n'a pas de surépaisseur au niveau des bordures des devants. Bon tricot!
08.04.2026 - 09:11
![]() Deborah wrote:
Deborah wrote:
What size needles (3mm or 4mm) were used for the tension square? The main part of the pattern is knitted using 4mm needles so I am using that size to check that tension is correct. Is that correct?
01.04.2026 - 09:11DROPS Design answered:
Hi Deborah, The swatch is worked with needle size 4 mm. Happy Easter! Regards, Drops Team.
03.04.2026 - 07:43
![]() Monic wrote:
Monic wrote:
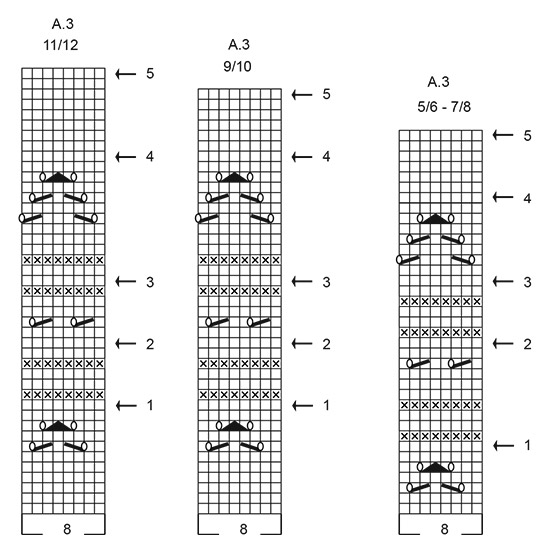
Bonjour, Je suis arrivée au rang de A3 sur lequel il faut répartir 24 mailles (flèche 1). Si je répartis ces mailles, mon motif A3 ne sera plus centré, puisque je dois répartir ces 24 mailles sur tout le rang. Est-ce normal ? Ou fais-je une erreur ?
19.03.2026 - 16:02DROPS Design answered:
Bonjour Monic, vous avez toujours un nombre de mailles divisible par 8 pour répéter A.3, tout est donc juste, les motifs ne seront juste pas alignés les uns au-dessus des autres comme dans le diagramme mais répartis tout le long de l'empiècement comme sur la photo. Bon tricot!
20.03.2026 - 07:10
![]() Christine wrote:
Christine wrote:
Bonjour, je vois une erreur sur le diagramme A1etA2 ,c est indiqué au 8eme rg de tricoter 2 mailles ensembles, mais il manque le jeté
07.03.2026 - 12:03DROPS Design answered:
Bonjour Christine, ce jeté figure dans la légende, cf. 4ème symbole = c'est l'ovale noir avant / après les 2 m ensemble à l'endroit dans A.1 et A.2, ce symbole est différent de celui du point ajouré car ces jetés se tricotent à l'endroit au rang suivant; les jetés des autres diagrammes se tricotent à l'envers au rang suivant sur l'envers. Bon tricot!
09.03.2026 - 08:05
![]() Sonia wrote:
Sonia wrote:
En que momento se hace el cuello doble y como se hace el patron no explica esta parte? Es despues de los 3 cm del comienzo y antes de aumentar los 7 puntos para las bandas de ojal y botones?
03.03.2026 - 10:01DROPS Design answered:
Hola Sonia, el cuello doble es la primera sección del patrón. Trabajas primero un elástico de 3cm, que es el que se doblará hacia dentro después. Luego aumentas puntos y trabajar el elástico con los diagramas hasta que la labor mida 6.5 cm. Después, como se indica en ESNAMBLAJE al final, doblas el cuello por la mitad y lo coses hacia dentro; esta sección interior se corresponden a los 3cm de elástico iniciales.
12.04.2026 - 20:35
![]() Stephanie wrote:
Stephanie wrote:
Je ne comprends pas le début de patron quand vous dites de monter les mailles et que directement après il est écrit faire un Rang envers sur l’envers mais nan le commence pas par l’endroit?
26.02.2026 - 00:05DROPS Design answered:
Bonjour Stéphanie, dans ce modèle (comme cela arrive parfois), le 1er rang tricoté juste après avoir monté les mailles est un rang sur l'envers, ainsi on tricote toutes les mailles à l'envers puis, au rang suivant = sur l'endroit, on commence les côtes. Bon tricot!
26.02.2026 - 09:59
![]() Inge Lis Christiansen wrote:
Inge Lis Christiansen wrote:
Hvad betyder sik sak markering i a1 og a2 Svar gerne på dansk
22.12.2025 - 08:55
![]() Maria wrote:
Maria wrote:
Vad betyder de svartmarkerade sick sack markeringarna i A 1 och A 2
14.12.2025 - 10:07DROPS Design answered:
Hei Maria. Ingen sick sack, men 2 ulik ikoner (men har blitt litt tykk) Enten 2 maskor räta tillsammans eller lyft 1 maska av stickan som om den skulle stickas rät, sticka 1 rätmaska och drag den lyfta maskan över maskan som stickades. Og den sorte prikken = mellan 2 maskor görs det 1 omslag om stickan, på nästa varv stickas omslaget rätt - det ska bli hål. mvh DROPS Design
15.12.2025 - 09:18
![]() Gerda wrote:
Gerda wrote:
Hvad betyder de sortmarkerede zigzag-streger under A 1 og A 2
13.12.2025 - 16:01DROPS Design answered:
Hei Gerda. Ingen zigzag, men 2 ulik ikoner (men har blitt litt tykk) Enten 2 maskor räta tillsammans eller lyft 1 maska av stickan som om den skulle stickas rät, sticka 1 rätmaska och drag den lyfta maskan över maskan som stickades. Og den sorte prikken = mellan 2 maskor görs det 1 omslag om stickan, på nästa varv stickas omslaget rätt - det ska bli hål. mvh DROPS Design
15.12.2025 - 14:15
|
|||||||||||||||||||||||||
Running Circles Cardigan#runningcirclescardigan |
|||||||||||||||||||||||||
 |
 |
||||||||||||||||||||||||
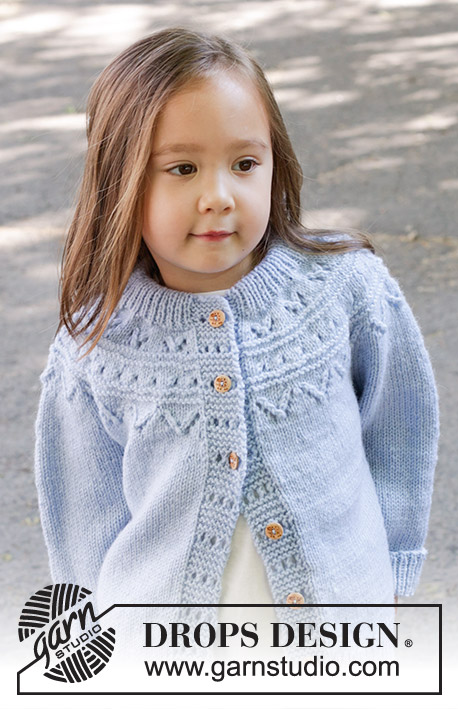
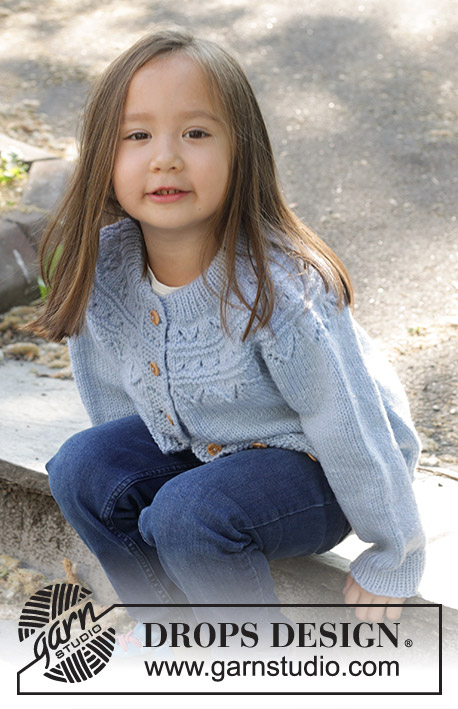
Knitted jacket for children in DROPS Karisma. The piece is worked top down with round yoke, lace pattern and double neck. Sizes 2 - 12 years.
DROPS Children 47-7 |
|||||||||||||||||||||||||
|
------------------------------------------------------- EXPLANATIONS FOR THE PATTERN: ------------------------------------------------------- GARTER STITCH (worked back and forth): Knit all rows. 1 ridge = knit 2 rows. PATTERN: See diagrams A.1 to A.3. Choose diagram for your size (applies to A.3). The diagrams show all rows in the pattern from the right side. When working A.3, the last stitch before the band is worked as the first stitch in A.3 so the pattern is symmetrical. INCREASE TIP: Increase 1 stitch by making 1 yarn over which is then worked twisted on the next row to avoid a hole. DECREASE TIP (for sleeves): Decrease 1 stitch on each side of the marker-thread as follows: Work until there are 3 stitches left before the marker-thread, knit 2 together, knit 2 (marker-thread sits between these 2 stitches), slip 1 stitch knit-wise, knit 1 and pass the slipped stitch over the knitted stitch. ------------------------------------------------------- START THE PIECE HERE: ------------------------------------------------------- JACKET – SHORT OVERVIEW OF THE PIECE. The neck and yoke are worked back and forth with circular needle, from mid front and top down as far as the armholes, then the body and sleeves are finished separately. The body is finished back and forth with circular needle. The sleeves are worked in the round with double pointed needles. Buttonholes are not worked, as the buttons are buttoned in the lace pattern on the band. DOUBLE NECK: Cast on 75-79-85-87-89-93 stitches with circular needle size 4 mm and DROPS Karisma. Change to circular needle size 3 mm. Purl 1 row from the wrong side. Work rib (knit 1, purl 1) until there is 1 stitch left, knit 1. Work this rib back and forth for 3 cm. At the end of the next 2 rows cast on 7 stitches in garter stitch for the bands = 89-93-99-101-103-107 stitches. On the next row from the right side work as follows: A.1 over the 7 band stitches, continue the rib as before until there are 7 stitches left, A.2 over the 7 band stitches. Continue this pattern until the rib measures 6½ cm from the cast-on edge and the next row is from the right side. YOKE: Work the 7 band stitches as before, knit until there are 7 stitches left, increasing 14-18-20-18-24-20 stitches evenly over these stitches - read INCREASE TIP, work the 7 band stitches as before = 103-111-119-119-127-127 stitches. Insert a marker; the yoke is measured from here. Change to circular needle size 4 mm. Purl 1 row from the wrong side (bands worked as before). Now work A.3 - read PATTERN in explanations above, and at the same time increase on each row marked with an arrow in A.3 as follows (bands worked as before): ARROW 1: Increase 24 stitches evenly spaced = 127-135-143-143-151-151 stitches. REMEMBER THE KNITTING TENSION! ARROW 2: Increase 24-24-28-28-32-32 stitches evenly spaced = 151-159-171-171-183-183 stitches. ARROW 3: Increase 24-24-28-28-32-32 stitches evenly spaced =175-183-199-199-215-215 stitches. ARROW 4: Increase 24-24-26-32-28-36 stitches evenly spaced = 199-207-225-231-243-251 stitches. ARROW 5: Increase 26-30-26-32-32-36 stitches evenly spaced = 225-237-251-263-275-287 stitches Continue with stocking stitch (bands worked as before) until the yoke measures 13-14-15-16-17-18 cm from the marker. Now divide for the body and sleeves as follows from the right side: Work the first 37-39-42-44-46-48 stitches as before (left front piece), place the next 44-46-48-50-52-54 stitches on a thread, without working them (sleeve), cast on 6 stitches under the sleeve, knit 63-67-71-75-79-83 (back piece), place the next 44-46-48-50-52-54 stitches on a thread, without working them(sleeve), cast on 6 stitches under the sleeve, work the last 37-39-42-44-46-48 stitches as before (right front piece). The piece is now measured from here! BODY: = 149-157-167-175-183-191 stitches. Continue back and forth as before for a further 13-15-18-21-24-25 cm, with the next row from the right side (approx. 4 cm left; try the jacket on and work to desired length). Work the bands in GARTER STITCH – see explanation above, and stocking stitch over the other stitches, increasing 28-30-30-32-33-36 stitches evenly over the stocking stitches = 177-187-197-207-216-227 stitches. Purl back from the wrong side (bands in garter stitch). Change to circular needle size 3 mm and work rib as follows from the right side: 7 band stitches in garter stitch, rib (knit 1, purl 1) until there are 8 stitches left, knit 1, worked 7 band stitches in garter stitch. Continue this rib for 4 cm. Cast off a little loosely with knit over knit and purl over purl. The jacket measures approx. 33-36-40-44-48-50 cm from the shoulder. SLEEVES: Place the 44-46-48-50-52-54 stitches from the thread on the one side of the piece on double pointed needles size 4 mm and knit up 1 stitch in each of the 6 stitches cast on under the sleeve = 50-52-54-56-58-60 stitches. Insert a marker-thread in the middle of the new stitches under the sleeve and allow it to follow your work onwards. Work stocking stitch in the round. When the sleeve measures 4 cm, decrease 1 stitch on each side of the marker-thread – read DECREASE TIP. Decrease like this every 2½-3½-4½-5-6-7 cm a total of 5 times = 40-42-44-46-48-50 stitches. Work until the sleeve measures 16-20-24-28-31-35 cm from the division (or to desired length. There is approx. 4 cm left). Knit 1 round and increase 4 stitches evenly spaced = 44-46-48-50-52-54 stitches. Change to double pointed needles size 3 mm and work rib (knit 1, purl 1) for 4 cm. Cast off with knit over knit and purl over purl. Work the other sleeve in the same way. ASSEMBLY: Fold the neck double to the inside and sew down. To avoid the neck being tight and rolling outwards, it is important that the seam is elastic. Sew the openings together mid-front with small stitches. Sew the buttons onto the left band; the top button is positioned so it can be buttoned through the first row of the lace pattern on the band and the other buttons positioned evenly down the band. |
|||||||||||||||||||||||||
Diagram explanations |
|||||||||||||||||||||||||
|
|||||||||||||||||||||||||
 |
|||||||||||||||||||||||||
 |
|||||||||||||||||||||||||
 |
|||||||||||||||||||||||||
Have you finished this pattern?Tag your pictures with #dropspattern #runningcirclescardigan or submit them to the #dropsfan gallery. Do you need help with this pattern?You'll find 31 tutorial videos, a Comments/Questions area and more by visiting the pattern on garnstudio.com. © 1982-2026 DROPS Design A/S. We reserve all rights. This document, including all its sub-sections, has copyrights. Read more about what you can do with our patterns at the bottom of each pattern on our site. |
|||||||||||||||||||||||||


With over 40 years in knitting and crochet design, DROPS Design offers one of the most extensive collections of free patterns on the internet - translated to 17 languages. As of today we count 324 catalogues and 12290 patterns translated into English (UK/cm).
We work hard to bring you the best knitting and crochet have to offer, inspiration and advice as well as great quality yarns at incredible prices! Would you like to use our patterns for other than personal use? You can read what you are allowed to do in the Copyright text at the bottom of all our patterns. Happy crafting!
Post a comment to pattern DROPS Children 47-7
We would love to hear what you have to say about this pattern!
If you want to leave a question, please make sure you select the correct category in the form below, to speed up the answering process. Required fields are marked *.