
Popular categories
Looking for a yarn?


Comments / Questions (21)
![]() Fleur wrote:
Fleur wrote:
Kan ik ergens een uitleg met foto’s en/of video’s vinden? De uitleg van de voorste poten is niet heel duidelijk. Ik brei dus 9 steken naar binnen, richting lijf? En dan 4 steken erbij in het “midden” en dan het werk omdraaien? Klopt het dat er dan een gat zit? Lijkt me niet kloppen. Helemaal in de war met dit stuk. SOS
04.12.2023 - 11:39
![]() Wida wrote:
Wida wrote:
Hej! Ska jag sticka denna två gånger? eller hur blir det en hel kanin??
29.10.2023 - 00:22DROPS Design answered:
Hei Wida. Du strikkers det som et stykke. Når den er ferdig syr du sammen hvert øre (på baksiden), Deretter sys åpningen på toppen av hode, så hele veien ned midt bak. Husk å fyll vatt underveis. mvh DROPS Design
30.10.2023 - 09:24
![]() Tatiana Moscoso wrote:
Tatiana Moscoso wrote:
Hola. Estoy tratando de realizar el conejo, pero tengo una duda acerca de las patas delanteras. Dice que teja 9 puntos, aumente 4 y luego solo teja 8 puntos de ida y vuelta x 7 centímetros, quedando 5+13 puntos más. ¿?. Al cerrar tengo que realizar otra vez 4 aumentos (en la parte interna?) y luego tejer nuevamente los 8 externos, quedandome 10 puntos en el centro, Es así?
03.06.2023 - 03:37DROPS Design answered:
Hola Tatiana, primero trabajas 9 pts del cuerpo (que vienen de la cabeza) y montas 4 pts. Ahora trabajas sobre estos 4 pts + los 4 pts del cuerpo más cercanos (de los 9 pts) a estos pts montados. Después de 7 cm, cerrar los 8 pts sobre los que has trabajado y continuar la vuelta, trabajando los siguientes 10 pts. Ahora montar 4 pts y trabajar sobre estos 4 pts + los 4 pts más cercanos a los pts montados de los 10 pts recién trabajados. Después de 7 cm, cerrar estos 8 pts. Ahora terminar la vuelta, trabajando sobre los últimos 5 pts. Tras terminar las patas delanteras, deberías tener 5+6+5 pts para el cuerpo.
04.06.2023 - 18:31
![]() Kathleen wrote:
Kathleen wrote:
Thank you for that information about commenting or questioning. With the Bunny Bunch pattern above I have tried unsuccessfully three times following the directions for the second front leg. There aren't enough characters in the question section below adequately to address my needs so I am pitching the entire project. The pattern, in my humble estimation, lacks clear directions, such as "The second leg should also fold toward center...", etc.
05.04.2023 - 23:00DROPS Design answered:
Dear Kathleen, both legs are worked in the same way, and the instructions are identical for both, except for the number of stitches in the body and between both legs. After having worked both front legs, it's stated in the first row of the body that you fold the stitches of both legs: "ROW 1 (wrong side): ... fold the front leg double so you can knit up 1 stitch in each of the 4 cast-on stitches on the front leg, skip the next 4 front-leg stitches, knit 6 (between the legs), fold the second front leg double and knit up 1 stitch in each of the 4 cast-on stitches on the front leg .... What part of the front legs gives you trouble? Happy knitting!
06.04.2023 - 23:10
![]() Kathleen wrote:
Kathleen wrote:
Will you please translatethe German comments or respond in English?
01.04.2023 - 23:14DROPS Design answered:
Dear Kathleen, the comments are answered in the same language as they were asked, when possible, so that they will better understand the answers. If you want to know what was asked and answered before you can use a translation page or plug-in in your browser to translated all other text. If you have any doubts regarding the pattern you can post your specific question here and we will answer in English. Happy knitting!
02.04.2023 - 22:12
![]() Kathleen wrote:
Kathleen wrote:
In English, please.
01.04.2023 - 23:13
![]() Kathleen wrote:
Kathleen wrote:
This pattern is rather difficult in places. I need pictures or a video to follow the front legs portion of the pattern.
01.04.2023 - 22:16
![]() Caroline Giesberts wrote:
Caroline Giesberts wrote:
Evenals Verena, kom ik niet uit het patroon van de Bunny bunch: na de neus heb ik 24 steken. Dan naar de voorste poten: ik brei 9 (lijf?)steken, zet er 4 op, waar ik niets mee doe, ik keer het werk en brei de buitenste 8 steken ( ik meende van het lijf?) 7 cm lang. Dan zit ik met 4 steken van de voorpoot? En nog overig 15 steken. . Hiervan brei ik vlg patroon: 10 voor het lijf en dan weer 4 steken voor de poot . Nu de buitenste 8 st voor de poot. Het is niet symmetrisch met de andere kant. Out
23.03.2023 - 21:53DROPS Design answered:
Dag Caroline,
Na het opzetten van de 4 steken, keer je het werk en brei je heen en weer over deze 4 steken + 4 steken van het lijf. Je breit heen en weer tot je een hoogte hebt van 7 cm en dan kant je af. Je hebt nu eigenlijk een los lapje eraan gebreid. Nu pak je het werk weer op op het lijf, je breit 10 steken van het lijf en dan brei je de andere voorpoot op dezelfde manier. De voorpoten worden op het einde in de lengte dicht genaaid.
24.03.2023 - 19:44
![]() Verena wrote:
Verena wrote:
Hallo, die Anleitung sollte korrigiert werden. Arbeitsschritt Arme: wenn ich die Arme einstricke, sind 5M am re Rand, 6M zwischen den Armen und die letzten 5M am li Rand stillgelegt. Davon steht aber nichts in der Anleitung. Beste Grüsse Verena
20.03.2023 - 10:38DROPS Design answered:
Liebe Verena, man muss 10 Maschen stricken und die letzten 4 gestrickten Maschen für den Arm behalten (so sind es zuerst nur 6 Maschen für Rückenteil/Vorderteil) und diese 4 M + die 4 neue angegschlagene Maschen = 8 M für den Arm. Viel Spaß beim stricken!
20.03.2023 - 14:22
![]() Verena wrote:
Verena wrote:
Ich komme mit dieser Anleitung ab den Arbeitsschritten ARME nicht mehr klar! Ich verstehe nicht, wie ich diese arbeiten muss, auch nicht wie nach der Arbeit der Arme der Körper von anfangs 10M plötzlich nur noch 5M hat??? 🤔🧐 Und auch nicht wie dann beim nächsten Arbeitsschritt KÖRPER dann wieder 24M auf der Nadel sind ..? Ich bin verwirrt 😠
19.03.2023 - 19:29DROPS Design answered:
Liebe Verena, stricken Sie die ersten 5 Maschen (die sind für Körper und werden später gestrickt), dann für den 1. Arm stricken Sie die nächsten 4 Maschen + schlagen Sie 4 M, jetzt stricken Sie 7 ncm über diese 8 Maschen und ketten Sie ab. Faden Abschneiden und die nächste 10 M nach den 5 ersten Maschen vom Körper stricken, 4 M anschlagen und jetzt stricken Sie den 2. Arm über die letzten 8 M (es sind 6 M zwischen beide Ärme), nach dem 2. Arm, Faden abschneiden und die letzten 5 Maschen vom Körper stricken. Viel Spaß beim stricken!
20.03.2023 - 09:13
|
|||||||
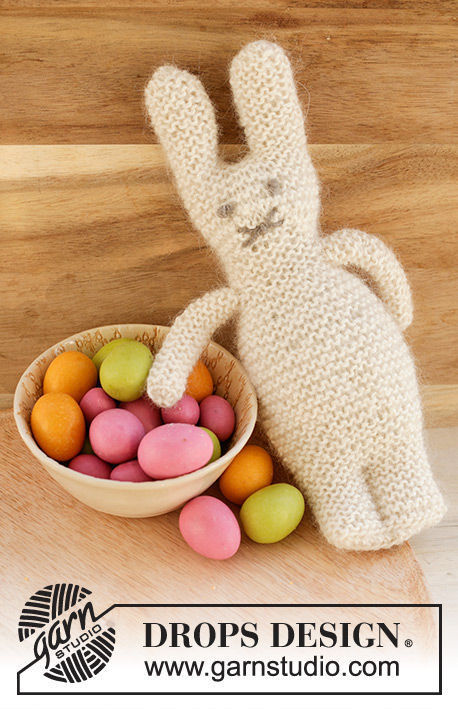
The Bunny Bunch#thebunnybunch |
|||||||
 |
 |
||||||
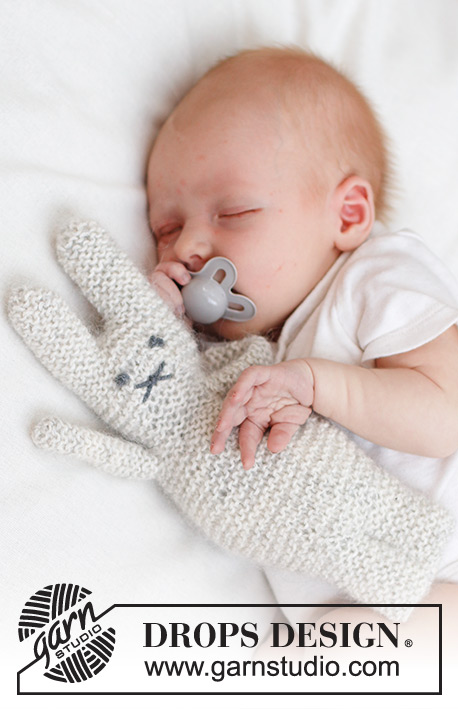
Knitted bunny for babies and children in DROPS Alpaca and DROPS Kid-Silk or 1 strand DROPS Brushed Alpaca Silk. The piece is worked back and forth in garter stitch. Theme: Soft toys.
DROPS Baby 46-18 |
|||||||
|
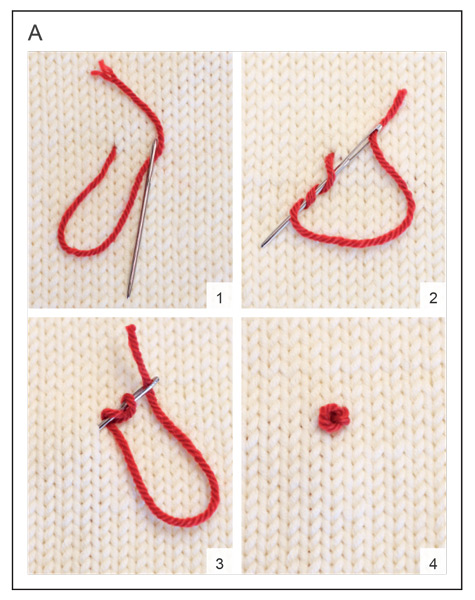
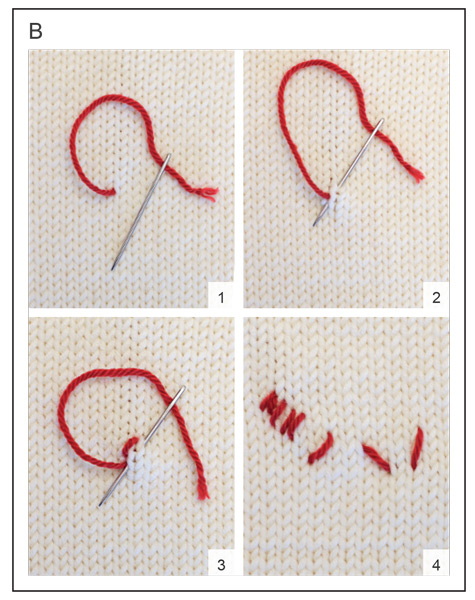
------------------------------------------------------- EXPLANATIONS FOR THE PATTERN: ------------------------------------------------------- RIDGE/GARTER STITCH (worked back and forth): Knit all rows. 1 ridge = knit 2 rows. PATTERN: See diagrams A and B. The diagrams show how to work the embroidered stitches. ------------------------------------------------------- START THE PIECE HERE: ------------------------------------------------------- BUNNY – SHORT OVERVIEW OF THE PIECE: The piece is worked back and forth, top down in GARTER STITCH – read description above. The ears are worked first, then the head and body. FIRST EAR: Cast on 5 stitches with needle size 3.5 mm, 1 strand DROPS Alpaca and 1 strand DROPS Kid-Silk (held together) or 1 strand DROPS Brushed Alpaca Silk: ROW 1: Knit. ROW 2: Knit 1, 1 yarn over, knit 1, 1 yarn over, knit 1, 1 yarn over, knit 1, 1 yarn over, knit 1 = 9 stitches. ROW 3: Knit, knit yarn overs twisted to avoid holes. ROW 4: Knit 1, 1 yarn over, knit 2, 1 yarn over, knit 3, 1 yarn over, knit 2, 1 yarn over, knit 1 = 13 stitches. ROWS 5- 22: Knit, knit yarn overs twisted to avoid holes (the piece measures approx. 5 cm). Cut the strand. Leave the stitches on the needle and work the second ear. SECOND EAR: Cast on and work in the same way as the first ear. Do not cut the strand. Cast on 1 stitch at the end of the last row. REMEMBER THE KNITTING TENSION! HEAD: Turn, knit the stitches from the second ear, cast on 2 stitches, knit the stitches from the first ear, cast on 1 stitch = 30 stitches. Work 4 ridges back and forth over all stitches. NOSE: Increase for the nose as follows: ROW 1: Knit 13, 1 yarn over, knit 4, 1 yarn over, knit 13 = 32 stitches. ROW 2: Knit 13, knit the yarn over twisted (no hole), 1 yarn over, knit 4, 1 yarn over, knit the yarn over twisted (no hole), knit13 = 34 stitches. ROWS 3-5: Knit, yarn overs knitted twisted to avoid holes . Now decrease as follows: ROW 1: Knit 13, knit 2 together, knit 4, knit 2 together, knit 13 = 32 stitches. ROW 2: Knit 12, knit 2 together, knit 4, knit 2 together, knit 12 = 30 stitches. ROW 3: Knit 11, knit 2 together, knit 4, knit 2 together, knit 11 = 28 stitches. ROW 4: Knit 10, knit 2 together, knit 4, knit 2 together, knit 10 = 26 stitches. ROW 5: Knit 9, knit 2 together, knit 4, knit 2 together, knit 9 = 24 stitches. ROWS 6-10: Knit. FRONT LEGS: On the next row: Knit 9 (body), cast on 4 stitches for the first front leg, turn and work garter stitch back and forth over the outermost 8 stitches for 7 cm. Cast off these 8 stitches with knit from the right side, cut the strand, leaving an end of 25 cm (used when assembling). The first front leg is finished. Knit the next 10 stitches (body), cast on 4 stitches for the second front leg, turn and work garter stitch back and forth over the outermost 8 stitches for 7 cm. Cast off these 8 stitches with knit from the right side, cut the strand, leaving an end of 25 cm (used when assembling). The second front leg is finished. Knit the last 5 stitches (body). Turn. BODY: ROW 1 (wrong side): Knit 5 (body), fold the front leg double so you can knit up 1 stitch in each of the 4 cast-on stitches on the front leg, skip the next 4 front-leg stitches, knit 6 (between the legs), fold the second front leg double and knit up 1 stitch in each of the 4 cast-on stitches on the front leg, skip the next 4 front-leg stitches, knit the last 5 stitches (body) = 24 stitches. Now increase for the tummy: ROW 2: Knit and increase 8 stitches evenly on the row – increase with yarn overs which are knitted twisted on the next row to avoid holes = 32 stitches. ROWS 3-7: Knit. ROW 8: Knit and increase 6 stitches evenly on the row – increase with yarn overs which are knitted twisted on the next row to avoid holes = 38 stitches. ROWS 9-14: Knit. ROW 15: Knit and increase 6 stitches evenly on the row – increase with yarn overs which are knitted twisted on the next row to avoid holes = 44 stitches. ROW 16: Knit. Continue with garter stitch until the body measures 7 cm (approx. 15 -16 ridges), and the next row is from the wrong side. Now decrease below the tummy as follows: ROW 1: Knit 3, knit 2 together, knit 5, knit 2 together, knit 5, knit 2 together, knit 5, knit 2 together, knit 5, knit 2 together, knit 5, knit 2 together, knit 4 = 38 stitches. ROWS 2-4: Knit. ROW 5: Knit 3, knit 2 together, knit 4, knit 2 together, knit 4, knit 2 together, knit 4, knit 2 together, knit 4, knit 2 together, knit 4, knit 2 together, knit 3 = 32 stitches. ROWS 6-8: Knit. ROW 9: Knit 3, knit 2 together, knit 6, knit 2 together, knit 6 knit 2 together, knit 6, knit 2 together, knit 6, knit 2 together, knit 6, knit 2 together, knit 3 = 28 stitches. BACK LEGS: The piece is now measured from here! Work garter stitch for 4 cm (approx. 8-9 ridges) and cast off loosely. EMBROIDERING: Use left-over colour grey, brown or black. Work 1 French knot for each eye, above the nose - see diagram A. Work the nose with 2 flat stitches (2 cm long) across each nose section - see diagram B; the flat stitches should cross. Work 1 small flat stitch (½ cm) crossing the middle of the other 2 flat stitches. ASSEMBLY: Sew each ear in the outermost loop of the outermost stitch, filling with wadding as you go. Sew the opening at the top of the head and continue down the back, sewing in the outermost loop of the outermost stitch, filling with wadding as you go. Sew the cast-off edges together at the bottom, sewing from side to side, making sure the seam meets mid-back. Sew a 4 cm seam along the middle to divide the legs, sewing through both layers and the wadding. Sew each front leg, sewing in the outermost loop of the outermost stitch, filling with wadding as you go. Tack a strand through the stitches at the bottom of each front leg, tighten and fasten well. |
|||||||
Diagram explanations |
|||||||
|
|||||||
 |
|||||||
 |
|||||||
Have you finished this pattern?Tag your pictures with #dropspattern #thebunnybunch or submit them to the #dropsfan gallery. Do you need help with this pattern?You'll find 15 tutorial videos, a Comments/Questions area and more by visiting the pattern on garnstudio.com. © 1982-2026 DROPS Design A/S. We reserve all rights. This document, including all its sub-sections, has copyrights. Read more about what you can do with our patterns at the bottom of each pattern on our site. |
|||||||


With over 40 years in knitting and crochet design, DROPS Design offers one of the most extensive collections of free patterns on the internet - translated to 17 languages. As of today we count 325 catalogues and 12298 patterns translated into English (UK/cm).
We work hard to bring you the best knitting and crochet have to offer, inspiration and advice as well as great quality yarns at incredible prices! Would you like to use our patterns for other than personal use? You can read what you are allowed to do in the Copyright text at the bottom of all our patterns. Happy crafting!
Post a comment to pattern DROPS Baby 46-18
We would love to hear what you have to say about this pattern!
If you want to leave a question, please make sure you select the correct category in the form below, to speed up the answering process. Required fields are marked *.