
Popular categories
Looking for a yarn?


Comments / Questions (98)
![]() Kia wrote:
Kia wrote:
Jag håller på att sticka denna koftan, men tycker inte att mönstret stämmer med bilden. På mönstret är inges rätdgickafe varv vid andra ökningen som det tydligt syns på bilden att det är. Slutet på armen stämmer inte heller, på mönstret slutar armen med resår, men på bilden syns att den slutar med några varv rätstockning???
27.04.2026 - 10:17DROPS Design answered:
Hei Kia. Oppskriften er oversendt til Design avd. for en dobbeltsjekk ang. rätdgickafe. Armene stemmer, om du ser på bildet ser du at ermene / vrangborden er brettet opp derfor kommer det vrangmasker nederst. mvh DROPS Design
27.04.2026 - 11:30
![]() Stefie wrote:
Stefie wrote:
Bonjour! Sur le patron, lorsqu il est indiquer terminer le A3 et le A5, est ce que l on doit tricoter le diagramme A3 au complet puis faire le diagramme A5. Ou bien on les tricote en même temps? Merci
22.04.2026 - 14:21DROPS Design answered:
Bonjour Stefie, vous tricotez A.3 et A.5 en même temps ainsi (au 1er rang): 4 m de bordure au point mousse, puis on répète (1 x A.3 en largeur et 1 x A.5 en largeur) jusqu'à ce qu'il reste 7 m (au 1er rang, au 3ème rang, il restera 9 m car on a augmenté 2 m dans chaque A.3) et on termine par 4 m de bordure au point mousse. Bon tricot!
22.04.2026 - 16:51
![]() Caro wrote:
Caro wrote:
Après le premier rang, on a (141) 166-184-202-211 (220) mailles. Terminer A.3 et A.4/A.5. J ai tricoter le A3 . J aimerais savoir si je dois tricoter leA4 et A5 en même temps.si oui, dois- je commencer le A4 à la deuxième ligne ( afin que ce soit à la mem3 ligne que A5? Merci beaucoup de m éclairer .
21.04.2026 - 23:34DROPS Design answered:
Bonjour Caro, terminez simplement les diagrammes comme vous les aviez commencé, A.4 se tricote en taille préma (et vous ne tricotez pas A.5 dans cette taille), et dans les autres tailles,vous tricotez A.5 (et pas A.4). Bon tricot!
22.04.2026 - 08:04
![]() Mariana wrote:
Mariana wrote:
Hola, estoy haciendo la talla 6/9 meses en la parte del canesú. He llegado al aumento hasta 202 puntos, y luego dice que debo ajustar a 191 puntos. ¿Como los disminuyo para eso?
08.04.2026 - 17:11DROPS Design answered:
Hola Mariana, lo mejor es disminuir trabajando puntos juntos de derecho y asegurándose de repartir las disminuciones lo mejor posible. Para eso puedes usar nuestra herramienta online para calcular disminuciones repartidas, que puedes encontrar en la esquina derecha de la página, con forma de llave inglesa (tienes que disminuir 11 pts sobre 202 pts). Por ejemplo, puedes repartir de esta manera: (16 derechos, 2 pts juntos de derecho) x 3 veces, (17 derechos, 2 pts juntos de derecho) x 2 veces, (16 derechos, 2 pts juntos de derecho) x 4 veces, (17 derechos, 2 pts juntos de derecho)x2 veces.
26.04.2026 - 23:58
![]() Donata wrote:
Donata wrote:
Negli schemi A.3 e A.5 la riga 3 va invertita con la riga 4 perché si formi la cresta sul diritto del lavoro
31.03.2026 - 15:04DROPS Design answered:
Buonasera Donata, la riga 4 risulta a rovescio sul diritto del lavoro. Buon lavoro!
04.04.2026 - 18:17
![]() Sticka wrote:
Sticka wrote:
Hur fick ni 34 cm Längd, om yoke measures -13 cm from the marker and body 15 m+ 3 cm ribb, det blir 31 cm för st. 12/18 m?
04.02.2026 - 10:26DROPS Design answered:
Hej, du finder de sidste cm øverst på bærestykket. Du vil se at det stemmer når du har strikket færdigt :)
05.02.2026 - 11:40
![]() Joke wrote:
Joke wrote:
Hallo, ik zou dit vestje willen breien in de maat 12-18 maanden. Na de ribbel moet ik het patroon A1 - A2 breien, maar dan eindig ik met 3 averechtse steken voor de 4 voorbiessteken (aan de goede kant) ? Doe ik iets fout? Groetjes Joke
19.01.2026 - 21:50DROPS Design answered:
Dag Joke,
Je breit het patroon zo ver mogelijk door tot de voorbies, op die manier heb je een symmetrisch patroon.
21.01.2026 - 18:10
![]() Gisela wrote:
Gisela wrote:
Ich stricke sehr viel schon seit 30 Jahren und bin noch nie mit einer Strickanleitungen sooo schlecht zurechtkommen wie mit dieser. Ich musste mehrmals wieder von vorne anfangen. LG Gisela
11.01.2026 - 08:50
![]() Gisela wrote:
Gisela wrote:
Ich bin bei der Halsblende. Inder nächsten Hin-Reihe in jeder 2.Linksrippe 1Masche zunehmen, indem 1 Umschlag gearbeitet wird. Vor oder nach der Linksrippe?
06.01.2026 - 17:00DROPS Design answered:
Liebe Gisela, so nehmen Sie zu: 4 Maschen kraus rechts, 1 Masche rechts, 1 Masche links, dann stricken Sie das Bündchen mit Zunahmen so (1 Masche rechts, 1 Umschlag, 1 Masche links), von (bis) wiederholen bis noch 4 Maschen übrig sind, dann mit 4 Maschen kraus rechts enden. Bei der nächsten Reihe stricken Sie die Umschläge rechts verschränkt (so sind es 2 Maschen links im Bündchen, bei der Vorderseite gesehen). Viel Spaß beim Stricken!
07.01.2026 - 07:50
![]() Gisela wrote:
Gisela wrote:
Wie soll ich in einer Linksrippe mit einem Umschlag 1 Masche zunehmen? Ich nehme entweder vor oder nach der Linksmasche mit einem Umschlag eine Masche zu, oder??? Liebe Grüße Gisela
05.01.2026 - 16:32DROPS Design answered:
Liebe Gisela, sorry ich verstehe hier nicht, wo Sie genau in der Anleitung sind. Was meinen Sie mit "Linksrippe"? Die Zunahmen werden wie bei dem Diagrammen bearbeitet, entweder zwischen rechten Maschen (A.1, A.2, A.3) oder zwischen linken Maschen (A.5). Gerne sagen Sie uns bitte mehr. Danke im voraus für Ihr Verständnis.
06.01.2026 - 08:58
|
||||||||||
Sweet Gleam Cardigan#sweetgleamcardigan |
||||||||||
 |
 |
|||||||||
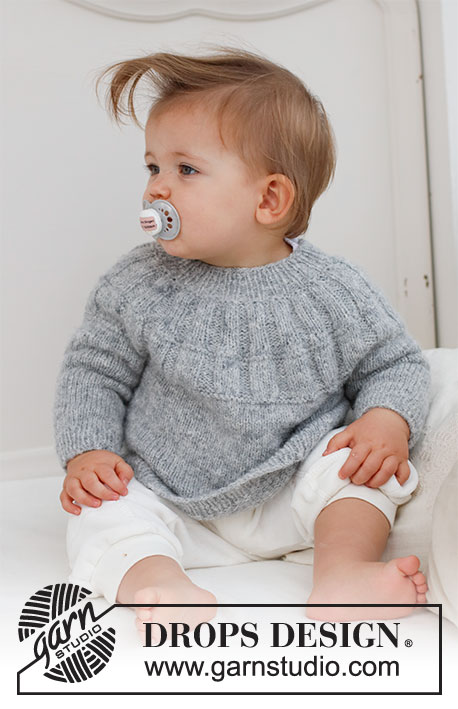
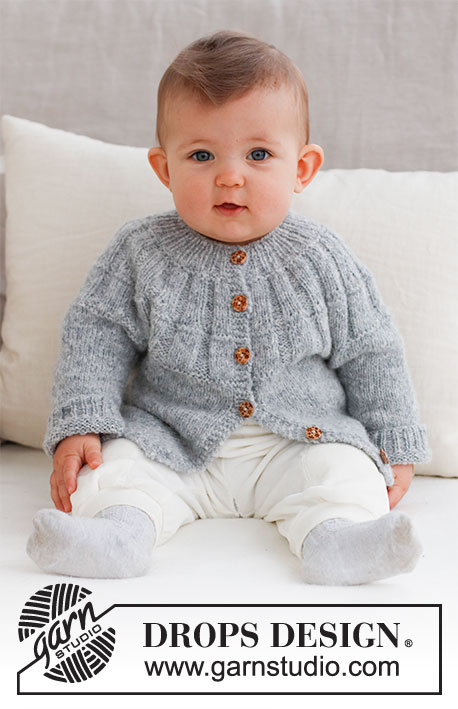
Knitted jacket for baby in DROPS Sky. The piece is worked top down, with round yoke and ribbing on the yoke. Sizes: Premature to 2 years.
DROPS Baby 43-6 |
||||||||||
|
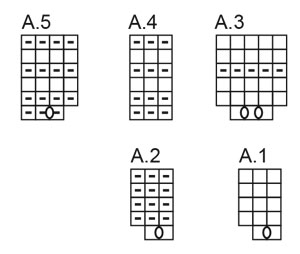
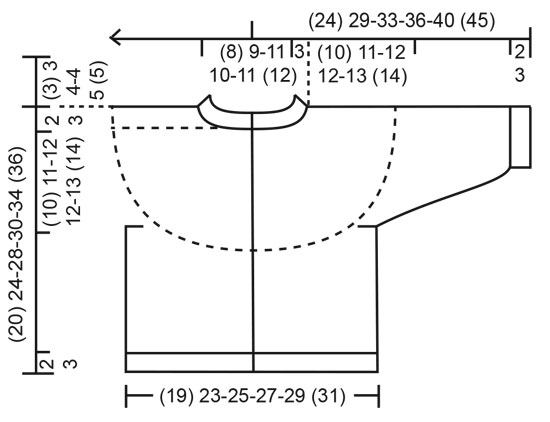
------------------------------------------------------- EXPLANATIONS FOR THE PATTERN: ------------------------------------------------------- RIDGE/GARTER STITCH (worked back and forth): Knit all rows. 1 ridge = knit 2 rows. PATTERN: See diagrams A.1 to A.5. The diagrams show all rows in the pattern from the right side. DECREASE TIP (for sleeves): Start 3 stitches left before the marker, knit 2 together, knit 2 (marker sits between these 2 stitches), slip 1 stitch as if to knit, knit 1 and pass the slipped stitch over the knitted stitch. BUTTONHOLES: Work the buttonholes on the right band (when the garment is worn). Work from the right side when there are 3 stitches left: Make 1 yarn over, knit 2 together and knit 1. On the next row (wrong side) knit the yarn over to leave a hole. The first buttonhole is worked when the neck measures 1½-2 cm, the other (3) 4-5-5-5 (5) buttonholes are worked with (5) 5-5-5-5½ (6) cm between each one. ------------------------------------------------------- START THE PIECE HERE: ------------------------------------------------------- JACKET – SHORT OVERVIEW OF THE PIECE. The neck and yoke are worked back and forth with circular needle, from mid front and top down. The yoke is divided for body and sleeves and the body continued back and forth. The sleeves are worked in the round with double pointed needles. NECK: Cast on (59) 63-71-75-79 (83) stitches with circular needle size 3 mm and DROPS Sky. Purl 1 row from the wrong side, then work the next row as follows: 4 band stitches in GARTER STITCH – read description above, * knit 1, purl 1 *, work from *-* until there are 5 stitches left, knit 1 and 4 band stitches in garter stitch. Work this rib for (2) 2-3-3-4 (4) cm – remember the BUTTONHOLES on the right band – read description above. On the next row from the right side increase every other purl-1 to purl-2 by making 1 yarn over – start to increase in the 2nd purled stitch after the band (knit the yarn overs twisted on the next row to avoid holes) = (12) 13-15-16-17 (18) increased stitches and (71) 76-86-91-96 (101) stitches. Continue the new rib until the neck measures (3) 3-4-4-5 (5) cm. Insert 1 marker after the band; the yoke is measured from this marker! YOKE: Change to circular needle size 4 mm and work 1 ridge over all stitches – AT THE SAME TIME on the first row increase (3) 2-0-3-2 (1) stitches evenly spaced = (74) 78-86-94-98 (102) stitches. After the ridge work as follows from the right side: 4 band stitches in garter stitch, * A.1, A.2 *, work from *-* until there are 6 stitches left, A.1 and 4 band stitches in garter stitch. After the first row there are (107) 113-125-137-143 (149) stitches. Complete A.1 and A.2, then continue with knit 3 /purl 3 until the yoke measures (4) 5-5-5-6 (6) cm from the marker on the neck. Work the next row from the right side as follows: SIZE (<0): 4 band stitches in garter stitch, * A.3, A.4 *, work from *-* until there are 7 stitches left, A.3 and 4 band stitches in garter stitch. SIZES 0/1 – 1/3 – 6/9 – 12/18 months (2 years): 4 band stitches in garter stitch, * A.3, A.5 *, work from *-* until there are 7 stitches left, A.3 and 4 band stitches in garter stitch. After the first row there are (141) 166-184-202-211 (220) stitches. Complete A.3 and A.4/A.5, then continue with knit 5 / purl 3 in size (<0) and knit 5 / purl 4 in the other sizes until the yoke measures (8) 10-10-10-12 (12) cm from the marker. Knit 1 row from the right side where you adjust the number of stitches to (139) 163-175-191-195 (207) stitches. Knit 1 row from the wrong side. Continue with stocking stitch and 4 band stitches in garter stitch on each side until the yoke measures (10) 11-12-12-13 (14) cm from the marker. On the next row divide for the body and sleeves as follows: Work the first (22) 26-28-30-31 (33) stitches as before, place the next (30) 34-36-40-40 (42) stitches on a thread for the sleeve, cast on (4) 4-6-6-8 (8) stitches (in side under sleeve), work (35) 43-47-51-53 (57) stitches, place the next (30) 34-36-40-40 (42) stitches on a thread for the sleeve, cast on (4) 4-6-6-8 (8) stitches (in side under sleeve), work the last (22) 26-28-30-31 (33) stitches. The body and sleeves are finished separately. The piece is now measured from here! BODY: = (87) 103-115-123-131 (139) stitches. Continue with stocking stitch and 4 band stitches in garter stitch on each side for a further (6) 9-12-12-15 (16) cm. Knit 1 row from the right side where you increase (12) 14-16-18-18 (20) stitches evenly spaced = (99) 117-131-141-149 (159) stitches. Change to circular needle size 3 mm and work as follows from the wrong side: 4 band stitches in garter stitch, * purl 1, knit 1 *, work from *-* until there are 5 stitches left, purl 1 and 4 band stitches in garter stitch. Continue this rib for (2) 2-2-3-3 (3) cm. Cast off a little loosely. The jacket measures approx. (20) 24-28-30-34 (36) cm from the shoulder down. SLEEVES: Place the (30) 34-36-40-40 (42) stitches from the thread on the one side of the piece on double pointed needles size 4 mm and knit up 1 stitch in each of the (4) 4-6-6-8 (8) stitches cast on under the sleeve = (34) 38-42-46-48 (50) stitches. Insert a marker in the middle of the (4) 4-6-6-8 (8) stitches under the sleeve. Start at the marker and work stocking stitch in the round for 1 cm. Now decrease 2 stitches under the sleeve (does not apply to sizes <0 and 0/1 month) – read DECREASE TIP. Decrease like this every 4th round a total of (0) 0-1-1-1 (2) times = (34) 38-40-44-46 (46) stitches. Continue working until the sleeve measures (5) 8-10-13-15 (19) cm from the division. There is approx. (2) 2-2-3-3 (3) cm to finished length; try the jacket on and work to desired length. Knit 1 round where you decrease (0) 0-0-4-4 (2) stitches evenly spaced = (34) 38-40-40-42 (44) stitches. Change to double pointed needles size 3 mm and work rib (knit 1, purl 1) for (2) 2-2-3-3 (3) cm. Cast off a little loosely The sleeve measures approx. (7) 10-12-16-18 (22) cm from the division. Work the other sleeve in the same way. ASSEMBLY: Sew the buttons onto the left band. |
||||||||||
Diagram explanations |
||||||||||
|
||||||||||
 |
||||||||||
 |
||||||||||
Have you finished this pattern?Tag your pictures with #dropspattern #sweetgleamcardigan or submit them to the #dropsfan gallery. Do you need help with this pattern?You'll find 30 tutorial videos, a Comments/Questions area and more by visiting the pattern on garnstudio.com. © 1982-2026 DROPS Design A/S. We reserve all rights. This document, including all its sub-sections, has copyrights. Read more about what you can do with our patterns at the bottom of each pattern on our site. |
||||||||||


With over 40 years in knitting and crochet design, DROPS Design offers one of the most extensive collections of free patterns on the internet - translated to 17 languages. As of today we count 324 catalogues and 12290 patterns translated into English (UK/cm).
We work hard to bring you the best knitting and crochet have to offer, inspiration and advice as well as great quality yarns at incredible prices! Would you like to use our patterns for other than personal use? You can read what you are allowed to do in the Copyright text at the bottom of all our patterns. Happy crafting!
Post a comment to pattern DROPS Baby 43-6
We would love to hear what you have to say about this pattern!
If you want to leave a question, please make sure you select the correct category in the form below, to speed up the answering process. Required fields are marked *.