
Popular categories
Looking for a yarn?


Comments / Questions (70)
![]() Noémie wrote:
Noémie wrote:
Bonsoir ! ! Je ne suis pas certaine de comprendre comment réaliser le biais de l'épaule suite au dos .Pouvez-vous m'expliquer svp ! Merci d'avance Noémie
16.03.2023 - 04:11DROPS Design answered:
Bonjour Noémie, pour le biais des épaules, vous allez mettre en attente les mailles en début de rang à partir de l'emmanchure (vers l'encolure) ainsi: tricotez les 5 à 8 premières mailles et glissez-les en attente, terminez le rang, tournez, rabattez 1 m au début du rang à partir de l'encolure, terminez le rang. Répétez ces 2 rangs encore 1 fois. Puis tricotez les 5-8 premières mailles, mettez-les en attente, terminez le rang, tournez, tricotez le rang suivant, tourner, tricotez les mailles restantes, tournez et tricotez toutes les mailles de l'épaule, rabattez au rang suivant. Bon tricot!
16.03.2023 - 09:11
![]() Noémie Fabre wrote:
Noémie Fabre wrote:
Rebonjour! Je ne suis pas certaine de comprendre egalement comment tricoter le dos et les coter separement apres les emmanchure du modele DROPS 230-4! Merci beaucoup!
13.03.2023 - 23:02DROPS Design answered:
Bonjour Mme Fabre, lorsque vous avez rabattu les mailles des emmanchures, vous mettez les mailles des deux devants en attente sur un fil ou une autre aiguille et tricotez d'abord le dos, puis chacun des deux devants. Bon tricot!
14.03.2023 - 10:02
![]() Noémie Fabre wrote:
Noémie Fabre wrote:
Bonjour. on demande de rabattre 4-4-4-8-12-16 pour l'emmancherais je ne suis pas certaine de comprendre la suite de chiffres. Merci beaucoup
13.03.2023 - 21:58DROPS Design answered:
Bonjour Mme Fabre, en taille S, M et L, vous rabattez les 4 mailles suivantes, en taille XL les 8 mailles suivantes, en taille XXL les 12 mailles suivantes et en taille XXXL les 16 mailles suivantes; autrement dit, vous allez rabattre en fonction de votre taille 2-2-2-4-6-8 mailles avant chacun des marqueurs sur les côtés du gilet et 2-2-2-4-6-8 mailles après ces marqueurs. Bon tricot!
14.03.2023 - 09:57
![]() Noémie Fabre wrote:
Noémie Fabre wrote:
Bonjour ! J'ai une autre petite question ! Je suis en train de tricoter le modèle DROPS 230-4 et je me demandais si quand il est dit dans les explications " lorsque l'ouvrage mesure 10cm à l'étape dos et devants " cela comprends les 6 premiers cm tricoter dans les pièces précédentes! Merci d'avance ! Noémie
09.03.2023 - 21:07DROPS Design answered:
Bonjour Mme Fabre, tout à fait, il faut bien mesurer à partir du rang de montage et pas depuis que les pièces sont réunies. Bon tricot!
10.03.2023 - 09:42
![]() Noémie Fabre wrote:
Noémie Fabre wrote:
Bonjour! Je tricote ce modèle DROPS 230-4 et je ne suis pas certaine de comment je dois mettre en attente et tricoter d'autres partie avec ma même pelotte ! J'ai regardé plusieurs vidéos mais aucun ne m'aide ! Merci d'avance :)
07.03.2023 - 15:08DROPS Design answered:
Bonjour Mme Fabre, coupez le fil à la fin de la 1ère partie du dos, et du devant gauche, et, lorsque vous avez terminé le devant droit, continuez les 3 parties avec la pelote du devant droit. Bon tricot!
07.03.2023 - 16:28
![]() Tul wrote:
Tul wrote:
Je m'excuse d'insister, mais pour poursuivre ma question, cela signifie que l'endroit du tricot sera, en réalité l'envers ? Merci beaucoup !
16.12.2022 - 18:21DROPS Design answered:
Bonjour Mme Tul, le tout premier rang après le montage sera un rang sur l'envers, et le rang suivant (le 1er rang de côtes) sera un rang sur l'endroit, ainsi, vous avez 1 rang jersey endroit, vu sur l'endroit, avant les côtes. et donc ce tout premier rang est l'envers et le 1er rang de côtes l'endroit de l'ouvrage; Bon tricot!
19.12.2022 - 08:42
![]() Tul wrote:
Tul wrote:
Bonjour, Il est écrit au début du tricot, pour le dos: "Tricoter 1 rang envers sur l'envers.". Est-ce que cela signifie qu'il faut d'abord tricot un rang endroit sur l'endroit après avoir monté les mailles ? Merci d'avance !
16.12.2022 - 14:34DROPS Design answered:
Bonjour Mme Tul, juste après avoir monté les mailles, tricotez toutes les mailles à l'envers = c'est l'envers de l'ouvrage, ainsi, vous aurez 1 rang de mailles endroit, vu sur l'endroit, avant les côtes. Au rang suivant (= ce sera l'endroit de l'ouvrage), commencez les côtes. Bon tricot!
16.12.2022 - 15:45
![]() Chantal wrote:
Chantal wrote:
Bonjour j'ai une autre question je fais le modèle 230-4 je suis rendu au manche je doit tricoté en rond avec 4 aiguilles à 2 pointes je doit placé un marqueur au début du rang et après la 23 ieme mailles quand je doit augmenter les mailles au début je doit commencer avec la 3ieme aiguilles selon la méthode demandé merci de me répondre
22.11.2022 - 01:29DROPS Design answered:
Bonjour Chantal, pour les manches, vous augmentez 2 mailles avant la fin du tour + 2 mailles après le début du tour - cf aussi AUGMENTATIONS au début des explications; vous aurez ainsi 4 mailles entre les augmentations. Si vous avez vos mailles sur 3 aiguilles et tricotez avec la 4ème, augmentez 2 m avant la fin de la 3ème + 2 m après le début de la 1ère aiguille. Bon tricot!
22.11.2022 - 10:17
![]() Chantal wrote:
Chantal wrote:
Bonjour je fait le modele230-4 je suis rendu à faire le devant gauche il me dise de mettre les 16 premières ailles côté encourent les mettre en attente ensuite rabattre côté encolure au début de chaque rang droit mais j'ai 16 mailles en attente est se que j'oublie c'est mailles ou je commence à diminuer ses mailles ce patron très difficile mal expliqué merci de maider
03.11.2022 - 11:58DROPS Design answered:
Bonjour Chantal, effectivement, vous "oubliez" ces 16 mailles en attente, elles seront reprises plus tard pour le col, continuez en rabattant les mailles pour l'encolure (celles après les mailles en attente). Bon tricot!
03.11.2022 - 13:59
![]() Chantal wrote:
Chantal wrote:
Bonjour je fait modèle 230-4 xxxl je comprend pas la partie j'ai diminué côté encolure ensuite biais des épaules ou il dise placer en attente les mailles 3 fois 8 mailles et les 8 dernières aussitôt les mailles sont tous en attente il marqué reprendre les32 maillesen attente sur les aiguilles 5 se sont les même mailles ou des nouvelles je comprend pas merci de maider
31.10.2022 - 14:34DROPS Design answered:
Bonjour Chantal, il s'agit de ces 32 mailles (3 fois 8 m + 1 fois 8 m en attente), on reprend maintenant toutes les mailles des épaules pour tricoter 1 rang sur l'envers et rabattre au rang suivant sur l'endroit. Bon tricot!
31.10.2022 - 16:12
|
||||
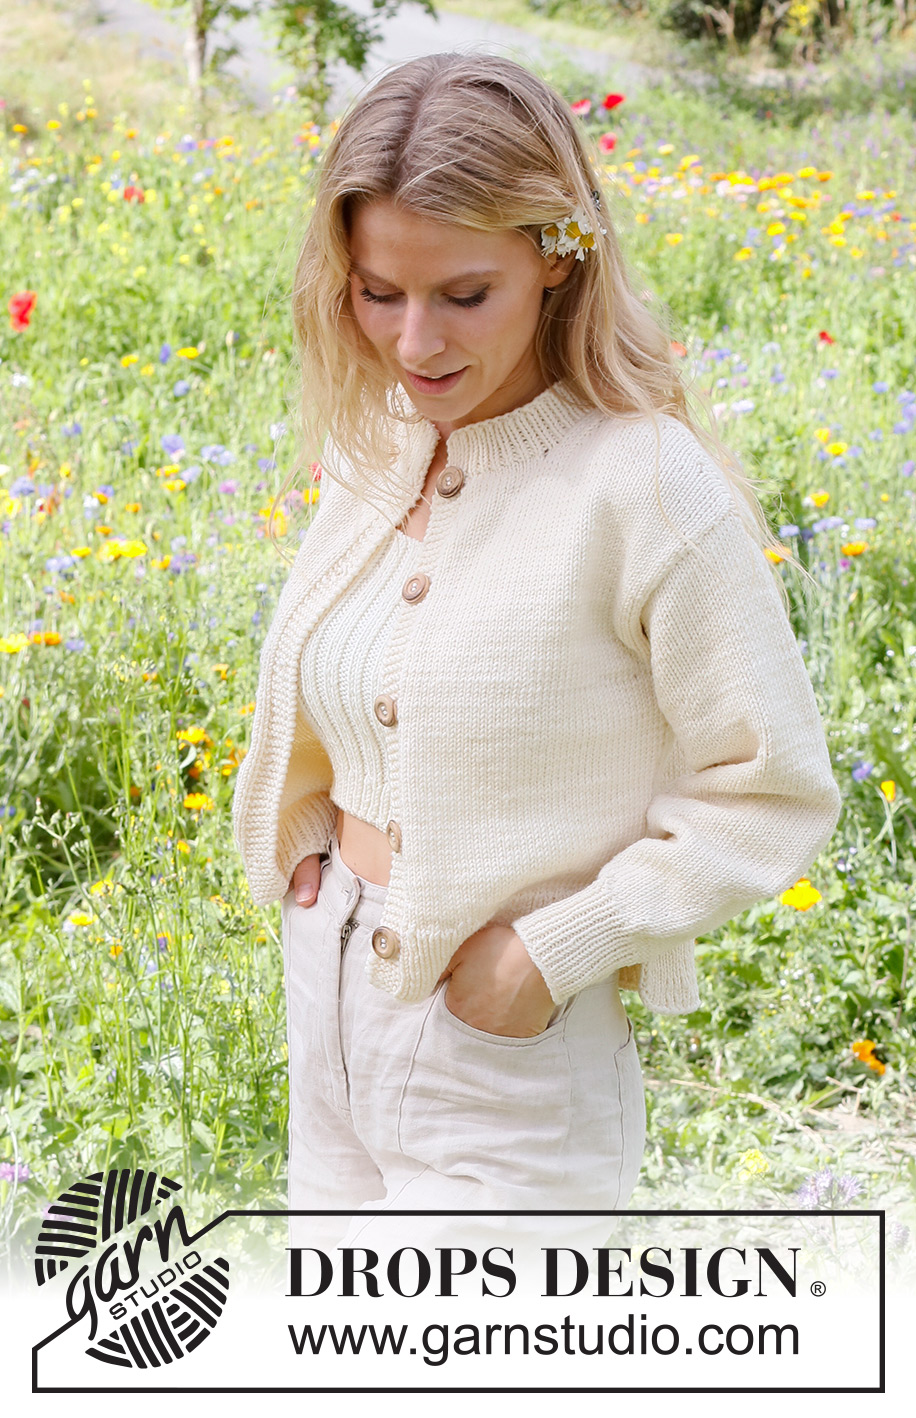
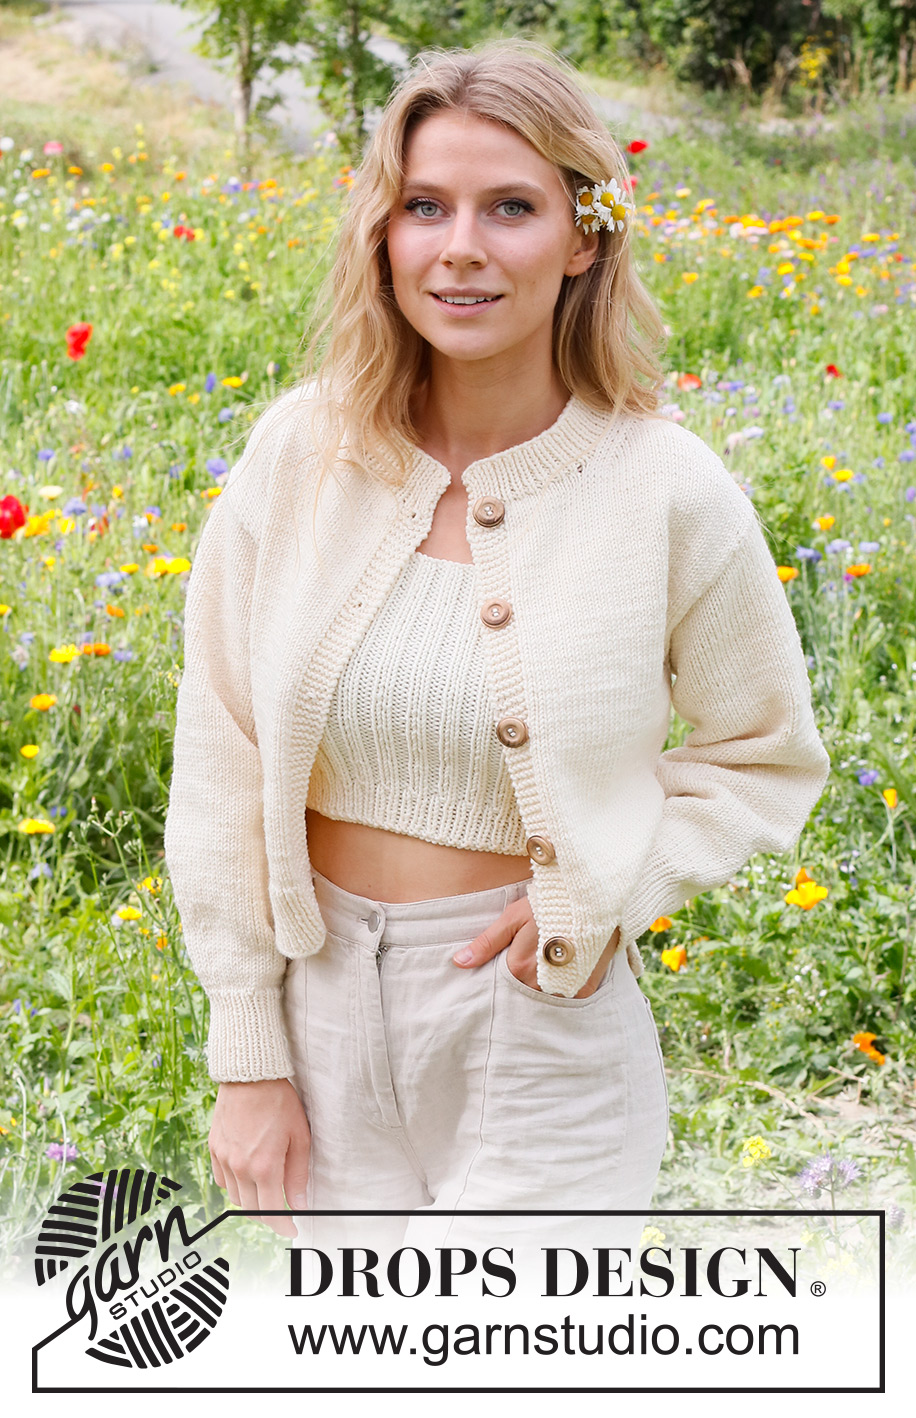
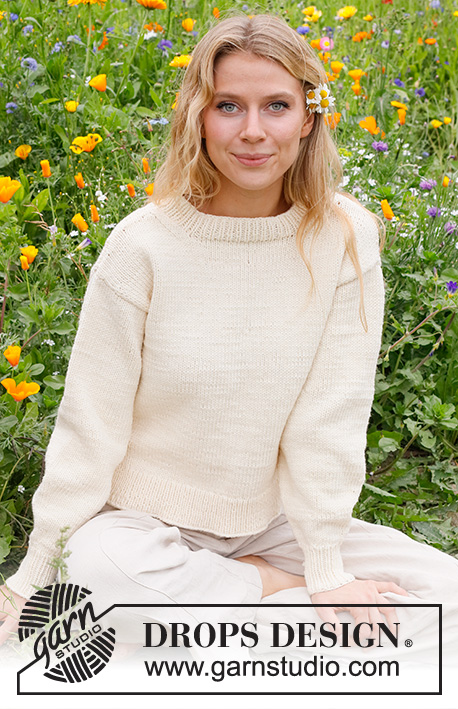
Prairie Rose Cardigan#prairierosecardigan |
||||
 |
 |
|||
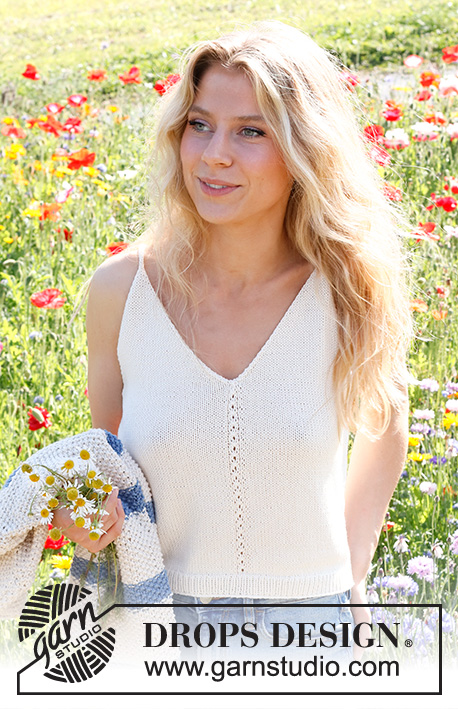
Knitted jacket in DROPS Big Merino. The piece is worked bottom up, with split in the sides. Sizes S - XXXL.
DROPS 230-4 |
||||
|
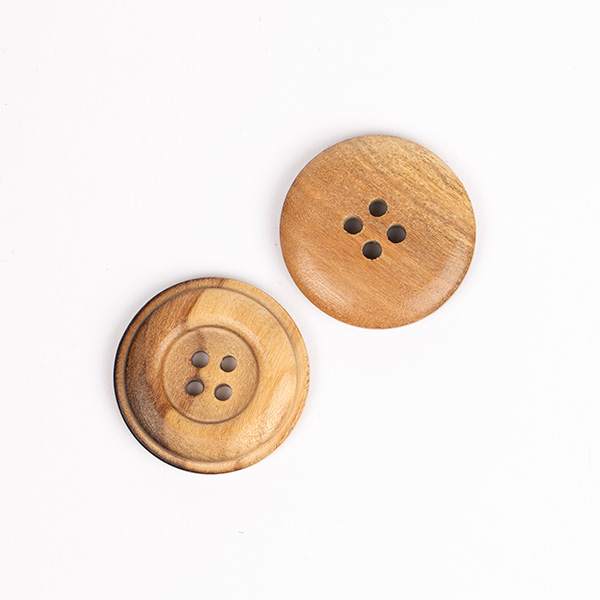
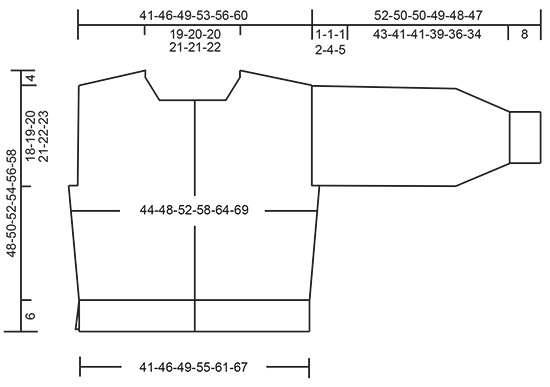
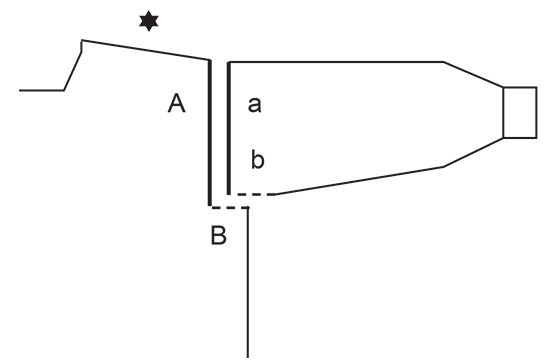
------------------------------------------------------- EXPLANATIONS FOR THE PATTERN: ------------------------------------------------------- RIDGE/GARTER STITCH (worked back and forth): Knit all rows. 1 ridge = knit 2 rows. INCREASE TIP (for body and sleeves): All increases are worked from the right side! Work until there are 2 stitches left before the marker, 1 yarn over, knit 4 (marker sits between these 4 stitches), 1 yarn over. On the next row/round work the yarn overs twisted to avoid holes. Then work the new stitches in stocking stitch. DECREASE TIP (decrease 1 stitch by the neck): Decrease from the right side, inside the 3 stocking stitches. AFTER THE 3 STOCKING STITCHES: Slip 1 stitch as if to knit, knit 1 and pass the slipped stitch over the knitted stitch (= 1 stitch decreased). BEFORE THE 3 STOCKING STITCHES: Work until there are 5 stitches left mid-front, knit 2 together, work the last 3 stitches in stocking stitch (= 1 stitch decreased). BUTTONHOLES: Work the buttonholes on the right band. 1 BUTTONHOLE = 1 yarn over inside the outermost 3 stitches on the row (from the right side). On the next row (wrong side) knit the yarn over together with the 3rd to last stitch on the row. Work the buttonholes when the piece measures: S: 5, 14, 24, 33 and 43 cm. M: 5, 15, 25, 35 and 45 cm. L: 6, 16, 26, 36 and 46 cm. XL: 6, 14, 23, 31, 40 and 48 cm. XXL: 6, 15, 23, 32, 40 and 49 cm. XXXL: 6, 15, 24, 33, 42 and 51 cm. ------------------------------------------------------- START THE PIECE HERE: ------------------------------------------------------- JACKET – SHORT OVERVIEW OF THE PIECE: The back and front pieces are worked separately, back and forth and bottom up until the split is finished. The pieces are joined and the body continued back and forth as far as the armholes. The back and front pieces are then finished separately, back and forth. The sleeves are worked in the round, bottom up. The neck is worked to finish. BACK PIECE: Cast on 95-105-113-127-141-153 stitches with circular needle size 4 mm and DROPS Big Merino. Purl 1 row from the wrong side. Then work rib (knit 1, purl 1) over all stitches – NOTE: The first and last stitches on the row are knitted from the right side and purled from the wrong side. Work this rib for 6 cm, finishing after a row from the wrong side. Lay the piece to one side. LEFT FRONT PIECE: Cast on 55-61-65-71-79-85 stitches with circular needle size 4 mm and DROPS Big Merino. Purl 1 row from the wrong side. Then work rib (knit 1, purl 1) until there are 6 stitches left, finish with 6 band stitches in GARTER STITCH – read description above. Work this rib for 6 cm, finishing after a row from the wrong side. Lay the piece to one side. RIGHT FRONT PIECE: Cast on 55-61-65-71-79-85 stitches with circular needle size 4 mm and DROPS Big Merino. Purl 1 row from the wrong side. Then work rib from the right side as follows: 6 band stitches in garter stitch, work rib (knit 1, purl 1) to the end of the row. Work this rib for 6 cm – remember the BUTTONHOLES on the band and finishing after a row from the wrong side. BODY: Place the right front piece, the back piece and the left front piece on the same circular needle size 5 mm = 205-227-243-269-299-323 stitches. Knit 1 row from the right side and decrease 53-59-63-69-79-83 stitches evenly spaced (do not decrease over the bands) = 152-168-180-200-220-240 stitches. Insert 1 marker 41-45-48-53-58-63 stitches in from each side (= 70-78-84-94-104-114 stitches between the markers on the back piece). Allow the markers to follow your work onwards; they are used when increasing in the sides. Work stocking stitch back and forth with 6 band stitches in garter stitch on each side. REMEMBER THE KNITTING TENSION! When the piece measures 10 cm, increase 1 stitch on each side of both markers – read INCREASE TIP (= 4 stitches increased). Repeat the increase when the piece measures 18-18-19-19-20-20 cm = 160-176-188-208-228-248 stitches. When the piece measures 26-27-28-29-30-31 cm, work the armholes as follows: Work 41-45-48-51-54-57 stitches as before (front piece), cast off 4-4-4-8-12-16 stitches, work 70-78-84-90-96-102 stitches (back piece), cast off 4-4-4-8-12-16 stitches, work 41-45-48-51-54-57 stitches (front piece). The back and front pieces are finished separately. BACK PIECE: = 70-78-84-90-96-102 stitches. Continue with stocking stitch back and forth until the piece measures 44-46-48-50-52-54 cm. On the next row cast off the middle 28-30-30-32-32-34 stitches for the neck and finish each shoulder separately. OVERVIEW OF THE NEXT SECTION: Decrease for the neck and place stitches on a thread for the shoulder as follows. Read NECK and DIAGONAL SHOULDER before continuing. NECK: Decrease 1 stitch for the neck, on each row from the right side, 2 times – read DECREASE TIP. DIAGONAL SHOULDER: Place the outermost stitches by the armhole on a thread, but to avoid cutting the strand, work the stitches before placing them on the thread. Place 5-5-6-7-7-8 stitches on the thread 3 times, then place the last 4-7-7-6-9-8 stitches on the thread. All stitches are now either decreased or placed on the thread. Place the 19-22-25-27-30-32 stitches from the thread back on circular needle size 5 mm. Purl 1 row from the wrong side but, to avoid a hole where you turned in the middle of the piece, pick up the strand between 2 stitches and purl it twisted together with the first stitch on the left needle. Then cast off loosely with knit from the right side. The piece measures approx. 48-50-52-54-56-58 cm from the cast-on edge to the top of the shoulder. Work the other shoulder in the same way. LEFT FRONT PIECE: = 41-45-48-51-54-57 stitches. Work stocking stitch back and forth with 6 band stitches in garter stitch towards mid-front. When the piece measures 42-44-45-47-48-50 cm, place the 13-14-14-15-15-16 stitches towards mid-front on a thread for the neck; to avoid cutting the strand, work the stitches before placing them on the thread. OVERVIEW OF THE NEXT SECTION: Cast off for the neck and place stitches on a thread for the shoulder as follows. Read NECK and DIAGONAL SHOULDER before continuing. NECK: Cast off for the neck at the beginning of each row from the neck as follows: Cast off 3 stitches 1 time and 2 stitches 1 times. Then decrease 1 stitch on each row from the right side 4 times - remember DECREASE TIP. DIAGONAL SHOULDER: AT THE SAME TIME, when the piece measures 44-46-48-50-52-54 cm, place the outermost stitches towards the armhole on a thread for the shoulder in the same way as on the back piece. When all the stitches are either decreased or placed on a thread, place the 19-22-25-27-30-32 stitches from the thread back on circular needle size 5 mm. Purl 1 row from the wrong side in the same way as on the back piece, then cast off loosely with knit from the right side. The piece measures approx. 48-50-52-54-56-58 cm from the cast-on edge to the top of the shoulder. RIGHT FRONT PIECE: Work in the same way as the left front piece. SLEEVES: Cast on 36-38-38-40-42-42 stitches with double pointed needles size 4 mm and DROPS Big Merino. Knit 1 round. Then work rib (knit 1, purl 1) in the round for 8 cm. Knit 1 round and increase 2-2-2-4-4-4 stitches evenly spaced = 38-40-40-44-46-46 stitches. Change to double pointed needles size 5 mm. Insert 1 marker at the beginning of the round and 1 marker after 19-20-20-22-23-23 stitches. These markers mark mid-under and mid-top of the sleeve. Allow the markers to follow your work onwards; they are used when increasing. Work stocking stitch. When you have worked 3 rounds, increase 1 stitch on each side of both markers – read INCREASE TIP (= 4 stitches increased). Increase like this every 4th round a total of 6-6-7-7-7-8 times = 62-64-68-72-74-78 stitches (change to short circular needle size 5 mm when you have enough stitches). Continue with stocking stitch until the sleeve measures 51-49-49-47-44-42 cm. Now continue back and forth with stocking stitch from mid-under the sleeve until the sleeve measures 52-50-50-49-48-47 cm (a split of 1-1-1-2-4-5 cm). Cast off. Work the other sleeve in the same way. ASSEMBLY: Sew the shoulder seams. Sew the sleeve cap to the armhole inside the outermost stitch on the body. Then sew the split to the bottom of the armhole – see sketch. Sew the buttons onto the left band. NECK: Start from the right side and knit up 86 to 100 stitches around the neck (including the stitches from the threads in front) with short circular needle size 4 mm. Purl 1 row from the wrong side where you increase to 103-107-109-111-115-119 stitches (do not increase over the bands). Work rib (knit 1, purl 1) back and forth, with 1 edge stitch in garter stitch on each side, for 4 cm. Cast off a little loosely. |
||||
Diagram explanations |
||||
|
||||
 |
||||
 |
||||
Have you finished this pattern?Tag your pictures with #dropspattern #prairierosecardigan or submit them to the #dropsfan gallery. Do you need help with this pattern?You'll find 29 tutorial videos, a Comments/Questions area and more by visiting the pattern on garnstudio.com. © 1982-2026 DROPS Design A/S. We reserve all rights. This document, including all its sub-sections, has copyrights. Read more about what you can do with our patterns at the bottom of each pattern on our site. |
||||


With over 40 years in knitting and crochet design, DROPS Design offers one of the most extensive collections of free patterns on the internet - translated to 17 languages. As of today we count 324 catalogues and 12290 patterns translated into English (UK/cm).
We work hard to bring you the best knitting and crochet have to offer, inspiration and advice as well as great quality yarns at incredible prices! Would you like to use our patterns for other than personal use? You can read what you are allowed to do in the Copyright text at the bottom of all our patterns. Happy crafting!
Post a comment to pattern DROPS 230-4
We would love to hear what you have to say about this pattern!
If you want to leave a question, please make sure you select the correct category in the form below, to speed up the answering process. Required fields are marked *.