
Popular categories
Looking for a yarn?


Comments / Questions (70)
![]() Juliana wrote:
Juliana wrote:
Guten Tag, ich würde Sie gern um Hilfe beim Stricken der Vorderteilen bitten. In der Anleitung ist geschrieben, dass bei 42 cm bei S-Größe sollen die Maschen für Halsausschnitt stillgelegt werden. Gleichzeitig aber sollte noch ein Knopfloch bei der Länge von 43 cm einarbeitet werden. Ist dann das Knopfloch in der Halsblende? Danke für die Unterstützung. Liebe Grüße
19.11.2023 - 22:08DROPS Design answered:
Liebe Juliana, ja genau, das letzte Knofploch liegt an der Halsblende. Viel Spaß beim stricken!
20.11.2023 - 11:24
![]() C S wrote:
C S wrote:
Er nået til venstre forstykke ved indtagning til hals og skråskulder. Men jeg har ikke helt knækket koden til det i skriver. Hvis de 13 første masker (ved kanten) sætte på snor, hvordan skal det så foregå med at der først lukkes 3 m af også 2 m af og derefter indtagninger i alt 4 gange. Hvordan kan det alt i alt blive reduceret til 19 m til de skrå skuldre som bagstykket også har ? På forhånd tak ! Håber i kan hjælpe, så den kan blive færdig :)
13.09.2023 - 20:55
![]() Nosiba wrote:
Nosiba wrote:
Hei, hva er vanskelighetsgrad i denne oppskrift? :)
27.08.2023 - 18:22DROPS Design answered:
Hei Nosiba Ingen vanskelige teknikker på denne jakken, så den er lett å strikke. Kanskje noen vil ha litt vanskelig å få monteringen pent, men ingen umulig oppgave :) Bare les oppskriften godt, se på hjelpevideoer, og evnt legg inn Spørsmål her om man står fast. Lykke til . mvh DROPS Design
28.08.2023 - 14:23
![]() Katarzyna wrote:
Katarzyna wrote:
Czy można znaleźć jakiś filmik który wyjaśniłby w jaki sposób robić skosy ramion? We wzorze jest mowa o przekładaniu oczek na nitkę a nie o ich zamykaniu
27.08.2023 - 16:01DROPS Design answered:
Witaj Kasiu, niestety nie ma takiego filmu, ale technika odpowiada rzędom skróconym. W rozmiarze S: Rz. 1 (na prawej stronie) przerabiasz 5 oczek na prawej stronie robótki (zaczynając od boku, od podkroju rękawa) i zdejmujesz je na nitkę/drut pomocniczy, przerabiasz rząd do końca. Rz.2 (a lewej stronie) przerabiasz do końca oczka na drucie (nie przerabiasz oczek z nitki/drutu pomocniczego). Rz. 3 i 5 jak rząd 1. Rz. 4 i 6 jak rząd 2. Dalej patrz opis. Pozdrawiamy!
28.08.2023 - 08:20
![]() Elena wrote:
Elena wrote:
"Back piece diagonal SHOULDER: Place the outermost stitches by the armhole on a thread " Question: do I decrease 1 stitch on the front side knit (for the neck) and move the stitches to the thread after I work them on the wrong side purl? 😁
18.08.2023 - 16:52DROPS Design answered:
Hi Elena! You finished with casting off the middle stitches. Now work to the end of the row on the left shoulder, turn, knit shoulder stitches and place them on a thread and keep going from there. For the other shoulder, you should actually start from the wrong side, knit to the end of the row, turn and do what you did on the other shoulder. Hope it helps!
18.08.2023 - 20:51
![]() Jagna wrote:
Jagna wrote:
Witam mam problem w ty miejscu wzoru Umieścić prawy przód, tył i lewy przód na tych samych drutach z żyłką nr 5 = 205-227-243-269-299-323 oczka. Przerobić 1 rząd na prawo na prawej stronie robótki, równomiernie zamykając 53-59-63-69-79-83 oczka (nie zamykać oczek ponad obszyciami przodów) = 152-168-180-200-220-240 oczek. W jakiej sekwencji trzeba zamykać te oczy i którym sposobem ?
28.06.2023 - 14:38DROPS Design answered:
Witaj Jagno, weźmy rozmiar S za przykład: 205-12 o. (na obszycia przodów)=193 o. 193:53 (liczba oczek jaką chcemy zamknąć)=3,64. To znaczy że będziesz przerabiać razem na prawo każde 2-gie i 3-cie i każde 3-cie i 4-te oczko przez cały rząd (za wyjątkiem obszyć przodów). Jak równomiernie dodawać/zamykać oczka znajdziesz TUTAJ. Miłej pracy!
28.06.2023 - 15:04
![]() Katarina wrote:
Katarina wrote:
Hej! Jag stickar storlek M. När man stickar ärm så stickar man slätstickning en längre bit innan man bryter av till sprund i de mindre storlekarna (49 cm för stl M) och kortare i de större storlekarna. Stämmer det? Mindre storlek borde väl ha kortare ärm? Eller tänker jag fel?
26.06.2023 - 19:30DROPS Design answered:
Hej Katarina, ærmerne skal være kortere i de større størrelser, da bolen er bredere, se også målene i måleskitsen :)
29.06.2023 - 14:24
![]() Mireille Sicet wrote:
Mireille Sicet wrote:
Lorsqu'on a mis les mailles en attente pour le biais des épaules, il faut reprendre les mailles ,et tricoter un rang envers sur envers, mais je suis à l'endroit, je ne comprends comment faire merci de me répondrepas
16.04.2023 - 12:17DROPS Design answered:
Bonjour Mme Sicet, effectivement, sur une des épaules, vous serez sur l'envers et sur l'autre sur l'endroit. Continuez ainsi. Bon tricot!
05.05.2023 - 09:09
![]() Elise wrote:
Elise wrote:
Hei! Jeg forstår ikke helt hva dere mener i oppskriften når det står at man skal på skrå skulder på bakstykket «sett de ytterste maskene mot ermehullet på en tråd…». Hvorfor skal jeg sette de totalt 19 maskene på en tråd når det ikke skjer noe mellom sette på tråd og så strikke de ferdig? Og hvorfor står det at jeg skal hente opp en tråd fordi jeg har vridd arbeidet? Når ble det vridd?
09.04.2023 - 14:35DROPS Design answered:
Hej Elise, du sætter først 5-5-6-7-7-8 masker (vælg antal i din størrelse) på en tråd (yderst mod ærmet), strikker pinden ud og tilbage, så sætter du de næste 5-5-6-7-7-8 masker på tråden, strikker pinden ud og tilbage. Det gør du 3 gange og så de sidste. Nu sætter du alle masker tilbage på pinden osv :)
13.04.2023 - 15:09
![]() Una Næs Joensen wrote:
Una Næs Joensen wrote:
Jeg forstår ikke intagningen til hals og skrå skulder på forstykkerne. Skal alt gøres samtidig eller hver for sig? Jeg strikker M og skal tage 14 masker på tråd til halsintagning og masker til skrå skulder, men havd gør jeg med de sidste 9 masker?
16.03.2023 - 13:32DROPS Design answered:
Hej Una, når du har 9 masker tilbage, sætter du maskerne fra tråden tilbage på pinden og fortsætter stykket SKRÅ SKULDER :)
13.04.2023 - 09:18
|
||||
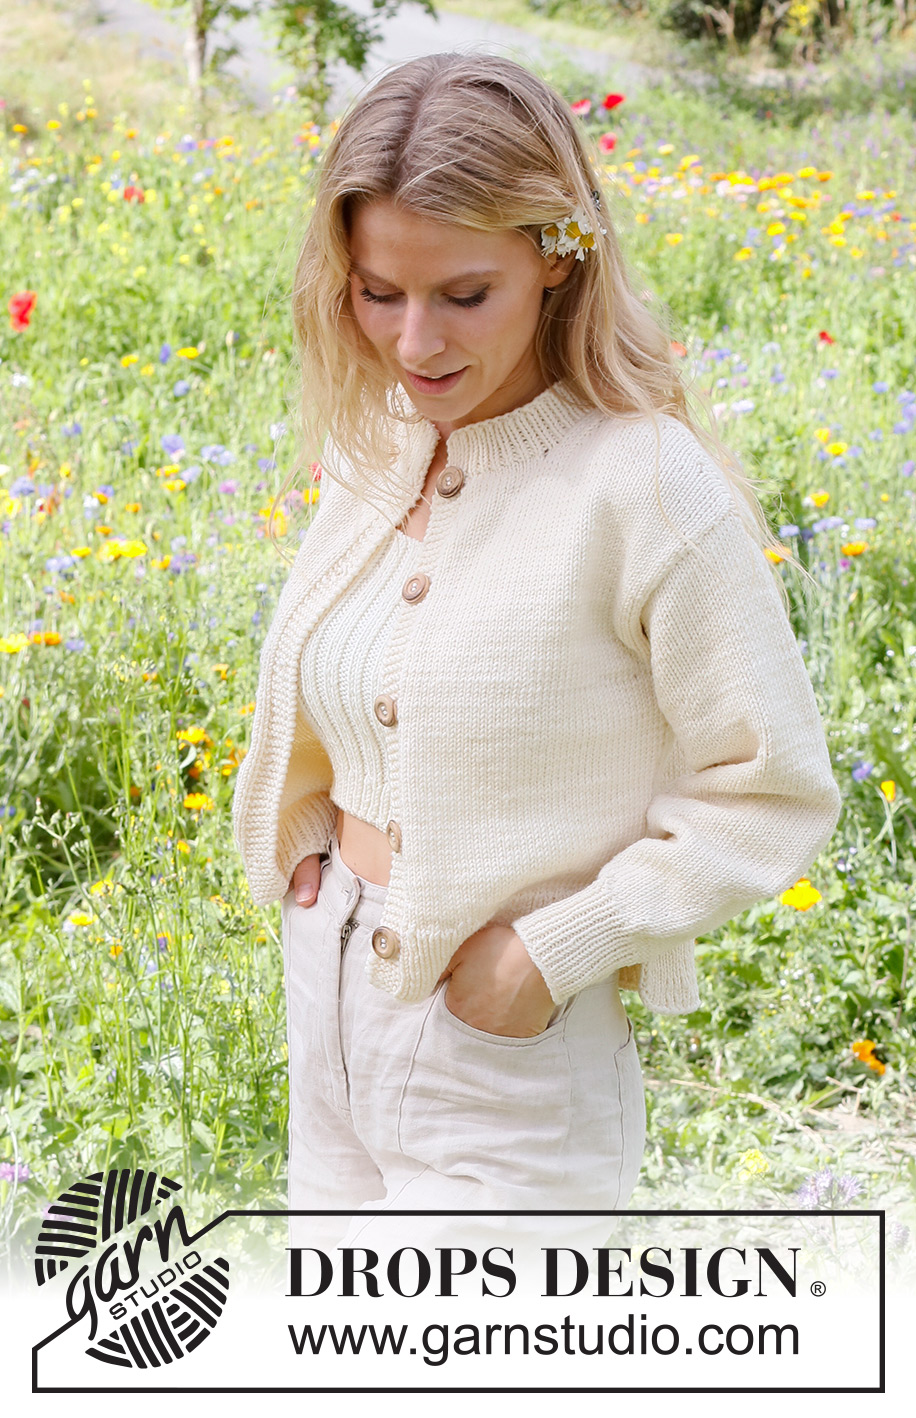
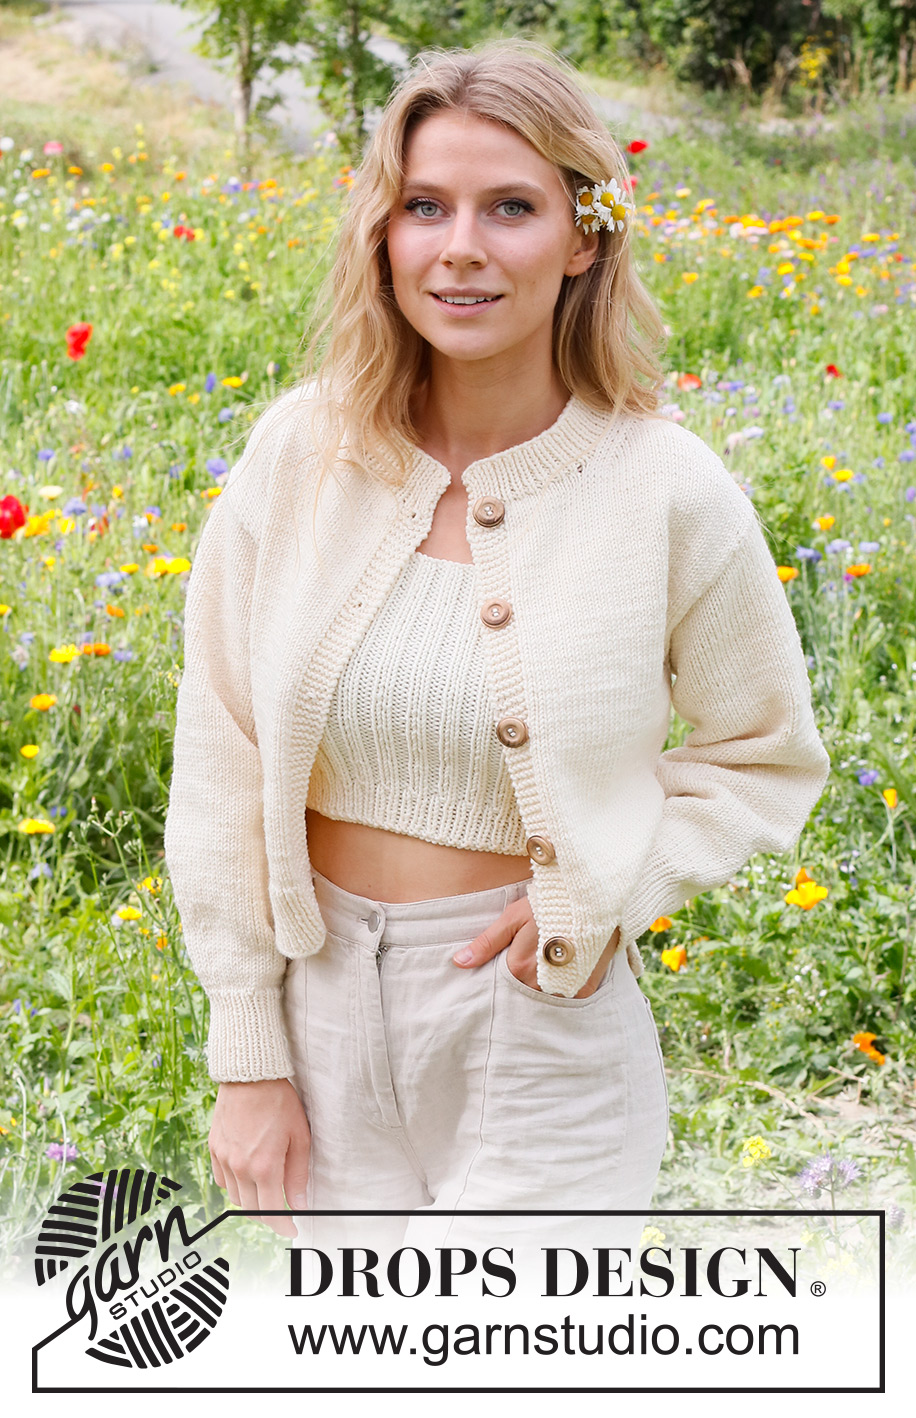
Prairie Rose Cardigan#prairierosecardigan |
||||
 |
 |
|||
Knitted jacket in DROPS Big Merino. The piece is worked bottom up, with split in the sides. Sizes S - XXXL.
DROPS 230-4 |
||||
|
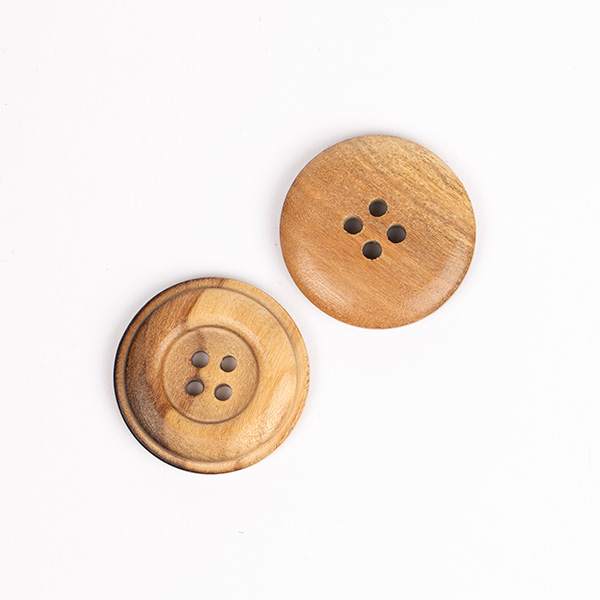
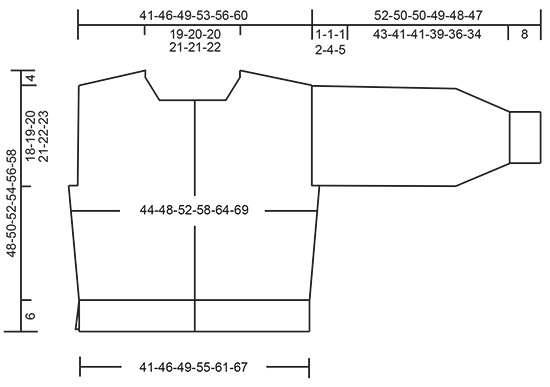
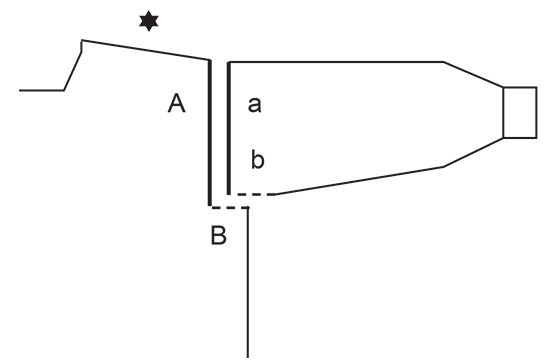
------------------------------------------------------- EXPLANATIONS FOR THE PATTERN: ------------------------------------------------------- RIDGE/GARTER STITCH (worked back and forth): Knit all rows. 1 ridge = knit 2 rows. INCREASE TIP (for body and sleeves): All increases are worked from the right side! Work until there are 2 stitches left before the marker, 1 yarn over, knit 4 (marker sits between these 4 stitches), 1 yarn over. On the next row/round work the yarn overs twisted to avoid holes. Then work the new stitches in stocking stitch. DECREASE TIP (decrease 1 stitch by the neck): Decrease from the right side, inside the 3 stocking stitches. AFTER THE 3 STOCKING STITCHES: Slip 1 stitch as if to knit, knit 1 and pass the slipped stitch over the knitted stitch (= 1 stitch decreased). BEFORE THE 3 STOCKING STITCHES: Work until there are 5 stitches left mid-front, knit 2 together, work the last 3 stitches in stocking stitch (= 1 stitch decreased). BUTTONHOLES: Work the buttonholes on the right band. 1 BUTTONHOLE = 1 yarn over inside the outermost 3 stitches on the row (from the right side). On the next row (wrong side) knit the yarn over together with the 3rd to last stitch on the row. Work the buttonholes when the piece measures: S: 5, 14, 24, 33 and 43 cm. M: 5, 15, 25, 35 and 45 cm. L: 6, 16, 26, 36 and 46 cm. XL: 6, 14, 23, 31, 40 and 48 cm. XXL: 6, 15, 23, 32, 40 and 49 cm. XXXL: 6, 15, 24, 33, 42 and 51 cm. ------------------------------------------------------- START THE PIECE HERE: ------------------------------------------------------- JACKET – SHORT OVERVIEW OF THE PIECE: The back and front pieces are worked separately, back and forth and bottom up until the split is finished. The pieces are joined and the body continued back and forth as far as the armholes. The back and front pieces are then finished separately, back and forth. The sleeves are worked in the round, bottom up. The neck is worked to finish. BACK PIECE: Cast on 95-105-113-127-141-153 stitches with circular needle size 4 mm and DROPS Big Merino. Purl 1 row from the wrong side. Then work rib (knit 1, purl 1) over all stitches – NOTE: The first and last stitches on the row are knitted from the right side and purled from the wrong side. Work this rib for 6 cm, finishing after a row from the wrong side. Lay the piece to one side. LEFT FRONT PIECE: Cast on 55-61-65-71-79-85 stitches with circular needle size 4 mm and DROPS Big Merino. Purl 1 row from the wrong side. Then work rib (knit 1, purl 1) until there are 6 stitches left, finish with 6 band stitches in GARTER STITCH – read description above. Work this rib for 6 cm, finishing after a row from the wrong side. Lay the piece to one side. RIGHT FRONT PIECE: Cast on 55-61-65-71-79-85 stitches with circular needle size 4 mm and DROPS Big Merino. Purl 1 row from the wrong side. Then work rib from the right side as follows: 6 band stitches in garter stitch, work rib (knit 1, purl 1) to the end of the row. Work this rib for 6 cm – remember the BUTTONHOLES on the band and finishing after a row from the wrong side. BODY: Place the right front piece, the back piece and the left front piece on the same circular needle size 5 mm = 205-227-243-269-299-323 stitches. Knit 1 row from the right side and decrease 53-59-63-69-79-83 stitches evenly spaced (do not decrease over the bands) = 152-168-180-200-220-240 stitches. Insert 1 marker 41-45-48-53-58-63 stitches in from each side (= 70-78-84-94-104-114 stitches between the markers on the back piece). Allow the markers to follow your work onwards; they are used when increasing in the sides. Work stocking stitch back and forth with 6 band stitches in garter stitch on each side. REMEMBER THE KNITTING TENSION! When the piece measures 10 cm, increase 1 stitch on each side of both markers – read INCREASE TIP (= 4 stitches increased). Repeat the increase when the piece measures 18-18-19-19-20-20 cm = 160-176-188-208-228-248 stitches. When the piece measures 26-27-28-29-30-31 cm, work the armholes as follows: Work 41-45-48-51-54-57 stitches as before (front piece), cast off 4-4-4-8-12-16 stitches, work 70-78-84-90-96-102 stitches (back piece), cast off 4-4-4-8-12-16 stitches, work 41-45-48-51-54-57 stitches (front piece). The back and front pieces are finished separately. BACK PIECE: = 70-78-84-90-96-102 stitches. Continue with stocking stitch back and forth until the piece measures 44-46-48-50-52-54 cm. On the next row cast off the middle 28-30-30-32-32-34 stitches for the neck and finish each shoulder separately. OVERVIEW OF THE NEXT SECTION: Decrease for the neck and place stitches on a thread for the shoulder as follows. Read NECK and DIAGONAL SHOULDER before continuing. NECK: Decrease 1 stitch for the neck, on each row from the right side, 2 times – read DECREASE TIP. DIAGONAL SHOULDER: Place the outermost stitches by the armhole on a thread, but to avoid cutting the strand, work the stitches before placing them on the thread. Place 5-5-6-7-7-8 stitches on the thread 3 times, then place the last 4-7-7-6-9-8 stitches on the thread. All stitches are now either decreased or placed on the thread. Place the 19-22-25-27-30-32 stitches from the thread back on circular needle size 5 mm. Purl 1 row from the wrong side but, to avoid a hole where you turned in the middle of the piece, pick up the strand between 2 stitches and purl it twisted together with the first stitch on the left needle. Then cast off loosely with knit from the right side. The piece measures approx. 48-50-52-54-56-58 cm from the cast-on edge to the top of the shoulder. Work the other shoulder in the same way. LEFT FRONT PIECE: = 41-45-48-51-54-57 stitches. Work stocking stitch back and forth with 6 band stitches in garter stitch towards mid-front. When the piece measures 42-44-45-47-48-50 cm, place the 13-14-14-15-15-16 stitches towards mid-front on a thread for the neck; to avoid cutting the strand, work the stitches before placing them on the thread. OVERVIEW OF THE NEXT SECTION: Cast off for the neck and place stitches on a thread for the shoulder as follows. Read NECK and DIAGONAL SHOULDER before continuing. NECK: Cast off for the neck at the beginning of each row from the neck as follows: Cast off 3 stitches 1 time and 2 stitches 1 times. Then decrease 1 stitch on each row from the right side 4 times - remember DECREASE TIP. DIAGONAL SHOULDER: AT THE SAME TIME, when the piece measures 44-46-48-50-52-54 cm, place the outermost stitches towards the armhole on a thread for the shoulder in the same way as on the back piece. When all the stitches are either decreased or placed on a thread, place the 19-22-25-27-30-32 stitches from the thread back on circular needle size 5 mm. Purl 1 row from the wrong side in the same way as on the back piece, then cast off loosely with knit from the right side. The piece measures approx. 48-50-52-54-56-58 cm from the cast-on edge to the top of the shoulder. RIGHT FRONT PIECE: Work in the same way as the left front piece. SLEEVES: Cast on 36-38-38-40-42-42 stitches with double pointed needles size 4 mm and DROPS Big Merino. Knit 1 round. Then work rib (knit 1, purl 1) in the round for 8 cm. Knit 1 round and increase 2-2-2-4-4-4 stitches evenly spaced = 38-40-40-44-46-46 stitches. Change to double pointed needles size 5 mm. Insert 1 marker at the beginning of the round and 1 marker after 19-20-20-22-23-23 stitches. These markers mark mid-under and mid-top of the sleeve. Allow the markers to follow your work onwards; they are used when increasing. Work stocking stitch. When you have worked 3 rounds, increase 1 stitch on each side of both markers – read INCREASE TIP (= 4 stitches increased). Increase like this every 4th round a total of 6-6-7-7-7-8 times = 62-64-68-72-74-78 stitches (change to short circular needle size 5 mm when you have enough stitches). Continue with stocking stitch until the sleeve measures 51-49-49-47-44-42 cm. Now continue back and forth with stocking stitch from mid-under the sleeve until the sleeve measures 52-50-50-49-48-47 cm (a split of 1-1-1-2-4-5 cm). Cast off. Work the other sleeve in the same way. ASSEMBLY: Sew the shoulder seams. Sew the sleeve cap to the armhole inside the outermost stitch on the body. Then sew the split to the bottom of the armhole – see sketch. Sew the buttons onto the left band. NECK: Start from the right side and knit up 86 to 100 stitches around the neck (including the stitches from the threads in front) with short circular needle size 4 mm. Purl 1 row from the wrong side where you increase to 103-107-109-111-115-119 stitches (do not increase over the bands). Work rib (knit 1, purl 1) back and forth, with 1 edge stitch in garter stitch on each side, for 4 cm. Cast off a little loosely. |
||||
Diagram explanations |
||||
|
||||
 |
||||
 |
||||
Have you finished this pattern?Tag your pictures with #dropspattern #prairierosecardigan or submit them to the #dropsfan gallery. Do you need help with this pattern?You'll find 29 tutorial videos, a Comments/Questions area and more by visiting the pattern on garnstudio.com. © 1982-2026 DROPS Design A/S. We reserve all rights. This document, including all its sub-sections, has copyrights. Read more about what you can do with our patterns at the bottom of each pattern on our site. |
||||


With over 40 years in knitting and crochet design, DROPS Design offers one of the most extensive collections of free patterns on the internet - translated to 17 languages. As of today we count 324 catalogues and 12290 patterns translated into English (UK/cm).
We work hard to bring you the best knitting and crochet have to offer, inspiration and advice as well as great quality yarns at incredible prices! Would you like to use our patterns for other than personal use? You can read what you are allowed to do in the Copyright text at the bottom of all our patterns. Happy crafting!
Post a comment to pattern DROPS 230-4
We would love to hear what you have to say about this pattern!
If you want to leave a question, please make sure you select the correct category in the form below, to speed up the answering process. Required fields are marked *.