
Popular categories
Looking for a yarn?


Comments / Questions (47)
![]() Marianne wrote:
Marianne wrote:
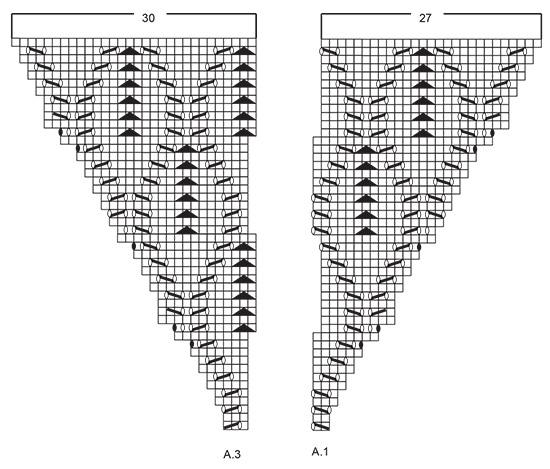
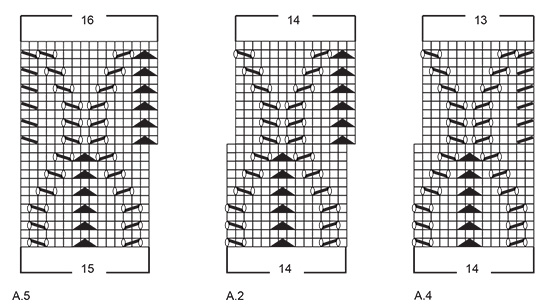
Hej Jeg kan ikke få det til at passe med antal masker i overgang fra række 13 til 14 i a1 og a3. Ved a1 har jeg 10 masker i række 13 men skal strikke 9 i række 14 - og jeg har 11 masker i række 13 ved a3 men skal strikke 12 på næste række. Håber I kan hjælpe mig - jeg tæller og tæller….på forhånd tak for hjælpen. Mange hilsner Marianne
11.12.2024 - 07:24DROPS Design answered:
Hei Marianne. Når du skal strikke 13. rad på A.1 "mangler" det 1 maske, men den ser du på 13.rad på A.2 (den ene masken som mangler i A.1 skal strikkes sammen med de 2 første maskene på A.2, så de er tegnet sammen, sort trekant over 3 masker). Det samme gjelder når du strikker siste rapport av A.2, da "mangler" det 1 maske, men denne masken er første maske i A.3. Og slik er det også på rad 15-17-19-21-23 og 37-39-41-43-45-47 (diag A. og A.3). mvh DROPS Design
16.12.2024 - 08:17
![]() Jamais wrote:
Jamais wrote:
Je ne comprends pas comment gérer les augmentations du dos et des devant. Pour la taille 12/18, le devant gauche utilise le diagramme A1=10 m A4 2 m , au rang 3, je me retrouve avec 14 m. Comm dois je tricoter les 2 dernières mailles? Jersey ? Démarrer A1 pour 2 mailles? Pour le dos idem: A5 1m, A2 20 mailles donc 2 motifs A2 et A4 2m soit un total de 23 m. Rang 3 total 26 mailles et 1 Jersey à chaque extrémités. Comment tricoter les 3 mailles supplémentaires en fin de rang du dos?
22.10.2024 - 21:16DROPS Design answered:
Bonjour Mme Jamais, vous tricotez ce gilet mais la version enfant, exact? Dans ce cas, les augmentations des raglans figurent dans les diagrammes A.4 (fin du devant gauche et du dos) et A.5 (début du dos et du devant droit); autrement dit, au 3ème rang, vous avez 3 m dans A.4 et 2 m dans A.5, vous tricotez ces 3 / 2 mailles comme indiqué dans le diagramme = vous augmentez encore 1 m et avez ainsi 4 m dans A.4 et 3 m dans A.5. Vous avez en plus 2 mailles en plus dans chaque manche. Bon tricot!
23.10.2024 - 08:22
![]() Lisette Alem wrote:
Lisette Alem wrote:
Er staat bij voorpand a1 a2 over 42 steken,a3 is het dan de bedoeling dat ik deze 3 patronen achter elkaar brei of alleen tussen a1 en a3 a2 herhaal?
21.08.2024 - 10:11
![]() Lisette Alem wrote:
Lisette Alem wrote:
Er staat bij voorpand a1 a2 over 42 steken,a3 is het dan de bedoeling dat ik deze 3 patronen achter elkaar brei of alleen tussen a1 en a3 a2 herhaal?
21.08.2024 - 10:11
![]() Rene Seaman wrote:
Rene Seaman wrote:
I am making this in size small. If I am reading the pattern correctly, for the small size, the increases for the raglan sleeves will end with the end of A1 and A3. So no more increases from there until the pieces measures 8-1/4". Is this right? Really enjoying this patterns. Thanks for your help.
14.04.2024 - 06:37DROPS Design answered:
Dear Rene, yes, since you increase every 2nd row 24 times for the sleeves and you have 48 rows in A.1/A.3 then the sleeve increases are finished, so you don't need to keep increasing; work straight until the indicated measurement. Happy knitting!
14.04.2024 - 23:43
![]() Lisbeth Petersen wrote:
Lisbeth Petersen wrote:
Jeg forstår ikke opskriften skal jeg først strikke a1 og samme pind A2 i alt 16 masker i mønster
28.03.2024 - 10:32DROPS Design answered:
Hej Lisbeth, ja du starter med A.1 gentager A.2 over det antal som står for din størrelse og slutter med A.3. Hvis vi skal forklare første omgang, så skriv hvilken størrelse du strikker :)
05.04.2024 - 11:05
![]() Kazia wrote:
Kazia wrote:
Hallo, Ich stricke die Grösse M und habe die 76 M für Ärmel nach 14 cm erreicht … wie ist das möglich ? Wie soll ich weiter stricken ? Das waren genau 27 Reihen hoch um 76 m zu erreichen … (also 54 runden) und ich bin erst in 8. Reihe A4 und. A2 und A5 … würde für die Hilfe sehr dankbar :)
19.01.2024 - 22:38
![]() CORINNE wrote:
CORINNE wrote:
Bonjour. Il ne faut tricoter qu’une fois en hauteur A4 et A5 ? Et ensuite tricoter A2 sur toutes les mailles ? Merci pour votre aide
22.11.2023 - 16:45DROPS Design answered:
Bonjour Corinne, tricotez le point ajouré en commençant par A.4, répétez A.2 et terminez le point ajouré en tricotant A.5, autrement dit, vous tricotez ainsi jusqu'à la division pour les manches, puis, quand on tricote le dos et le devant en rond après la division, on tricote A.2 tout le tour. Bon tricot!
23.11.2023 - 08:27
![]() Tana wrote:
Tana wrote:
Ich komme mit den Diagrammen nicht zurecht. Bei A1 in der 12. Runde sind acht rechte Maschen abgebildet. Eine Runde darüber sind plötzlich insgesamt nur sieben Maschen da mit vier Umschlägen und 1x zusammen stricken. Wo ist die eine Masche verschwunden?
11.11.2023 - 23:34DROPS Design answered:
Liebe Tana, bei der 13. Runde werden die 2 letzten Maschen in A.1 mit der nächsten Masche A.2 gestrickt, und die letzte Masche A.2 wird mit den 2 ersten Maschen A.3 gestrickt. Viel Spaß beim stricken!
13.11.2023 - 07:58
![]() Margareta Mattsson wrote:
Margareta Mattsson wrote:
Kan man sticka denna modellen i enbart slätstickning? Vill gärna använda detta garnet men hittar inget mönster i vanlig slätstickning med raglanärm. MVH
26.08.2023 - 10:23DROPS Design answered:
Hej Margareta. Jag tror det är enklare att följa detta mönster och ändra raglan om du inte vill ha flätor där. Mvh DROPS Design
30.08.2023 - 12:23
|
|||||||||||||||||||
Queen Bee#queenbeesweater |
|||||||||||||||||||
 |
 |
||||||||||||||||||
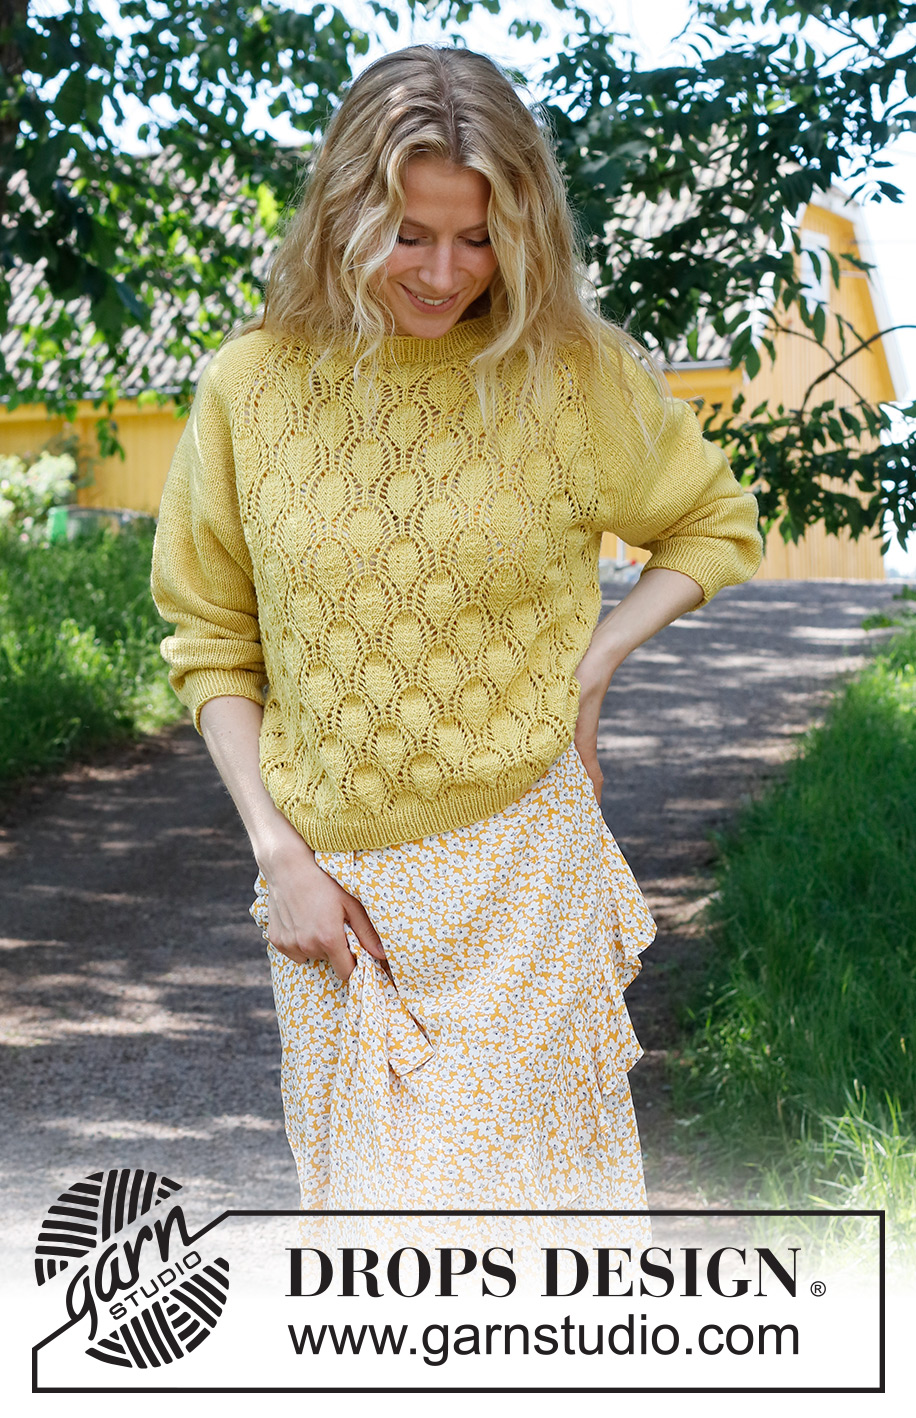
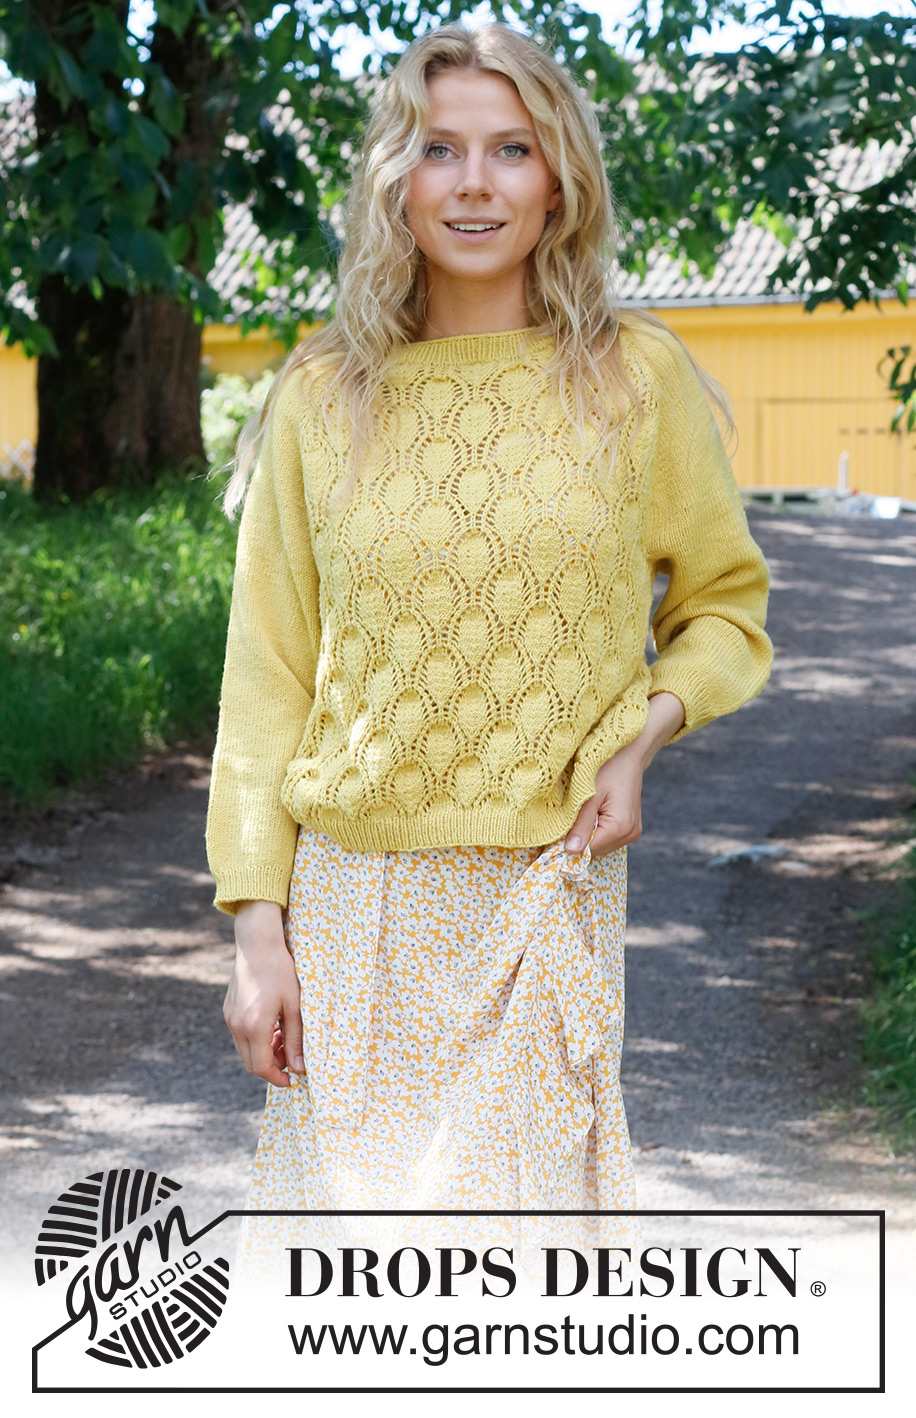
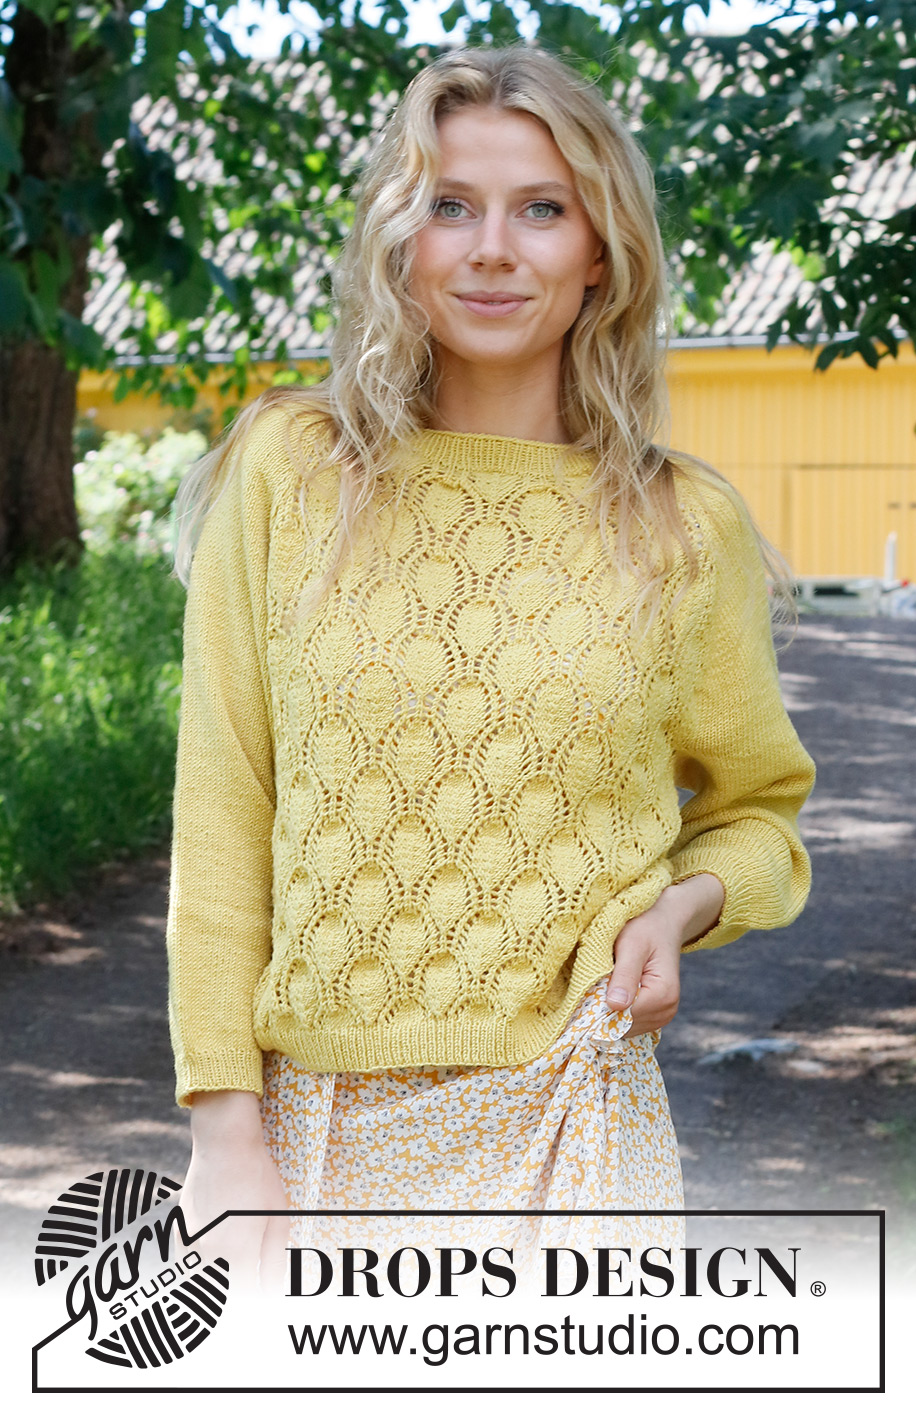
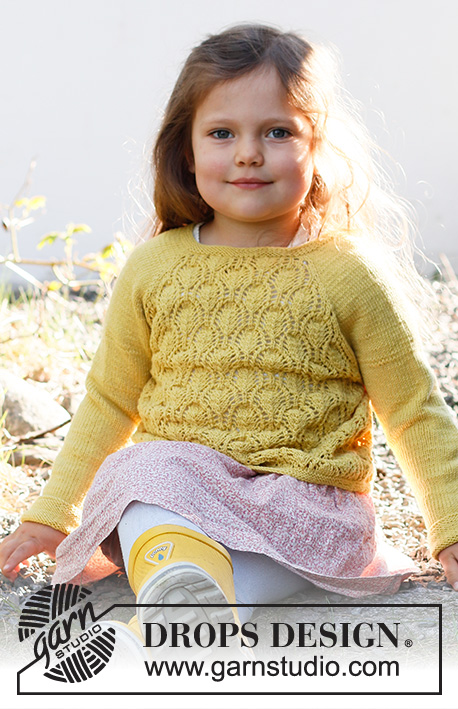
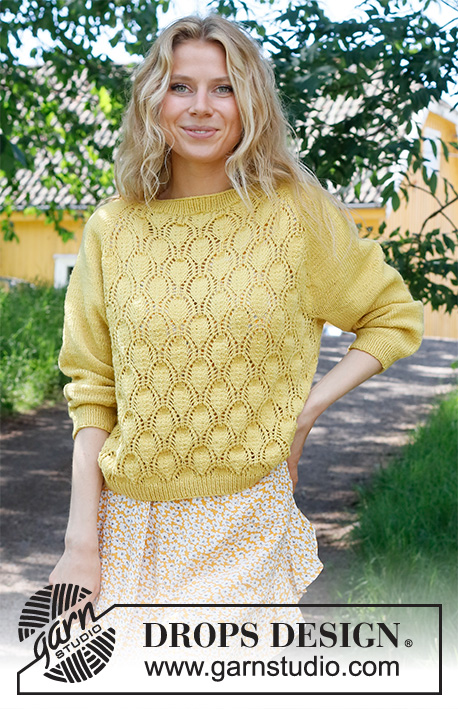
Knitted jumper in DROPS BabyMerino. The piece is worked top down, with raglan and lace pattern. Sizes S - XXXL
DROPS 231-16 |
|||||||||||||||||||
|
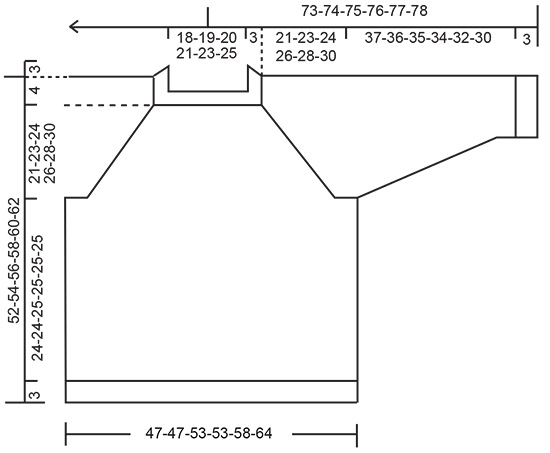
------------------------------------------------------- EXPLANATIONS FOR THE PATTERN: ------------------------------------------------------- PATTERN: See diagrams A.1 to A.5. RAGLAN: The increases to raglan on the front and back piece are included in the diagrams. Increase to raglan on each side of the sleeves as follows: Increase 1 stitch after markers 1 and 3 and before markers 2 and 4 by making 1 yarn over. The yarn overs are knitted twisted on the next round to avoid holes. Then work the new stitches in stocking stitch. DECREASE TIP (for sleeves): Decrease 1 stitch on either side of the marker as follows: Work until there are 3 stitches left before the marker, knit 2 together, knit 3 (marker sits in the middle stitch of these 3 stitches), slip 1 stitch as if to knit, knit 1 and pass the slipped stitch over the knitted stitch (2 stitches decreased). ------------------------------------------------------- START THE PIECE HERE: ------------------------------------------------------- JUMPER - SHORT OVERVIEW OF THE PIECE: The piece is worked in the round with circular needle, top down. The sleeves are worked in the round with short circular needle/double pointed needles. NECK: Cast on 124-130-134-138-148-158 stitches with circular needle size 2.5 mm and DROPS Baby Merino. Knit 1 round, then work rib (knit 1, purl 1) for 3 cm. Change to circular needle size 3 mm. Knit 1 round and increase 10-4-28-24-42-60 stitches evenly spaced (increase by working yarn overs) = 134-134-162-162-190-218 stitches. Knit 1 round; the yarn overs are knitted twisted. Insert 1 marker at the beginning of the round (transition between the back piece and right sleeve). THE PIECE IS NOW MEASURED FROM HERE! REMEMBER THE KNITTING TENSION! YOKE: Work the next round as follows: Right sleeve: Knit 1, insert marker-1, make 1 yarn over, knit 18, 1 yarn over, insert marker-2, knit 1. Front piece: Work A.1, A.2 over 42-42-56-56-70-84 stitches, A.3. Left sleeve: Knit 1, insert marker-3, make 1 yarn over, knit 18, 1 yarn over, insert marker-4, knit 1. Back piece: Work A.1, A.2 over 42-42-56-56-70-84 stitches, A.3. Continue this pattern and increase to RAGLAN – read description above, every 2nd round a total of 24-27-32-36-39-41 times. When A.1 and A.3 have been completed, continue as follows: Right sleeve: Continue with stocking stitch and increase every 2nd round as before. Front piece: Work A.4, A.2 over 70-70-84-84-98-112 stitches, A.5. Left sleeve: Continue with stocking stitch and increase every 2nd round as before. Back piece: Work A.4, A.2 over 70-70-84-84-98-112 stitches, A.5. Continue working until the piece measures 21-23-24-26-28-30 cm from the marker on the neck. When the sleeve-increases are finished there are 334-346-394-410-450-486 stitches. Work the next round as follows: Place the first 68-74-84-92-98-102 stitches on 1 thread for the sleeve, cast on 13 stitches (in side under sleeve), work pattern as before over the next 99-99-113-113-127-141 stitches (front piece), place the next 68-74-84-92-98-102 stitches on 1 thread for the sleeve, cast on 13 stitches (in side under sleeve), work pattern as before over the last 99-99-113-113-127-141 stitches (back piece). The body and sleeves are finished separately. BODY: = 224-224-252-252-280-308 stitches. Work A.2 over all stitches (continuing from the correct row in the diagrams) for 24-24-25-25-25-25 cm. Knit 1 round where you increase 24-24-26-26-30-32 stitches evenly spaced = 248-248-278-278-310-340 stitches. Change to circular needle size 2.5 mm and work rib (knit 1, purl 1) for 3 cm. Cast off. SLEEVES: Place the 68-74-84-92-98-102 stitches from the thread on the one side of the piece on short circular needle/double pointed needles size 3 mm and knit up 1 stitch in each of the 13 stitches cast on under the sleeve = 81-87-97-105-111-115 stitches. Insert a marker in the middle of the new stitches under the sleeve and start at the marker. Work stocking stitch in the round for 3 cm. Now decrease 2 stitches under the sleeve – read DECREASE TIP. Decrease like this every 4-3½-2½-2-1½-1½ cm a total of 8-9-12-14-15-15 times = 65-69-73-77-81-85 stitches. Continue working until the sleeve measures 37-36-35-34-32-30 cm. Knit 1 round where you increase 1 stitch = 66-70-74-78-82-86 stitches. Change to double pointed needles size 2.5 mm and work rib (knit 1, purl 1) for 3 cm. Cast off. The sleeve measures approx. 40-39-38-37-35-33 cm from the division. Work the other sleeve in the same way. |
|||||||||||||||||||
Diagram explanations |
|||||||||||||||||||
|
|||||||||||||||||||
 |
|||||||||||||||||||
 |
|||||||||||||||||||
 |
|||||||||||||||||||
Have you finished this pattern?Tag your pictures with #dropspattern #queenbeesweater or submit them to the #dropsfan gallery. Do you need help with this pattern?You'll find 29 tutorial videos, a Comments/Questions area and more by visiting the pattern on garnstudio.com. © 1982-2026 DROPS Design A/S. We reserve all rights. This document, including all its sub-sections, has copyrights. Read more about what you can do with our patterns at the bottom of each pattern on our site. |
|||||||||||||||||||


With over 40 years in knitting and crochet design, DROPS Design offers one of the most extensive collections of free patterns on the internet - translated to 17 languages. As of today we count 324 catalogues and 12290 patterns translated into English (UK/cm).
We work hard to bring you the best knitting and crochet have to offer, inspiration and advice as well as great quality yarns at incredible prices! Would you like to use our patterns for other than personal use? You can read what you are allowed to do in the Copyright text at the bottom of all our patterns. Happy crafting!
Post a comment to pattern DROPS 231-16
We would love to hear what you have to say about this pattern!
If you want to leave a question, please make sure you select the correct category in the form below, to speed up the answering process. Required fields are marked *.