DROPS Baby Merino
DROPS Baby Merino
100% Wool
from 7.00 BGN /50g
Get the yarn to make this pattern from 49.00BGN.

The yarn cost is calculated from the pattern’s smallest size and the yarn’s cheapest product type. Looking for an even better price? You might find it on the DROPS Deals!

DROPS SS24

Queen Bee

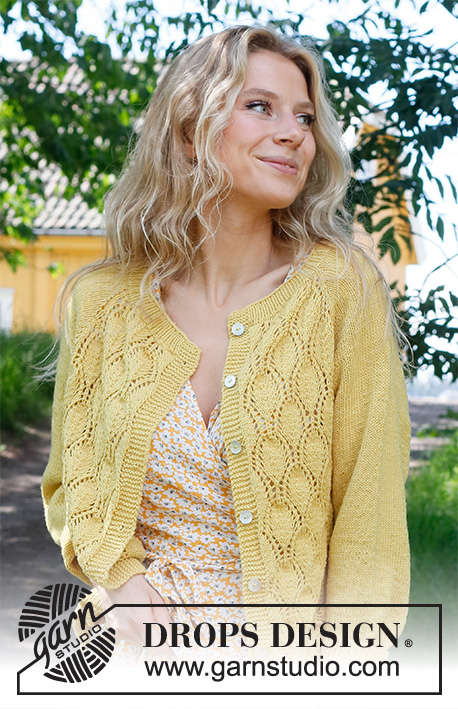
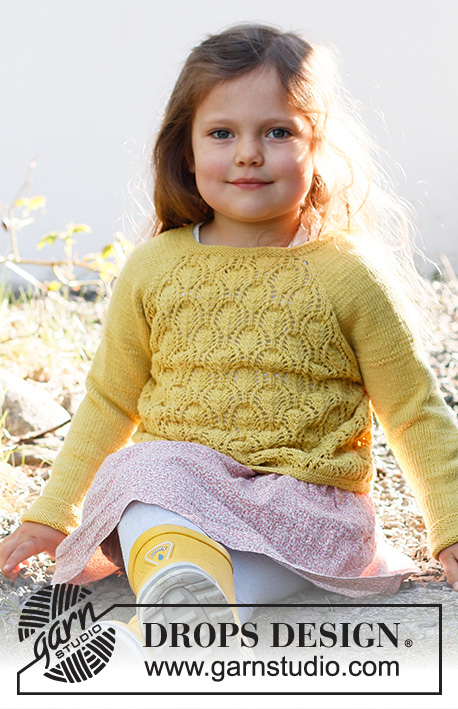
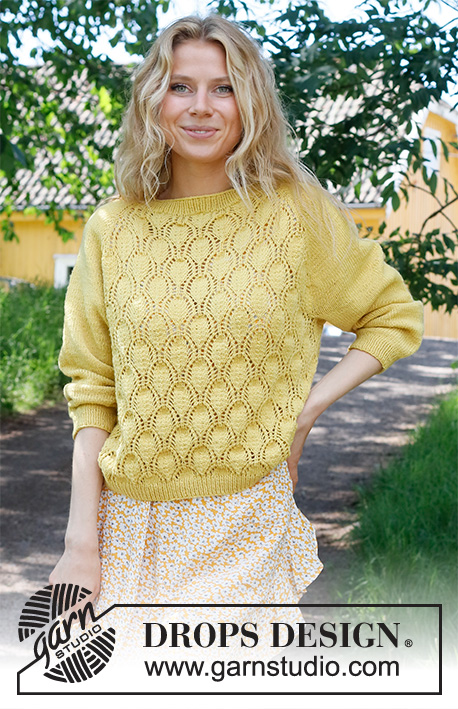
Knitted jumper in DROPS BabyMerino. The piece is worked top down, with raglan and lace pattern. Sizes S - XXXL

DROPS 231-16
DROPS Design: Pattern bm-097
Yarn group A
-------------------------------------------------------

SIZES:
S - M - L - XL - XXL - XXXL

MATERIALS:
DROPS BABY MERINO from Garnstudio (belongs to yarn group A)
350-400-450-450-500-550 g colour 45, lemon

NEEDLES:
DROPS CIRCULAR NEEDLE SIZE 3 MM: Length 40 cm and 80 cm.
DROPS CIRCULAR NEEDLE SIZE 2.5 MM: Length 40 cm and 80 cm.
DROPS DOUBLE POINTED NEEDLES SIZE 3 MM.
DROPS DOUBLE POINTED NEEDLES SIZE 2.5 MM.
The technique MAGIC LOOP can be used – you then only need circular needle of 80 cm in each size.

KNITTING TENSION:
24 stitches in width and 32 rows in height with stocking stitch = 10 x 10 cm.
NOTE: Needle size is only a guide. If you get too many stitches on 10 cm, change to a larger needle size. If you get too few stitches on 10 cm, change to a smaller needle size.

-------------------------------------------------------

Alternative Yarn – See how to change yarns here
Yarn Groups A to F – Use the same pattern and change the yarn here
Yarn usage using an alternative yarn – Use our yarn converter here

-------------------------------------------------------

DROPS Baby Merino
DROPS Baby Merino
100% Wool
from 7.00 BGN /50g
Get the yarn to make this pattern from 49.00BGN.

The yarn cost is calculated from the pattern’s smallest size and the yarn’s cheapest product type. Looking for an even better price? You might find it on the DROPS Deals!

Pattern instructions

-------------------------------------------------------

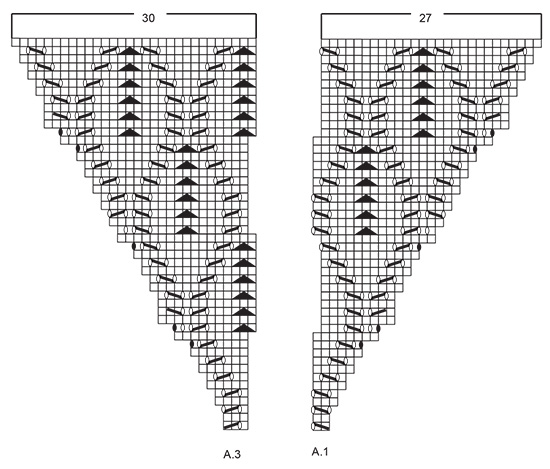
EXPLANATIONS FOR THE PATTERN:

-------------------------------------------------------

PATTERN:
See diagrams A.1 to A.5.

RAGLAN:
The increases to raglan on the front and back piece are included in the diagrams.
Increase to raglan on each side of the sleeves as follows:
Increase 1 stitch after markers 1 and 3 and before markers 2 and 4 by making 1 yarn over. The yarn overs are knitted twisted on the next round to avoid holes. Then work the new stitches in stocking stitch.

DECREASE TIP (for sleeves):
Decrease 1 stitch on either side of the marker as follows: Work until there are 3 stitches left before the marker, knit 2 together, knit 3 (marker sits in the middle stitch of these 3 stitches), slip 1 stitch as if to knit, knit 1 and pass the slipped stitch over the knitted stitch (2 stitches decreased).

-------------------------------------------------------

START THE PIECE HERE:

-------------------------------------------------------

JUMPER - SHORT OVERVIEW OF THE PIECE:
The piece is worked in the round with circular needle, top down. The sleeves are worked in the round with short circular needle/double pointed needles.

NECK:
Cast on 124-130-134-138-148-158 stitches with circular needle size 2.5 mm and DROPS Baby Merino. Knit 1 round, then work rib (knit 1, purl 1) for 3 cm. Change to circular needle size 3 mm.
Knit 1 round and increase 10-4-28-24-42-60 stitches evenly spaced (increase by working yarn overs) = 134-134-162-162-190-218 stitches. Knit 1 round; the yarn overs are knitted twisted.
Insert 1 marker at the beginning of the round (transition between the back piece and right sleeve). THE PIECE IS NOW MEASURED FROM HERE! REMEMBER THE KNITTING TENSION!

YOKE:
Work the next round as follows:
Right sleeve: Knit 1, insert marker-1, make 1 yarn over, knit 18, 1 yarn over, insert marker-2, knit 1.
Front piece: Work A.1, A.2 over 42-42-56-56-70-84 stitches, A.3.
Left sleeve: Knit 1, insert marker-3, make 1 yarn over, knit 18, 1 yarn over, insert marker-4, knit 1.
Back piece: Work A.1, A.2 over 42-42-56-56-70-84 stitches, A.3.

Continue this pattern and increase to RAGLAN – read description above, every 2nd round a total of 24-27-32-36-39-41 times. When A.1 and A.3 have been completed, continue as follows:
Right sleeve: Continue with stocking stitch and increase every 2nd round as before.
Front piece: Work A.4, A.2 over 70-70-84-84-98-112 stitches, A.5.
Left sleeve: Continue with stocking stitch and increase every 2nd round as before.
Back piece: Work A.4, A.2 over 70-70-84-84-98-112 stitches, A.5.

Continue working until the piece measures 21-23-24-26-28-30 cm from the marker on the neck. When the sleeve-increases are finished there are 334-346-394-410-450-486 stitches. Work the next round as follows:
Place the first 68-74-84-92-98-102 stitches on 1 thread for the sleeve, cast on 13 stitches (in side under sleeve), work pattern as before over the next 99-99-113-113-127-141 stitches (front piece), place the next 68-74-84-92-98-102 stitches on 1 thread for the sleeve, cast on 13 stitches (in side under sleeve), work pattern as before over the last 99-99-113-113-127-141 stitches (back piece).
The body and sleeves are finished separately.

BODY:
= 224-224-252-252-280-308 stitches.
Work A.2 over all stitches (continuing from the correct row in the diagrams) for 24-24-25-25-25-25 cm. Knit 1 round where you increase 24-24-26-26-30-32 stitches evenly spaced = 248-248-278-278-310-340 stitches. Change to circular needle size 2.5 mm and work rib (knit 1, purl 1) for 3 cm. Cast off.

SLEEVES:
Place the 68-74-84-92-98-102 stitches from the thread on the one side of the piece on short circular needle/double pointed needles size 3 mm and knit up 1 stitch in each of the 13 stitches cast on under the sleeve = 81-87-97-105-111-115 stitches. Insert a marker in the middle of the new stitches under the sleeve and start at the marker. Work stocking stitch in the round for 3 cm. Now decrease 2 stitches under the sleeve – read DECREASE TIP. Decrease like this every 4-3½-2½-2-1½-1½ cm a total of 8-9-12-14-15-15 times = 65-69-73-77-81-85 stitches. Continue working until the sleeve measures 37-36-35-34-32-30 cm. Knit 1 round where you increase 1 stitch = 66-70-74-78-82-86 stitches. Change to double pointed needles size 2.5 mm and work rib (knit 1, purl 1) for 3 cm. Cast off. The sleeve measures approx. 40-39-38-37-35-33 cm from the division.
Work the other sleeve in the same way.

Diagram

symbols = knit
symbols = knit 2 together
symbols = slip 1 stitch as if to knit, knit 1 and pass the slipped stitch over the knitted stitch
symbols = between 2 stitches make 1 yarn over; knit the yarn over on the next round to leave a hole
symbols = between 2 stitches make 1 yarn over; work the yarn over twisted on the next round to avoid a hole
symbols = slip 1 stitch as if to knit, knit 2 together and pass the slipped stitch over the knitted-together stitches
diagram
diagram
diagram

Each of our patterns has specific tutorial videos to help you.

Do you have a question? See a list of frequently asked questions (FAQ)

Knitting tension is what determines the final measurements of your work, and is usually measured per 10 x 10 cm. It is provided like so: number of stitches in width x number of rows in height - eg: 19 stitches x 26 rows = 10 x 10 cm.

The knitting tension is very individual; some people knit/crochet loosely while others work tightly. You adjust the knitting tension with the needle size, which is why the suggested needle size is only meant as a guide! You need to adjust this (up or down) to ensure that YOUR knitting tension matches the knitting tension provided in the pattern. If you work with a different knitting tension than provided you will have a different yarn consumption, and your work will have different measurements than what the pattern suggests.

The knitting tension also determines which yarns can replace each other. As long as you achieve the same knitting tension you can replace one yarn with another.

See DROPS lesson: How to measure your tension/gauge

See DROPS video: How to make a gauge tension swatch

The required amount of yarn is provided in grams, eg: 450 g. To calculate how many balls you’ll need you first need to know how many grams are in 1 ball (25g, 50g or 100g). This information is available if you click on the individual yarn quality on our pages. Divide the amount required with the amount of each ball. For example, if each ball is 50g (the most common amount), the calculation will be as follows: 450 / 50 = 9 balls.

The important thing when changing from one yarn to another is that the knitting/crochet tension remains the same. This is so that the measurements of the finished piece will be the same as on the sketch provided. It is easier to achieve the same knitting tension using yarns from the same yarn group. It is also possible to work with multiple strands of a thinner yarn to achieve the knitting tension of a thicker one. Please try our yarn converter. We recommend you to always work a test swatch.

Please NOTE: when changing yarn the garment might have a different look and feel to the garment in the photo, due to individual properties and qualities of each yarn.

See DROPS lesson: Can I use a different yarn than the one mentioned in the pattern?

All our yarns are categorised into yarn groups (from A to F) according to thickness and knitting tension – group A contains the thinnest yarns and group F the thickest. This makes it easier for you to find alternative yarns to our patterns, should you wish to switch yarn. All yarns within the same group have a similar knitting tension and can easily replace each other. However, different yarn qualities have different structures and properties which will give the finished work a unique look and feel.

Click here for an overview of the yarns in each yarn group

At the top of all our patterns you’ll find a link to our yarn calculator, which is a helpful tool should you wish to use a different yarn than suggested. By filling in the yarn quality you wish to replace, the amount (in your size) and number of strands, the calculator will present good alternative yarns with the same knitting tension. Additionally it will tell you how much you’ll require in the new qualities and whether you’ll need to work with multiple strands. Most skeins are 50g (some are 25g or 100g).

If the pattern is worked with multiple colours, every colour will have to be calculated separately. Similarly, if the pattern is worked with several strands of different yarns (for example 1 strand Alpaca and 1 strand Kid-Silk) you will have to find alternatives for each, individually.

Click here to see our yarn calculator

Since different yarns have different qualities and textures we have chosen to keep the original yarn in our patterns. However, you can easily find options among our available qualities by using our yarn calculator, or simply pick a yarn from the same yarn group.

It is possible that some retailers still have discontinued yarns in stock, or that someone has a few skeins at home that they would like to find patterns for.

The yarn calculator will provide both alternative yarn as well as required amount in the new quality.

If you think it's hard to decide what size to make, it can be a good idea to measure a garment you own already and like the size of. Then you can pick the size by comparing those measures with the ones available in the pattern's size chart.

You'll find the size chart at the bottom of the pattern.

See DROPS lesson: How to read size chart

The needle size provided in the pattern serves only as a guide, the important thing is to follow the knitting tension. And since knitting tension is very individual, you will have to adjust the needle size to ensure that YOUR tension is the same as in the pattern – maybe you’ll have to adjust 1, or even 2 needle sizes, up or down to achieve the correct tension. For this, we recommend that you work test swatches.

Should you work with a different knitting tension than the one provided, the measurements of the finished garment might deviate from the measurement sketch.

See DROPS lesson: How to measure your tension/gauge

See DROPS video: How to make a tension/gauge swatch

Working a garment top-down provides more flexibility and room for personal adjustment. For example it is easier to try the garment on while working, as well as making adjustments to length of yoke and shoulder caps.

The instructions are carefully explaining every step, in the correct order. Diagrams are adjusted to the knitting direction and are worked as usual.

The diagram depicts all rows/rounds, and every stitch seen from the right side. It is read from bottom to top, from right to left. 1 square = 1 stitch.

When working back and forth, every other row is worked from the right side and every other row is worked from the wrong side. When working from the wrong side, the diagram will have to be worked reversed: from left to right, knit stitches are purled, purl stitches are knit etc.

When working in the round every round is worked from the right side and the diagram are worked from right to left on all rounds.

See DROPS lesson: How to read knitting diagrams

The diagram depicts all rows/rounds, and every stitch seen from the right side. It is worked from bottom to top, from right to left.

When working back and forth every other row is worked from the right side: from right to left and every other row is worked from the wrong side: from left to right.

When working in the round, every row in the diagram are worked from the right side, from right to left.

When working a circular diagram you start in the middle and work your way outwards, counter clockwise, row by row.

The rows usually start with a given number of chain stitches (equivalent to the height of the following stitch), this will either be depicted in the diagram or explained in the pattern.

See DROPS lesson: How to read crochet diagrams

Instructions for working several diagrams after each other on the same row/round, will often be written like so: “work A.1, A.2, A.3 a total of 0-0-2-3-4 times". This means you work A.1 once, then A.2 is worked once, and A.3 is repeated (in width) the number of times provided for your size – in this case like so: S = 0 times, M = 0 times, L=2 times, XL= 3 times and XXL = 4 times.

The diagrams are worked as usual: begin with the first row in A.1, then work the first row in A.2 etc.

See DROPS lesson: How to read knitting diagrams

See DROPS lesson: How to read crochet diagrams

The total width of the garment (from wrist-to-wrist) will be larger in the larger sizes, despite the actual sleeves being shorter. The larger sizes have longer sleeve caps and wider shoulders, so there will be a good fit in all sizes.

The measurement sketch/schematic drawing provides information regarding the full length of the garment. If it’s a jumper or a jacket the length is measured from the highest point on the shoulder closest to the neckline, and straight down to the bottom of the garment. It is NOT measured from the tip of shoulder. Similarly, the length of yoke is measured from the highest point on the shoulder and down to where yoke is split into body and sleeves.

On a jacket measures are never taken along bands, unless specifically stated. Always measure inside band stitches when measuring the length.

See DROPS lesson: How to read a schematic drawing

Diagrams are often repeated on the round or in height. 1 repeat is the diagram the way it appears in the pattern. If it says to work 5 repeats of A.1 in the round, then you work A.1 a total of 5 times after/next to each other in the round. If it says to work 2 repeats of A.1 vertically/in height you work the entire diagram once, then begin again at the start and work the entire diagram one more time.

Chain stitches are slightly narrower than other stitches and to avoid working the cast-on edge too tight, we simply chain more stitches to begin with. The stitch count will be adjusted on the following row to fit the pattern and measurement sketch.

The rib edge is more elastic and will contract slightly compared to, for example, stocking stitch. By increasing before the rib edge, you avoid a visible difference in width between the rib edge and the rest of the body.

It’s very easy to cast off too tightly, and by making yarn overs while casting off (and simultaneously casting these off) you avoid a too tight cast off edge.

See DROPS video: How to bind off with yarn overs (yo)

To achieve an even increase (or decrease) you can increase on, for example: every 3rd and 4th row alternately, like so: work 2 rows and increase on the 3rd row, work 3 rows and increase on the 4th. Repeat this until the increase is complete.

See DROPS lesson: Increase or decrease 1 st on every 3rd and 4th row alternately

Should you prefer to work in the round instead of back and forth, you may of course adjust the pattern. You’ll need to add steeks mid-front (usually 5 stitches), and follow the instructions. When you would normally turn and work from the wrong side, simply work across the steek and continue in the round. At the end you’ll cut the piece open, pick up stitches to work bands, and cover the cut edges.

See DROPS video: How to knit steeks and cut open

Should you prefer to work back and forth instead of in the round, you may of course adjust the pattern so you work the pieces separately and then assemble them at the end. Divide the stitches for the body in 2, add 1 edge stitch in each side (for sewing) and work the front and back pieces separately.

See DROPS lesson: Can I adapt a pattern for circular needles into straight needles?

Pattern repeats can vary slightly in the different sizes, in order to get the correct proportions. If you’re not working the exact same size as the garment in the photo, yours might deviate slightly. This has been carefully developed and adjusted so that the complete impression of the garment is the same in all sizes.

Make sure to follow instructions and diagrams for your size!

If you have found a pattern you like which is available in women’s size it’s not very difficult to convert it to men’s size. The biggest difference will be the length of sleeves and body. Start working on the women size that you think would fit across the chest. The additional length will be worked right before you cast off for the armhole/sleeve cap. If the pattern is worked top-down you can add the length right after the armhole or before the first decrease on sleeve.

Regarding additional yarn amount, this will depend on how much length you add, but it is better with a skein too many than too few.

All yarns will have excess fibres (from production) that might come off as lint or shedding. Brushed yarns (ie hairier yarns) have more of these loose, excess fibres, causing more shedding.

Shedding also depends on what is worn under or over the garment, and whether this pulls at the yarn fibres. It’s therefore not possible to guarantee that there will be no shedding

Below are some tips on how to get the best result when working with hairier yarns:

1. When the garment is finished (before you wash it) shake it vigorously so the looser hairs come off. NOTE: do NOT use a lint roller, brush or any method that pulls at the yarn.

2. Place the garment in a plastic bag and put it in your freezer - the temperature will cause the fibres to become less attached to each other, and excess fibres will come off easier.

3. Leave in the freezer for a few hours before taking it out and shaking it again.

4. Wash the garment according to the instructions on the yarn label.

Pilling is a natural process that happens to even the most exclusive of fibers. It's a natural sign of wear and tear that is hard to avoid, and that is most visible in high friction areas of your garment like a sweater's arms and cuffs.

You can make your garment look as new by removing the pilling, using a fabric comb or a pill/lint remover.

Still can't find the answer you need? Then scroll down and leave your question so one of our experts can try to help you. This will be done normally within 5 to 10 working days.
In the meantime, you can read the questions and answers that others have left to this pattern or join the DROPS Workshop on Facebook to get help from fellow knitters/crocheters!

You might also like...

Post a comment to pattern DROPS 231-16

We would love to hear what you have to say about this pattern!

If you want to leave a question, please make sure you select the correct category in the form below, to speed up the answering process. Required fields are marked *.

Comments / Questions (33)

country flag Rene Seaman wrote:

I am making this in size small. If I am reading the pattern correctly, for the small size, the increases for the raglan sleeves will end with the end of A1 and A3. So no more increases from there until the pieces measures 8-1/4". Is this right? Really enjoying this patterns. Thanks for your help.

14.04.2024 - 06:37

DROPS Design answered:

Dear Rene, yes, since you increase every 2nd row 24 times for the sleeves and you have 48 rows in A.1/A.3 then the sleeve increases are finished, so you don't need to keep increasing; work straight until the indicated measurement. Happy knitting!

14.04.2024 - 23:43

country flag Lisbeth Petersen wrote:

Jeg forstår ikke opskriften skal jeg først strikke a1 og samme pind A2 i alt 16 masker i mønster

28.03.2024 - 10:32

DROPS Design answered:

Hej Lisbeth, ja du starter med A.1 gentager A.2 over det antal som står for din størrelse og slutter med A.3. Hvis vi skal forklare første omgang, så skriv hvilken størrelse du strikker :)

05.04.2024 - 11:05

country flag Kazia wrote:

Hallo, Ich stricke die Grösse M und habe die 76 M für Ärmel nach 14 cm erreicht … wie ist das möglich ? Wie soll ich weiter stricken ? Das waren genau 27 Reihen hoch um 76 m zu erreichen … (also 54 runden) und ich bin erst in 8. Reihe A4 und. A2 und A5 … würde für die Hilfe sehr dankbar :)

19.01.2024 - 22:38

country flag CORINNE wrote:

Bonjour. Il ne faut tricoter qu’une fois en hauteur A4 et A5 ? Et ensuite tricoter A2 sur toutes les mailles ? Merci pour votre aide

22.11.2023 - 16:45

DROPS Design answered:

Bonjour Corinne, tricotez le point ajouré en commençant par A.4, répétez A.2 et terminez le point ajouré en tricotant A.5, autrement dit, vous tricotez ainsi jusqu'à la division pour les manches, puis, quand on tricote le dos et le devant en rond après la division, on tricote A.2 tout le tour. Bon tricot!

23.11.2023 - 08:27

country flag Tana wrote:

Ich komme mit den Diagrammen nicht zurecht. Bei A1 in der 12. Runde sind acht rechte Maschen abgebildet. Eine Runde darüber sind plötzlich insgesamt nur sieben Maschen da mit vier Umschlägen und 1x zusammen stricken. Wo ist die eine Masche verschwunden?

11.11.2023 - 23:34

DROPS Design answered:

Liebe Tana, bei der 13. Runde werden die 2 letzten Maschen in A.1 mit der nächsten Masche A.2 gestrickt, und die letzte Masche A.2 wird mit den 2 ersten Maschen A.3 gestrickt. Viel Spaß beim stricken!

13.11.2023 - 07:58

country flag Margareta Mattsson wrote:

Kan man sticka denna modellen i enbart slätstickning? Vill gärna använda detta garnet men hittar inget mönster i vanlig slätstickning med raglanärm. MVH

26.08.2023 - 10:23

DROPS Design answered:

Hej Margareta. Jag tror det är enklare att följa detta mönster och ändra raglan om du inte vill ha flätor där. Mvh DROPS Design

30.08.2023 - 12:23

country flag Janina Ahner wrote:

Wenn ich mit A1 und A3 fertig bin, schreiben Sie dass ich A4 1x, A2 über 70 M und dann A5 1x stricken soll, ich habe aber nur jeweils 74 M für das Vorder- und Rückenteil. Was habe ich falsch gemacht? Danke für eine Antwort. Janina

14.08.2023 - 17:06

DROPS Design answered:

Liebe Frau Ahner, wenn A.1 bis A.3 fertig sind, haben Sie: 27 M in A.1, immer noch 42 M in A.2 und 30 M in A.3 = 99 Maschen, diese Maschen stricken Sie so: 14 M A.4, 70 M A.2 und 15 M A.5 (=14+70+15=99). Viel Spaß beim stricken!

15.08.2023 - 08:50

country flag Anne wrote:

Bonjour, je ne comprends pas comment faire le rang 13, je crois comprendre qu'il faut décaler d'une maille le diagramme mais sur le rang 12 de A1 nous avons 8 mailles, moins la maille de décalage, plus les 4 jetés, moins la diminution cela fait 10 mailles or sur le rang 14 il y a 9 mailles. J'ai vu dans un commentaire que Mme Lum avait eu le même problème mais comme elle, tout est décalé et je ne sais pas où déplacer cette maille en trop sur le reste des A2 ou A3

20.06.2023 - 18:02

DROPS Design answered:

Bonjour Anne, au 13ème rang de A.1, tricotez les 7 premières mailles comme indiqué par le diagramme (en augmentant 2 m) et tricotez la dernière maille de A.1 avec la 1ère maille de A.2 (glissez cette maille à l'endroit, tricotez ensemble à l'endroit les 2 premières mailles de A.2 et passez la m glissée par-dessus les m tricotées ensemble), tricotez A.2 comme indiqué par le diagramme, quand il reste 1 maille, glissez cette maille à l'endroit, tricotez les 2 premières mailles de A.3 ensemble à l'endroit et continuez comme pour A.1/A.2. Bon tricot!

21.06.2023 - 07:48

country flag Inge-Lise wrote:

Hej\r\nJeg har lidt problemer med at forstå , i starten efter afsnitende med halskant og bærestykke . Når A.1 og A.3 er strikket færdig, fortsættes der således. Det er denne her sidste sætninger ikke helt forstår, skal jeg ikke strikke A.2?? Er der kun mønstrene A.1 og A.3 der skal strikkes medens jeg tager ud til RAGLAN ???\r\nInge-Lise

16.05.2023 - 18:34

DROPS Design answered:

Hej Inge-Lise, det er A.1 og A.3 du strikker mod raglanudtagningerne og A.2 fortsættes over hele ryg & forstykke :)

17.05.2023 - 09:47

country flag Lise wrote:

Hej. Jeg vil gerne kun stikke mønster på forstykket. Kan jeg få maskeantallet til at passe på bagstykket, hvis jeg tager ud til raglan før 1. Mærke og efter 4. Mærke også?

09.03.2023 - 16:27

DROPS Design answered:

Hei Lise. Du følger samme raglan økning som med mønster. Men i diagrammene A.1 og A.3 økes det noen steder mer enn det tas inn. Pass også på at det kan være forskjell på strikkefastheten / målene som strikkes etter mønster kontra bare glattstrikk og da kan forstykket og bakstykket få noe forskjellige mål. mvh DROPS Design

13.03.2023 - 10:20