
Popular categories
Looking for a yarn?


Comments / Questions (47)
![]() Murielle Soares wrote:
Murielle Soares wrote:
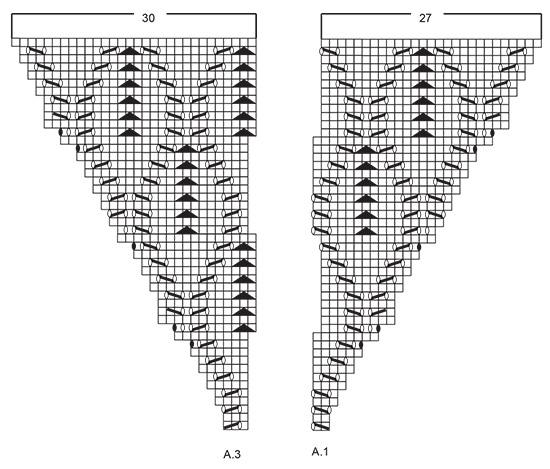
Je coince aux rangs 14 et 15 je n'ai pas le même compte de mailles inscrit sur le diagramme et sur l'aiguille Que faire?
20.04.2026 - 10:29DROPS Design answered:
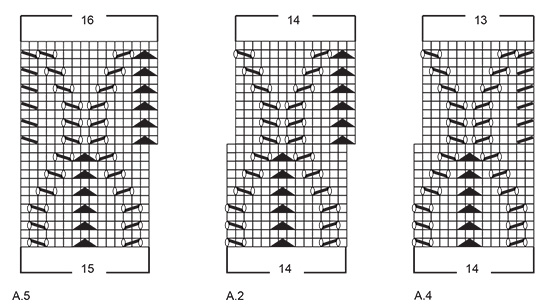
Bonjour Mme Soares, notez qu'au rang 13 (A.1) vous augmentez 2 m: 1 jeté, 1 m end, 1 jeté, 1 m end, 1 jeté, 1 dim, 1 jeté, 3 m end. La m suivante se tricote maintenant avec le diagramme suivant = A.2 : au rang 13, le diagramme "déborde" d'1 m à droite = cette maille supplémentaire est la dernière maille de A.1, et, quand on répète A.2, la maille qui "manque" à gauche se tricote avec la 1ère maille du A.2 suivant puis de A.3 (ou de A.5 par la suite). De même pour A.3: la maille qui "déborde" à droite est la dernière maille de A.2. Pensez à mettre des marqueurs pour délimiter vos diagrammes, le début/la fin sera de nouveau décalé d'1 m à gauche quand ce motif sera fait (25ème rang). Bon tricot!
20.04.2026 - 15:57
![]() Murielle Soares wrote:
Murielle Soares wrote:
Bonjour les explications du diagramme sont complètement incohérentes Impossible d'avoir le même nombre de mailles Peut être avoir de meilleures explications Merci
18.04.2026 - 15:02DROPS Design answered:
Bonjour Mme Soares, pouvez-vous nous indiquer quel endroit des diagrammes vous paraît incohérent pour que nous puissions mieux vous aider? Merci pour votre compréhension.
20.04.2026 - 09:31
![]() Diane wrote:
Diane wrote:
I want to know what is done with the Knit 1 stitch before Marker 1, after Marker 2, before Marker 3 and after Marker 4. Are they just knitted or are they somehow worked into the A2 pattern? Sleeve Knit 1, insert marker-1, insert marker-2, knit 1.Front piece: Work A.1, A.2 over 42-42-56-56-70-84 stitches, A.3. Left sleeve: Knit 1, insert marker-3,insert marker-4, knit 1.Back piece: Work A.1, A.2 over 42-42-56-56-70-84 stitches, A.3.
15.04.2026 - 19:35DROPS Design answered:
Dear Diane, the raglan stitches (before marker-1, after marker-2, before marker-3 and before marker -4) are worked in stocking stitch, on front and back pieces you work diagrams starting with A.1, repeating A.2 and finishing wiht A.3. Happy knitting!
16.04.2026 - 08:54
![]() Nicole wrote:
Nicole wrote:
Hallo, ich habe eine Frage zum Diagramm A1, Reihe 13. Dort mache ich 4 Umschläge (neue Maschen) und gäbe 1 Abnahme durch zusammen stricken, d.h. 3 neue Maschen. Laut Diagramm sind in der nächsten Runde aber nur 2 neue Maschen. Wo ist mein Fehler? Danke und liebe Grüße, Nicole
03.04.2026 - 20:27
![]() Nicole wrote:
Nicole wrote:
Hallo, ich habe eine Frage zum Diagramm A1, Reihe 13. Ich habe 4 Umschläge (neue Maschen) aber nur 1 Abnahme. D. h. In der nächsten Runde habe ich 3 Maschen mehr. Im Diagramm aber sind nur 2 Maschen mehr. Wo ist mein Fehler? Danke. LG Nicole
03.04.2026 - 20:24DROPS Design answered:
Liebe Nicole, beachten Sie daß die letzte Masche A.1 jetzt mit den 2 ersten Maschen A.2 gestrickt wird, deshalb gibt es am Ende dieser Reihe ein "Loch"; gleichfalls am Ende A.2, die letzte Masche A.2 wird jetzt mit den 2 ersten Maschen A.3/A.5 gestrickt. Viel Spaß beim Stricken!
08.04.2026 - 08:20
![]() Hettie wrote:
Hettie wrote:
I have knit a number of Drops Designs patterns and have never had such a problem with the stitch pattern. Right from the first pattern row A1, A2 and A3 does not work out in the indicated stitch count. Is there an error and possibly a corrected pattern?
15.02.2026 - 21:49
![]() Martine wrote:
Martine wrote:
Bonjour, doit-on repasser l'ouvrage ou laisser le point en relief ? Pour mesurer la progression, doit on aplatir l'ouvrage ? Merci de votre réponse.
06.02.2026 - 13:59DROPS Design answered:
Bonjour Martine, respectez toujours les consignes d'entretien de la laine que vous utilisez (certaines déconseillent le fer à repasser); la tension doit être ici la même en jersey et en point fantaisie, vous devez avoir la même largeur, si votre échantillon est juste, mesurez simplement l'ouvrage, sans l'étirer. Bon tricot!
06.02.2026 - 17:19
![]() FRANCOISE wrote:
FRANCOISE wrote:
Je tricote a 2 aiguilles si je commence par le bas je dois prendre le dessin par le haut merci pour votre réponse
24.07.2025 - 18:13DROPS Design answered:
Bonjour Françoise, si, effectivement, vous tricotez ce modèle de bas en haut (au lieu de haut en bas), il vous faudra lire les diagrammes de haut en bas, mais je vous recommande de bien tricoter un échantillon au préalable pour voir si le point vous convient ainsi. Bon tricot!
25.07.2025 - 10:49
![]() Joanna wrote:
Joanna wrote:
Cześć. Mam problem ze wzorem A.1 i A.3. Wzror A.1 Rząd 13 tworzy 10 oczek ale w rzędzie 15 używamy 9 oczek. Co zrobic z dodatkowym oczkiem? Podobnie w A.3 rząd 13 tworzy 11 oczek ale rząd 15 wymaga 12 oczek. Czy należy w 15 rzędzie wykonać przesunięcie tak samo jak w 13? Co wtedy ze wzorem A.2? Pozdrawiam!
13.05.2025 - 08:00DROPS Design answered:
Witaj Joanno, w 13-tym rzędzie schematu A.1 przerabiasz 7 pierwszych oczek wg schematu i przerabiasz ostatnie oczko schematu A.1 z 1-szym oczkiem schematu A.2 (zdjąć to oczko jak do przerobienia na prawo, przerobić 2 pierwsze oczka schematu A.2 razem na prawo i przełożyć oczko zdjęte ponad oczkami przerobionymi razem), przerabiać schemat A.2, a gdy zostaje 1 oczko, zdjąć to oczko jak do przerobienia na prawo, przerobić 2 pierwsze oczka schematu A.3 razem na prawo i dalej przerabiać wg schematów A.1/A.2. Miłej pracy!
14.05.2025 - 08:26
![]() Andrea wrote:
Andrea wrote:
Jeg skal strikke denne i S, men skjønner ikke oppskriften der mønsteret starter. Kan dere forklare de to første omgangene?
12.02.2025 - 21:48DROPS Design answered:
Hei Andrea, Diagrammene leses fra bunnen oppover og fra høyre til venstre. Bruk diagramforklaringene og ta 1 symbol av gangen - eller skrive dem ut hvis det gjør det enklere. På forstykket: A.1 er strikket 1 gang, A.2 er gjentatt 3 ganger, A.3 strikket 1 gang. Osv.. Husk å sette merkene som beskrevet i teksten. God fornøyelse!
13.02.2025 - 10:42
|
|||||||||||||||||||
Queen Bee#queenbeesweater |
|||||||||||||||||||
 |
 |
||||||||||||||||||
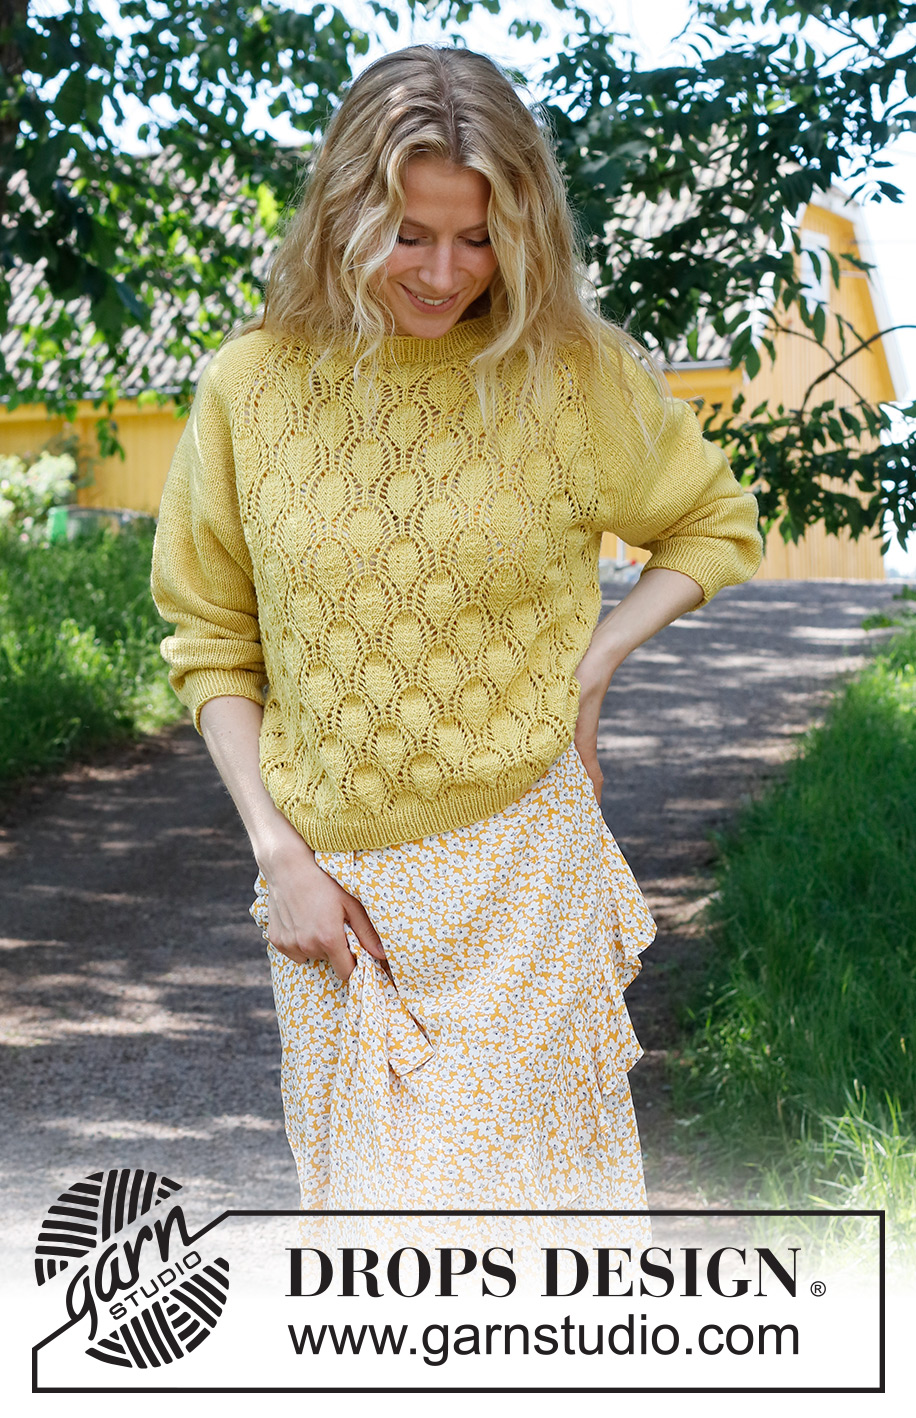
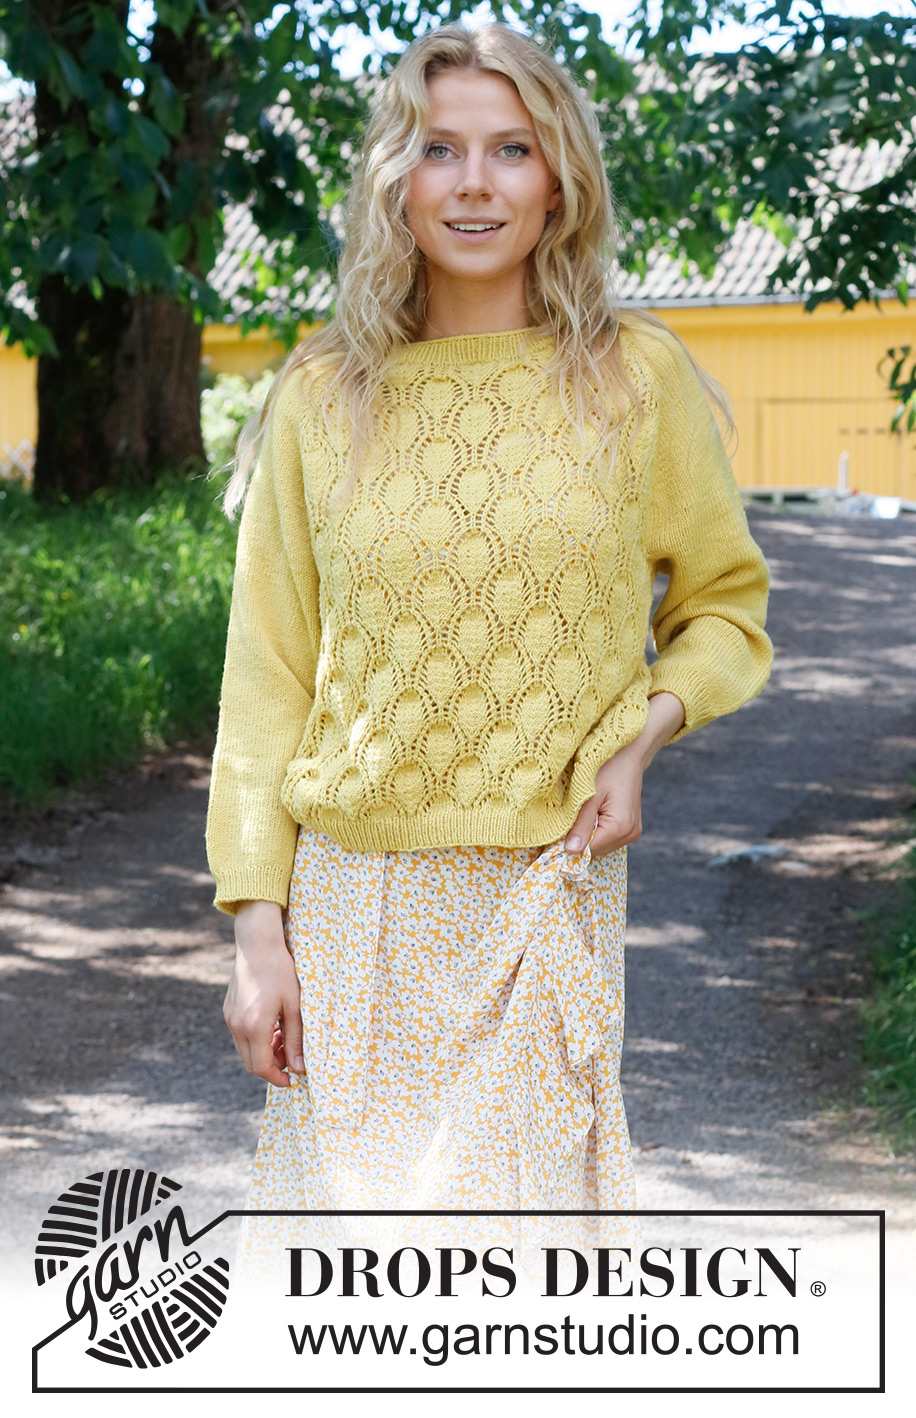
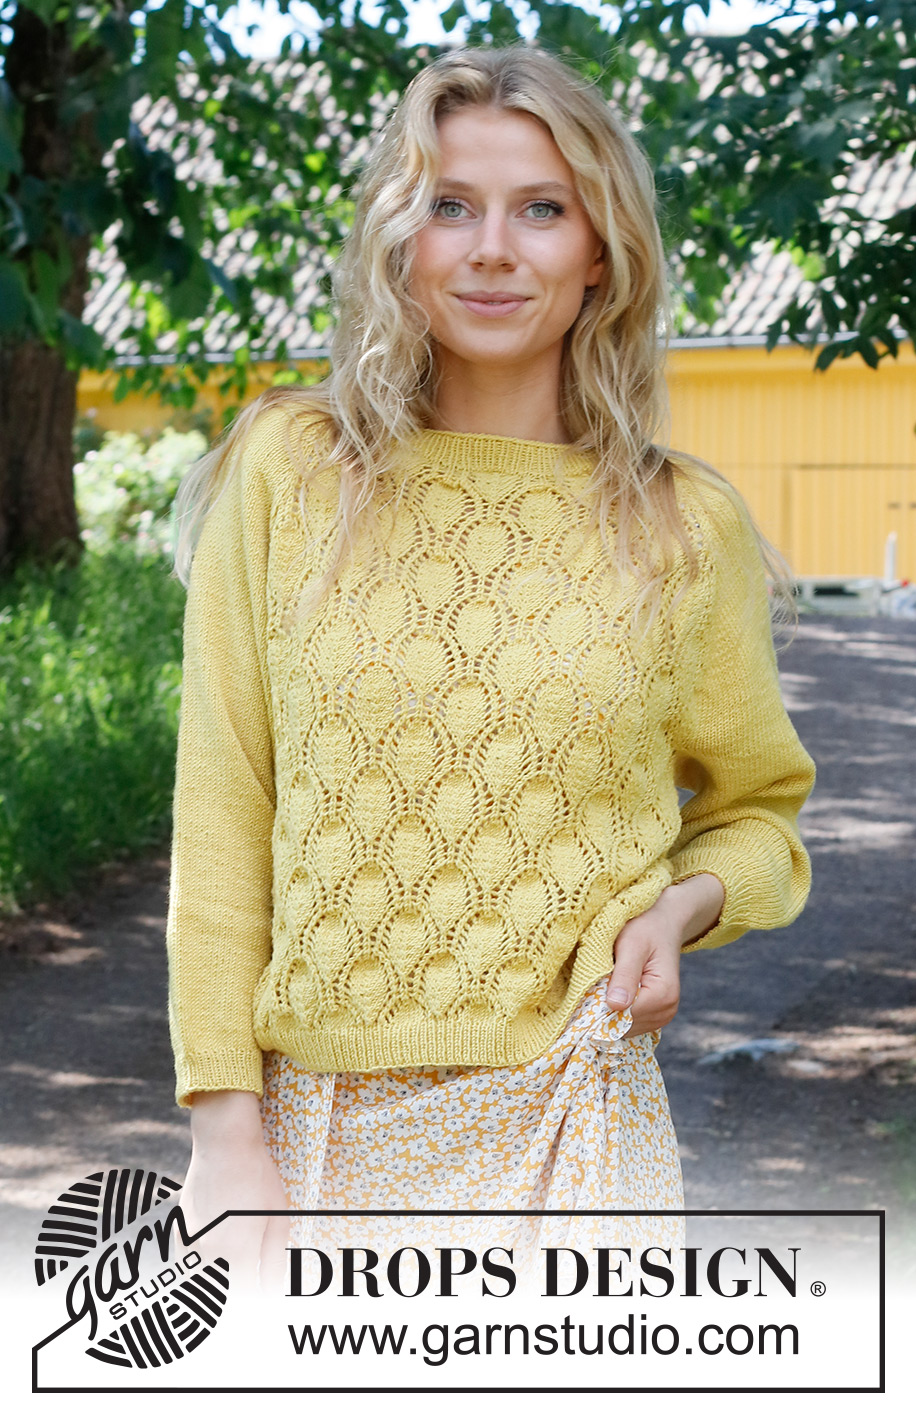
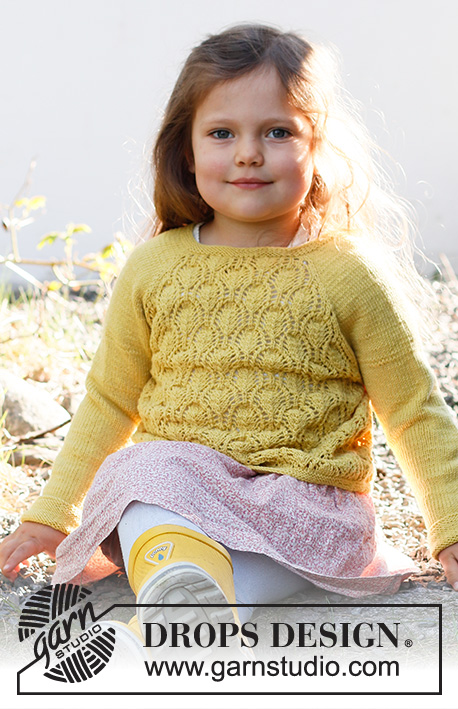
Knitted jumper in DROPS BabyMerino. The piece is worked top down, with raglan and lace pattern. Sizes S - XXXL
DROPS 231-16 |
|||||||||||||||||||
|
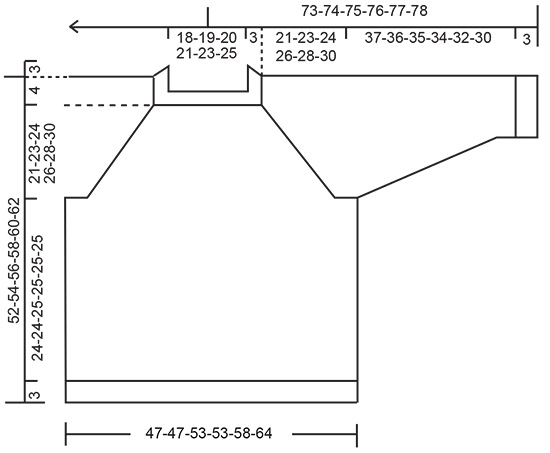
------------------------------------------------------- EXPLANATIONS FOR THE PATTERN: ------------------------------------------------------- PATTERN: See diagrams A.1 to A.5. RAGLAN: The increases to raglan on the front and back piece are included in the diagrams. Increase to raglan on each side of the sleeves as follows: Increase 1 stitch after markers 1 and 3 and before markers 2 and 4 by making 1 yarn over. The yarn overs are knitted twisted on the next round to avoid holes. Then work the new stitches in stocking stitch. DECREASE TIP (for sleeves): Decrease 1 stitch on either side of the marker as follows: Work until there are 3 stitches left before the marker, knit 2 together, knit 3 (marker sits in the middle stitch of these 3 stitches), slip 1 stitch as if to knit, knit 1 and pass the slipped stitch over the knitted stitch (2 stitches decreased). ------------------------------------------------------- START THE PIECE HERE: ------------------------------------------------------- JUMPER - SHORT OVERVIEW OF THE PIECE: The piece is worked in the round with circular needle, top down. The sleeves are worked in the round with short circular needle/double pointed needles. NECK: Cast on 124-130-134-138-148-158 stitches with circular needle size 2.5 mm and DROPS Baby Merino. Knit 1 round, then work rib (knit 1, purl 1) for 3 cm. Change to circular needle size 3 mm. Knit 1 round and increase 10-4-28-24-42-60 stitches evenly spaced (increase by working yarn overs) = 134-134-162-162-190-218 stitches. Knit 1 round; the yarn overs are knitted twisted. Insert 1 marker at the beginning of the round (transition between the back piece and right sleeve). THE PIECE IS NOW MEASURED FROM HERE! REMEMBER THE KNITTING TENSION! YOKE: Work the next round as follows: Right sleeve: Knit 1, insert marker-1, make 1 yarn over, knit 18, 1 yarn over, insert marker-2, knit 1. Front piece: Work A.1, A.2 over 42-42-56-56-70-84 stitches, A.3. Left sleeve: Knit 1, insert marker-3, make 1 yarn over, knit 18, 1 yarn over, insert marker-4, knit 1. Back piece: Work A.1, A.2 over 42-42-56-56-70-84 stitches, A.3. Continue this pattern and increase to RAGLAN – read description above, every 2nd round a total of 24-27-32-36-39-41 times. When A.1 and A.3 have been completed, continue as follows: Right sleeve: Continue with stocking stitch and increase every 2nd round as before. Front piece: Work A.4, A.2 over 70-70-84-84-98-112 stitches, A.5. Left sleeve: Continue with stocking stitch and increase every 2nd round as before. Back piece: Work A.4, A.2 over 70-70-84-84-98-112 stitches, A.5. Continue working until the piece measures 21-23-24-26-28-30 cm from the marker on the neck. When the sleeve-increases are finished there are 334-346-394-410-450-486 stitches. Work the next round as follows: Place the first 68-74-84-92-98-102 stitches on 1 thread for the sleeve, cast on 13 stitches (in side under sleeve), work pattern as before over the next 99-99-113-113-127-141 stitches (front piece), place the next 68-74-84-92-98-102 stitches on 1 thread for the sleeve, cast on 13 stitches (in side under sleeve), work pattern as before over the last 99-99-113-113-127-141 stitches (back piece). The body and sleeves are finished separately. BODY: = 224-224-252-252-280-308 stitches. Work A.2 over all stitches (continuing from the correct row in the diagrams) for 24-24-25-25-25-25 cm. Knit 1 round where you increase 24-24-26-26-30-32 stitches evenly spaced = 248-248-278-278-310-340 stitches. Change to circular needle size 2.5 mm and work rib (knit 1, purl 1) for 3 cm. Cast off. SLEEVES: Place the 68-74-84-92-98-102 stitches from the thread on the one side of the piece on short circular needle/double pointed needles size 3 mm and knit up 1 stitch in each of the 13 stitches cast on under the sleeve = 81-87-97-105-111-115 stitches. Insert a marker in the middle of the new stitches under the sleeve and start at the marker. Work stocking stitch in the round for 3 cm. Now decrease 2 stitches under the sleeve – read DECREASE TIP. Decrease like this every 4-3½-2½-2-1½-1½ cm a total of 8-9-12-14-15-15 times = 65-69-73-77-81-85 stitches. Continue working until the sleeve measures 37-36-35-34-32-30 cm. Knit 1 round where you increase 1 stitch = 66-70-74-78-82-86 stitches. Change to double pointed needles size 2.5 mm and work rib (knit 1, purl 1) for 3 cm. Cast off. The sleeve measures approx. 40-39-38-37-35-33 cm from the division. Work the other sleeve in the same way. |
|||||||||||||||||||
Diagram explanations |
|||||||||||||||||||
|
|||||||||||||||||||
 |
|||||||||||||||||||
 |
|||||||||||||||||||
 |
|||||||||||||||||||
Have you finished this pattern?Tag your pictures with #dropspattern #queenbeesweater or submit them to the #dropsfan gallery. Do you need help with this pattern?You'll find 29 tutorial videos, a Comments/Questions area and more by visiting the pattern on garnstudio.com. © 1982-2026 DROPS Design A/S. We reserve all rights. This document, including all its sub-sections, has copyrights. Read more about what you can do with our patterns at the bottom of each pattern on our site. |
|||||||||||||||||||


With over 40 years in knitting and crochet design, DROPS Design offers one of the most extensive collections of free patterns on the internet - translated to 17 languages. As of today we count 324 catalogues and 12290 patterns translated into English (UK/cm).
We work hard to bring you the best knitting and crochet have to offer, inspiration and advice as well as great quality yarns at incredible prices! Would you like to use our patterns for other than personal use? You can read what you are allowed to do in the Copyright text at the bottom of all our patterns. Happy crafting!
Post a comment to pattern DROPS 231-16
We would love to hear what you have to say about this pattern!
If you want to leave a question, please make sure you select the correct category in the form below, to speed up the answering process. Required fields are marked *.